[BSOD Error] How to Fix the Stop Code Memory Management in Windows
If your PC has stopped working abruptly, it's likely due to issues with code memory management in Windows. The "Stop Code Memory Management" error is a common computer issue that turns the screen blue, disrupting user access. This guide will help you fix the stop code memory management in Windows.
| Workable Solutions | Step-by-step Troubleshooting |
|---|---|
| Fix 1. Reboot your Windows | Rebooting Windows is an efficient fix when facing Stop Code Memory Management...Full steps |
| Fix 2. Check Windows Updates | Older versions of Windows may also lead to one of the reasons behind the annoying...Full steps |
| Fix 3. Quick Scan PC Memory | It is one of the most effective built-in tools that help users protect their PCs against...Full steps |
| Fix 4. Boot into Safe Mode | If you have tried the solutions mentioned above but didn't have to find the perfect solution...Full steps |
| More Fixes | Other 4 fixes are available here for you to follow and fix the error: stop code memory...Full steps |
What is Windows Memory Management?
Windows Memory Management is a crucial part of the Windows operating system that efficiently manages system memory. It optimizes memory usage by transferring processes from primary storage to disk storage during execution, ensuring steady RAM usage and perfect memory management.
Windows Memory Management is responsible for providing support for large memory, copy-on-write memory, assisting the cache manager, and memory-mapped files, among other things. It plays a crucial role in managing the transaction of memory between physical memory and RAM during the execution of processes, effectively handling the memory-related tasks in a computer system.
- 🎁The best thing about Windows Memory Management is the efficient memory allocation for each method, allowing for optimal use of system resources.
- 🔧The tool ensures the remembrance of the allocated memory spaces when and wherever required.
- 🖲️The system monitors and manages the memory space, freeing it up as needed to facilitate sharing and status changes.
- ⌛The central processing unit (CPU) is the primary component of a computer system, responsible for executing instructions and performing calculations, ultimately ensuring the smooth and efficient functioning of the entire system.
A minor issue with Windows Memory Management can significantly affect the entire operating system, leading to a Stop code Memory Management error, which can cause the system to crash.
Why is Windows Stop Code Memory Management?
You're experiencing a persistent blue screen of death on your Windows device, preventing you from accessing it. This is a frustrating issue.
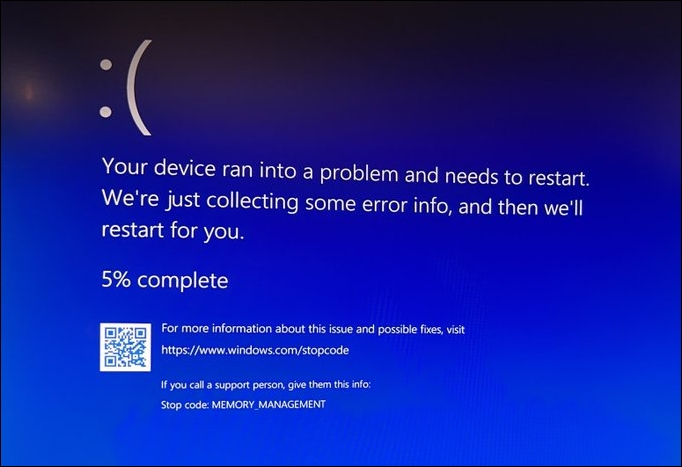
Windows Stop Code Memory Management is a frustrating error that prevents access to Windows. Several reasons contribute to this issue, including a few that can be identified, such as.
- Corrupted system files
- Corrupted or damaged RAM
- Disk Errors
- Virus or malware attack
- System hard drive issues
- Issues with the graphic cards
How to Fix Stop Code Memory Management on Windows?
Fixing Stop Code Memory Management on Windows is crucial. If you're unsure how to do it, don't worry - we've got you covered. Before proceeding, make sure to safeguard your data and review your security settings. We'll provide the complete solutions to resolve the issue.
- Fix 1. Reboot your Windows to Fix Stop Code Memory Management
- Fix 2. Check for Windows Updates
- Fix 3. Quick Scan your PC Memory Management Using Windows Security
- Fix 4. Boot Windows 11 into Safe Mode
- Fix 5. Update GPU Driver on Windows
- Fix 6. Perform a Memory Management Test
- Fix 7. Run the CHKDSK to Fix Stop Code Memory Management
- Fix 8. Reset Windows OS
Fix 1. Reboot your Windows to Fix Stop Code Memory Management
Rebooting Windows is a quick and efficient fix for the Stop Code Memory Management issue, as Windows OS can independently resolve minor glitches with a simple reboot.
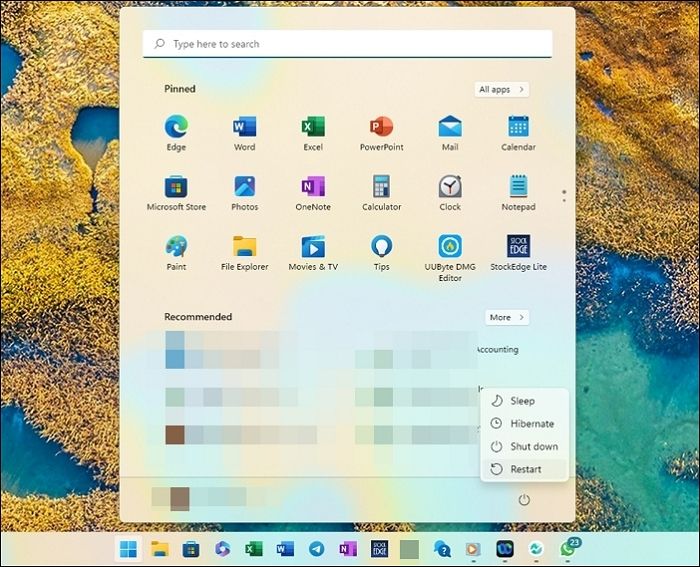
Step 1. To access the Start menu, click the Start menu icon, which is typically located in the bottom left corner of the desktop.
Step 2. The Power button is located in the bottom left corner of the Start menu, and clicking it will shut down your computer.
Step 3. Select Restart from the list of options that appear.
Step 4. If prompted, save any unsaved work before continuing.
Step 5. Click the Restart button to confirm the reboot.
Fix 2. Check for Windows Updates
Older versions of Windows may lead to the Stop Code Memory Management error issue. If you haven't updated your Windows for a longer time, it's likely the cause. You can quickly check for Windows updates by.
Step 1. To open the Menu option on Windows, tap the Windows key and the I button simultaneously. This will bring up a menu that allows you to access various system settings and options.
Step 2. Go to the Settings option and navigate to the Update & security section.
Step 3. Once you've completed the previous steps, check the Windows Update section in League to see if there are any pending updates.

Step 4. Tap on the "Install now" option to enable the successful downloading and installing of the Windows update.
Step 5. Wait patiently for the Windows update; save any unsaved work and tap the Restart Now button.
Fix 3. Quick Scan your PC Memory Management Using Windows Security
The built-in tool is one of the most effective tools that helps users protect their PCs against malware or virus attacks. It enables users to efficiently perform a successful scan and fix the stop code: memory management by following a few simple steps.
Step 1. To access the Settings on your computer, start by tapping on the Start button, which is usually located at the bottom left corner of the screen. From there, navigate to the Settings option.
Step 2. Now move towards the Update & Security section.
Step 3. Once you're done, select the Windows Security option from the left pane.
Step 4. To access the Windows Security setting, tap on the "Virus & threat protection" option in the right pane.
Step 5. The user should move to the Current threats section and tap the Quick scan option.

Step 6. Windows Security will initiate a successful scan on your PC, saving you from potential threats and fixing them once done.
Fix 4. Boot Windows 11 into Safe Mode
If you're unable to access your Windows 11, you can try booting into Safe Mode, which runs the operating system with the lowest possible drivers and programs, providing a secure access point. To do this, quickly restart your Windows 11 and repeatedly press the F8 key until the Advanced Boot Options menu appears. From there, select Safe Mode and follow the prompts to log in. This can help you troubleshoot and potentially resolve any issues preventing access to your Windows.
Step 1. Press the Windows key and the I button together to launch the Menu option.
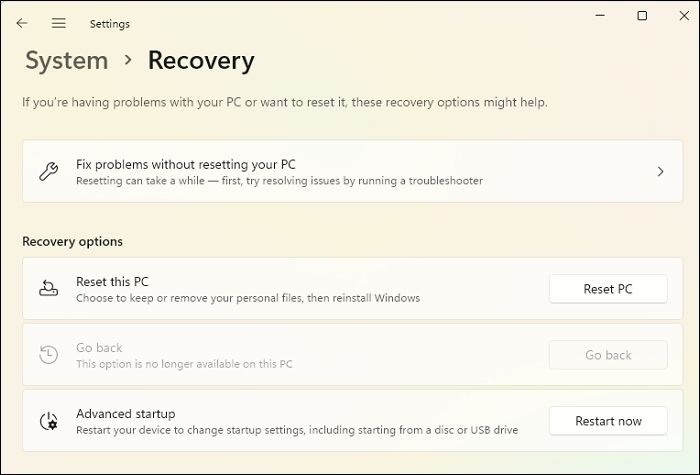
Step 2. Now select System > Recovery.
Step 3. To restart your computer, click on the Restart button next to the Advanced Startup option.
Step 4. To force your PC to restart in Advanced Recovery Mode, you can press the power button on your computer for about 10 seconds to shut it down. Then, press the power button again to turn it back on. As soon as the Windows logo appears, press the power button again to shut it down once more.
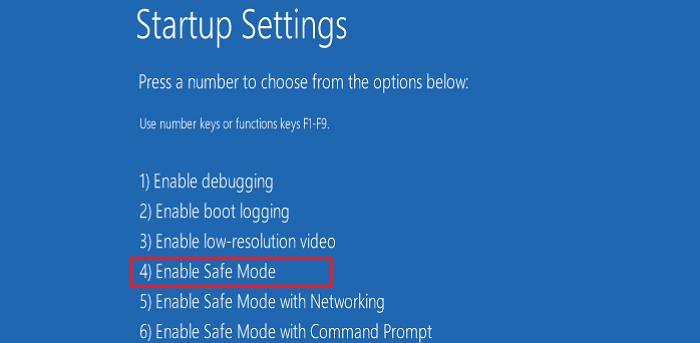
Step 5. To access the Startup Settings, you can tap on the Startup Settings option on the screen. This will take you to a new screen where you can choose how your device boots up.

Step 6. Select the Startup Settings option and then click the Restart button.
Step 7. Once you've completed the steps, select Restart in Safe Mode to access your computer system smoothly.
Step 8. Leave your computer system in Safe Mode for a while to check if the error has been resolved.
Your Windows PC should now be rebooted in Safe Mode, allowing you to troubleshoot any issues and hopefully resolve the error you were experiencing.
Fix 5. Update GPU Driver on Windows
Outdated or brand-New GPU drivers can also cause BSOD Errors, but updating them can help resolve the issue. To fix this, simply update your GPU drivers to the latest version, which can effectively get rid of the annoying error.
Step 1. To run the Windows Memory Diagnostic tool, simply type "dxdiag" in the search box, and then launch the tool on your device. This will allow you to run a diagnostic test on your computer's memory to identify any issues or problems.
Step 2. To view the detailed list of your system's GPU details, tap on the Display tab in the tool window.

Step 3. Go to the GPU manufacturer's website and download the corresponding GPU driver for your specific graphics card model.
Step 4. Once done, download and install the driver, then restart your computer to enable smooth access.

You should now have the latest GPU driver installed on your Windows PC, which should improve performance and resolve any issues you are experiencing.
Fix 6. Perform a Memory Management Test
To fix the Stop Code Memory Management in Windows, Memory test is a great solution. To use it, you'll need to follow a few steps.
Step 1. To run the Windows Memory Diagnostic, tap the Windows key on your keyboard to open the Start menu, then type "Windows Memory Diagnostic" in the search bar. This will bring up the Windows Memory Diagnostic tool, which you can then run to check your system's memory for any issues.
Step 2. To troubleshoot an issue, tap on the corresponding app, then tap on "Restart now" and check if the problem persists.
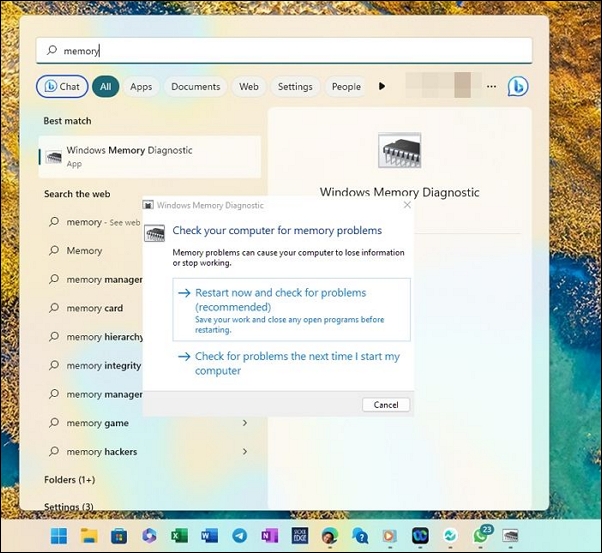
Step 3. Wait for the Memory Test to run efficiently.
Step 4. Once you've finished the process, the results will be displayed on your screen. If any issues arise, you can quickly resolve them using the provided solutions.
After running the Windows Memory Diagnostic tool, if any issues are found, take the necessary steps to resolve them.
Fix 7. Run the CHKDSK to Fix Stop Code Memory Management
Corrupted system files or disks are the primary reasons behind the Windows Stop Code Memory Management error, preventing access to Windows processes. The System File Checker can be used to troubleshoot Windows 10, detecting and repairing corrupted system files in two working orders.
Step 1. Type the command prompt in the search bay and tap the Run as Administrator option.
Step 2. Type the chkdsk/r command in the Command Prompt and press Enter to run the command. This will check the integrity of the drive and attempt to repair any issues found.
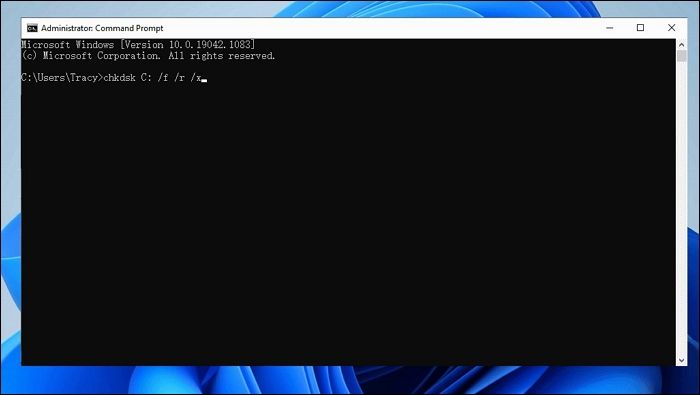
Step 3. Once the process is completed, the system will automatically initiate a scan for system-related files and repair them, ensuring the system is in a stable and functional state.
After running the chkdsk command on your Windows PC, you've successfully scanned and repaired system-related files, addressing any issues that were found. This process helps maintain the overall health and stability of your system, ensuring that your computer runs smoothly and efficiently.
Fix 8. Reset Windows OS
If the previous solutions didn't work, you may need to reset your Windows OS to completely fix the issue. This will resolve memory management problems and clear them effectively.
Step 1. To access the Settings option on your device, tap on the Start button, which is usually located at the bottom left corner of the screen. Once you've tapped on the Start button, you'll see a list of available apps and settings.
Step 2. To proceed with the system recovery process, tap on the "System" option and then select "Recovery" from the menu.
Step 3. Click on the Reset PC button to start the reset.
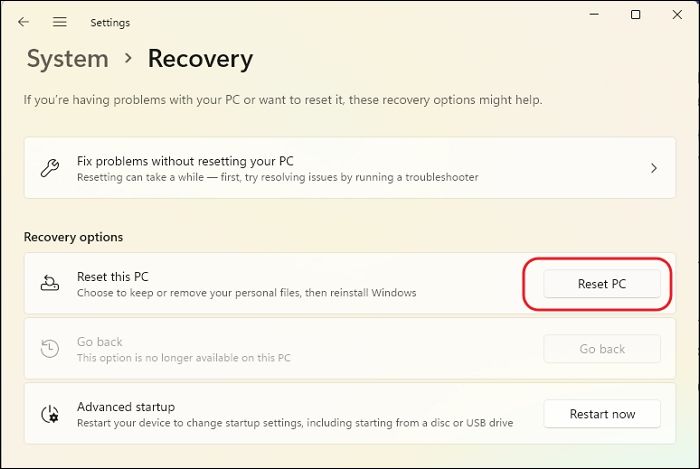
Step 4. Once you've completed the above steps, your PC will automatically restart.
Step 5. Save any unsaved data before proceeding further with the Get Started tab.
Step 6. Once the PC has restarted, you'll be presented with the Keep my files or Remove everything option. Please select the preferable option.
Step 7. Wait for the process to complete and check if the blue screen memory management errors have been resolved.
Here's a brief summary: You can resolve blue screen memory management errors by resetting your PC using the Windows settings, which will restore your computer to its original settings and resolve any issues that may have been causing the errors.
Several Windows users have found that these 8 fixes can resolve stop codes, including memory management issues, and have shared their success on social media platforms.
How to Recover Lost Data Due to BSOD Error on Windows
Data loss is one of the most common things one usually faces while fixing the Stop Code Memory Management in Windows. If you are also going through such an annoying issue now, you can opt for the tool to assist you to recover deleted files.
Deep Data Recovery is a powerful tool designed to assist in recovering data loss due to file system malfunctions, system crashes, or unintended file deletion. It features a simple and user-friendly interface that makes it easy for anyone to use.
The tool is capable of recovering data from a variety of devices, including USB flash drives, cameras, memory cards, and SD cards. It offers a range of options and is priced affordably, making it a convenient and accessible solution.
Download the software and follow the steps:
Note: To increase the chances of successful data recovery, install Qiling data recovery software on a separate disk drive, rather than the original drive where the files were lost.
Step 1. Launch Deep Data Recovery on your computer, select the disk partition or storage location where the lost data is located, and click "Scan" to start the recovery process.

Step 2. This recovery software will start scanning the disk to find all lost and deleted files. Once the scan process completes, you can click "Filter" > "Type" to specify the types of lost files you're looking for.

Step 3. This software allows users to scan and preview lost Windows files, and then recover them by saving them to a safe location.

Final Words
Fixing Stop Code Memory Management in Windows is a relatively straightforward task, thanks to the detailed solutions provided. With the assistance of data recovery software like Qiling, which can help acquire lost data effectively and secure it online, resolving this error is now more manageable. This approach not only resolves the Stop Code Memory Management issue but also helps protect your data.
Stop Code Memory Management on Windows FAQs
Although we have provided detailed solutions for the annoying error and introduced you to the possible reasons, here are the most common FAQs for you if you have some issues or queries.
1. Can insufficient RAM cause memory management errors?
If your PC is running low on RAM, Windows may struggle to handle increasing memory demands, leading to issues like BSODs, freezes, and crashes.
2. Why does my PC keep a blue screen after the RAM upgrade?
After upgrading the RAM, two different memory modules are causing the bluescreen. This is often due to the motherboard's RAM timings and voltages not being compatible with the new memory.
3. Does Windows 11 have better memory management?
Windows 11 has more features and programs than previous versions, giving users more RAM, and a better memory management system, resulting in lower performance issues. However, the effectiveness also depends on the OEM, such as Intel's Optane memory, which can reduce RAM usage and improve performance.
4. Why do I get a memory management error while installing Windows 10?
A common cause of crashes is faulty or incompatible hardware, such as RAM or hard disk issues. To resolve this, running a hardware check and replacing any necessary components is recommended. If the hardware is fine, upgrading the RAM by adding more memory to the PC may also help.
Related Articles
- How to Unblock Websites on School Chromebook 2023
- FIXED: Windows Update Error 80072EFE [Windows 7 Tips]
- Tutorial on Windows 10: Move Partition to End of Disk [Step-by-Step Guide]
- How to Format External Hard Drive for PS4 [2023 Full Guide and Choice]
- 3 Steps: How to Fix PCL XL Error in Printer Windows 10/11
If you're experiencing a PCL XL Error in your printer, try our suggested solutions to resolve the issue. - Portal/Portal 2 Save File Location - Everything You Need to Know
The Portal Save File allows you to resume your progress from where you left off, and in this post, we'll show you how to locate it and use a professional backup tool to safeguard your save files.