Transfer Data from Mac to Mac (Old to New) - 6 Tested Methods
If you've recently purchased a new Mac and are concerned about transferring data from your old Mac to the new one, there are several reasons that might be driving this need. You might be looking to upgrade your Mac for better performance, or perhaps you've outgrown your current device and need a larger storage capacity. Whatever the reason, transferring your data from one Mac to another can be a straightforward process if you follow the right steps. Here's a brief guide to help you get started.
To transfer data from a dead Mac to a new Mac, you can use a USB drive, iCloud, or a third-party software. First, connect the old Mac to the new Mac using a USB cable or Wi-Fi and select the files you want to transfer. If the old Mac is dead, you can use a USB drive or a third-party software like SuperDuper or Carbon Copy Cloner to transfer the data. If the old Mac is still functional, you can use iCloud or a third-party software like Migration Assistant to transfer the data. Once the data is transferred, you can erase the old Mac's hard drive to start fresh.
There are multiple solutions to transfer data from one Mac to another, and we'll discuss six proven methods in this guide to help you achieve this.
| Workable Solutions | Step-by-step Troubleshooting |
|---|---|
| Fix 1. Use Migration Assistant | Open Migration Assistant via the path Applications > Utilities, and click on Continue...Full steps |
| Fix 2. Use Mac AirDrop | Turn on Bluetooth on both Macs, ensure they share the same Wi-Fi, and go to System Settings...Full steps |
| Fix 3. Use File Sharing | Select System Settings, click General from the sidebar, and choose Sharing...Full steps |
| Fix 4. Use USB Cable | Connect the USB cable between the old Mac and the hard drive, and copy and paste files...Full steps |
| Other Practical Fixes | Transfer data from Mac to Mac with iCloud or using Time Machine backup ...Full steps |
Fix 1. Transfer Data from Mac to Mac Using Migration Assistant
The Migration Assistant is a popular tool to transfer data from one Mac to another. However, before using it, you need to follow some pointers. These include ensuring both Macs are connected to the same Wi-Fi network, having the Migration Assistant turned on on both devices, and making sure the source Mac is running macOS High Sierra or later. Once these steps are completed, you can initiate the transfer process.
- Make sure both systems are updated with the latest software to ensure they are running smoothly and securely.
- Disable any antivirus, VPN, or firewall software to troubleshoot or bypass security measures.
- Turn the Wi-To ensure the versions of a file on both systems are close to each other, you can use a version control system like Git. Git allows you to track changes made to a file over time and revert back to previous versions if needed.
When you get a new Mac, you can use Migration Assistant to transfer your data, apps, and settings from your old Mac. To do this, make sure both Macs are connected to the same Wi-Fi network, then turn off your old Mac, and turn on your new Mac.
You need to follow the steps on your new Mac:
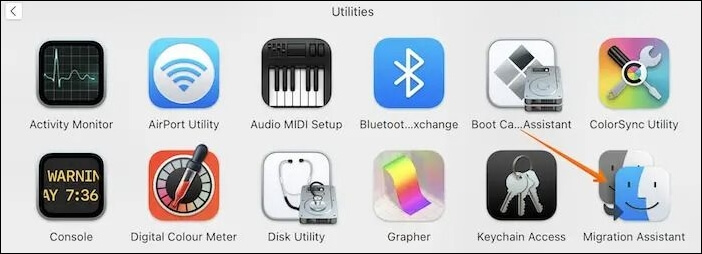
Step 1. Open "Migration Assistant" via the path "Applications > Utilities > Migration Assistant".
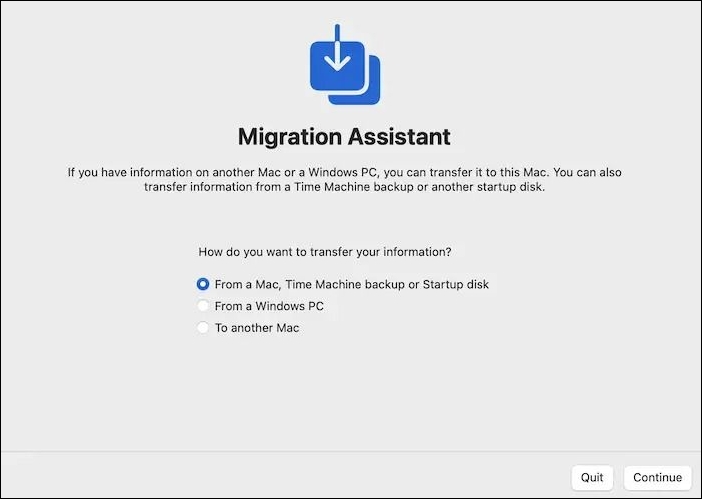
Step 2. Migration Assistant will ask permission to make changes and quit the other apps. Click on "Continue" to move further. Next, it will ask you to select the startup disk where you want to install your new system.
Step 3. Enter the administrator password. Click "OK".
Step 4. You'll see two options: "Transfer my data" and "Don't transfer my data". Select the "Transfer my data" option to move your information to the new device.
Step 5. You should choose the "From a Mac, Time Machine backup, or Startup disk" option. Then click "Continue".
You need to follow the steps on your old Mac simultaneously:
Step 6. Open "Migration Assistant", and a window will appear.
Step 7. Choose the option "To another Mac". Click "Continue".
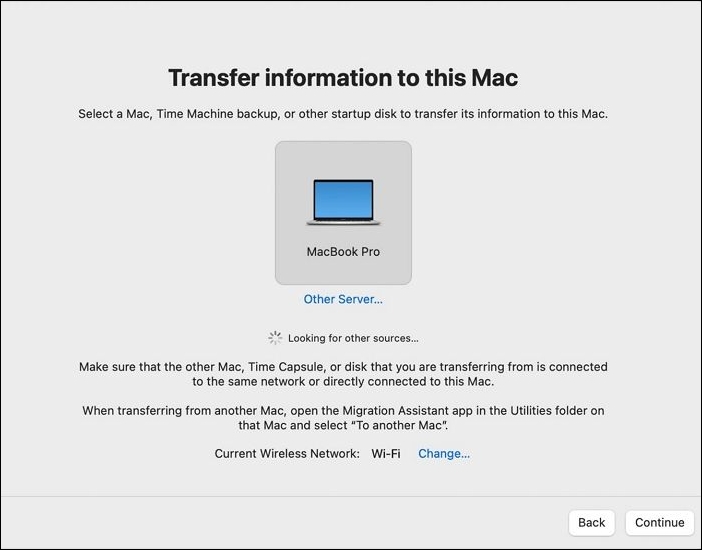
Step 8. On the new Mac: select "The other Mac". Press "Continue".
Step 9. A security code will appear on the old Mac, verify that it's the same on both systems, and then click "Continue".
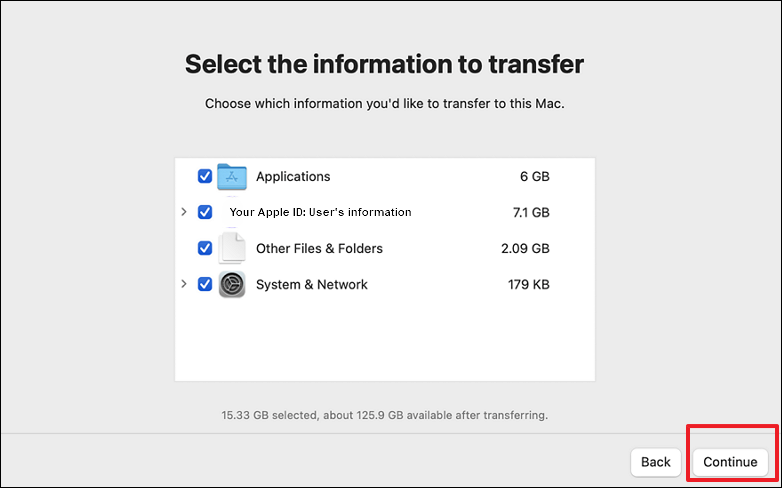
Step 10. On the new Mac, a window will appear where you should select the information to transfer.
Step 11. Tick-mark the options you want and click "Continue".
Step 12. To confirm the transfer of data from the old Mac to the new Mac, quit the Migration Assistant on the old Mac and log into the new Mac with the same account to verify if all the data has been successfully transferred.
If your Mac's Migration Assistant isn't working, don't panic - this article can help you troubleshoot the issue.
8 Ways to Fix Migration Assistant Not Working on Mac
If you're experiencing issues with Migration Assistant not working on your Mac, there are several effective methods to resolve the problem. Firstly, ensure that both Macs are connected to the same Wi-Fi network and that the Migration Assistant is enabled on the source Mac. Next, check that the destination Mac has enough free space to accommodate the data being transferred.
Fix 2. Use AirDrop to Transfer Data from Mac to Mac
To transfer data from an old Mac to a new one, you can use AirDrop, which allows you to transfer some files between the two devices, but both Bluetooth and Wi-Fi need to be enabled.
Take a look at the steps you need to follow:
Step 1. Turn on the Bluetooth on both Macs.
Step 2. Make sure both systems share the same Wi-Fi.
Step 3. Go to "System Settings" or "System Preferences".
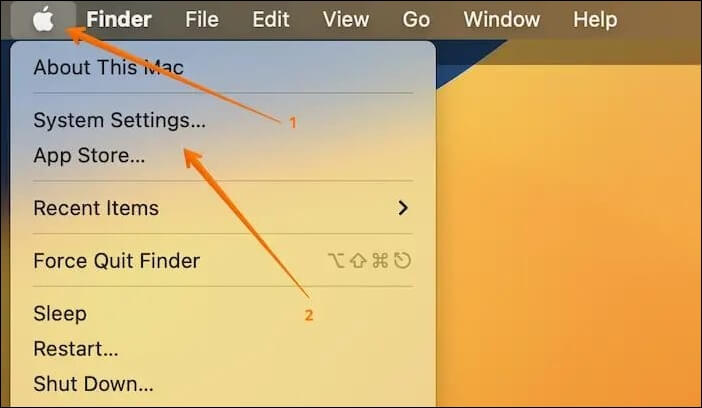
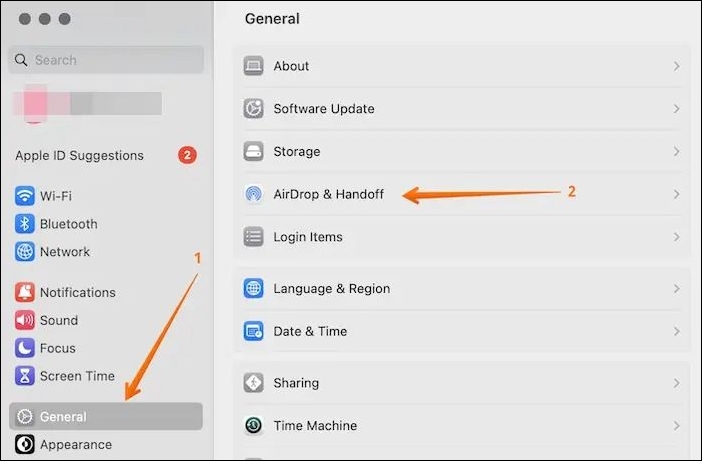
Step 4. Choose "General" from the left side.
Step 5. Select "AirDrop & Handoff" on the right-hand side settings pane.
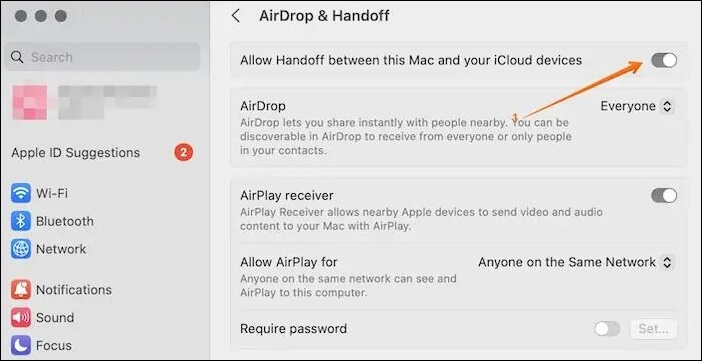
Step 6. To enable file sharing between Macs using Handoff, toggle the switch for "Allow Handoff between this Mac and your iCloud devices" on. This allows you to share files between your Mac and other Macs.
Step 7. On the old Mac, select the files for transfer.
Step 8. Control-click the files.
Step 9. Click on "Share" and select the Mac you want to share the files with.
Want to transfer your data from one Mac to another? Don't worry, it's easier than you think!
Fix 3. Use File Sharing to Transfer Files from Mac to Mac
To use File Sharing, you need to follow these steps:
Step 1. Go to the Apple menu.
Step 2. Select "System Settings".
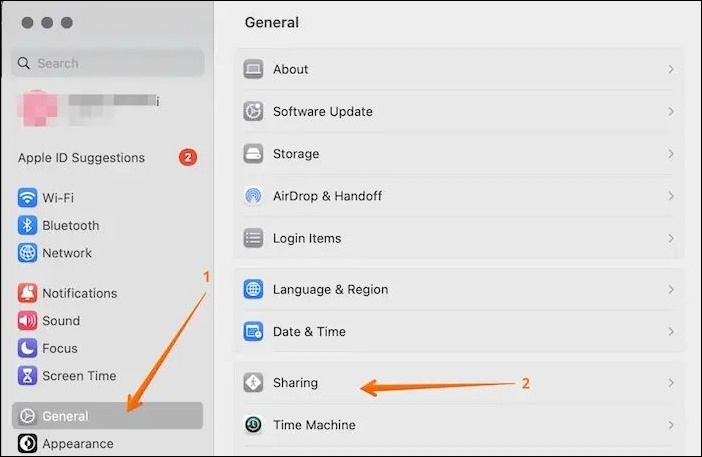
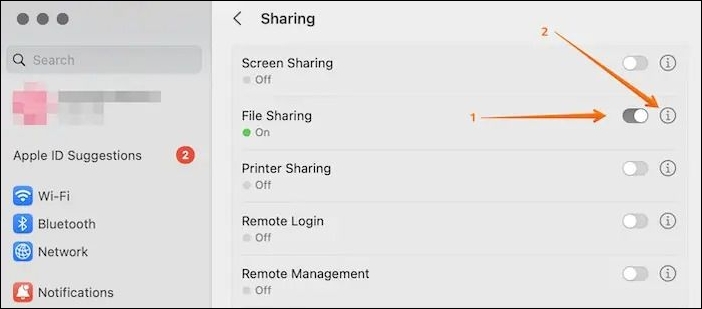
Step 3. Click "General" from the sidebar, and choose "Sharing".
Step 4. Turn "File Sharing" on. Choose the Info button.
Step 5. Click the "Add" button at the end of the Shared Folders list to add folders you want to share.
Step 6. On the name of the folder, control-click on it.
Step 7. Go to "Advanced Options".
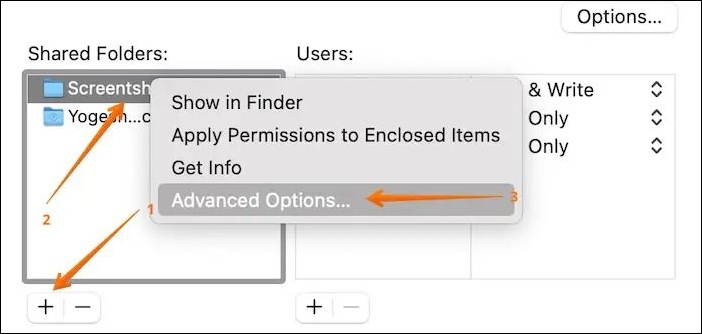
Step 8. Follow the on-screen instructions, and click "Done".
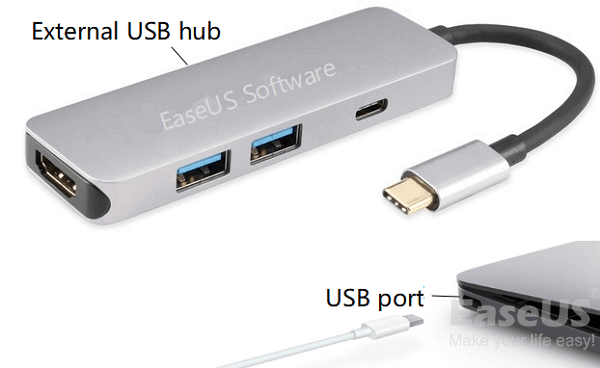
Fix 4. Transfer Data from Mac to Mac with USB Cable
You can easily transfer data from one Mac to another using a USB cable, and it's a relatively straightforward process. To get started, you'll need to purchase an external hard drive or a USB flash drive to store your data, and then connect the USB cable between the old Mac and the hard drive. This will allow you to transfer all your files, photos, and other important data to the new Mac, making the transition as smooth as possible.
To transfer files from an external drive to a new Mac, first, copy and paste the files from the drive to the Mac, then eject the drive safely. Repeat the process in reverse, copying and pasting the files from the Mac back to the drive. This ensures a safe and complete transfer of files.
If your USB flash drive is not showing up on your Mac, there could be several reasons for this issue. It might be due to a faulty USB port, a corrupted file system on the flash drive, or compatibility issues with the operating system.
If a USB flash drive is not showing up on a Mac after being inserted into the USB port, there are several solutions that can be tried. These include restarting the Mac, checking the USB port for any blockages, and ensuring that the flash drive is properly formatted for use on a Mac. Additionally, checking the System Report to see if the USB drive is recognized by the Mac, and trying a different USB port or cable can also resolve the issue. Furthermore, running a disk utility scan to check for any errors on the flash drive, and using the Disk Utility app to reformat the drive if necessary, can also help to resolve the issue.
Fix 5. Transfer Data from Mac with iCloud
Here's how to transfer data from one Mac to another using iCloud:
Step 1. Go to the Apple icon, and choose "System Preferences/Settings".
Step 2. Select Apple ID and choose the "iCloud" option. Enter your Apple ID and password if prompted.
Step 3. Tickmark the "iCloud Drive" option. Now, iCloud is turned on.

Step 4. To locate your iCloud files, click on the desktop, then go to the Finder menu, select "Go," and choose "iCloud" from the dropdown menu. This will direct you to the files you need.
Files will be synced to iCloud only if the old system uses the same Apple ID.
Fix 6. Transfer Data from Mac to Mac via Time Machine Backup
If you want to migrate all data from your old Mac to the new one, using Mac Time Machine backup is a more efficient approach. This method allows you to transfer a wide range of data, including applications, preferences, user accounts, and more, making the transition smoother and more convenient.
To transfer data from an old Mac to a new one, start by using Time Machine to back up the old Mac's data. This will ensure that all your files, settings, and applications are safely stored. Once the backup is complete, you can erase the old Mac's hard drive and reinstall macOS.
Step 1. Connect the hard drive of your choice to the system.
Step 2. Go to the Apple logo.
Step 3. Click on "System Preferences".
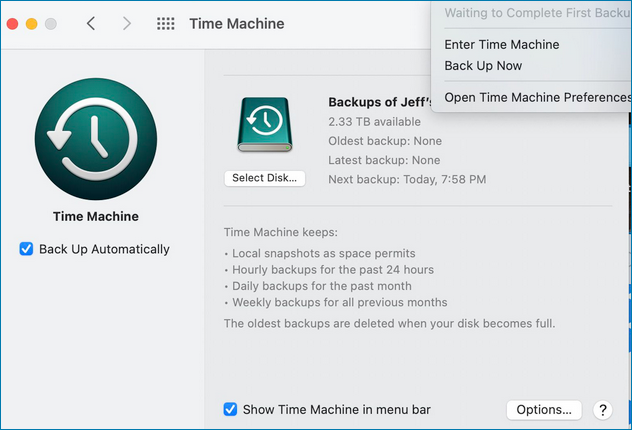
Step 4. Choose the Time Machine application.
Step 5. Select the disk you want to use for Time Machine backups.
Step 6. A window will appear. Check the boxes for "back up automatically" and "show Time Machine in the menu bar".
Step 7. You need to wait as the Time Machine backs up data.
If the Time Machine is stuck or can't complete the backup, this article can help you troubleshoot and resolve the issue with Time Machine backup.
2023 Fixed: Time Machine Won't Complete First Backup
If your Time Machine is stuck waiting to complete the first backup, this article will guide you through the steps to resolve the issue. To fix Time Machine stuck waiting to complete the first backup, follow the instructions provided in the article to troubleshoot and resolve the problem. The article will walk you through the process of identifying and addressing the root cause of the issue, ensuring that your Time Machine backup completes successfully.
To restore from Time Machine on a new Mac, follow these steps: Connect the external drive containing your Time Machine backup to the new Mac. Make sure the drive is recognized by the new Mac.
Step 1. To transfer a Time Machine backup to a new Mac, start by connecting the drive containing the backup to the new Mac. This will allow the new Mac to recognize the drive and access the backup.
Step 2. To restore your Mac from a Time Machine backup, start your Mac in Recovery Mode and choose the option "Restore from Time Machine".
Step 3. Click "Continue" and select the backup disk. Click "Continue" again.
Step 4. Opt for the recent backup.
Step 5. Follow the instructions on the screen. Restart the system.
Bonus Tip: How to Recover Data from Mac
If you have a Mac with a broken screen, don't worry about transferring your data to a new system. You can use professional software like Deep Data Recovery for Mac to restore data from the dead system seamlessly. This efficient and user-friendly recovery tool makes it easy to recover your data.
The tool offers powerful recovery features and a user-friendly interface, making it easy for beginners to use. It can retrieve data from various loss situations, such as recovering files from a Mac that won't boot, a virus attack, a macOS update, system crash, or human errors.
Step 1. Select the drive to be scanned
In the main Deep Data Recovery window, select the drive containing the lost files from which you need to recover, then click the "Search for lost files" button.
Note: Before attempting data recovery, it's recommended to create a backup of your Mac by clicking "Disk Backup" from the left sidebar, ensuring that your data is safe in case of further loss. Once backed up, the software can then recover data from the Mac backup, allowing you to write new data to your computer.

Step 2. Select your lost data/files
Deep Data Recovery for Mac scans the selected disk volume and displays the results, allowing you to sort and find specific files if needed.

Step 3. Recover lost/deleted data
Once you have found the desired files, preview them and then click "Recover" to initiate the recovery process for your deleted or lost Mac files.

Conclusion
You can transfer data from your old Mac to your new one using a USB cable, Migration Assistant, Time Machine backup, or other methods, depending on your specific needs and preferences.
If you're ready to transfer data from one dead Mac to another, Deep Data Recovery for Mac is a highly powerful yet easy-to-use recovery tool that can help you recover different types of data with ease.
Transfer Data from Mac to Mac FAQs
Want to know more about transferring data from one Mac to another? Check out the questions and answers listed here to learn more about this process.
1. How do I transfer data from my old Mac to my new Mac?
You can transfer data from an old Mac to a new Mac using a USB cable, Migration Assistant, Time Machine Backups, File Sharing, or iCloud.
2. Does Migration Assistant erase old Mac?
Migration Assistant doesn't erase the old Mac, it only copies files to help transfer data from one system to another, avoiding file overwrites.
3. How long does it take to transfer from Mac to Mac using Migration Assistant?
The time it takes to transfer data from one Mac to another using Migration Assistant varies, taking anywhere from a few minutes to a couple of hours, depending on the size of the data being transferred.
4. How do I transfer files from Mac to Mac without iCloud?
You can choose from multiple solutions to transfer files from Mac to Mac without using iCloud. Options include using "File Sharing" or taking advantage of Time Machine backups.
Related Articles
- How to Open Terminal on Mac and How to Use it [2023 Guide]
- Blackmagic Disk Speed Test Alternative for Windows [Top 5]
- Fix Mark Partition as Active Greyed Out in Disk Management in Windows 10/11
- How to Upgrade Switch SD Card and Transfer Switch Games to A New SD Card
- Samsung T7 vs. T9: Which SSD to Choose?
A post comparing the Samsung T7 and T9 SSDs provides valuable insight into the performance and features of these drives, highlighting the pros and cons of each model to help users make an informed decision when choosing an external SSD. - SanDisk Extreme Pro Portable SSDs Become Unreadable: Causes and Solutions
Fix SanDisk Extreme Portable SSD failing, not detected, or showing errors. Learn troubleshooting steps and data recovery options.