How to Turn Off Sleep Mode on Mac/MacBook Air/iMac
Sleep mode on Mac allows your MacBook to enter a highly inactive state when not in use, conserving power and maximizing battery life.
If you're wondering how to turn off sleep mode on Mac, you're not alone. Sometimes, you may not want your MacBook to sleep when you're away for a longer period. Fortunately, there are 5 practical methods to turn off sleep mode on Mac, making it easy to keep your device running when you need it to.
| Workable Solutions | Step-by-step Troubleshooting |
|---|---|
| Fix 1. Turn Off Sleep Mode in System Preferences | Hit the Apple menu by selecting the Apple symbol. Opt for System Preferences...Full steps |
| Fix 2. Turn Off Sleep Mode on Mac via Terminal | Open the Terminal app from the Application > Utilities folder, and type a command...Full steps |
| Fix 3. Prevent Sleep Mode on Mac When Closing Lid | Navigate to the Apple symbol > System Settings, select Displays, and hit Advanced...Full steps |
| Fix 4. Schedule the Sleep Mode on Your Mac | Hit the Apple icon > System Preferences, and select the Energy Saver option...Full steps |
| Fix 5. Turn Off Sleep Mode Using Applications | There are several apps available in the market that allow you to delay sleep settings...Full steps |
Fix 1. Turn Off Sleep Mode on Mac Using System Preferences
To turn off sleep mode on your MacBook, go to System Preferences, then Energy Saver, and uncheck the box next to "Turn display off after" to set it to "Never".
Here are the steps to turn off sleep mode on Mac using System Preferences in one paragraph:
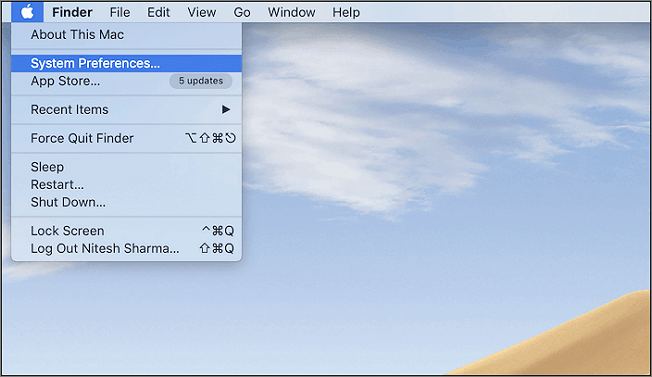
Step 1. Select the "System Preferences" option from the drop-down menu.
Step 2. Opt for "System Preferences".
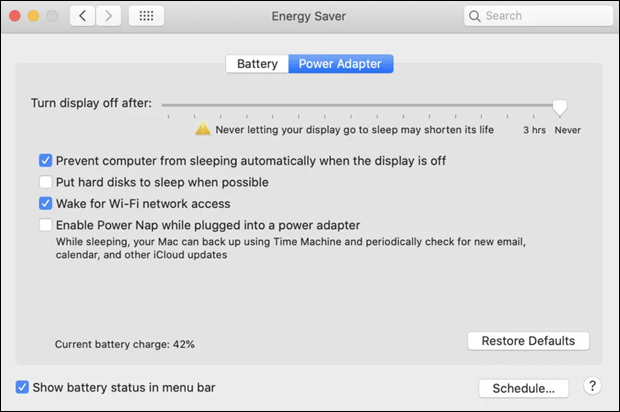
Step 3. Opt for "Energy Saver"; this icon resembles a light bulb.

Step 4. The checkbox next to "Prevent computer from sleeping automatically when the display is off" should be ticked.
Step 5. Uncheck the box next to "Put hard disks to sleep when possible" to prevent your hard disk from going to sleep.
Step 6. Lastly, turn the slider from "Turn display off after" to "Never".
If your Mac's System Preferences isn't responding, you can try restarting your Mac, force quitting the System Preferences app, or resetting the System Management Controller (SMC) and power management unit (PMU). If none of these steps work, you can try reinstalling the System Preferences app or seeking further assistance from Apple Support.
System Preferences Not Responding on Mac: Possible Causes and Solutions
Fixing the System Preferences not responding issue on Mac can be achieved through several effective methods. One approach is to force quit the System Preferences app, which can be done by pressing Command + Option + Esc, selecting System Preferences, and clicking Force Quit. Another method is to reset the System Management Controller (SMC), which can be done by shutting down the Mac, pressing the power button, and holding it for 10 seconds.
Fix 2. How to Turn Off Sleep Mode on Mac via Terminal
You can put your MacBook into temporary sleep mode by using the "caffeinate" command in Terminal, which disables sleep mode for as long as the Terminal window is open. To do this, open Terminal, type "caffeinate -i" and press enter. This will keep your MacBook awake until you close the Terminal window. You can also add a time interval with the "-t" option, for example, "caffeinate -t 60" to keep your MacBook awake for 1 minute. Once you close the Terminal window, your MacBook will go back to its normal sleep mode.
Step 1. Open the Terminal app on your Mac, which can be found in the Utilities folder within the Applications folder.
Step 2. Type Caffeinate in the Terminal, and hit the "Enter" button.
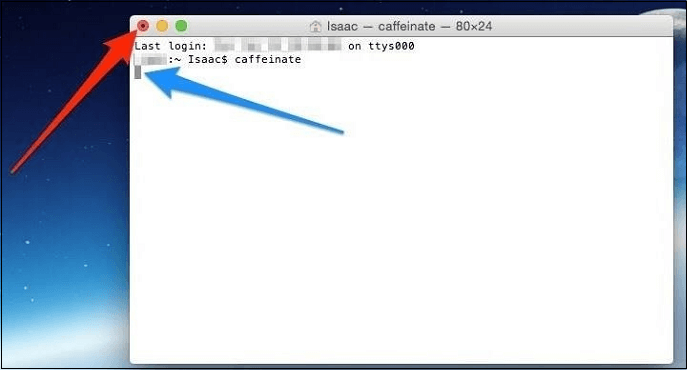
The cursor will move to a new line and "caffeinate" will appear next to your username in the Terminal, keeping your MacBook awake and energized, similar to getting a morning coffee boost.
When the Terminal window is open, you can use the "kill" command to close it. However, if you try to shut down the window while it's open, a warning message will appear, asking if you want to proceed. This is a safety feature to prevent accidental closure of the window.
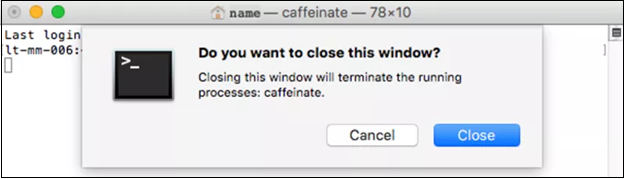
If you click the "Close" button, your Mac will go into sleep mode according to the energy-saving settings you've set in System Preferences.
If your Mac won't go to sleep when you lock the screen, try disabling the "Prevent computer from sleeping" option in System Preferences, check for software updates, and restart your Mac. You can also try resetting the System Management Controller (SMC) and the power manager, or reset the System Configuration (NVRAM).
If your Mac won't go to sleep, don't worry - there are 7 proven ways to fix it. First, check for any software updates and install them, as outdated software can cause issues.
If your Mac won't go to sleep, don't worry, there are 7 effective ways to fix the issue. Firstly, check the System Preferences to ensure that the "Put the computer to sleep" option is enabled. If not, click on "Energy Saver" and select the desired sleep time.
Fix 3. Prevent Sleep Mode on Mac When Closing Lid
The MacBook has a default feature that puts it to sleep when the lid is shut down, which helps save battery life. When you open the lid, you can simply enter your password and start working without any additional steps.
To prevent your MacBook from sleeping with the closed lid on macOS Sonoma and Ventura, you can follow these steps: Go to System Preferences, then select Power, and choose "Prevent computer from sleeping" under the "Power adapter" tab. This will prevent your MacBook from sleeping even when the lid is closed, allowing you to use an external monitor for work without having to switch to sleep mode.
Step 1. Navigate to the Apple symbol > System Settings.
Step 2. Opt for "Displays" in the sidebar.
Step 3. Hit the "Advanced" button.
Step 4. Toggle on "Prevent automatic sleeping when the display is off".
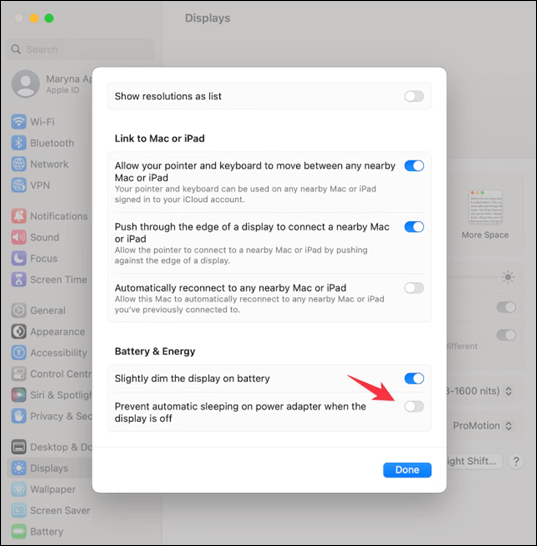
Step 5. Click the "Done" button to save the changes you made.
Share this article on social media to help others learn how to turn off sleep mode on Mac.
Fix 4. Schedule Sleep Mode on Your Mac
Sleep mode is beneficial for MacBook users as it helps conserve power and enables quick resumption of work. It's especially useful for preserving battery life when you know you'll soon return, making it a convenient feature for those who need to take a temporary break.
To schedule sleep mode on your MacBook, follow these steps. This feature is particularly useful for MacBook users who need to turn their PCs on and off frequently. By scheduling sleep mode, you can set your MacBook to automatically turn off or go to sleep at a specific time, saving you the hassle of manually turning it off and on.
Step 1. Hit the Apple icon > System Preferences.
Step 2. Hit the "Energy Saver" option.
Step 3. Select the "Schedule".
Step 4. Establish adequate parameters.

You can start or awaken during the week, on the weekend, every day, or a particular day, and sleep, resume, or power down on weekdays, weekends, every day, or just one particular day.
When scheduling the sleep mode on macOS Ventura, you may encounter an error that says "macOS Ventura WindowServer stop Mac from sleeping". Don't worry, this problem can be solved by following the steps outlined in this article.
macOS Ventura's WindowServer issue can prevent your Mac from sleeping, causing inconvenience and wasting energy. To resolve this, try one of the 10 available solutions, such as disabling the "Prevent Windows from Sleeping" feature, resetting the System Management Controller (SMC), or restarting your Mac in Safe Mode.
This article discusses 10 available solutions to fix the 'WindowServer prevents from sleeping' error, providing a comprehensive guide to resolving the issue.
Fix 5. Turn Off Sleep Mode on Mac Using Applications
It's hassle-For most MacBook users, the steps mentioned can help prevent the Macs from going back to sleep mode. Alternatively, there are several apps available that allow you to delay sleep settings, with the top 2 applications being popular choices to turn off sleep mode on your Mac.
🦉Owly
If you like to control the sleep preferences of your Mac with a straightforward interface, Owly is a one-stop application to turn off sleep mode on Mac.
This top-notch application demonstrates a tiny symbol that can be located in the menu bar at the MacBook's top. Hitting the Owly app will open up a menu that allows you to prevent your MacBook from sleeping for a specific time.
|
👍Pros
|
|
😭Cons
|
✨Amphetamine
Amphetamine is a Mac app that keeps your computer awake by using its triggers, allowing you to quickly set up triggers to keep it awake when an external display is plugged in or a specific app is running.
You can control your PC's behavior when you're not around by toggling on or off in the primary interface, allowing you to choose whether it goes back to sleep, triggers the screen saver, or performs other actions.
|
👍Pros
|
|
😭Cons
|
🏆Bonus: Recover Unsaved/Lost Files After Sleep Mode
Switching to sleep mode on your Mac halted the saving progress, resulting in lost or unsaved files. To recover the lost data, use data recovery software like Deep Data Recovery for Mac.
This tool is a one-stop solution for recovering deleted files on Mac, including videos, photos, documents, audio files, and more, from various storage devices such as fusion drive, hard drive, SSD, SD card, Time Machine backup drive, and USB drive.
Here are the 3 steps to recover your lost files quickly:
Step 1. Search for lost files
To search for lost files on macOS Sierra, High Sierra, Mojave, Catalina, Big Sur, Monterey, Ventura, and the latest Sonoma, select the disk location to search, which can be an internal HDD/SSD or a removable storage device, and then click the "Search for lost files" button.
Note: Before attempting data recovery, it's recommended to create a backup of your Mac by clicking "Disk Backup" from the left sidebar to prevent further data loss. This backup can then be used to recover data, allowing your computer to write new data again.

Step 2. Go through the scanning results
Deep Data Recovery for Mac will immediately scan your selected disk volume and display the scanning results.

Step 3. Select the file(s) and recover
Select the desired files from the scan results and click the "Recover" button to retrieve them.

Conclusion
To solve the issue of your Mac not going to sleep, you need to check your sleep settings. You can try using the Terminal app, scheduling sleep mode, closing the lid, or adjusting system preferences to turn off sleep mode. If you've accidentally deleted data while trying to troubleshoot, you can download Deep Data Recovery for Mac to recover your lost files.
How to Turn Off Sleep Mode on Mac FAQs
Go through the FAQs below to understand the topic in a better way:
1. How do I turn off the screen timeout on Mac?
To disable the screen timeout, click on the Apple logo, go to System Preferences, then Battery or Power Adapter, and drag the slider to "Never".
2. How do I stop my Mac screen from going black?
To prevent your Mac from automatically sleeping, go to System Options, select the Energy Saver tab, and move the Display Sleep slider to the far right, setting it to "never". This way, your Mac will only sleep when you intentionally put it to sleep or close the laptop lid.
3. Should I turn off sleep mode on my Mac?
When your Mac is in sleep mode, it uses minimal energy to run routine repair processes, making it okay to perform maintenance tasks while it's in this state.
Related Articles
- The Disk Macintosh HD Can't Be Unlocked? Here Are Solutions
- How to Fix Dying Light 2 Multiplayer Not Working
- Fix: Scanning and Repairing Drive Stuck at 0, 10, 100... in Windows 10
- Full Guide on GPT Max Size | What Is GPT Max Size?
- How to Solve Screen Freezes but PC Keeps Running (2024 Answers)
If your screen freezes but your PC continues to run, don't worry - it's a common issue that can be easily resolved. By applying a few simple fixes, you can identify and address the problem, ensuring your computer runs smoothly again. - What Happens If an SD Card Is Corrupted [Full Guide on 10 Fixes]
This page explains what happens if an SD card is corrupted and provides ten full guides on how to fix SD card corruption.