Fix: Scanning and Repairing Drive Stuck at 0, 10, 100... in Windows 10
If your Windows 10 is stuck at scanning and repairing drive error, there are six solutions to help you resolve the issue. You can refer to the manual tutorial to manually troubleshoot the problem and remove the scanning and repairing drive stuck issue on your own.
| Workable Solutions | Step-by-step Troubleshooting |
|---|---|
| Fix 1. Check Disk Connection | Remove the computer case > Check the cable and port to ensure the disk is correctly connected...Full steps |
| Fix 2. Let Scanning Process Finish | If the drive is in a bad condition, the scanning process may take longer and you need to wait for it to finish...Full steps |
| Fix 3. Stop Scanning Process | Shutdown PC by pressing the power button > Restart PC > Enter "Repairing Automatic Repair"...Full steps |
| More Fixes | Press the power button to shutdown PC > Restart PC and hold the power button for 10 seconds ...Full steps |
Windows 10 Stuck at Scanning and Repairing Drive
To exit the scanning and repairing process on your Lenovo running Windows 10, try pressing the Shift key while clicking on the 'Cancel' button on the scanning and repairing drive screen. This should interrupt the process and allow you to proceed with booting your computer. If the issue persists, you may want to consider booting your computer in Safe Mode or performing a System Restore to a previous point when your computer was functioning normally. If the problem continues, you may need to consider a more in-depth troubleshooting process or seek professional assistance.
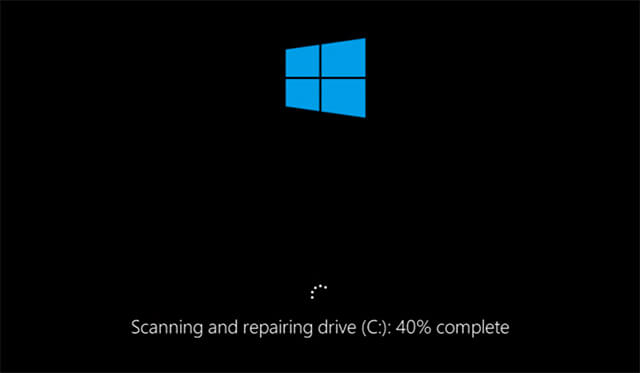
Windows 10 users often face the frustrating issue of getting stuck at scanning and repairing their hard drive during the CHKDSK process. The scan may partially complete, but then get stuck at a certain percentage value, failing to advance further. This can occur on either drive C: or D:, causing inconvenience to users.
Best Data Recovery Software for Deleted Data Recovery
For Windows and Mac users, there are several top-rated data recovery software options available to quickly retrieve deleted or lost data.
About Scanning and Repairing Drive
When a computer experiences a boot issue, Windows Automatic Repair initiates and displays a screen showing Preparing Automatic Repair, Diagnosing your PC, and then Scanning and repairing drive C, D... This process can also be started manually from the Advanced Options in the Windows Recovery Environment (WinRE). If the Scanning and repairing drive process becomes stuck, it typically indicates a problem reading the drive, which may be caused by issues with the disk connection or disk errors such as bad sectors and file system errors.
6 Fixes for Scanning and Repairing Drive C/D Stuck at 0%, 10%, 11%...100%
This guide presents six effective methods to resolve the scanning and repairing drive stuck issue, allowing you to boot your computer successfully again.
Fix 1. Check the Disk Connection
If you've recently moved your PC or done something that could have dislodged the computer disks, the issue might be with the connection between the disks and the computer. Check the cables and ports to ensure they're properly connected. This could resolve the "Scanning and repairing drive" stuck issue.
Fix 2. Wait for the Scanning and Repairing Process to Finish
The time it takes for the "Scanning and repairing drive" process to complete varies greatly depending on the severity of the issue with the drive. If the problem is minor, the process should be relatively quick, but if the drive is in a poor condition, it may take several hours to complete. In some cases, simply waiting patiently has been found to be a viable solution.
Fix 3. Stop Windows from Scanning and Repairing the Drive
You can disable the automatic disk checking process in the Automatic Repair by pressing any key during Windows startup to bypass "Scanning and repairing drive".
Step 1.The computer will restart itself after shutting down, and the installation process will continue. The "Scanning and repairing drive" process can be time-consuming, but it's a normal part of the installation process.
Step 2. The computer starts, displaying the "Preparing Automatic Repair" screen, followed by a "Diagnosing your PC" message.
Step 3.To disable disk checking, press any key, such as the spacebar, repeatedly, and you will have the option to skip the disk checking. Alternatively, you can press "Ctrl + C" to attempt to skip it.

Fix 4. Disable Automatic Repair
Automatic Repair can sometimes cause more problems than it solves, such as getting stuck at "Preparing Automatic Repair" or looping in an infinite cycle. To avoid these issues, you can disable Automatic Repair. To do this, you'll need to access the Windows Recovery Environment (WinRE), which is a built-in feature that allows you to troubleshoot and repair Windows. If you don't have the Windows installation media available, you can use WinRE to disable Automatic Repair and resolve the issue.
Step 1.To shut down the computer, press and hold the power button for 10 seconds. This will completely power off the computer.
Step 2.Start the computer by pressing the power button. As soon as Windows starts, press and hold the power button for 10 seconds to turn it off.
Step 3. Turn on the computer by pressing the power button. After Windows restarts, press and hold the power button for 10 seconds to shut it down.
Step 4.Press the power button to start the computer and don't interrupt it this time. Then, you'll see your computer in WinRE.
Step 5. On the "Choose an option" screen, select "Troubleshoot", then "Advanced options", and finally "Command Prompt".
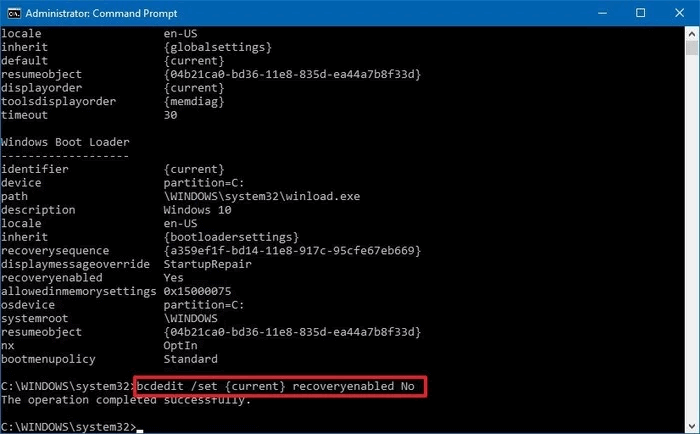
Step 6.To configure the Windows Boot Loader using the bcdedit command, you can enter the command and note the values of "identifier" and "recoveryenabled" under Windows Boot Loader. Typically, these values are "{current}" and "Yes" respectively.
Step 7. To disable Automatic Repair, enter the command `bcdedit /set {current} recoveryenabled no` in Command Prompt, which will set the value to "no" and disable Automatic Repair.
Step 8.Restart the computer.
Fix 5. Enter Safe Mode and Run CHKDSK
Since the cause of the "Scanning and repairing drive" stuck is likely due to disk errors, you can try running CHKDSK in Safe Mode to fix the errors, which starts the computer with minimal services and drivers, allowing for diagnostic and fix operations.
Step 1.To shut down the computer, hold down the power button for 10 seconds.
Step 2.Start the computer by pressing the power button. Once the Windows logo appears, press and hold the power button for 10 seconds to shut it down.
Step 3. Press the power button to start the computer. Once Windows restarts, hold down the power button for 10s to turn off the computer.
Step 4. Press the power button to start the computer and don't interrupt it this time. Then, you will see your computer in WinRE.
Step 5.On the "Choose an option" screen, choose "Troubleshoot", then "Advanced options", followed by "Startup Settings" and finally "Restart".
Step 6.After the restart, select option 5 or press F5 to enable Safe Mode with Networking.
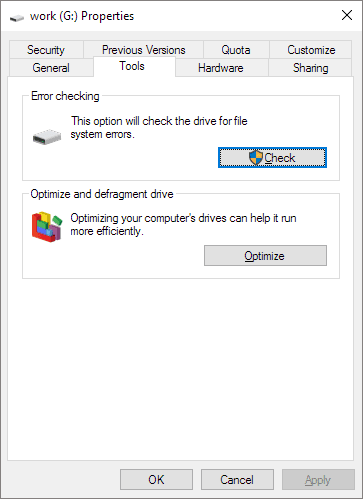
Step 7. To resolve the issue of Windows being stuck scanning and repairing, open the "This PC" window, right-click on the drive that Windows is stuck on, and select "Properties" from the context menu. This will allow you to view and potentially troubleshoot the issue with the drive.
Step 8.To run a disk check, go to the "Tools" tab in the Disk Management window and select "Check".
Fix 6. Recover Data
In cases where the "Scanning and repairing drive C, D..." issue persists, one of the proposed solutions may resolve the problem. However, if the system drive (C drive) is severely damaged, even after trying all the fixes, a bootable data recovery software such as Deep Data Recovery with Bootable Media may be necessary to recover files from the non-functional PC, allowing for a subsequent Windows reinstallation.
To create a bootable USB or CD/DVD:
Note: To ensure a high chance of successful data recovery, install a data recovery software like Qiling on a separate disk, rather than the original one where the files were lost.
Step 1: Select file types that you want to recover

Step 2.Launch Deep Data Recovery on your Windows computer and select the disk partition or storage location where you lost data, then click "Scan".

Step 3.To recover lost Windows files, you can scan the PC, preview the files, select the target data, and then click the "Recover" button to save them to a safe location.

Step 4.Reinstall Windows.
Whenever you encounter a boot issue, you can use bootable data recovery software to recover data, but if that doesn't work, reinstalling Windows is the last resort. Alternatively, you can also send the PC for manual repair.
Extra Tip: How to Enable Disk Checking or Automatic Repair
When the computer is able to boot normally, you might want to consider turning on disk checking or Automatic Repair, as these features can potentially help resolve some boot-related problems.
To enable disk checking:
Step 1. Press "Windows + R" and enter regedit.
Step 2. Click "Yes" to allow the app to make changes.
Step 3. Go to HKEY_LOCAL_MACHINE\SYSTEM\CurrentControlSet\Control\Session Manager.
Step 4. Find and double-click "BootExecute".
Step 5.To enable disk checking, replace the value in the registry key HKEY_LOCAL_MACHINE\System\CurrentControlSet\Services\Disk and change the value from "autocheck autochk *" to "autocheck autochk * /r\DosDevice\C:". This modification will instruct the system to check the disk for errors and also check the C: drive in particular.
To enable Automatic Repair:
To enable the feature again, go to Settings > Accounts > [Your account name] > Settings > toggle the switch next to "Allow others to see your profile picture and email address" to the ON position. If you have disabled the feature by going to Settings > Accounts > [Your account name] > Settings > toggle the switch next to "Allow others to see your profile picture and email address" to the OFF position, you can enable it again by toggling the switch to the ON position.
Step 1.Type "cmd" in the search bar, right-click "Command Prompt" and choose "Run as administrator".
Step 2.To access the Windows Boot Loader settings, enter the command `bcdedit` and note the values of "identifier" and "recoveryenabled". Typically, these values are "{current}" and "No", respectively.
Step 3.To turn on Automatic Repair in Windows, enter `bcdedit /set {current} recoveryenabled yes` into the command line.
The Bottom Line
The "Scanning and repairing drive C" stuck issue suggests disk issues. To resolve this, you can either fix the disk errors or let Windows skip them, depending on your situation. If you're experiencing disk errors, you can try running a disk check or repair using tools like Check Disk (chkdsk) or a third-party disk repair tool. If the issue persists, you can try letting Windows skip the errors by running the installation in safe mode or using the /p option when running the installation. If you're not experiencing disk errors, you can try running the installation in safe mode or using the /p option to skip the errors.
Next are some other questions related to scanning and repairing drive stuck. Check the answers if you're interested.
1. How long should scanning and repairing drive take?
A computer may take over 2 hours to scan and repair a hard drive, depending on its size and the number of errors found, and may appear to be stuck at around 10-11% before suddenly reaching 100% completion.
2. Can I stop scanning and repairing the drive?
You can disable the automatic disk checking process in Automatic Repair, allowing you to quickly access your system without waiting for the disk check to complete.
Step 1. Press the power button to shut down the computer.
Step 2. Start the computer and you will see the "Preparing Automatic Repair" screen and then "Diagnosing your PC".
Step 3. Before the disk checking starts, you need to press any key to disable the disk checking.
3. What does scanning and repairing drive mean?
In Windows Automatic Repair, the "Scanning and repairing drive" process is a disk checking process that runs when there is a boot issue on the computer. This process automatically starts and displays the computer screen with messages such as "Preparing Automatic Repair", "Diagnosing your PC", and "Scanning and repairing drive C, D...".
Related Articles
- How to Solve Webcam Freeze Up in Windows 10 Error?
- SD Card Keeps Disconnecting or Disappearing
- Will System Restore Delete My Files
- How to Cancel Windows 10 Updates Once Started
- Why do you need to back up the data?
Qiling disk master is a powerful, reliable and secure backup facility with numerous benefits, including system Backup, file backup, clone utilities and so on. - How to Auto Clone Hard Drive: The Solution to Free Your Hands
Cloning a hard drive can save time and effort compared to manual operation. By setting a scheduled clone time, Qiling Backup automatically creates a duplicate of the hard drive, ensuring minimal downtime in case the original fails.