[100% Working] 3 Easiest and Successful Ways to Unprotect Excel
Many individuals add passwords to their Excel files to prevent unauthorized access or modification. But sometimes, the user may forget the password, making the files inaccessible or uneditable. It can be annoying because many users risk important file missing. Not to worry, as in this post, we will offer several helpful techniques you may use to unlock the Excel file if you have forgotten the password. So, given below are the three most straightforward and most successful ways to unprotect Excel.
Method 1: Entering a Script or Code
To change the password of an Excel file, follow these steps:
Step 1. Open Excel, switch to the password-protected spreadsheet, and press Alt + F11 to open Microsoft Visual Basic for Applications window.
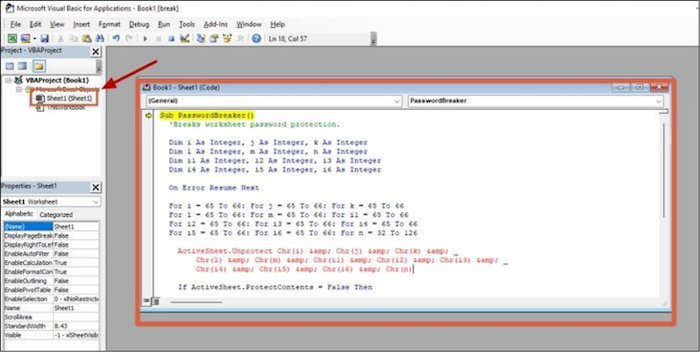
Step 2. To protect a spreadsheet, select the workbook on the left pane and right-click on it. From the context menu, select Insert > Module. Then, copy and paste the code below into the code window of the protected spreadsheet, which you can choose from the window's left pane.
Sub PasswordBreaker()
Dim i As Integer, j As Integer, k As Integer
Dim l As Integer, m As Integer, n As Integer
Dim i1 As Integer, i2 As Integer, i3 As Integer
Dim i4 As Integer, i5 As Integer, i6 As Integer
On Error Resume Next
The given code snippet is a nested loop structure that iterates over the range of 65 to 66 for three variables i, j, and k. This results in a total of 8 iterations, as each variable has 2 possible values (65 and 66), and the loops are nested, leading to a product of the number of iterations for each variable.
The program iterates over the values 65 to 66 for the variables l, m, and i1.
For i2 = 65 To 66: For i3 = 65 To 66: For i4 = 65 To 66
For i5 = 65 To 66: For i6 = 65 To 66: For n = 32 To 126
ActiveSheet.Unprotect Chr(i) & Chr(j) & Chr(k) & _
Chr(l) & Chr(m) & Chr(i1) & Chr(i2) & Chr(i3) & _
Chr(i4) & Chr(i5) & Chr(i6) & Chr(n)
If ActiveSheet.ProtectContents = False Then
The code snippet is designed to generate a password by combining two characters, one from the ASCII character set and one from a specified character set, and then displaying the generated password in a message box. The password is created by using the Chr() function to convert the ASCII values of the characters to their corresponding characters, and then concatenating them together.
The input string is comprised of the characters "Chr", "k", "l", "m", "i1", "i2", and an underscore. The string appears to be a sequence of variable names or function calls, possibly from a programming language such as Python or MATLAB, where "Chr" is likely a function or variable name, and "k", "l", and "m" are variable names.
Chr(i3) & Chr(i4) & Chr(i5) & Chr(i6) & Chr(n)
Exit Sub
End If
Next: Next: Next: Next: Next: Next
Next: Next: Next: Next: Next: Next
End Sub
Step 3. To run the code, press the F5 key or navigate to Run > Run Macro in the menu. This will execute the script.
To unlock the spreadsheet, follow these steps: a pop-up will appear asking for a password. Press OK and the spreadsheet will become unprotected.
Method 2: Using WinRAR
To quickly remove the password protection from an Excel file and change the extension, you can use a technique that involves using a software like WinRAR. This process is a bit complex but can be done by following a series of steps.
Note: Make a copy of your protected Excel file to avoid any potential data loss or corruption issues.
Step 1. Right-click on the copied Excel file, rename the folder from .xlsx to .zip, and press "Yes" on the Rename prompt window.
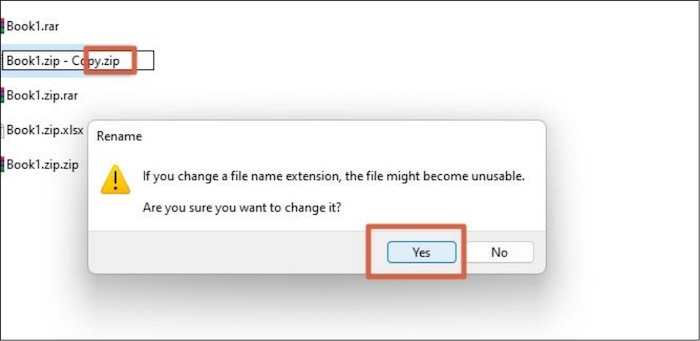
Note: To view file extensions in Windows, go to File Explorer, click on the View tab, then select Show > File name extensions, which will allow you to see the file extensions for all files.
Step 2. Double-click on your ZIP file, which will open a window showing the components of your spreadsheet. From this window, select the xl folder.
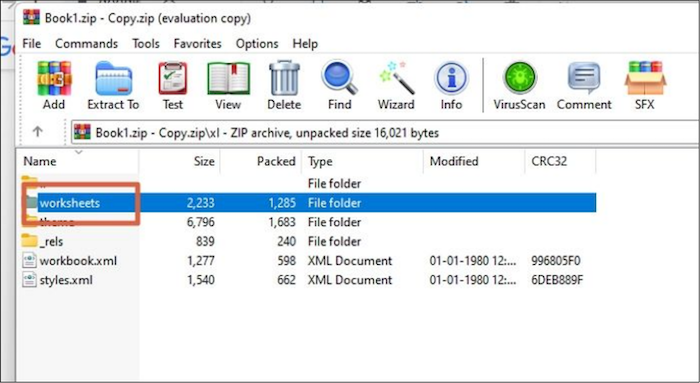
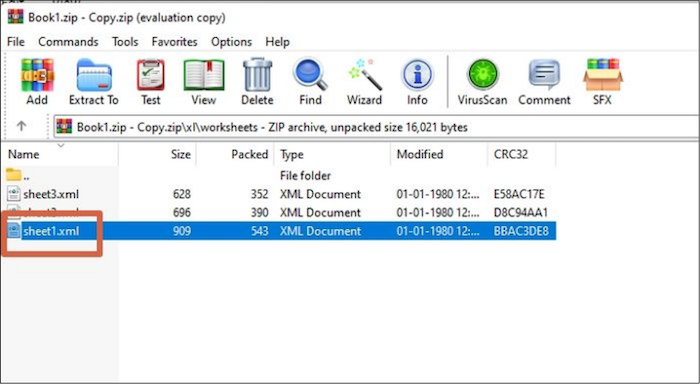
Step 3. To proceed, go to the worksheets folder, where you will find individual .xml files for each worksheet. Next, copy and paste the protected sheet from the list to your desktop.
Step 4. To view the contents of a protected Excel sheet, right-click on the protected sheet and select "Open with" followed by your preferred text editor, such as Notepad.
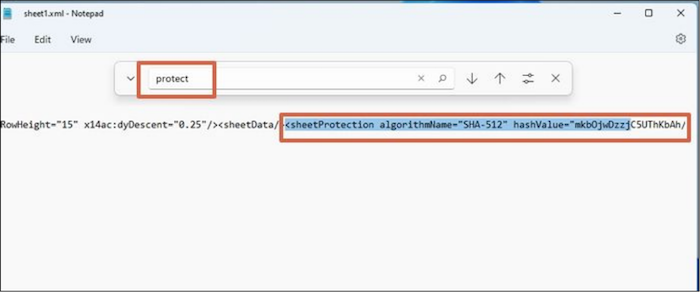
Step 5. Press "Ctrl + F" and type protect into the search bar.
Step 6. Select the code from the opening angle bracket where the word "sheetProtection" starts, including the closing bracket, and delete it.
Step 7. Close the window, and save the changes.
Step 8. Delete the old version of the XML-protected sheet from the worksheets folder.
Step 9. Copy and paste the .xml sheet, where the changes were made, back into the worksheets folder.
Step 10. Press "OK" in the Archive name and parameters window.
Step 11. Close the Excel file, rename it back to .xlsx, and press OK.
Now that the Excel file has been unprotected, you can make changes to the Excel sheet. You can now edit cells, add or remove rows and columns, and make any other changes you need to make to the Excel file.
Method 3: Open With Spreadsheet
This method only applies to Excel files that are locked only in the sheet section, and not the main file. If the main file is protected, the spreadsheet cannot be opened.
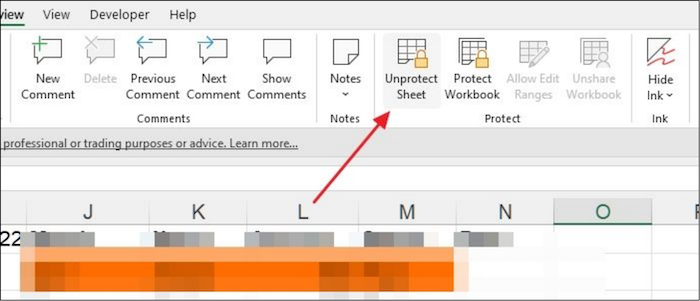
Step 1. Open your Excel spreadsheet and go to the Review tab.
Step 2. To unprotect a protected Excel sheet, click on the "Unprotect Sheet" option. A pop-up window will appear asking for the password.
Step 3. Type the password and press OK.
Your Excel spreadsheet is free of protection.
Conclusion
Businesses often use Excel files to manage finances, growth, and output, which requires secure password protection. With numerous files to keep track of, remembering passwords can be challenging. This is where password management tools come in handy, helping to securely store and generate strong passwords for all Excel files, ensuring they are protected from unauthorized access.
If you've forgotten the password to an Excel spreadsheet, don't worry, there are simple methods to help you regain access. The three methods outlined in this post can help you recover your password and unlock your spreadsheet, so you can continue working on it without any issues.
Related Articles
- How to Solve Mouse Not Working Windows 10? [Step by Step]
- [6 Quick Fixed] Computer Turns On But No Signal to Monitor
If your computer turns on but there's no signal to the monitor, it's likely due to driver or power issues. Fortunately, there are 6 simple fixes that can resolve the problem and get you back to work quickly. - [FIXED] Could Not Initialize Graphics System on Windows 10 Computer
If you're tired of dealing with the frustrating error “Could not initialize graphics system” on your Windows 10 computer, this guide covers the issue. It provides all the necessary solutions to help you resolve this issue once and for all. - 2023 Tips| Could Not Complete Your Request Because of a Program Error Photoshop
If you're experiencing an error in Photoshop due to a program error, try the suggested solutions to resolve the issue. Additionally, consider recovering your Photoshop files to a safe location using Qiling data recovery software, which can help protect your data on Windows 11/10/8/7. - SSD Not Detected in BIOS | Top 8 Ways to Fix🔥
Troubleshoot SSD not detected in BIOS with effective solutions. Follow the step-by-step instructions to learn how to fix SSD recognition and ensure smooth system operation. - Is Your SSD Slow to Load Games? Here Are New Fixes!
Fix an SSD that is slow to load games. Check drive health, free space, game files, drivers, and system performance settings.