[FIXED] Could Not Initialize Graphics System on Windows 10 Computer
The "Could not initialize graphics system" error in Windows 10 can be frustrating, especially for gamers and PC users, as it often occurs while installing or updating applications that require the Graphics Processing Unit (GPU). The GPU is a specialized processor that accelerates 3D graphics and video effects rendering, making it a crucial component for many applications.
The "Could not initialize the graphics system" error can occur due to incompatible drivers or other software issues, often resulting from a malfunctioning graphics driver that fails to communicate properly with the graphics card and display the image on the screen.
The issue might be caused by a hardware failure, such as a faulty graphics card, which can occur at any time.
During gameplay, Windows may automatically update drivers and change resolution settings, leading to incompatibility between the game and the system.
How to Fix "Could Not Initialize Graphics System" on Windows 10 Computer
1) Check if your system is up-to-date. Ensure Windows 10 is running the latest version.
- Method 1. Update Your Graphics Driver
- Method 2. Run Your Software in Compatibility Mode
- Method 3. Update Latest Windows
- Method 4. Manually Install DirectX
Let's look at how each method works in the next part.
Method 1. Update Your Graphics Driver
If you keep getting the "Could Not Initialize Graphics System" error, it's likely due to outdated or corrupt graphics drivers, which can be updated through Device Manager or your device manufacturer's website.
Guide 1. Update Through Device Manager:
Step 1: Open the Run prompt by pressing Windows + R simultaneously.
Step 2: To open the Device Manager, type "devmgmt.msc" into the empty text box, then click OK or press Enter.
Step 3: Navigate to the Display adapter on the Device Manager window, click the arrow mark to expand its menu.
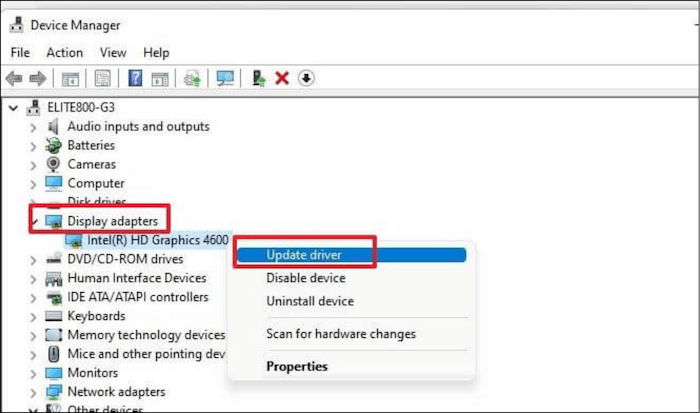
Step 4: To update the driver for a device, right-click on the device in the Device Manager and select the option to Update Driver from the context menu. This will initiate the process of searching for and installing any available updates for the device's driver.
Step 5: Allow your computer to automatically search for and install the latest driver software available, which will be done with an active internet connection.
Guide 2. Update Through Device Manufacturer's Website:
In rare cases, updating Graphic drivers through Device Manager may not always produce the desired results. To ensure 100% success, it's recommended to directly visit the NVIDIA, AMD, or Intel websites and install the most recent driver updates, bypassing any potential issues that may arise from using Device Manager.
After updating the Graphics driver, open the program/game that was displaying the error message and check if the issue has been resolved. If it has, then the update was successful and you're good to go.
Method 2. Run Your Software in Compatibility Mode
If your Windows 10 PC is having trouble initializing the graphics system, you can try running League of Legends in compatibility mode to resolve the issue. To do this, follow the steps outlined in the original text.
Step 1: Select Properties from the right-click menu of the LoL app.
Step 2: On the Compatibility tab, select "Run this program in compatibility mode for" a system.
Step 3: To resolve the issue, select the "Disable fullscreen optimizations" and "Run this program as administrator" checkboxes. This will allow you to run the game in fullscreen mode without any issues and also ensure that the game is running with the necessary permissions.

Step 4: To save the change, go to Apple > OK.
To resolve the "Could Not Initialize Graphics System" error, try closing and reopening the game. If that doesn't work, restart your computer and try launching the game again.
Method 3. Update Latest Windows
Windows 10 updates regularly improve system performance and fix existing errors and glitches, making it essential to install all available updates regularly.
Step 1. To begin, type "Updates" into the desktop search bar and select the option "Windows update settings" from the search results.
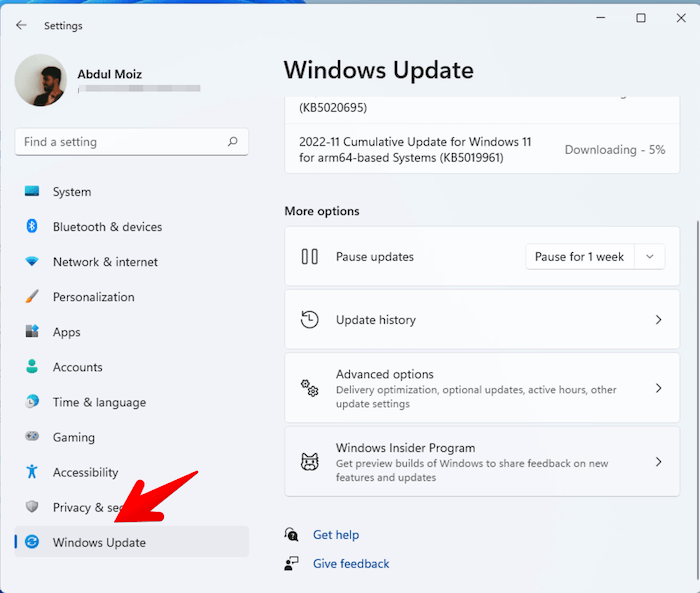
Step 2. Select the "Check for Updates" option on the next screen to search for and install all available updates on your system.
Step 3. Restart your system once the updates have been installed.
After that, re-run the relevant game to see if the issue has been resolved.
Method 4. Manually Install DirectX
Microsoft DirectX is a collection of technologies that accelerates hardware for multimedia applications such as HD videos and 3D games, and is a necessary part of the Windows operating system, with updates available through Windows updates, but manual installation of the DirectX update may be necessary if still experiencing problems.
Step 1: Download DirectX from Microsoft's website.
Step 2: To download the setup file to your computer, click the red Download button.
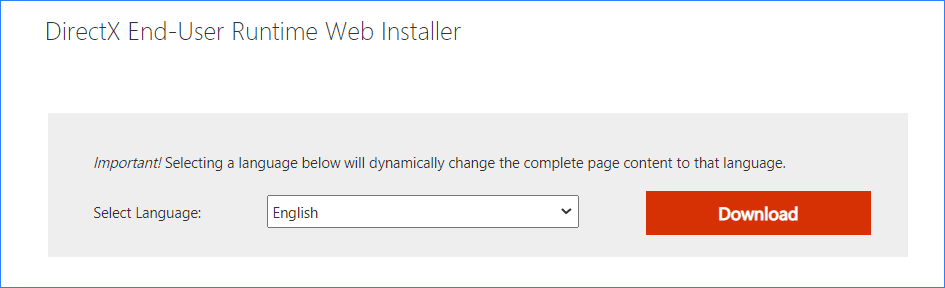
Step 3: To complete the installation process, run the dxwebsetup.exe file and follow the on-screen instructions.
Step 4: The installation process is quick and easy, taking only a few seconds to complete. Once finished, simply restart your computer to finalize the changes.
Conclusion
With the solutions provided, you can resolve this frustrating error in under 10 minutes, depending on your computer's processing speed.
Be sure to follow the steps for your chosen method carefully to ensure a smooth and uninterrupted game experience.
Related Articles
- Can I Use My SD Card as RAM on Android and Windows?
- Samsung T7 vs. T9: Which SSD to Choose?
- Can I Clone a Damaged Hard Drive [Detailed Guide]
- How to Fix Drag and Drop Not Working [8 Ways Included]
The Windows drag-The and-drop feature allows for quick movement of objects across the OS, streamlining tasks. However, users may encounter a drag and drop not working error, which can be frustrating. Fortunately, this issue can be resolved, and the article provides a solution and an additional layer of data protection. - What Does Wipe Cache Partition Mean and How to Wipe the Cache Partition
Transform your PC with a quick cache partition wipe! Our step-by-step guide shows you how to clear temporary system files and troubleshoot any issues for improved performance. - What Is MBR2GPT and How to Use It on Windows 10 [Full]
I have rewritten the text in one paragraph as per your request)