How to Fix Checking File System on C Error on Windows 7/8/10/11 Startup
Problem with PC Startup: Checking File System on C
Encountering the issue of checking the file system on C at startup can be frustrating, especially when it leads to system crashes. To avoid this, it's essential to shut down your PC properly by pressing the power button or unplugging the power cable. Restarting your Windows PC afterwards may display the error "checking file system on C," which can jeopardize your hard drives if you power on or off directly.
The error message causes damage to the PC's data and prevents it from booting normally. While checking the file system on C is a natural step, if the issue persists every time the PC is booted, it's best to stop checking the C file system. However, there are methods to fix the issue.
Causes of Checking File System on C on Windows 7/8/10/11
To fix the Checking File System on C error, it's essential to understand its causes. When you encounter this issue, fixing the checking file system on C is a must!
Here are the 3 reasons why users may see the onscreen error message in one paragraph:
Reason 1. Power outage causes the error message
The "checking file system on C" error on Windows PC can occur after a power outage, which may be caused by a planned interruption in electricity supply, equipment failure, or natural weather conditions, resulting in the PC shutting down and then displaying the error message upon restart.
Reason 2. File system damage
Checking the file system on a C drive on Windows can also be caused by file system damage, which can be contained by following these steps.
Step 1. To access the properties of the C drive, double-click the "Computer" icon on the desktop, search for the C drive, and then right-click on it to select "Properties".
Step 2. Click the "tools" option and the "check now" button.
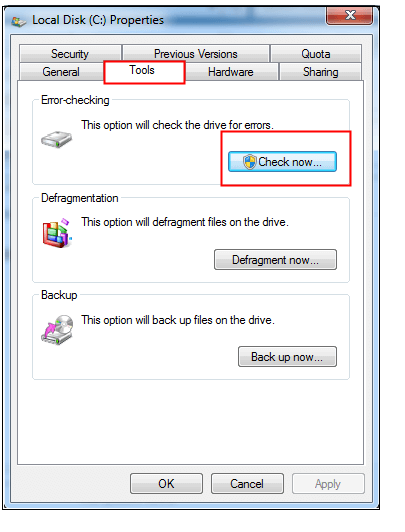
Step 3. A pop-up window will open, where you need to tick before "Fix the system errors automatically" and click on the "start" button.
Reason 3. Bad sectors
A bad sector on a computer's hard drive is a sector that has become corrupted and can no longer store or retrieve data. If the C drive has no file system issues, checking for faulty sectors is a good option, which can be done quickly and easily using a comprehensive disc management program. Such a program can also provide additional features like partition alignment and cleaning, making it a convenient and all-inclusive solution.
4 Solutions to Fix Checking File System on C on Windows 7/8/10/11
Here are the top 4 solutions to fix the checking file system on C:
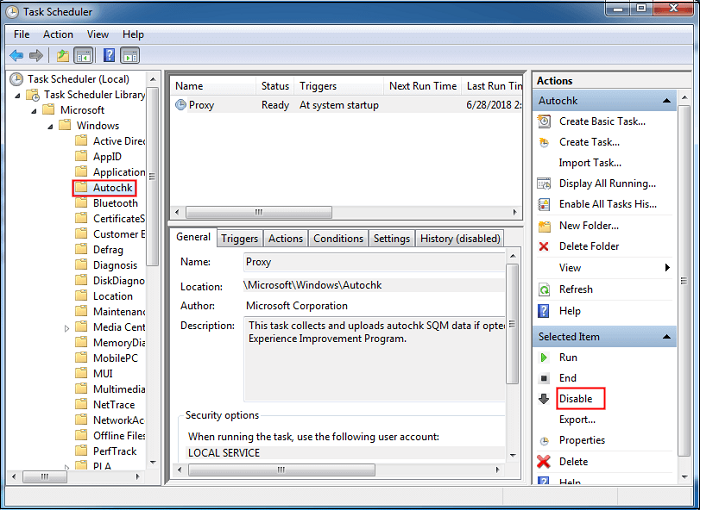
To eliminate the checking file system on the C issue on a Windows PC, you can disable Autochk.exe from the scheduled tasks list. This involves going to the Task Scheduler, navigating to the Task Scheduler Library, and deleting the "Autochk" task. Alternatively, you can also disable it by going to the Command Prompt as an administrator and running the command "schtasks /delete /tn "Autochk" /f". This will remove the scheduled task and prevent the system from checking the file system on the C drive.
Method 1. Using Control Panel
Step 1. To access the Device Manager, start by hitting the start button, then click on the Control Panel. From there, navigate to "System and Security" and select "Administrative Tools."
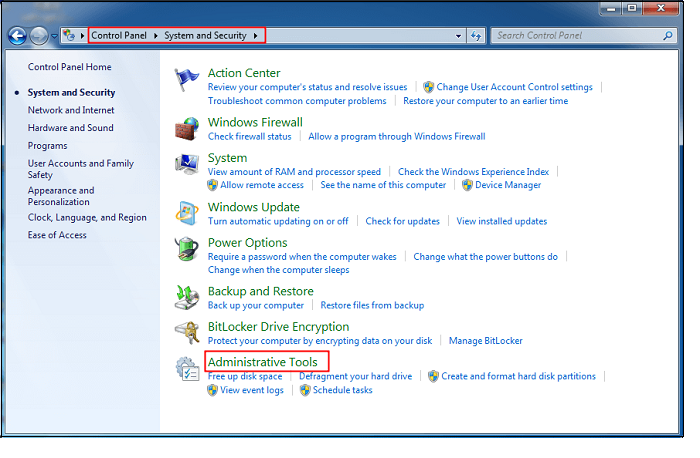
Step 2. To proceed, double-click the Task Scheduler and search for Autochk in the pop-up window, then click it and select "Disable" from the right-side panel.
Method 2. Check the Session Manager Registry Entry
To fix the "Checking File System on C" issue on Windows 7/8/10/11, disable the automatic checking file system on C through the registry editor. You can do this by following these steps:
Step 1. To open the Registry editor, press Windows Key + R, type "Regedit" and hit Enter or click "OK".
Step 2. To move to the next path, expand the entries in the left-hand pane.
HKEY_LOCAL_MACHINE\SYSTEM\CurrentControlSet\Control\Session Manager
Step 3. Double-click on BootExecute, located in the right-hand pane.
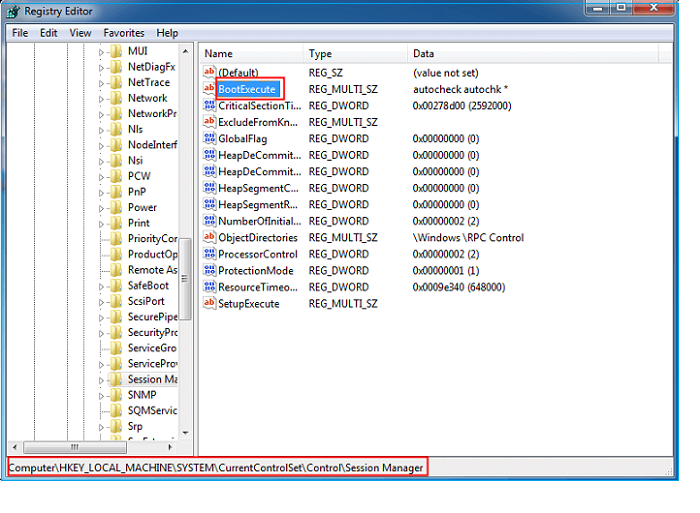
Step 4: To change the key's default value, add /K:C at the end of the command in the pop-up window and click "OK".
Step 5: You should shut down the "Registry Editor."
Method 3. Disable the automatic checking file system on C through the registry.
Follow the steps below to disable the automatic checking file system on C through the registry:
Step 1: Hit the start button, and in the search box, type "Regedit."
Step 2: You must rummage for this registry key:
HKEY_LOCAL_MACHINE\SYSTEM\CurrentControlSet\Control\Session Manager
Step 3: Double-click on BootExecute in the right-hand pane.
Here, autochk or autocheck is the key's default value, which means every drive is verified for consistency. To turn off autocheck on the C: disc when Windows starts, simply put /K:C before *, resulting in the final value of autocheck autochk /k:C *.
If you want to add more drives to autocheck, the key should look like this: autocheck autochk /k:C /k:D *, after disabling drives C and D.
To reset the system to its default state, replace the current key with the default key, which is "autochk autocheck*". This will restore the system to its original settings, reverting any changes made.
Method 4. Run CHKDSK to file Windows file errors
To resolve the "checking file system on C" error, you can check the disk to locate and fix the issues. Alternatively, you can run the CHKDSK check to automatically fix Windows file errors. To do this, follow the steps below.
Step 1. To open Command Prompt (Admin) in Windows, you need to press the Windows key + X and then select Command Prompt (Admin) from the menu. This will open a command prompt with administrator privileges, allowing you to run commands that require elevated permissions.

Step 2. Press "Enter" right after typing "chkdsk /f c:".
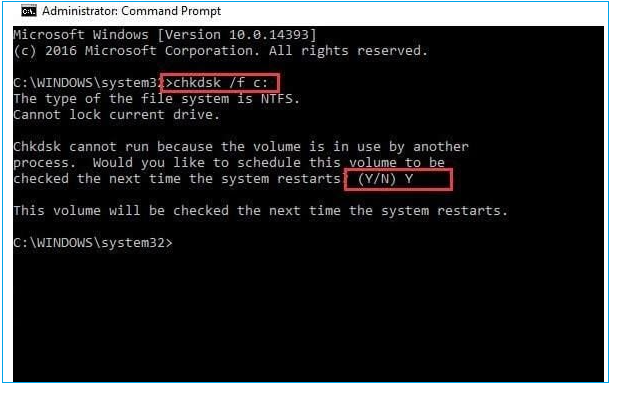
Step 3. Don't forget to type in "chkdsk C: /r".
If you're experiencing a problem, try the troubleshooting steps provided. If these don't resolve the issue, don't give up - there are other potential solutions available.
Further Solution: Recover Data When the File System Corrupts
When running SFC and CHKDSK, files may unexpectedly disappear, especially after inspecting a faulty file system, which can lead to significant data loss. To prioritize data security, users may find it helpful to utilize a specialist data recovery program, particularly if they're using Windows.
You can download the effective data recovery software Deep Data Recovery, which helps recover data lost due to file system malfunction, system crashes, and accidental file deletion.
Deep Data Recovery
- Formatted recovery: Qiling allows you to recover data from any type of storage device, including SSDs, flash drives, HDDs, and USB drives.
- Damaged HDD recovery: With the support of the Deep Data Recovery, you can recover data from a dead hard drive.
- Deleted file recovery: If you accidentally delete a file, don't worry - the lost files are retrievable with a professional recovery tool.
To retrieve data from a corrupted hard drive, you can create a WinPE bootable CD or DVD and use Deep Data Recovery. This process involves creating a bootable media, which can be used to boot your computer and access the corrupted hard drive. The detailed steps for this process are available, but essentially, you'll need to create a bootable CD or DVD using a tool like Deep Data Recovery, which will allow you to access and recover data from the corrupted hard drive.
Step 1. Create a bootable disk
To prepare the USB, first copy any important data from it to another device, as creating a bootable disk will erase the existing data. Once the data is safely transferred, you can use Deep Data Recovery WinPE Edition to create a bootable disk on the empty USB.
Connect a USB drive to your PC, then launch Deep Data Recovery WinPE Edition. From there, select the USB drive and click "Create" to create a bootable disk.
Step 2. Boot from the bootable USB
Connect a bootable disk to a PC that won't boot, then change the computer's boot sequence in the BIOS settings, which can usually be accessed by pressing F2 at startup. This should allow the PC to restart and potentially boot from the disk.
To boot your PC from a device other than the hard drive, press F10 to save and exit the BIOS settings, then select "Removable Devices" (bootable USB disk) or "CD-ROM Drive" (bootable CD/DVD) as the boot priority.
Step 3. Recover data from a hard drive that won't boot
When you boot from a USB, you can run Deep Data Recovery from the WinPE bootable disk, select the drive to scan to find all lost files.

Click "Scan" to start the scanning process.

After scanning, you can preview all recoverable files, select the targeted files, and click "Recover" to restore your files, saving them to another place to avoid data overwriting.

Final Thoughts
With the solutions above, you can quickly resolve the file system on C error on your Windows PC. However, despite the answers, there's a risk of data loss, so it's essential to have premium data recovery software to retrieve files. Deep Data Recovery is the best option as it helps reduce disk space with its features.
Fix Checking File System on C FAQs
What are the key factors to consider when choosing a home security system?
1. How do I know if FAT32 or NTFS?
To determine the file system format of a drive, open "My Computer or PC," right-click the drive, and select "Properties." The file system format will be listed in the Disk Properties window.
2. How to stop checking the file systems on c Windows XP?
To access the registry and find the specified key, select the Start menu, type "regedit" and select it to open the Registry Editor. Navigate to "HKEY_CURRENT_USER\Software\Microsoft\Office\16.0\Word\Options" and click on it to select it.
To modify the HKEY_LOCAL_MACHINE\System\CurrentControlSet\Control\Session Manager\BootExecute registry key, click on the Start button, then type "regedit" in the search bar and press Enter. In the Registry Editor, navigate to HKEY_LOCAL_MACHINE\System\CurrentControlSet\Control\Session Manager\BootExecute. Click on the Edit menu, then select Modify. In the Value data field, enter "autocheck autochk" and press Enter.
3. How to disable disk check Windows 7 startup?
To disable disk check on Windows 7 startup, you can use the chkntfs command. Start by hitting the "Start" button and typing "command prompt," then right-click on the command prompt and select "Run as Administrator."
4. How to fix checking the file system on C Windows 7 every boot?
Follow the steps below:
- Step 1. To access the C drive properties on a Windows 7 desktop, double-click the "Computer" icon, search for C drive, right-click on it, and select "Properties".
- Step 2. Hit the "Tools" tab and, after that "check now" button.
- Step 3. Select the option to automatically resolve file system faults and click the "Start" button in the pop-up window.
5. How long does checking the file system on C take?
Checking the file system on C usually takes over 2 hours due to the drive's size and the errors found.
Related Articles
- How to Make PRAM Reset Mac? [Updated 2023]
- What Is Chrome.exe *32 and How to Remove Chrome.exe *32 Malware
- [3 Solutions] Fix Word Not Opening on Mac
- (4 Solutions) How to Fix Windows 7 Startup Repair Not Working
- Chromebook vs. Laptop, Which One Should I Pick? [Full Guide]
Are you struggling to decide which device is better for using, Chromebooks or laptops? So you are engaged with the informative article that contains the apparent crystal differences between them and helps you to choose the right one. - What is a Client Server Network? How Does It Work?
In this article, you will learn about the client server network and how the model operates.