How To Change Startup Programs on Windows 10? [Updated 2023]
You may be sacrificing your PC's performance for unimportant programs without realizing it. Some programs run automatically at startup without your action, consuming memory and CPU power and affecting speed. However, you can easily change this by adjusting the startup programs on your computer, stopping unnecessary ones from running and adding important ones to the list, freeing up resources and improving overall performance.
To change startup programs in Windows 10, you can start by modifying the programs that launch automatically when the computer boots up. This can be done by accessing the Startup folder, where you can add or remove programs from the list of startup items. Additionally, you can identify and disable any startup programs that may be slowing down your PC, and enable only the ones that are necessary for a smooth startup experience.
Startup Programs That slow down your PC
If your Windows 10 computer takes a while to boot up, it's likely because many programs are trying to start up simultaneously, slowing down the process. Be aware of applications that can cause this delay, such as those listed below, and consider disabling or uninstalling them to improve your computer's startup speed.
- Zoom: For an application not used daily, it's optional to add it as a startup program in Windows 10, allowing you to manually enable it only when needed, such as for meetings.
- Chat Applications: While Skype, Slack, and other chat applications are excellent, you can have them outside your startup programs. You might want to disable it.
- Cloud Storage: If you're not a heavy user of programs like OneDrive, Google Drive, and Dropbox, it's okay to exclude them from your startup programs.
To backup your files from or to OneDrive, you can refer to the article "How to Backup OneDrive?" which provides detailed information on the process.
- Google Chrome: Having Chrome under your startup apps is unnecessary, as it consumes more resources and slows down your system.
- Adobe Applications: If you're not a creative user, you don't need to allow applications like Reader and Acrobat to run on startup, as they will automatically add themselves to the startup folder. This is because they are part of the Adobe Creative Cloud family, which has this feature built-in.
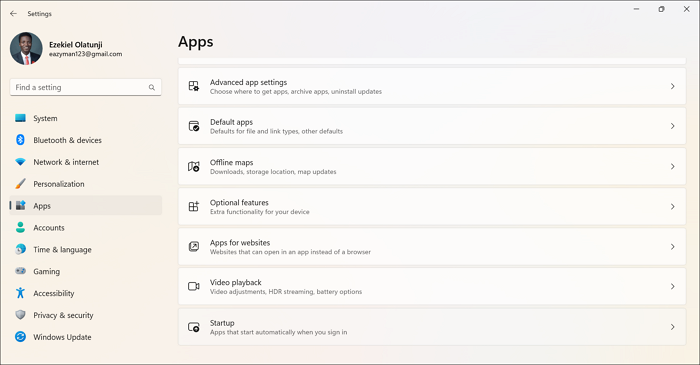
How to Change Startup Programs Windows 10 in Settings
If you're experiencing slow startups on your Windows 10, you can resolve the issue by managing your programs through simple steps.
Step 1. Click on the Start button at the bottom left corner of the screen and select "Settings."

Step 2. Search Apps and select "Startup."
Step 3. Windows allows you to sort applications by their impact, making it easy to manage which ones run at startup. You can simply turn on or off any app you want to run at startup or not.
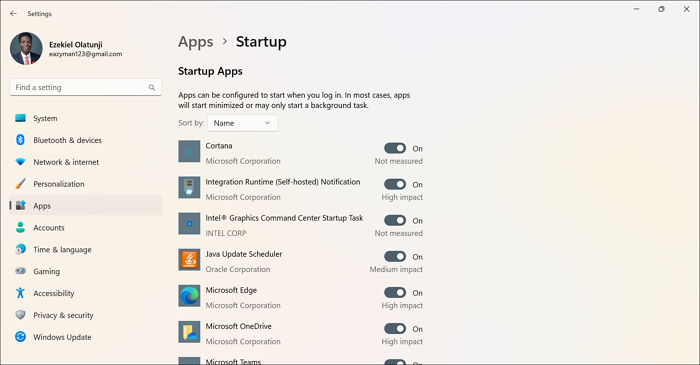
To run apps automatically at Windows startup, go to Settings, then select the "On" status for the desired app, which will then be added as a startup program.
How to Enable or Disable Startup Programs in Task Manager
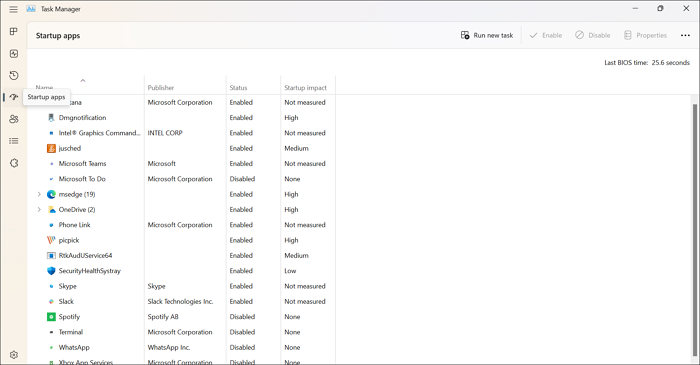
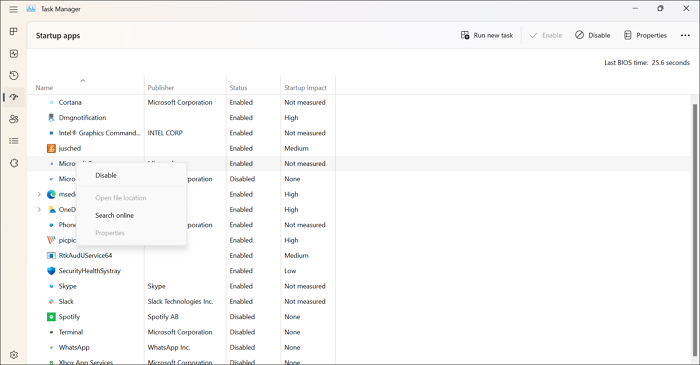
To access the startup menu in Windows 10 Task Manager, open the Task Manager, click on the "Startup" tab, and you will see a list of applications that are set to run at startup. From there, you can enable or disable any application that you want to run on startup. This is a convenient way to manage which applications run automatically when you start your computer.
Step 1. Open Task Manager by pressing Ctrl +Shift + Esc or by right-clicking on the taskbar and selecting "Task Manager".
Step 2. To view all startup programs, click on the "Startup" tab.
Step 3. Right-click the app you wish to change and select "Enable" or "Disable" to enable or disable the startup program.
How To Change Startup Program in Startup Folder
To add a program to the Startup folder, simply right-click on the program's shortcut, select "Copy" from the context menu, navigate to the Startup folder, right-click and select "Paste" to add the program to the Startup folder, and then click "OK" to confirm. This will run the program every time you start your computer. Alternatively, you can also drag and drop the program's shortcut into the Startup folder to add it. This way, you can easily add programs to the Startup folder and have them run automatically when you start your computer.
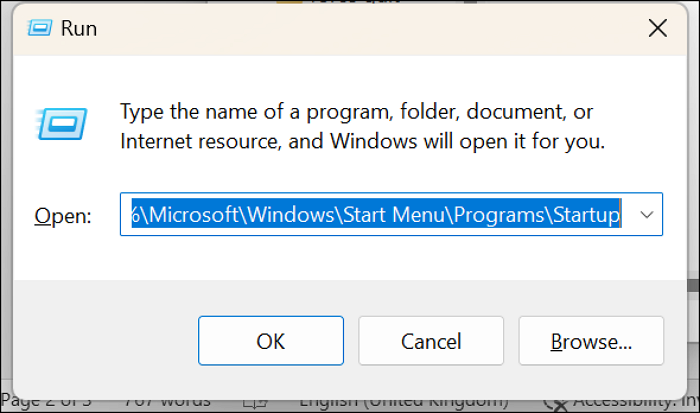
Step 1. To access the startup folder, press the Windows Key + R to open the Run dialogue, then type in '%AppData%\Microsoft\Windows\Start Menu\Programs\Startup' or simply 'shell:startup' and press Enter. This will open the startup folder, where you can add or remove programs that run automatically when you start your Windows computer.
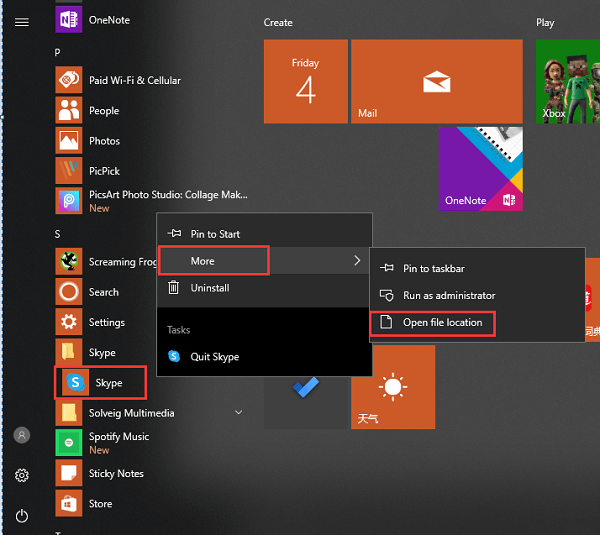
Step 2. To set an app to launch at startup, open the Start Menu by clicking the Start button, and find the app you want to launch at startup. Right-click the program, then select "More" and finally "Open File Location". This will open the app's installation directory in File Explorer.
Step 3. To locate the shortcut to the app on your PC, select "More" and then "Open the file location".
Step 4. Copy and paste the program shortcut to the startup folder, and the app will be launched automatically next time you start your computer.
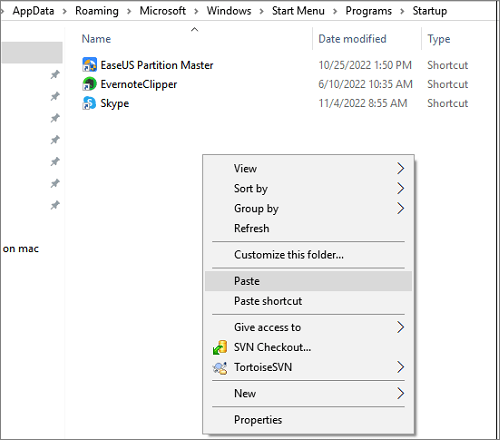
To avoid having to manually open the program every time you reboot, you can add a shortcut to the Startup folder, and to remove a program, simply delete the shortcut from that folder.
Third-Party Startup Managers
The inbuilt startup managers on Windows 10 may not be effective, requiring more advanced features and functions, which can complicate startup management.
With the help of third-party startup manager software, you can better manage your startup applications and take advantage of additional features, making it easier to control what launches at startup.
Conclusion
Taking control of your Windows 10 startup programs is vital for your computer to keep running smoothly, helping both yourself as a user and reducing unnecessary load on your PC, ultimately boosting its overall performance.
Related Articles
- C Drive VS D Drive: What Are the Main Differences?
- How to Fix Checking File System on C Error on Windows 7/8/10/11 Startup
- 8 Fixes for WD External Hard Drive Slow Transfer Rate in 2022 [New]
- [Solved] System Image Recovery Not Showing
- How to Enter BIOS in Windows 10/11 on HP, Dell, Lenovo, Acer, Asus
To enter the BIOS on Windows 10 or Windows 11, the key you press varies depending on your computer's manufacturer. Here's a brief rundown: HP: F10, F2, or F12; Lenovo: F1, F2, F11, or F12; Asus: F2, F9, or Del; Dell: F2, F9, or F12. Simply restart your computer, and as soon as the boot screen appears, press the corresponding key to access the BIOS settings. Note that some newer computers may have a different key or require a specific button press combination. Refer to your computer's manual or manufacturer's website for specific instructions. - How to Find Autodesk Product Key? Answer Is Here!
Want to find Autodesk product key? Locating any key of existing software can be easily extracted by a product key finder. Moreover, if you prefer to take the manual and free options, you are lucky to read this article. All methods we marked are available for Windows 11.