What Is Wake on LAN and How to Enable Wake on LAN in Windows 10
To have your computer ready when you arrive at your home office, you can use an app that lets you remotely launch the necessary software and boot your computer with a single button press on your mobile device. This way, your computer will be ready to use when you arrive, saving you time and effort.
To activate your computer using Wake-on-LAN, you'll need to set up the feature on your router and on the computer itself. This involves enabling the WoL feature on your computer's BIOS settings and configuring your router to send the Wake-on-LAN magic packet. You can then use a utility like WakeMeOnLan to send the magic packet from another computer, a Mac, or even a smart speaker, allowing you to remotely turn on your computer without physically touching it. This method is useful not only in the office but also in the living room, making it a convenient option for those who want to access their computer without getting up.

What Is Wake on LAN
Wake-Wake-on-LAN (WoL) is a protocol that allows computers to be remotely awakened from a low-power state, also known as "off" but still accessible via electricity. This feature supports Wake-on-Wireless-LAN, enabling devices to be powered on remotely over a wireless network.
A network administrator can remotely switch on a computer or wake it from hibernation using Wake on LAN, saving time by not having to physically visit each machine in the network. This allows a server with network management software to send a wake-up frame or packet to a client system, enabling remote repairs and maintenance.
What Are the Requirements for Wake on LAN
If you want Wake-To get a LAN (Local Area Network) to work, you need to ensure that all devices are connected to the same network switch, and that the switch is connected to a router which is then connected to the internet. Additionally, you need to configure the network settings on each device to match the settings on the router, and make sure that the router is properly configured to assign IP addresses to devices and provide internet access.
· To enable Wake-on-LAN, the machine's network adapter and BIOS must be configured to react to wake-up packets. This involves setting the network adapter to allow wake-up packets and configuring the BIOS to wake the machine from a power-off state when it receives a wake-up packet.
· Adapters must support Magic Packet. Configure remote machines' network adapters for information.
· Older motherboards may require a WAKEUP-LINK header connected to the network adapter via a 3-pin cable, but newer systems with PCI 2.2 compliant network adapters can use the PCI bus to send standby power, eliminating the need for a Wake-on-LAN line. Additionally, PCI-2.2 supports PME (Power Management Events), allowing adapters to transmit and receive signals via a PCI socket.
· Machines should use an ATX power supply that meets the ATX 2.01 specifications.
· To use Wake on LAN (WOL), the target machine must be in a shut down state, not switched off, and with the AC adapter still plugged in. Additionally, the machine won't respond to WOL if it experiences a power failure during shutdown. Furthermore, network adapter settings need to be adjusted to allow WOL to work on machines that are in sleep or hibernate mode.
How to Enable Wake on LAN in Windows 10
To enable Wake on LAN in Windows 10, follow these steps: First, go to the Start menu and search for "Device Manager." Open the Device Manager and expand the "Network Adapters" section.
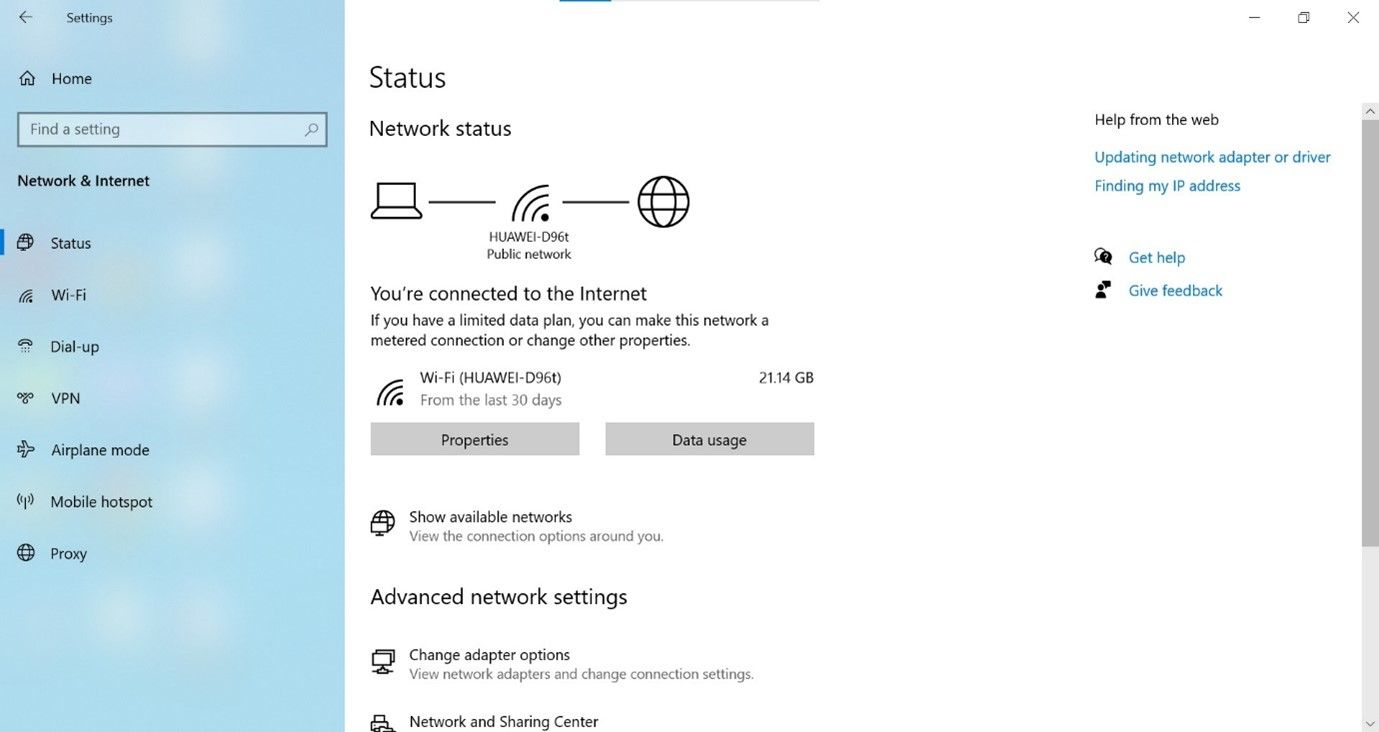
Step 1: Open Settings.
Step 2: Go to the Network and Internet tab.
Step 3: Select "Status" from the menu.
Step 4: To change the adapter options, click on the "Change adapter options" link in the "Advanced network settings" subheading. This will open the Network Connections window, where you can select the adapter you want to modify and click on the Properties button to access the adapter's settings.
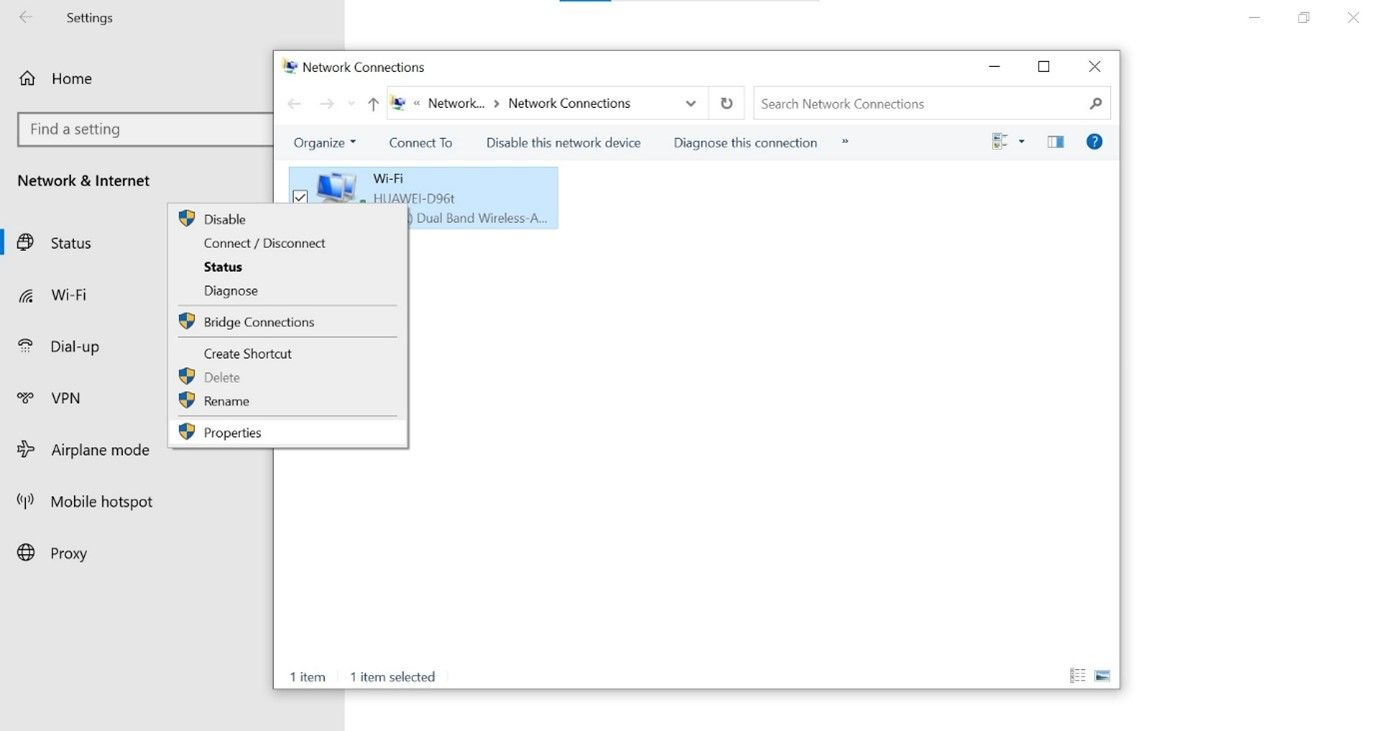
Step 5: To access the Select Properties option, right-click on the current network adapter and select Properties from the context menu that appears.
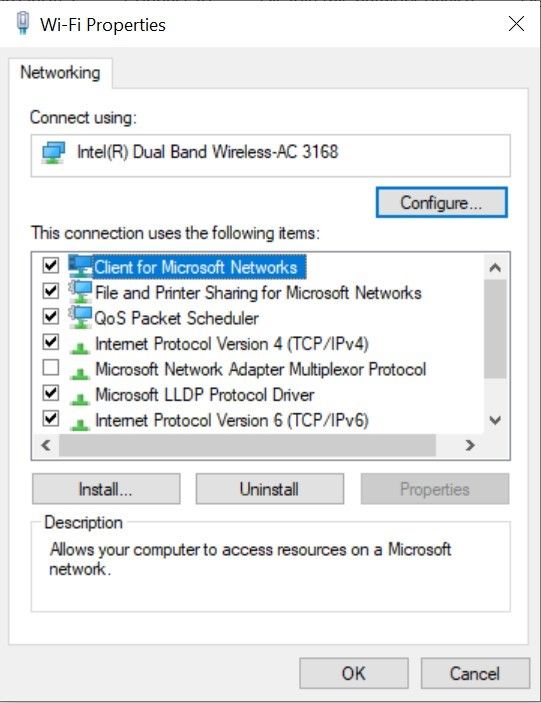
Step 6: To access networking features, choose the appropriate tab.
Step 7: Just hit the Settings tab.
Step 8: Choose the "Advanced" menu item.
Step 9: Awaken on Magic Packet should be chosen.
Step 10: Select the Enabled option from the "Value" drop-down menu.
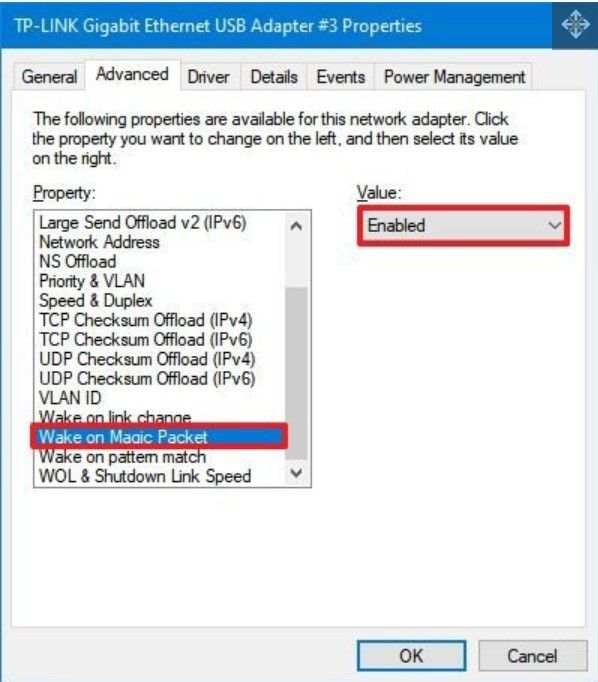
Step 11: A wake-on pattern match is an available option.
Step 12: Select the Enabled option from the "Value" menu.
Step 13: It is optional to choose the WoL & Shutdown Link Speed setting.
Step 14: Select 10Mbps from the "Value" drop-down menu.
Note: If you're using a Realtek network adapter, you might need to adjust some supplementary settings.
Step 15: The Power Management menu item must be selected.
Step 16: Select the box labeled "Let this device wake the computer"
Step 17: Set the computer to wake up only if it receives a "magic packet" and click the box. This is a feature that allows the computer to wake up from sleep or hibernation only when it receives a specific signal, in this case, a "magic packet".
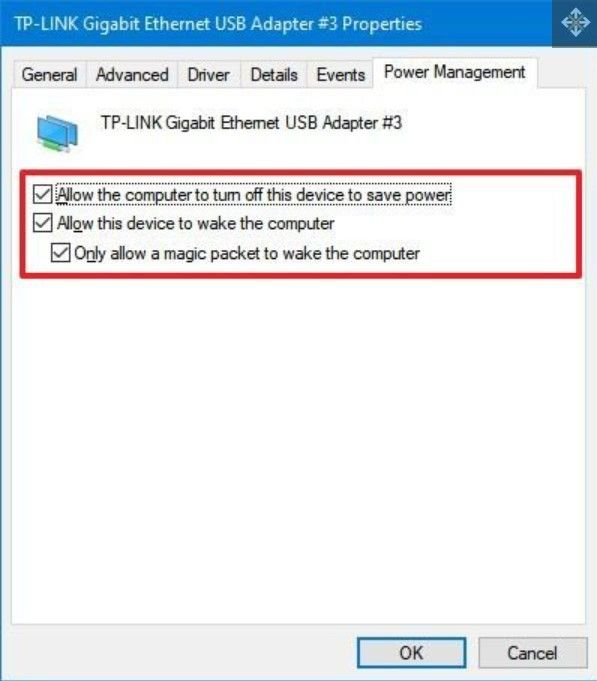
Step 18: To proceed, choose the OK button.
When you're done, your device will be prepared to receive the remote magic packet from an external program.
If you don't want to use Wake on LAN, you can turn it off by following the same steps, but selecting "Disabled" in step 9, or you can disable it in your device's firmware by following the manufacturer's instructions.
Conclusion
When a network adapter detects a Wake on LAN (WOL) event, it can wake a computer from a low-power state, typically using an Ethernet packet with specific formatting. The default action in response to WOL events differs between Windows 7 and 10.
Related Articles
- Fix Computer Slow after Windows 10 Update | Speed Up PC in 6 Ways
- 7 Best Ways to Fix CD/DVD Missing or Not Showing Up in Windows 10/8/7
- Should You Compress Backups or Not [Pros & Cons]
- Brand New Ways to Reset/Erase Mac M1/M2 [Safe & Sound]
- How to Open Task Manager on Windows 10/11
Task Manager is a display center for running applications, allowing you to view and stop apps that are currently running. You can access Task Manager in various situations on Windows 10 or 11 through simple methods. - How to Recover Data from SD Card Formatted As Internal Storage
When you adopt an SD card as the internal memory of Android, the card is encrypted and the data is completely erased. If you did not back up photos or other important files on the SD card, recover data from SD card formatted as internal storage with third-party data recovery software.
Products
Articles & Tutorials
- Data Recovery
- Data Backup
- File Recovery
- File Backup
- System Backup and Restore
- Disk and Partition Clone
- Technical articles
- Mobile articles
- Disk Master Help
- Windows Data Recovery Tutorials
- Windows Secure Delete Tutorials
- Windows Partition Management Tutorials
- Windows File Backup and Restore Tutorials
- Windows System Backup and Restore Tutorials
- Windows Disk Backup and Restore Tutorials
- Windows Clone Tutorials