How to Install macOS Ventura on Unsupported Mac with OpenCore Legacy Patcher
You can install macOS Ventura on an unsupported Mac using OpenCore Legacy Patcher, which requires just four simple steps. To get started, click the link to skip to the target parts.
| Four Steps | Step-by-step Troubleshooting |
|---|---|
| 1. macOS Ventura Resource | You can download the most recent developer beta from the Apple Developer website...Full steps |
| 2. macOS Ventura Bootable USB | Your computer must be connected to the storage device. Open Disk Utility...Full steps |
| 3. OpenCore Legacy Patcher | On your macOS, launch OpenCore Legacy Patcher. On the main...Full steps |
| 4. Boot and Install macOS Ventura | When the Mac resumes, continue to press and hold the option key...Full steps |
Why Should I Upgrade to macOS Ventura
Apple's release of macOS Ventura on June 6, 2022, has taken the MacBook experience to a whole new level, thanks to its numerous beneficial features. This premium upgradation has undoubtedly enamored Apple lovers, elevating the overall experience of MacBook to a brand-new standard.
Upgrading to macOS Ventura allows you to take advantage of new features like Stage Manager, passkeys, and Continuity Camera, which enables your iPhone to be used as a webcam, among other convenient features.
If you're tired of using the same Apple interface for years, installing macOS Ventura on unsupported Macs can give your productivity a boost. To do this, you'll need to follow a process to install the operating system on machines not originally designed for it, which can be a bit of a challenge. Additionally, if you're worried about losing important data during the installation process, there are ways to retrieve it.
The video about installing macOS Ventura on unsupported Macs is available, and the key points are outlined here.
- 00:38 A brief introduction before we started
- 03:48 Download and USB setup
- 15:19 Install macOS Ventura
- 21:35 Install the necessary patches for your Mac
Unsupported Macs That can Run macOS Ventura
These are the unofficial Macs that support the latest macOS version, but the following unsupported Mac models are listed in the OpenCore Legacy Patcher and available on Apple's official site. However, the lists of unsupported Macs that can operate macOS Ventura include: 1, 2, 3, 4, 5, 6, 7, 8, 9, and 10. Note that these models are not officially supported by Apple. The OpenCore Legacy Patcher provides a way to run macOS Ventura on these unsupported Macs.
- iMac 14,1 (21.5″)
- MacBookPro5,1 (15″)
- MacBookPro8,2 (15″)
- iMac 14,3 (21.5″)
- MacBookAir7,x
- MacMini4,1
- MacBookPro6,1 (17″)
- MacBookPro7,1 (13″)
- MacBookAir4,2 (13″)
How to Install macOS Ventura on an Unsupported Mac
Installing macOS Ventura on unsupported Macs requires some tricks. You can quickly install it on older Macs using OpenCore Boot Manager, and this guide will show you how to do it on an unsupported Mac with OpenCore Legacy Patcher.
1 - Download macOS Ventura Resource on Unsupported Mac
To install macOS Ventura, start by obtaining the installation file for your macOS Ventura. You can get the latest version of macOS Ventura through various means, such as .
If you have an Apple Developer Program login, you can download the most recent developer beta from the Apple Developer website.
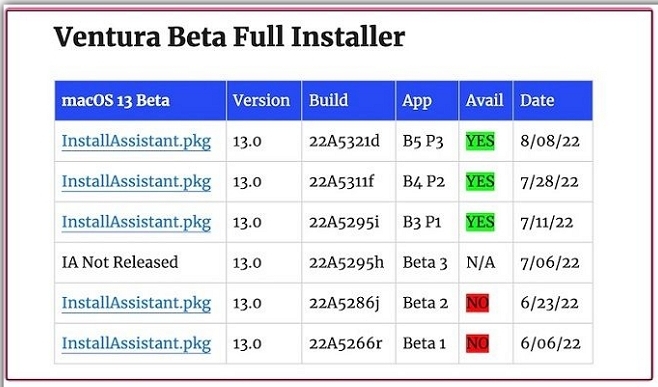
You can get the Ventura beta download links from Mr. Macintosh without an Apple Developer account, but the download will take around 11 GB and some time.
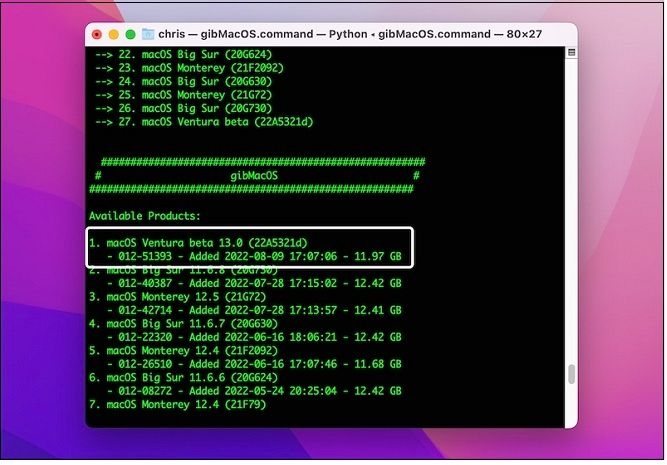
To download macOS Ventura, you can use the gibMacOS download tool, a python-powered script that allows you to download several macOS versions on your Mac or PC. Simply download the project from Github, unzip it, and run the.command or.bat script to launch the program. Switch the default setting to developer, and you'll find a button to download macOS Ventura on the home screen.
2 - Create macOS Ventura Bootable USB to Install
To create a bootable USB drive for Mac, you'll need to download the macOS Ventura Installer program, which should be around 12GB in size, and then use the Terminal app to create a bootable USB drive. You can do this by running the command `sudo /Applications/Install\ macOS\ Ventura.
Method 1: Eliminate your storage device
Step 1. Your computer must be connected to the storage device.
Step 2. Open Disk Utility, and choose your storage device from the left sidebar.
Step 3. On Disk Utility's top menu bar, select Erase.
Step 4. To change the disk's settings, select a new name for the disk, choose "Mac OS Extended (Journaled)" in the "Format" dropdown, and select "GUID Partition Map" in the "Scheme" dropdown.
Step 5. You can confirm your actions by clicking the Erase button.
Method 2: Make your storage device a bootable installer by running command lines
Step 1. To open Terminal using the Spotlight Search, press `Cmd + Space` to bring up the spotlight search bar, type "Terminal" and press `Enter`. This will open the Terminal application.
Step 2. In the Terminal window, enter the aforementioned command strings:
sudo /Applications/Install\ macOS\ Ventura.app/Contents/Resources/Createinstallmedia – volume /volumes/voluems name
Step 3. To secure your activities, enter the password for your admin account and press Y.
Step 4. Once the process is complete, the partition's name will be changed to "Install macOS Ventura".
3 - Download OpenCore Legacy Patcher and Install EFI Disk
The steps to download OpenCore Legacy Patcher are given below:
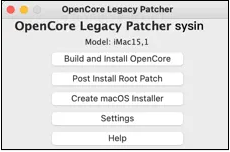
Step 1. On your macOS, launch OpenCore Legacy Patcher.
Step 2. On the main page of the OpenCore Legacy Patcher, click settings.
Step 3. During the installation process, select the "Verbose" option to provide detailed information for debugging purposes. This allows for more accurate troubleshooting and issue resolution.
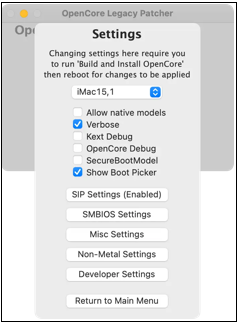
[N.B: Remember to ignore and untick this Verbose option if certain Mac models experience issues when you enable it.]
Then we will start the installation work.
1. Create and Install OpenCore
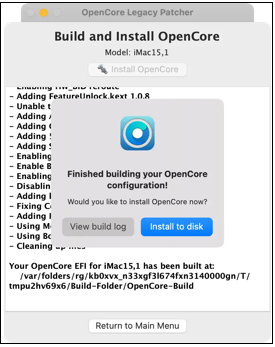
Step 1. To proceed, select the "Build and Install OpenCore" option from the main interface of the OpenCore Legacy Patcher.
Step 2. In the fresh popup, click the Build OpenCore button.
Step 3. Following a successful build, select "Install OpenCore" and then select "Install to Disk".
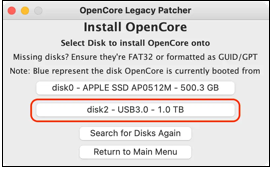
Step 4. The correct disc to install OpenCore on should be selected from the list of available discs, taking care to distinguish between the Macintosh HD (Disk 0) and the external storage device (Disk 2) with the factory-installed partition. Other discs may also be listed if they are inserted into the device.
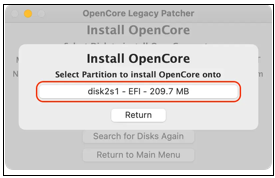
Step 5. To confirm your actions, opt for EFI.
2. Launch the macOS Installer and OpenCore
Step 1. When you restart your Mac, hold down the Option key until a boot screen with various options appears.
Step 2. When using the EFI Boot characters option, select the OpenCore icon using the keyboard and mouse.
![]()
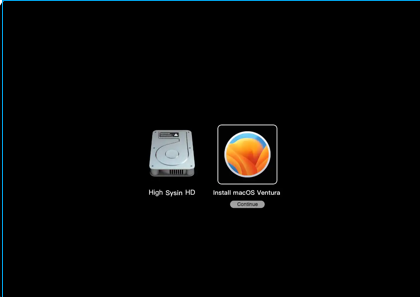
Step 3. You can see the OpenCore Picker on your screen because you successfully uploaded OpenCore here.
Step 4. After selecting Install macOS Ventura in the wizard, you reach the standard boot screen.
4 - Boot and Install macOS Ventura on Unsupported Macs
You can now boot into macOS Ventura using OpenCore Picker. If bootup issues arise, press and hold the Option key until the EFI Boot option with the OpenCore icon appears, then choose the grey hard drive with the Macintosh HD by default.
How to Install macOS Ventura on Unsupported Mac
To install macOS Ventura on an unsupported Mac, you can use OpenCore, but be aware that this process will erase everything on your device. The installation steps involve using OpenCore.
Step 1. When the Mac resumes from sleep, press and hold the option key to access the Startup Manager.
Step 2. Decide on the EFI boot.
Step 3. Pick macOS 13.
Step 4. Choose a user whose password you know.
Step 5. Next, select Install macOS 13 Beta.
Step 6. After selecting the drive and acknowledging the terms, click continue and wait for the installation to be finished.
Note: The link provides a step-by-step guide on how to resolve issues with installing macOS Ventura on a Mac. It covers troubleshooting tips and solutions for common problems that may be preventing the installation process from completing successfully.
Get Back Lost or Deleted Files on macOS Ventura
If you've lost data or files during a macOS Ventura upgrade, or if the installation failed and some essential files were deleted, don't worry - you can recover them! With Deep Data Recovery for Mac, a professional software, you can easily recover all your lost data from accidental deletion, emptied trash bin, and safeguard countless data with just a few hassle-free steps.
This macOS Ventura data recovery software helps recover various types of files from Mac devices, including HDD, SSD, and Time Machine backup drives, as well as external storage devices and cameras, even without a Time Machine backup. It was downloaded by 79% of Apple users to restore deleted files on Macs.
Losing data due to a human error, virus attack, hardware failure, system crash, or deletion without a backup can be frustrating. Fortunately, the Qiling Mac data recovery tool can help recover files of any size, from a single Office Word document to multiple images stored on a Mac. This software is particularly useful in the following situations:
- Virus attack
- Partition loss or formatting
- System crash
- Unmounted drive
- Hard drive damage
With the help of this functional tool, you can now learn how to recover lost files on macOS.
Step 1. Select file types
Launch Deep Data Recovery software, select the desired file types, and click "Next" to initiate the recovery process.

Step 2. Select the location to scan
Choose the hard drive, SSD, SD card, USB flash drive, or TF card where you lost data, then click "Scan" to start scanning.

Step 3. Filter lost Mac data
The software automatically scans for lost data on MacBook/iMac, and after completing the scan, users can filter the found data by type and path.

Step 4. Recover lost data or files
Double-To recover lost data, click on a file to preview it, and then click the "Recover" button to restore the lost data to another location.
Conclusion
macOS Ventura brings many exciting upgrades and improvements to the user experience. If Apple doesn't officially support your Mac, you can still install the new operating system using the provided instructions and enjoy the latest features right away.
Hopefully, this article helps you install macOS Ventura on your unsupported Mac. You can also downgrade to Monterey if needed, and to do so without data loss, download Deep Data Recovery for Mac.
Install macOS Ventura on Unsupported Mac FAQs
The FAQs about installing macOS Ventura on unsupported Macs provide essential information to grasp this topic. They cover key points such as the compatibility of Ventura with various Mac models, the potential risks and limitations of installing the operating system on unsupported devices, and the steps required to successfully install and run Ventura on unsupported Macs.
Can my MacBook Pro 2013 run macOS Ventura?
The MacBook Pro 2013 can't run macOS Ventura, but it can be upgraded with specific steps.
How do I factory reset macOS Ventura on my MacBook Pro 2016?
You can factory reset macOS Ventura on your MacBook Pro 2016 using three methods.
- 1. Use Mac Erase Assistant to factory reset macOS Ventura.
- 2. Use Disk Utility to erase the disk on Mac.
- 3. You can reinstall macOS to factory reset macOS Ventura.
How do I install Ventura on an unsupported Mac?
A: The steps to install Ventura on an unsupported Mac are the following:
- 1. Download macOS Ventura Resource
- 2. Create macOS Bootable USB
- 3. Download OpenCore Legacy Patcher and Install EFI Disk
- 4. Boot and Install macOS Ventura.
Why can't I install macOS Ventura on my Mac?
To install a fresh macOS, you must do it within a specific time frame approved by Apple. If you install outside of this time frame, the installer may freeze. Your date and time must be accurate.
Related Articles
- [Fixed Lately] How to Perform a Netsh Winsock Reset on Windows
- How to Clean Install macOS Ventura [2023 Detailed Guide]
- Windows 10 Keeps Restarting or Continuously Reboots? Fix It Now!
- How to Fix Mac Stuck on Checking for Updates [macOS Ventura/Monterey/Big Sur]
- Ontrack EasyRecovery Review, Pros, Cons, Performance
Ontrack EasyRecovery is one of the best data recovery software applications available on the market. It is powerful enough to help you recover from a wide variety of data loss situations. In order to help you solve data loss problems using Ontrack EasyRecovery, this post will give an in-depth Ontrack EasyRecovery review. - What Is Pagefile.sys? Is It OK to Delete It?
Pagefile.sys is one of the key components of computers today. This article will explore what it is, how it works, and why it's necessary. Plus, we'll address if you should delete it or remove it or how you can increase or decrease its size.