NTFS VS Share Permissions, What's the Difference and How to Set Them?
Modern data management requires preventing unauthorized access to systems, making NTFS and Share permissions a trusted solution. Windows offers various permission settings to protect data, and understanding the difference between NTFS and Share permissions is crucial. This write-up will delve into the details of both, providing a comprehensive comparison.
We'll delve into the details of NTFS permissions and Share permissions, comparing them based on types, file systems, and suitable users. We'll also cover the step-by-step process of checking and changing both NTFS and Share permissions, making it easy to understand and resolve any unavailability issues with NTFS permissions.
NTFS VS Share Permissions - Definition
NTFS permissions refer to the access control settings applied directly to files and folders on a Windows system, allowing users to control who can read, write, or execute files, and who can read, write, or delete folders. This is in contrast to share permissions, which are used on network shares and allow users to control access to shared files and folders. NTFS permissions are typically more granular and flexible than share permissions, allowing for more detailed control over access to specific files and folders. Share permissions, on the other hand, are typically used on network shares and allow users to control access to shared files and folders, but may not provide the same level of granularity as NTFS permissions.
What Are NTFS Permissions?
NTFS (New Technology File System) is a file system developed by Microsoft for its Windows operating system. It was first introduced in Windows NT 3.
NTFS, or New Technology File System, is a file system used to store and retrieve files on storage devices running on Windows NT operating system. It offers improved security, disk space usage, reliability, and performance compared to other file systems like FAT and HPFS.
NTFS assigns a security descriptor to each file or folder, defining the owner and providing two access control lists (ACLs) that specify users or groups with access rights to a file or folder, ensuring high security in NTFS.
- The Discretionary Access Control List (DACL) is a list that defines the type of interactions allowed or forbidden by users or groups, and can only be modified by administrative users.
- The System Access Control List (SACL) is a feature that defines the type of interactions with folders or files that need to be audited before modification, typically for sensitive data files.
NTFS permissions control access to data stored on a partition with the NTFS file system, allowing specific access to files or folders and can be assigned to individual users or groups. Users can set different permissions for files or folders on Windows, managing who can read, write, or execute them. This allows for fine-grained control over access to data.
- Write: This setting determines whether a user or group can modify file content, create new files or folders, or write data and attributes for files or folders.
- Read: The "read" permission determines if a user or group of users can access and view the contents of a file or folder.
- Read and execute: The "Execute files" permission in Windows determines whether a user or group can view or run executable files in a specific folder. This setting controls access to executable files, such as programs and scripts, within the folder.
- List folder contents: This permission defines whether a user or group of users can list the contents of a folder.
- Modify: The permission to modify a file or folder's content is defined by its write access, which determines if an individual user or group of users can make changes to its content.
- Full control: The "Full Control" permission allows an individual or group to have complete control over files or folders, enabling them to delete, move, modify, or add them. This permission also allows for quick changes to permission settings.
What Are Share Permissions?
Share permissions help control the access of folders shared over a network, and can be used for folders with NTFS and FAT file systems. The three main types of share permissions are: Read, Read & Execute, and Full Control, which determine the level of access users have to shared folders and files.
- Full control: The system provides users with complete control over various permissions, including read and write access, and grants these permissions to the "Administrators" group.
- Change: The system allows users to modify data, delete, add files, and add subfolders to files, in addition to granting read and change permissions.
- Read: The "Read" permission allows individual users or groups to view files or subfolders, making it easy to read contents and run programs, and is granted to the "Everyone" group by default.
To determine which type of permission takes precedence, we'll analyze the situation based on restrictive permissions. NTFS permissions and share permissions are two different types of permissions, and understanding which one takes precedence is crucial. If you'd like to learn more about file and folder permissions, there's a link available to help you. However, for the purpose of this explanation, let's focus on the scenario where restrictive permissions are involved.
NTFS VS Share Permissions - Which Takes Precedence?
Understanding the differences between NTFS and Share permissions is crucial for users to take control. NTFS permissions are a more advanced and granular way of controlling access to files and folders, allowing for specific rights to be assigned to users or groups, such as read-only or full control. In contrast, Share permissions are a more basic and simplified method of controlling access, where users can be granted read, read/write, or no access at all to shared resources.
- NTFS permissions are set on the security tab of files or folders, while share permissions are configured in the "Advanced Sharing" properties under "Permissions".
- NTFS permissions control access to files and folders on a local machine, whereas Share permissions regulate the number of users who can access a shared folder at the same time.
- NTFS permissions apply to users logged on locally to the server, whereas Share permissions apply to users logged on to the server remotely.
- NTFS permissions are specific to NTFS file systems and cannot be applied to FAT or FAT32 systems, whereas share permissions can be applied to all file systems, including FAT and FAT32.
- NTFS permissions provide more fine-grained control over shared folders and their contents compared to Share permissions, allowing for more detailed access management.

When Share and NTFS permissions are combined, the most restrictive permissions are chosen by default.
NTFS vs. share permissions can be compared in a table, which shows the key differences between the two. NTFS permissions are a more secure and flexible way to manage access to files and folders, with features like inheritance, permissions propagation, and more granular control over who can access what.
| Features | NTFS Permissions | Share Permissions |
|---|---|---|
| Types |
|
|
| File System |
|
|
| Suitable Users | It affects local and remote access. | It applies to network users. |
In cases where detailed control of files or folders is required, NTFS permissions take precedence over share permissions. Conversely, share permissions are ideal for easy applications, such as network access. This means that if a user has Full Control NTFS permission but only "Read" share permission, they will only be able to read the files or folders. Therefore, NTFS permissions are best for remote or local access, while share permissions are suitable for network users.
NTFS VS Share Permissions - How to Check and Change Them?
After learning about the method of precedence in NTFS vs. Share permissions and key differences, users may want to check and change these permissions. To do this, we'll go through detailed guides to check and change NTFS and Share permissions one by one.
Guide 1. How to Check and Change NTFS Permissions?
The quick steps for the same are:
1. Checking NTFS Permissions:
Now, follow these steps to check NTFS permissions.
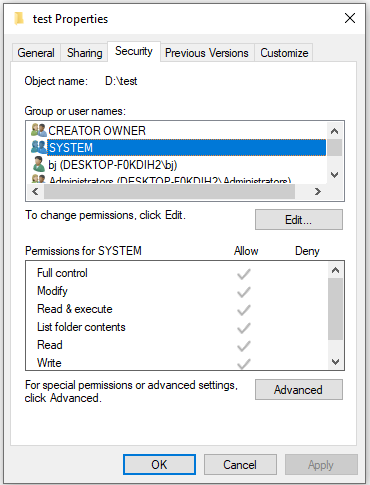
Step 1. Right-click on the file or folder and select "Properties."
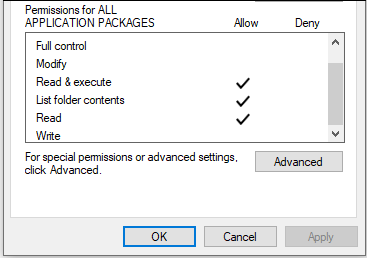
Step 2. To check NTFS permissions, switch to the "Security" tab and click on the user or group having access to the file or folders to see the type of NTFS permissions.
2. Changing NTFS Permissions:
It's time to learn how to change NTFS permissions. NTFS permissions are a crucial aspect of Windows file system security, allowing you to control who can access, modify, and delete files and folders.
Step 1. Click on "Edit" to change NTFS permissions.
Step 2. To select a group or user, go to the pop-up window and choose the desired group or user from the list provided. This will allow you to manage or interact with the selected group or user.
Step 3. Click on "Add" to add more groups or users.
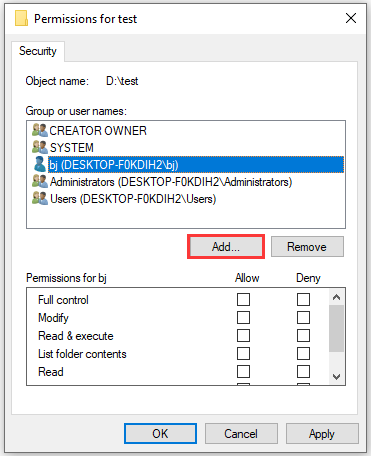
Step 4. Check the permissions you want to assign.
Step 5. Click "Apply" and "Ok" to save changes.
Guide 2. How to Check and Change Share Permissions?
The quick steps for the same are:
1. Checking Share Permissions:
To check Share permissions, follow the content to learn how.
Step 1. Right-click on the file or folder and select "Properties."
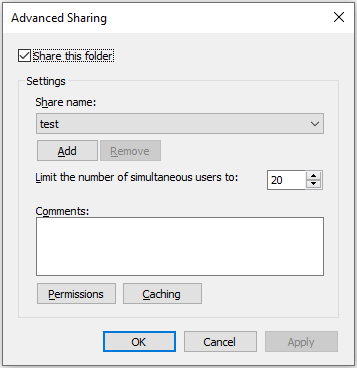
Step 2. To access the advanced sharing options, open the "Properties" window, switch to the "Sharing" tab, and click on "Advanced Sharing."

Step 3. To view share permission groups or users, select "Permissions" in the pop-up window.
2. Changing Share Permissions:
This guide will walk you through the steps of changing Share permissions. To do this, you can follow these steps.
Step 1. Click on "Edit" to change Share permissions.
Step 2. To select a group or user, go to the pop-up window and choose a group or user from the options provided. This will allow you to manage access and permissions for the selected group or user.
Step 3. Click on "Add" to add more groups or users.
Step 4. Check the permissions you want to assign.
Step 5. Click "Apply" and "Ok" to save changes.
After learning about changing and checking NTFS and Share permissions individually, let's explore the possible issues that may arise in the NTFS vs. Share Permissions journey.
NTFS Permission Not Available in FAT32 File System? Here are Solutions!
To resolve the issue of NTFS permissions on FAT32, converting the FAT32 partition to NTFS is the most effective solution. This can be achieved using a tool like Qiling Partition Master, which simplifies the process and ensures a smooth transition.
Qiling Partition Master Free is a free partition manager that can easily be used by individual users. It allows for various partition operations, including setting up hard drives, merging partitions, creating new partitions, adjusting disk space, and more. Additionally, it can convert NTFS and FAT32 partitions without additional requirements, making it a convenient and efficient tool for disk management.
After downloading the software, follow these steps to convert FAT32 to NTFS. First, you need to download the software, then create a bootable USB drive using the downloaded software.
Step 1. Install and launch Qiling Partition Master on your computer.
Step 2. To convert a FAT32 partition to NTFS, right-click on the FAT32 partition in Partition Manager, select "Advanced", and then choose "NTFS to FAT" from the options.
Step 3. Click "Proceed" on the pop-up dialog box to continue.
Step 4. Wait until the operation process is finished.
Other features of Qiling Partition Master:
- Quickly convert NTFS to FAT32.
- Can effectively clean, format, and reformat a hard drive, USB, external hard drive, etc.
- This device comes with assistance for upgrading to Windows 11 and runs smoothly on various Windows versions, including Windows XP, Vista, 7, 8, 8.1, 10, and 11.
- Offers detailed user guides and dedicated customer support.
Now, download Qiling Partition Master to free your hands now.
NTFS VS Share Permissions - Verdict
The concepts of NTFS and Share Permissions are now clear, with detailed definitions and a method of precedence that's easy to understand. Users can now check and adjust both NTFS and Share Permissions according to their needs, making it simpler to manage access control.
Users can quickly resolve issues with NTFS permissions not being available in the FAT32 file system by using tools like Qiling Partition Master to convert FAT32 to NTFS format, which resolves the issue.
FAQs About NTFS VS Share Permissions
After exploring NTFS vs. Share Permissions in detail, you may have questions about the topic. Here's a quick rundown of the top and frequently asked questions related to NTFS vs. Share Permissions.
1. NTFS vs. Share Permissions: which takes preferences?
NTFS permissions control access to files and folders on a local server, while Share permissions control access to shared files and folders over a network.
2. What is the purpose of the share permission?
The share permission allows control over who can access files or folders over the network, and comes in three levels: read, change, and full control.
3. What are the six types of standard NTFS permissions?
The six types of standard NTFS permissions are read, write, full control, modify, list folder contents, and read and execute. These permissions allow users to perform various actions on files and folders, such as reading, writing, and executing them.
4. When we use both share and NTFS permissions, which one is applied?
When both share and NTFS permissions are applied, the most restrictive permission is chosen by default, meaning if share permissions are set to "Everyone Read Allow" while NTFS permissions are set to "Everyone Modify Allow", the share permissions will override the NTFS permissions due to being more restrictive.
Related Articles
- [Linux Format Disk Guide] How to Format Disk in Linux
- What Is Single User Mode Mac? How to Boot Into it? [Everything you need to know]
- [Fix] A required device isn't connected or can't be accessed with error
- Fix HDD Hard Drive Not Showing Up in Windows 10 Error
- Working With Thumb Drive& Get the Difference Between It and a Flash Drive
This article will give you a comprehensive introduction to the thumb drive. Later are contents about what a thumb drive is, how to use it, and the distinction between a thumb drive and a flash. Some caring tips are also attached at the end. - [Tracing IP Address] How to Trace An IP Address?
Tracing an IP address is an easy process, and there are multiple ways how to trace an IP address. Tracing the IP address using command prompt and raw email data. Make use of the best IP tracking tools to discover the locations of the IPs approximately.