What Is the Latest Version of macOS Until 2023 [Ventura]
What Is the Latest Version of macOS
The latest version of macOS is Ventura.
Apple introduced the latest macOS base system, macOS Ventura, at WWDC 2022, which brings significant updates, including a refined multitasking experience, updated capabilities across platforms, and support features for multiple apps.
macOS 13 Ventura is the latest operating system from Apple, featuring a range of updates and improvements. Some of the key features include a redesigned System Settings app, improved multitasking capabilities, and enhanced security features.
- Stage Manager. On macOS Ventura, the Focus feature lets you concentrate on a single task while keeping other apps at the ready, accessible with a quick swipe, and integrates with Spaces and Mission Control.
- Continuity Camera. Mac users can now connect their iPhone's camera to their Mac using macOS Ventura, eliminating the need for a separate webcam. The iPhone is simply placed on top of the Mac, held in place by a stand, and the two devices will automatically connect. This feature allows for higher-quality video calls and recordings, making it a convenient upgrade for those who were previously using the internal Mac camera.
- The Mail App. macOS Ventura has made improvements to the Mail app, including the ability to undo sent emails within 10 seconds and enhanced search functionality that provides more accurate and relevant results.
- Handoff expands to FaceTime. Users can now undo or edit messages, recover deleted messages, or mark messages as unread, and on macOS Ventura, they can transfer calls from their Mac to their iPhone.
- Live Text. macOS Ventura now allows you to pause a video and copy text from it, enabling you to look up the text online for research or content creation purposes, a significant upgrade for Mac users.
Knowing that the latest version of macOS is Ventura, we'll proceed to the next section, where we'll introduce the historical version of macOS and provide a complete guide on checking if you have the latest macOS and how to upgrade or download macOS Ventura.
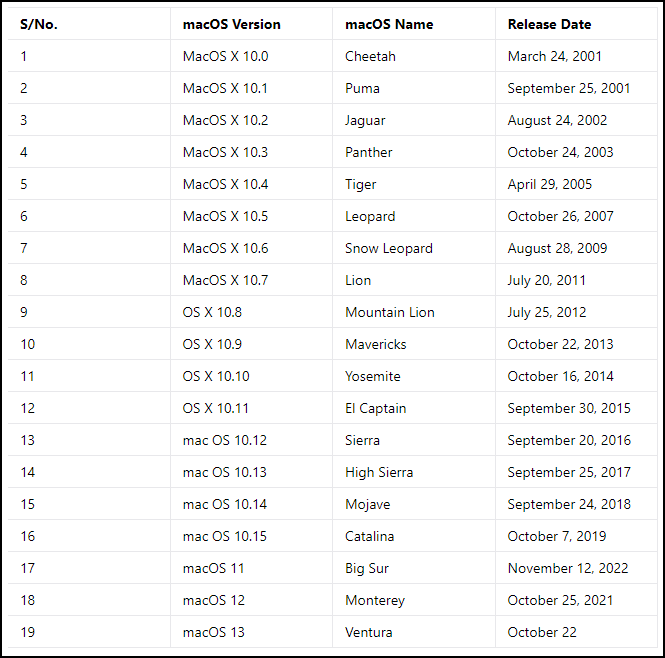
macOS Version History Overview
macOS has undergone significant development and is primarily designed for Apple laptops and desktops, with each release improving and adding new features. The latest macOS version is not specified, but the evolution of the operating system is outlined in a chart starting from macOS 10.10.
How to Check if You Have the Latest macOS
As a Mac user, it's essential to know if you're running the latest macOS version for the best experience. To check this, simply follow these steps:
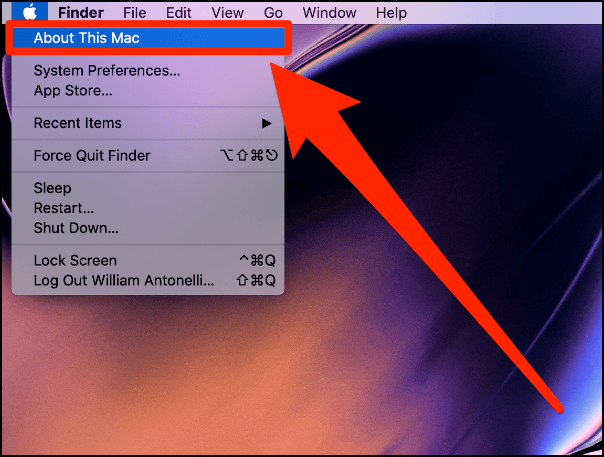
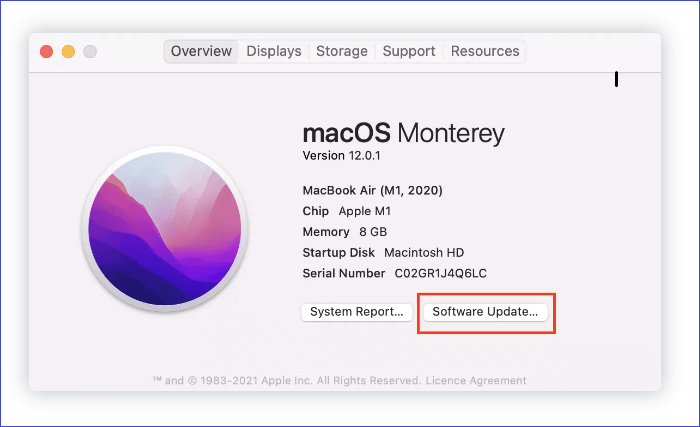
Step 1. To view the About This Mac window, click on the Apple logo in the upper-left corner of your screen and select "About This Mac".
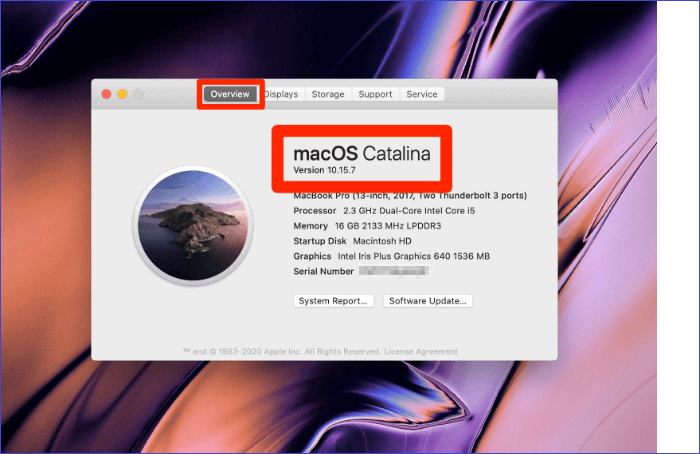
Step 2. Click on the "Overview" tab if it doesn't open by default, then view the macOS version running on your computer. If it's Monterey or earlier, download macOS Ventura.
To upgrade to macOS Ventura, follow these steps: click the Apple menu, go to System Settings, select General, click Software Update, and click Upgrade Now.
How to Upgrade or Download the Latest Version of macOS
Upgrading to macOS Ventura is a relatively straightforward process. One of the reasons you might want to upgrade is that you're looking for a solution to your Mac's webcam, which can be a bit disappointing. Fortunately, macOS Ventura offers a convenient alternative - you can use your iPhone as a webcam, making it a great reason to upgrade to the latest operating system.
Upgrading to macOS Ventura offers several benefits, including the ability to un-send messages within ten seconds of hitting the "Send" button, eliminating accidental message sends. Additionally, the Stage Manager feature allows you to have separate workspaces on your device, providing a more organized and efficient way to manage your tasks.
macOS Ventura offers various features, including the ability to copy live text from a video and search for it online, as well as a shared photo library, improved gaming, and new apps. Upgrading to Ventura can be done by either upgrading from the current macOS or downloading a clean install.
If you can't install macOS Ventura, click the link to fix the problem. We'll discuss how to use both methods. If you can't install macOS Ventura, click the link to fix the problem.
How to Upgrade to macOS Ventura
To upgrade to the latest macOS version, follow these steps:
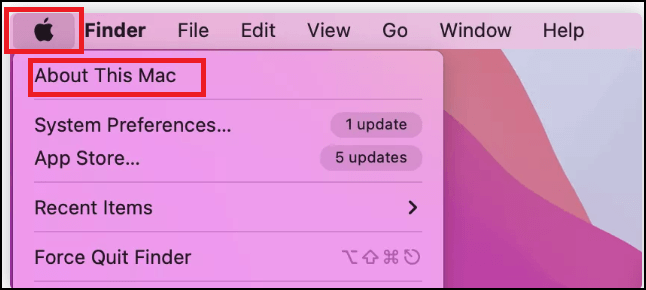
Step 1. Click on the Apple menu, then select "About This Mac".
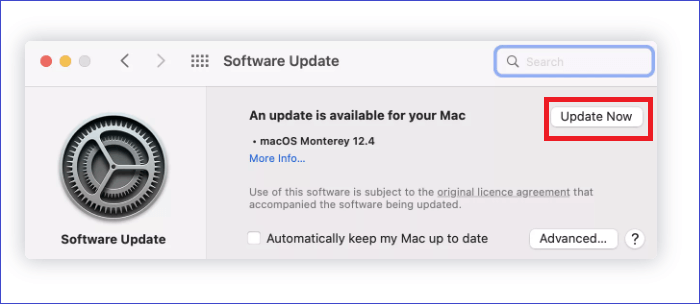
Step 2. Click on the "Software Update" option in the next window.
Step 3. "System Preferences" will start checking for new macOS updates.
Step 4. Click on "Update Now" to download an update, or "Restart Now" to install an already downloaded update.
The time it takes to install an update on a Mac varies greatly depending on the size of the update and your internet speed, but on average, it can take anywhere from five minutes to five hours. So, be prepared to be patient until the process is complete.
How to Download and Install macOS Ventura
To get a clean install of macOS Ventura, start by checking if your device is compatible with the new operating system. If it is, you can download macOS Ventura from the App Store, where you can find the latest version of macOS.
Step 1. Open the App Store and type "macOS Ventura".
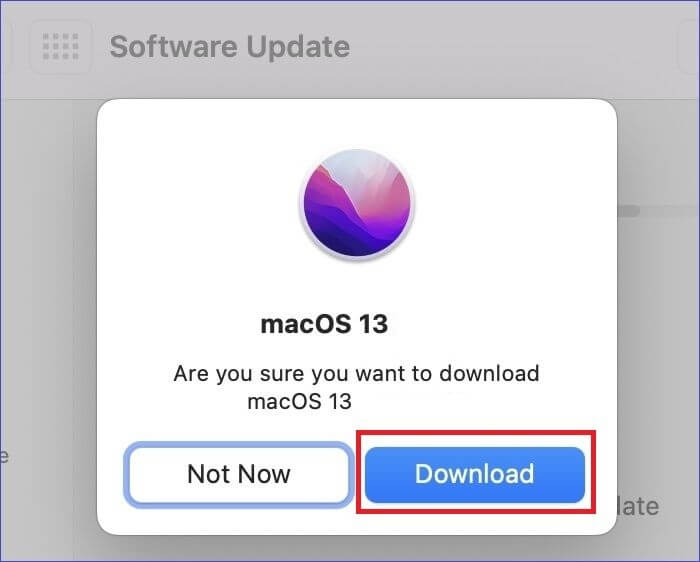
Step 2. Click "Get" to download macOS Ventura.
Step 3. Next, confirm the process by clicking "Download".
Step 4. After the download process is complete, the system will automatically start installing macOS Ventura on your Mac, and you should wait for it to finish without shutting down or disconnecting your device.
Recover Lost Data When Upgrade and Download macOS Ventura
When upgrading or downloading a new macOS version, it's possible to lose important files due to various situations such as repartition, partition loss, formatting, accidental deletion, hard drive damage, etc. To recover lost data, you can use a recovery tool called Deep Data Recovery for Mac.
Deep Data Recovery for Mac enables the recovery of lost files, particularly after a macOS Ventura upgrade, and can also recover various data types such as videos, documents, music, and emails. The software can recover data from different storage devices, including SSDs, fusion drives, USB drives, Time Machine backups, and cameras.
Features of Deep Data Recovery for Mac
The software's power and reliability in data recovery can be attributed to several key factors. Its advanced algorithms and techniques enable it to effectively scan and recover data from various storage devices, including hard drives, solid-state drives, and memory cards.
- File Filter. This feature enables users to search for specific files within a storage device by using keywords, allowing them to narrow down the search results and recover only the desired files.
- Scan Mode. Deep Data Recovery for Mac enables quick and deep scans to target specific recovery tasks, facilitating faster file loading during the scanning and recovery process.
- File Preview. The software allows you to preview the files you want to recover before the actual recovery process, ensuring that you only recover the essential files.
To recover lost data on a Mac, start by downloading a trial version of Deep Data Recovery software. Once installed, you can recover your lost data in just three simple steps: locate, scan, and recover. The process involves using the software to locate the lost data, scanning the selected location to find the recoverable files, and finally recovering the desired files.
Step 1. Select file types and click "Next" to start
Launch Deep Data Recovery on your Windows computer, select the file types you want to recover, and click "Next" to begin the recovery process.

Step 2. Select the drive to be scanned
In the main Deep Data Recovery window, select the drive you need to recover lost/deleted files from and click the "Search for lost files" button.

Step 3. Select your lost data/files
Deep Data Recovery for Mac scans the selected disk volume and displays the results, allowing users to sort and find specific files.

Step 4. Recover lost/deleted data
Once you have located the desired files, preview them and then click "Recover" to initiate the recovery of your deleted or lost Mac files.
Conclusion
To upgrade to the latest macOS version, Ventura, click on the Apple logo, then select "About This Mac" to check if you have the latest version. If not, you can upgrade to enjoy features like Stage Manager, Continuity Camera, and more. The "Overview" tab will display the macOS version running on your device.
If you're still running macOS Monterey, it's worth considering an upgrade to Ventura, which can be done through either an upgrade or a clean install. Don't worry if you later regret the upgrade, as you can still downgrade to Monterey. However, if you do upgrade or install Ventura, you may lose data, in which case you can try Deep Data Recovery for Mac to recover it.
Deep Data Recovery for Mac is a powerful and reliable tool that can help you recover lost files, including videos, emails, music, documents, photos, and more. To get started with a trial version, click the button below.
The Latest Version of macOS FAQs
Below are common questions about macOS Ventura.
Should I Update Mac to Ventura?
Upgrading to macOS Ventura today is a great idea, as it offers a range of unique features, including a variety of new and exciting capabilities.
- Stage Manager
- The Mail App
- Continuity Camera
- Safari Passkeys
- Handoff expands to FaceTime
- Live Text
Is macOS Ventura better than Monterey?
macOS Ventura is a significant upgrade to Monterey, offering improved speed and efficiency, along with new features like copying text from videos, continuity camera, and the ability to un-send messages in the Mail app, among others. Overall, it's a great update that's worth trying out today.
Why Can't I Update My Mac to Ventura?
Although it's a straightforward process, you may fail to upgrade to macOS Ventura due to issues such as
- Low storage space
- Poor internet connectivity
- Incompatible device
- Problem with the Apple server.
Try sorting any of these issues and see if you can now upgrade to macOS Ventura.
How to Downgrade macOS Ventura to Monterey?
Time Machine is the simplest way to downgrade from macOS Ventura to Monterey, as long as you had made a backup of Monterey using a Time Machine backup. To downgrade, simply follow the steps below.
- 1. Connect Time Machine backup to your Mac.
- 2. Restart your device.
- 3. Hit Command+R when the Apple logo displays.
- 4. Click "Restore from Time Machine Backup" and hit "Continue".
- 5. Follow the on-screen instructions to finish the macOS reinstallation process.
Related Articles
- Your Complete Guide to Format Macintosh Hard Drive [Lately Upgraded in 2023]
- macOS Ventura Issues, Bugs, Promblems [Latest Updated]
- 2 Ways to Reinstall Windows 10 [Full Guide]
- How Many CPU Cores Do I Have [Fixed]
- [Detailed Guide] How to Fix Cyberpunk 2077 Saves Missing
Losing game progress is a total nightmare, but if your Cyberpunk 2077 save files disappear, there are steps you can take to prevent it from happening again. You can follow simplified ways to fix the issue and ensure your progress is safe. - How to Delete Everything on MacBook [Two 2024 Solutions]
Planning to delete everything on MacBook? Do you want to ensure the data is not recoverable? Then follow this easy guide where we show how to delete everything on MacBook Air and Pro.