How to Change the Location of Installed Programs in Windows 11 in 2022? Your Guide Is Here
- Complex Level: Easy
- Applies to: To change the location of installed apps on Windows, you can use the built-in feature called "Move installed apps to the location of your choice." To do this, go to the Start menu, click on "Settings," and then select "System." From there, click on "Storage" and then select the drive where you want to move the apps.
This page provides guidance for new Windows 11 users on how to change the default save location for new content in Windows 11, which is useful for applications like Office, Adobe software, and large games.
| Workable Solutions | Step-by-step Troubleshooting |
|---|---|
| Fix 1. Use App Migration Software | Try every USB port available; Determine you\'re using USB 2.0 or 3.0...Full steps |
| Fix 2. Use Apps and Features | Step 1. To open the Windows settings, press the Windows key and the letter "I" at the same time. This will open the Windows settings window. From there, click on the "System" tab, then select "Apps and Features" from the menu. This will take you to a list of installed apps, where you can manage and uninstall them as needed.Full steps |
| Fix 3. Use CMD Command-Line | Step 1. You want me to help you move an app from your C drive to another drive. To do this, you can follow these steps: 1) Open your C drive and navigate to the app you want to move. 2) Right-click on the app and select "Cut" or press Ctrl+X. 3) Open the drive you want to move the app to and navigate to the desired location.Full steps |
| Fix 4. Using Registry Editor | Step 1. It seems like you were about to provide a solution to a problem. However, it seems like the response got cut off.regedit, and click "OK"...Full steps |
Why Do You Want to Change the Location of an Installed Program in Windows 11
Despite the many new features in Windows 11, such as a revamped Start menu and taskbar, the operating system retains a classic Windows design. Similarly, the default storage location for new content remains the same, with all new files and installations being saved to the Local System C (This PC) Drive.
As a result, the C drive will soon get full with the following content:
- Downloaded content.
- Installed applications and software.
- Operating system.
- Personal folders, like Documents, Pictures.
- Desktop contents, etc.
To resolve the issue of a full C drive in Windows 11, consider changing the default download location, moving user folders like Documents, Pictures, and Desktop to another drive, deleting large and unnecessary files, and changing the location of installed programs to free up space on the system C drive.
To change an app's location in Windows 11 without causing boot issues, you can use the 'Move' option in the Properties window. This method allows you to relocate an app to a different drive or partition without affecting the system's boot process. To do this, right-click on the app's shortcut or executable file, select 'Properties', and then click on the 'Move' button.
How to Change Location of Installed Programs in Windows 11? [4 Ways]
4 efficient ways to move apps around Windows 11 without losing data or boot issues
- #1. Third-Party App Migration Software
- #2. Apps and Features Tool in Windows 11
- #3. CMD Command Line
- #4. Registry Editor
Among the 4 methods, the method that suits you the most is the one that is most efficient and effective for your specific situation. To determine this, compare the comparison table to your specific needs and circumstances, and choose the method that best aligns with them. This will ensure that you are using the most suitable approach to achieve your goals.
| Comparison | App Migration Software | Apps and Features | CMD | Registry |
|---|---|---|---|---|
| Transfer Content |
|
|
|
|
| Difficulty Level | Easy | Easy | Medium | Complex |
The comparison table reveals that the third-party app migration software is the most comprehensive solution for Windows 11 users to change the location of installed applications, but if you're looking for a simple and efficient method, Method 1 is a great option, allowing you to easily migrate apps and change the install location of your programs in Windows 11.
#1. Change Location of Installed Programs in Windows 11 Using App Migration Software
Professional app migration software can help you move installed programs, software, and games from the C drive to another local drive on your computer without any boot issues. Qiling Disk Master, with its App Migration feature, is a suitable solution for this purpose.
You can directly move multiple programs and apps from the C drive to the D drive or a second hard drive on your computer without losing any personal data or boot issues. To do this, you can follow the detailed steps provided, which allow you to transfer multiple programs and apps at one time without any complications.
Step 1. Run Qiling Disk Master on your PC
To proceed, go to the "Backup and recovery" section and click on "File sync".

Step 2. Select programs to move from C drive to another drive
1. Select the C drive and choose the programs (labeled as "Yes") that you want to transfer.

2. Select another drive on your computer as the destination and click "Proceed" to start the cloning process.

Step 3. Finish the transferring
Wait patiently until the transferring process finishes and click "OK" to confirm.
When the process is complete, you can restart your PC if needed. This will preserve all changes and allow you to run programs from the other hard drive without reinstalling them.
Aside from this, you can also apply Qiling Disk Master to other tasks, such as disk cloning, disk wiping, and disk partitioning, making it a versatile tool for managing and maintaining your computer's storage devices.
- Move apps from other drives to C drive
- Move the Desktop folder to another drive
- Transfer apps or programs to another computer
- Backup and rescue data and programs in computer
- More...
#2. Use Apps and Features Tool in Windows 11 to Change Location of Installed Programs
The Apps and Features tool in Windows allows users to change the location of installed programs, enabling the relocation of some programs from the C drive to other drives, especially useful for Windows 11 users.
Here are the steps:
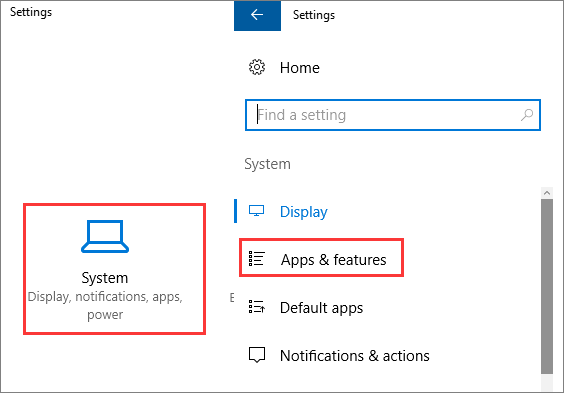
Step 1. To access the Apps and Features section in Windows settings, press the Windows key and the "I" key simultaneously, which will open the Windows settings. Then, click on the "System" option from the menu and select "Apps and Features" from the list of options.
Step 2. To transfer programs or applications, wait for the Apps and Features to open, then select the desired program and click "Move".
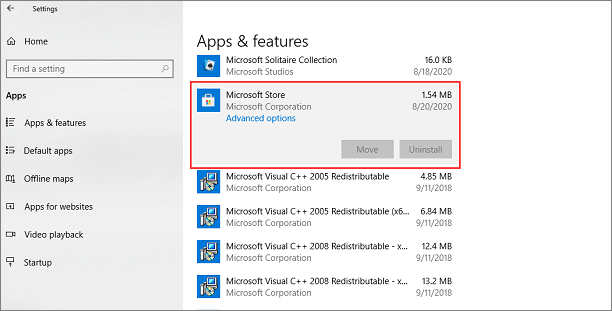
Step 3. To move a program to a different drive, select the drive where you want to move the program to, such as D: drive.
Step 4. Click "Move" to confirm.

If you need to move several programs, you'll need to repeat the process several times, which can be tedious. However, for a more efficient way, you can totally trust Qiling Disk Master.
#3. Use CMD Command-Line to Move Apps Around Windows 11
To efficiently move apps around in Windows 11, you can run CMD command lines, but be cautious while doing so. This more complex solution involves following specific steps on your PC, requiring careful attention to avoid any issues.
Experienced Windows administrators suggest creating a restore point in Windows 11 if you encounter problems while rearranging apps, as a precautionary measure.
Here are steps to move apps around in Windows 11 using CMD:
Step 1. Open your C drive and find out the app you want to move to another drive.
Step 2. Create a text document, copy and paste the two command lines in the file:
- Robocopy "Source" "Destination" /sec /mov /e
- Mklink "Source" "Destination" /j
Replace the Source with the path location of the target program in your C drive.
To move the app to a different location on your PC, select the "Destination" dropdown menu and choose the desired path. This can be a folder on your desktop, documents, or any other directory where you want to relocate the app.
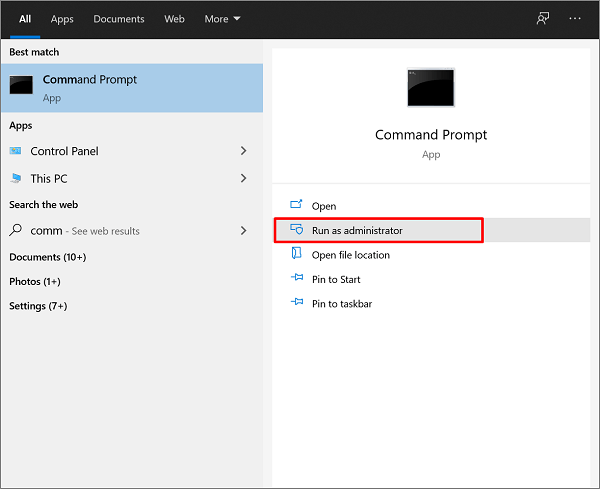
Step 3. To run Command Prompt as an administrator, type `cmd` in the search box, right-click on "Command Prompt" in the search results, and select "Run as Administrator" from the context menu.
Step 4. Once the command prompt opens, type the first line in your text file and press Enter.
- Robocopy "Source" "Destination" /sec /mov /e
Step 5. Type the second line in the command prompt and hit Enter:
- Mklink "Source" "Destination" /j
Wait for the process to complete, then open the target new drive to verify if the selected app folder has been successfully moved there.
Note: You need to be very careful while running the command lines, as any errors could be due to Windows restrictions. If an error occurs, you should stop the operation and return to Method 1 for assistance.
#4. Change App Location from C to Other Drive in Windows 11 Using Registry Editor
To move apps from the C drive to another drive in Windows 11, you can use the Registry Editor as a last workaround. Before doing so, confirm the destination drive for the app move.
Here are the steps:
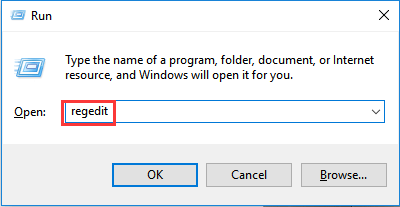
Step 1. To open the Registry Editor, press the Windows + R keys to open the Run dialog, type "regedit", and click "OK".
Step 2. Once Registry Editor opens, navigate to the path HKEY_CURRENT_USER\Software\Microsoft\Windows\CurrentVersion\Explorer\Shell Folders\Start Menu to open the folder in Registry.
HKEY_LOCAL_MACHINE\SOFTWARE\Microsoft\Windows\CurrentVersion
Step 3. Double-click on the ProgramFilesDir (x86) key, then change the default value "C:\ProgramFiles" to the new drive path.
Step 4. Click "OK".
Step 5. Double-click To change the default value of the "ProgramFilesDir" variable to a new drive path, you can use the following command in your PowerShell or Command Prompt: `New-ItemProperty -Path "HKLM:\SOFTWARE\Microsoft\Windows\CurrentVersion" -Name "ProgramFilesDir" -PropertyType String -Value "YourNewDrivePath" -Force`. Replace "YourNewDrivePath" with the actual path you want to use, such as "D:\Program Files" or "E:\Program Files".
Step 6. Click "OK", close Registry, and restart your computer.
Bonus Tip: How to Change Windows 11 Default Installation Folder
Aside from the above 4 methods to change the location of installed programs in Windows 11, it's also important to change the Windows 11 default installation folder to save disk space in the C drive. This can be done in addition to the other methods to ensure that your programs are installed in a location of your choice, freeing up space on your C drive.
Here are the steps that you can follow:
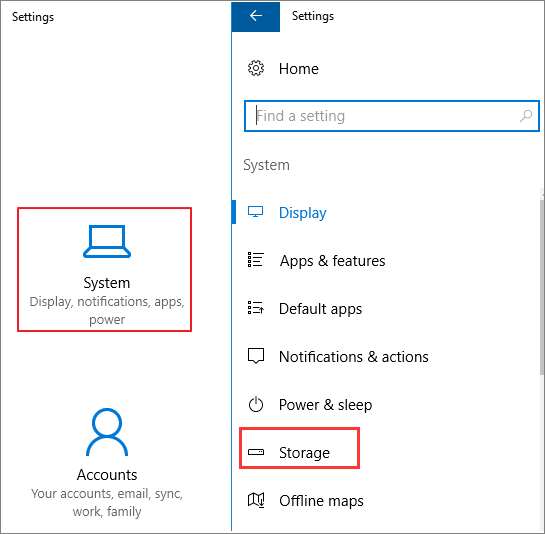
Step 1. To access the Storage settings in Windows, press the Windows key + I to open the Windows Settings, then click on "System" and select "Storage".
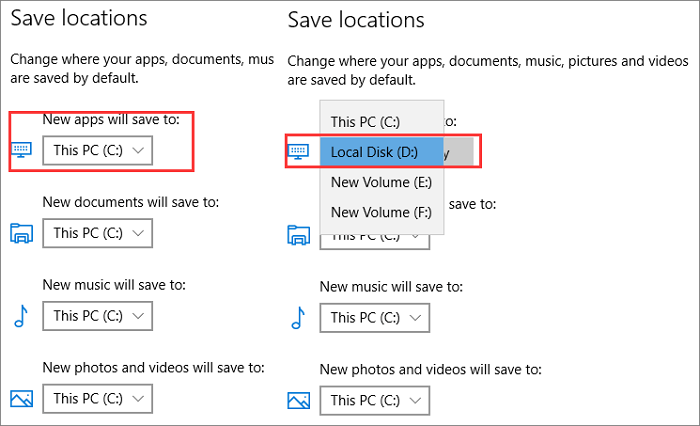
Step 2. To change the default save location for apps, documents, music, pictures, and videos, go to the Save locations section, click on the "New apps will save to:" column, and select a new drive from the dropdown menu. This will change the default save location for all new files and folders created on your computer.
Conclusion
Moving installed programs in Windows 11 from the C drive to another drive can be done using 4 reliable methods. These methods ensure that the programs are successfully relocated without causing any boot issues, allowing users to optimize their disk space and improve system performance.
For Windows beginners, migrating apps from the C drive to another drive can be a daunting task. However, Qiling Disk Master is a reliable method that can make this process smooth and hassle-free.
Experienced Windows users can also try other methods to move basic apps around Windows 11, if they only want to do so.
Changing the location of installed programs in Windows 11 is a straightforward process. By using the correct methods, you can easily relocate installed programs to a new location, making it a simple task to accomplish on your own.
Related Articles
- How to Free Up C Drive Space in the Windows Server?
- Move Programs/Apps/Software from C Drive to Second Hard Drive in Windows 10/8/7
- How to Repair and Uninstall Windows 11/10 Program | Get Your Answer Here
- How to Transfer Microsoft Office To Another Computer
- Grandfather-Father-Son Backup Scheme - Safest Backup Strategy
The grandfather-father-son (GFS) backup scheme is the safest backup strategy, which always keeps one or more backups for disaster recovery. Get it now. - How to Deal with Hard Disk 1 Quick (303) Error?
This article is written for users like you who want to fix Hard Disk 1 Quick (303) error. Scroll down to learn more.