2022 Ultimate Guide to Clone Hard Drive to SSD
Cloning your hard drive to an SSD can give your computer a boost and save you from the hassle of reinstalling everything from scratch, making it a great option for upgrading your computer's performance.
Cloning a hard drive with sensitive data and an operating system can seem daunting, especially for beginners. However, with the right tools and a bit of know-how, anyone can revive their computer's performance by cloning their hard drive to a new SSD. This process is not as difficult as it may sound, and can be easily done by following the necessary steps.
Ⅰ. You Got to Know How Disk Cloning Works
Disk cloning is the process of creating an exact copy of one hard drive's contents onto another, including the operating system, files, downloads, programs, and settings. This results in two identical hard drives, with the cloned drive containing an exact replica of the original drive's contents.
Ⅱ. Disk Cloning vs. Disk Imaging
Disk cloning and disk imaging are often confused with each other, but they have distinct differences. A glance at the table can help differentiate between the two in terms of form, purpose, benefits, and whether they are bootable or not after creation.
| Comparison | Form | Purposes | Benefits | Bootable |
|---|---|---|---|---|
| Disk Cloning | To achieve this, you would need to have two identical hard drives, where Drive A is cloned to Drive B. This process involves copying the contents of Drive A to Drive B, making Drive B an exact replica of Drive A. | To upgrade or replace a hard drive without losing data or reinstalling Windows, follow these steps: | Uncompressed replication with fast recovery speed | √ |
| Disk Imaging | Backing up Drive A and storing it in a compressed image file requires a recovery process to access data on Drive A or other drives. | Make full, incremental, and differential backups of data to ensure recovery in case of data loss or disaster, and to maintain data integrity and availability. | Additional backup options are available, providing valuable assistance in the event of data loss, system crashes, and ransomware attacks, helping with disaster recovery. |
× unless performing a system restore |
When dealing with a slow, small, or failing hard drive, disk cloning is a suitable solution to sync all files from the old computer to a new one, or to clone RAID drives or servers to multiple hard drives for backup purposes. This approach is particularly useful for enterprise users who want to ensure business continuity by duplicating critical data. In contrast, disk imaging is more suitable for users who need to create a backup of their system or data, but don't necessarily need to replicate the entire system.
LEARN MORE
This guide provides an overview of disk cloning, including its definition, purposes, and key benefits. Disk cloning is a process that involves creating an exact copy of a hard drive or solid-state drive, allowing for the transfer of an operating system, applications, and data to a new device.
Note: Windows 10 and 11 do not have built-in disk cloning software, but they do have disk imaging software, including File History and Backup and Restore, which can create system image backups and backup files and folders.
Ⅲ. How to Prepare for Cloning Hard Drive to SSD
Before cloning one hard drive to another, it's essential to prepare thoroughly by ensuring the target drive is empty or has enough space, the source drive is healthy and not corrupted, and the cloning software is compatible and up-to-date, to ensure a successful and accurate clone.
1. Pick up the Right SSD for Your PC/Laptop
When choosing a SSD for running Windows, consider factors such as performance needs, budget, and compatibility to select the right SSD that meets your requirements for a smoother and faster experience.
✔ It Suits Your Computer Motherboard
To purchase the right SSD for your computer, first check your motherboard to see what type of SSD it supports, which can be either 2.5-inch SATA or M.2. Some motherboards may support both types. Knowing this information will help you make the correct choice for your needs.
If your motherboard supports 2.5-inch SATA, you can use a standard 2.5-inch SSD, which is often the cheapest option. If it supports M.2, you'll need to buy an M.2 SSD, which is usually more expensive but offers higher performance.
✔ 500GB~1TB Capacity
To ensure a smooth cloning process, it's essential to have an SSD with a capacity that matches or exceeds the used space on your current hard drive. Check the drive info in This PC (for Windows 10 users) or Finder (for Mac users) to determine the size of your hard drive, and then select an SSD that is at least as large as the used space on your current drive. This will ensure that all your data is successfully cloned to the new SSD.
Some people may think they can get away with a smaller SSD, but it's not worth the risk, as it will force them to start over with a fresh installation of their operating system.
But for long-For long-term use, a larger SSD is recommended. We suggest purchasing a new SSD with a capacity of at least 500GB.
✔ PCIe/NVMe SSD
Most modern SSDs use the SATA 3.0 interface, offering a maximum transfer rate of 6Gbps, but some newer models use the faster PCIe 3.0 interface, which reaches 32Gbps. If you're looking for a significant speed boost over an HDD, consider a PCIe 3.0 SSD or an NVMe type, which offers a good balance of speed and price.
LEARN MORE
When selecting a solid-state drive (SSD), consider factors beyond motherboard compatibility, capacity, and type, such as speed, price, performance, and power consumption. A detailed analysis of how to choose the right SSD for your needs is also available.
2. Backup Old Data on Your Hard Drive
Cloning the hard drive data to a new, smaller SSD provides a backup, giving you access to important files in case something goes wrong during the cloning process. This is an optional but significant move.
3. Delete Unnecessary Files & Uninstall Unused Programs on HDD
Cloning a hard drive to an SSD creates an exact copy of all data, including junk files and cache data, wasting valuable storage space and potentially leading to performance issues.
To boost the cloning speed and enhance SSD efficiency after cloning, consider deleting unnecessary files, uninstalling unused programs, and running disk cleanup utilities to thoroughly remove Windows temporary files and cache data.
4. A SATA Cable
If your computer doesn't have a free SATA port, you'll need an adapter or converter. If using a USB adapter, a USB cable is also required. For laptops with only one hard drive bay, a USB-to-SATA adapter can be used to connect the new SSD.
5. HDD to SSD Cloning Software
Dedicated disk cloning software is the best way to clone a hard drive to an SSD, ensuring a correct and complete transfer of data, including the operating system, with minimal risk of errors.
- Qiling Backup
- Acronis Cyber Protect Home
- Macrium Reflect
- Paragon Hard Disk Manager
- Clonezilla
When selecting disk cloning software, ensure it supports both MBR and GPT formats on the source hard drive and destination SSD. Additionally, opt for software that offers a trial period or money-back guarantee, allowing you to test it before making a purchase.
With all necessary materials in hand, you're now ready to seamlessly clone your hard drive to your SSD.
LEARN MORE
Are you overwhelmed by the numerous disk cloning tools available? Want to know the best ones in 2022? Learn about the top hard drive cloning software, their features, pros, and cons, and make an informed decision.
Ⅳ. How to Clone Hard Drive to SSD on PC and Laptop
Qiling Backup is a professional backup and disaster recovery software that can also help clone hard drives to solid-state drives (SSDs) in Windows 10/8/7 with ease. It's the recommended disk cloning tool for upgrading HDD to SSD or migrating OS to SSD, allowing you to do so without reinstalling the Windows system and applications.
Compared to other disk cloning software like Clonezilla or Macrium Reflect, Qiling Backup has its own unique advantages, setting it apart from the competition.
✔ Flexible Cloning Options: Three modes of Disk clone - partition clone and system clone - cater to different needs. The system clone feature is particularly useful, automatically selecting and transferring all necessary Windows installation files and boot files from the source drive to the target drive, ensuring a 100% successful boot afterwards. This feature also allows for the creation of a portable Windows 10 USB drive that can be used on any PC or even Mac.
LEARN MORE
The system clone feature is more beneficial when you only need to migrate Windows 10 to a solid-state drive (SSD), rather than cloning the entire source hard drive. This approach allows you to transfer only the necessary components of Windows 10, making the process more efficient and targeted.
✔ SSD Optimization: Aligning the SSD automatically after cloning is crucial to achieve optimal performance. This process is essential for the software to help maintain the SSD's ability to work seamlessly, despite its different structure compared to an HDD. By doing so, the software can ensure that the SSD is configured to work efficiently, allowing it to perform at its best.
✔ Resize Partition Size: When cloning a hard drive to a smaller SSD, the cloning process can be simplified by resizing the partition on the destination disk, allowing the cloning to complete even if the target SSD is smaller than the source hard drive.
✔ More Details: Qiling cloning software is compatible with Windows 11/10/8.1/7/XP/Vista, allowing you to clone MBR disks to GPT SSDs and vice versa without data loss. This 2-in-1 software integrates both backup and clone functions, making it a convenient tool for HDD/SSD cloning and OS migration.
To clone a hard drive to an SSD in Windows 10/8/7 using Qiling Backup, follow these steps: First, download and install Qiling Backup on your computer. Next, connect your SSD to your computer and make sure it's recognized by the system.
Step 1. Connect the New Second Hard Drive to the PC
Preparations before cloning start:
1. To connect the target disk to your PC, you may need a screwdriver, a Power Splitter Adapter Cable, a SATA cable, or a USB to SATA adapter.
2. Before transferring data from an old hard drive (HDD) or solid-state drive (SSD) to a new one, ensure that the target drive has a capacity equal to or greater than the amount of used space on the old drive. This is to prevent data loss due to insufficient space on the new drive.
3. If the new disk's style doesn't match the old one, initialize it to either MBR or GPT to match the old disk's style.
4. Download a Disk Cloning Tool – Qiling Backup
Qiling Backup is a cloning software that integrates multiple functions, including backup and recovery, disk clone, and system migration. In the disk clone field, it stands out due to its ability to clone entire disks, including system, data, and applications, with minimal downtime and no data loss. Its user-friendly interface and efficient cloning process make it a popular choice among users.
- Support system/disk clone, backup, restoring , and system transfer.
- Disk cloning software covers a wide range of demands, including updating a hard drive to a larger one, cloning an operating system, and more.
- Disk cloning software has a high success rate compared to other similar products available in the market.
- This software supports a wide range of disk types, including IDE, EIDE, SATA, ESATA, ATA, SCSI, iSCSI, and USB 1.0/2.0/3.0.
- Supports cloning of basic/dynamic disks and MBR/GPT disks.
Step 2. Step by Step Guide
System Clone: To clone your system, choose System Clone, select the destination disk, and click Next to start. Alternatively, you can choose Advanced options and select the option to create a portable Windows USB drive to clone your system to a USB drive.

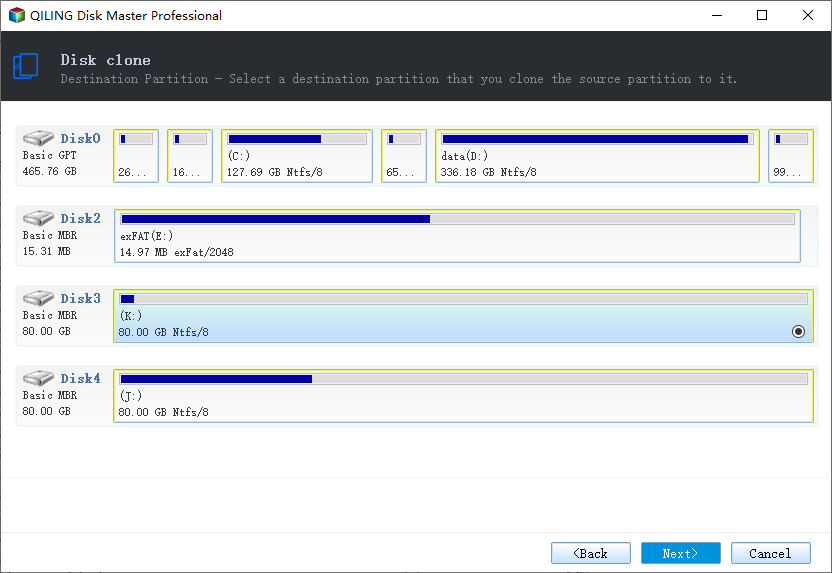
Disk/Partition Clone: To clone a resource disk or partition, select Clone, then choose the resource disk or partition you want to clone, followed by the target disk where you want to clone it to. Once you've selected both, click Next to begin the cloning process.
Step 3. Boot from the Clone Hard Drive
Case 1. If you want to keep both the old disk and the new disk
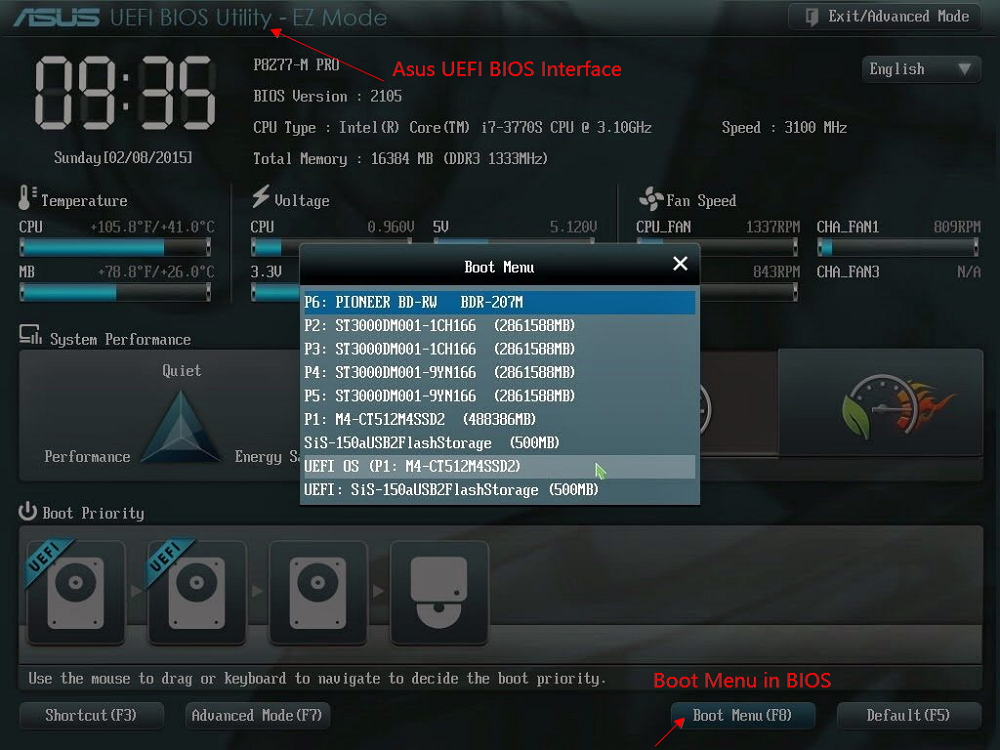
- To resolve the issue, restart your PC and press the corresponding key (usually F2, F8, F10, or DEL) to enter the BIOS settings. This will allow you to access and configure the basic input/output system, which may help resolve the problem.
- In the Boot option, select the new HDD/SSD as the new boot drive.
- Exit BIOS and restart the computer.
Case 2. If you want to only keep the new disk
- Unplug the old disk and ensure the new one is securely connected.
- Connect the new disk and ensure it's detected by the computer. Then, open Disk Management (Windows) or Disk Utility (Mac) to initialize and format the disk.
- Restart your computer.
Ⅴ. Troubleshooting Problems After Cloning Hard Drive to SSD
After cloning your hard drive, it's a good idea to verify that the process was successful. Simply boot up your computer from the new hard drive and ensure that everything is working as expected. This will give you peace of mind and confirm that your data and programs are intact on the cloned drive.
Next, delete the old hard drive. Unless you have a specific reason to keep it around, there's no need to keep two copies of your data. Just be sure to back up any data you still need from the old drive before you delete it. This will help declutter your space and prevent any potential data loss.
✘ Problem 1. Why Cloned SSD Won't Boot
After cloning, you should set the new SSD as the boot drive in BIOS settings before the old HDD. If you followed the correct procedure, cloned to the right SSD specification, and used the right cloning software, it's usually done. However, some users still encounter issues with the SSD not booting after cloning. This can be frustrating, and it's natural to wonder if the unbootable SSD is fixable. Fortunately, in most cases, the issue can be resolved by checking the BIOS settings, verifying the SSD is properly connected, and ensuring the cloning software was used correctly. In some cases, re-cloning the SSD or seeking professional help may be necessary. But, in general, it's not a lost cause, and you can try to fix the issue.
This issue can be caused by a faulty cloning process, incorrect SSD settings, or an incompatible file system.
✘ Problem 2. Cloning Hard Drive Takes Forever to Complete, or Failed Midway
Cloning a hard drive to an SSD can be a lengthy process, with some users experiencing errors while using tools like Qiling Disk Master.
If you're having trouble cloning a selected hard drive or partition, it's likely due to the software not being powerful enough or a health issue with the source hard drive, causing the cloning process to be slow.
The mentioned problems are usually fixable, you can follow the solutions below for a manual check and repair.
Solution 1. Check If the Target Disk Has Been Set as Active
To confirm that the target disk has been set as active after cloning the hard drive to an SSD, you need to check the BIOS settings. Ensure that the BIOS is set to boot from the SSD instead of the original hard drive. This typically involves entering the BIOS settings, navigating to the boot order, and selecting the SSD as the primary boot device. Once set, save the changes and exit the BIOS settings.
Step 1. Connect the SSD to your computer and ensure it is detected by the system.
Step 2. To open the Diskpart utility, type "diskpart" in the search box and click on the "diskpart.exe" result to launch it.
Step 3. In Diskpart, type the following commands one by one and hit Enter after each:
- list disk
- select disk (id of target disk)
- list partition
- select partition (number of the active partitions)
- active
If there's no active partition on your target disk, you can set it active, but if there's already an active partition on the SSD, you shouldn't set it again to avoid potential boot issues.
To resolve the issue of the computer not booting from the target disk after setting it as active, try restarting your computer and see if it boots successfully from the SSD. If not, proceed with the next solution.
Solution 2. Convert SSD File System to NTFS/FAT32
If your SSD's file system isn't compatible with your computer, you won't be able to boot from it. You can convert the file system to NTFS or FAT32, which are compatible with both Windows and macOS.
Step 1. Connect the SSD to your computer and ensure it can be detected by the system.
Step 2. To open the Format Utility, simply type "format" in the search box and click on the "Format" option that appears. This will allow you to perform various formatting tasks on your computer.
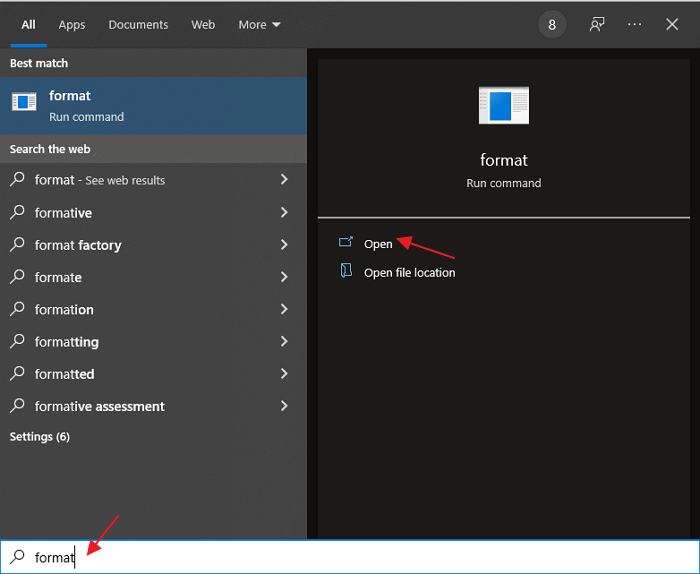
Step 3. To convert an SSD to NTFS or FAT32, open a pop-up window, select the SSD, and choose the desired file system. Click "Start" to initiate the conversion process.
After the conversion, try to boot from the SSD again and see if it works.
Solution 4. Set SATA Controller Mode in BIOS
If you're unable to boot from your SSD after trying various solutions, it's possible that the SATA controller mode is set incorrectly in your BIOS. In this case, you can try changing it to AHCI mode and then attempting to boot from the SSD again.
Step 1. To access the BIOS settings, restart your computer and press the F2 or DEL key repeatedly while it's booting up.
Step 2. To enable AHCI mode, go to the "Advanced" tab, then select "Drive Configuration" and change the "SATA Mode" to "AHCI".
Step 3. Save changes and exit BIOS.
Step 4. Shut down your computer, unplug the power cord, wait for 10 seconds, and then plug it back in. Press the power button to turn it on.
If this solution doesn't work, try the next one.
Solution 5. Check and Fix Disk Errors
If your target disk has errors, you can't clone your hard drive to an SSD successfully. To resolve this, you can use the Windows Error-checking tool to automatically check and fix any disk errors. This should allow the cloning process to proceed without issues.
Step 1. Right-click on the target disk and select "Properties".
Step 2. Go to the "Tools" tab and click "Check" under Error-checking.
Step 3. To start the scan, select "Scan drive" in the pop-up window and click "Start".
After the scanning is completed, try cloning the hard drive to the SSD again to see if it works.
Solution 6. Re-Clone Hard Drive to SSD
If you fail to clone a hard drive to an SSD with the first attempt, you can try again using professional cloning software like Qiling Backup, which can help you clone the hard drive to SSD easily and quickly with minimal chance of failure. Additionally, the software's in-house tech support team is available 24/7 to provide patient guidance and remote assistance if needed.
LEARN MORE
If you're still experiencing issues with the failed hard drive to SSD cloning process, there are several troubleshooting steps you can take. Firstly, ensure that the cloning software you're using is compatible with your system and the SSD you're cloning to. Next, verify that the source and destination drives are properly connected and recognized by your system.
Ⅵ. How to Clone Mac Hard Drive to SSD
Windows users are the majority seeking a cloning method to quickly transfer data from an old hard drive to a new one, while a smaller number of macOS users aim to upgrade their Mac with a newer, faster hard drive. Cloning the current hard drive to an SSD is the best approach. This guide will walk you through the step-by-step process of cloning your Mac hard drive to an SSD using the inbuilt Disk Utility.
Step 1. Prepare SSD for Cloning
To upgrade your Mac's storage, start by purchasing a compatible SSD (solid-state drive) that matches or exceeds the size of your current hard drive. Then, connect the new SSD to your Mac using a USB cable or an external enclosure, making sure it's properly powered and recognized by your computer.
Open Disk Utility, select your current hard drive, click on the "Erase" tab, choose "Mac OS Extended (Journaled)" and click "Erase".
Step 2. Clone Source Drive to Destination Drive
Now that your current hard drive has been erased, it's time to clone it to the SSD. Select the SSD from the left sidebar and click on the "Restore" tab.
To transfer your current hard drive's data to a new SSD, drag the hard drive into the "Source" field and the SSD into the "Destination" field. Ensure the "Erase Destination" box is selected and click the "Restore" button to initiate the process.
To free up disk space on your computer, you can delete unnecessary files, empty the recycle bin, and uninstall unused programs. You can also check for and remove temporary files and system files that are no longer needed.
Step 3. Boot Mac from SSD After Clone
Once you've finished the process, you can restart your Mac and hold down the Option key while it boots up, which will allow you to choose which drive to boot from, and then select your new SSD.
LEARN MORE
If you're still curious about cloning your Mac hard drive, you might be looking for alternatives to Disk Utility. If so, click here to learn about the most popular way to clone your Mac hard drive to an SSD.
FAQs About How to Clone Hard Drive to SSD
Cloning a hard drive to an SSD (Solid-State Drive) allows you to transfer all your data, programs, and settings to a faster, more reliable storage device, resulting in improved system performance and boot times. This process involves using specialized software to create a bit-for-bit copy of the original hard drive, including the operating system, applications, and personal files, which is then written to the new SSD. This approach ensures that your computer will function exactly as it did before, with no need to reinstall operating systems, programs, or reconfigure settings.
1. What do I need to clone my hard drive to SSD?
To clone your hard drive to an SSD, you'll need an SSD with enough storage capacity to hold all your current hard drive's data, a USB cable or SATA cable to connect the drives, and cloning software like Qiling Backup.
2. How do I clone my hard drive to SSD?
Cloning your hard drive to a solid-state drive (SSD) is a straightforward process. Simply connect your SSD to your computer via USB or SATA, launch the cloning software, and follow the on-screen instructions. The software will copy all of your data from the hard drive to the SSD, allowing you to boot up from the SSD just as you would from a regular hard drive.
3. Is cloned hard drive bootable?
As long as the source hard drive contains Windows installation files and folders, typically the system C drive and boot drive, cloning software will migrate all Windows-related files to the destination drive. This means that the cloned hard drive will be bootable on your computer, and all you need to do is change the boot drive order in BIOS settings to make it work.
4. Will cloning my hard drive to SSD speed up my computer?
Cloning your hard drive to an SSD can significantly improve your computer's startup time due to the much faster speeds of SSDs compared to regular hard drives.
Related Articles
- One for All Guideline: How to Clone a Hard Drive
- A Complete Guide to System Image Recovery in Windows 11/10/8.1/7
- Create Windows 10 Recovery USB (Including Windows 11, 8.1, 7)
- [July 2022] Complete Guide on How to Back Up Computer (Windows & Mac)
- Best HP USB drive Image Tool – Qiling Disk Master
Want to create an image for your HP USB so as to protect data on it? Read this article carefully to get the best HP USB disk image tool for Windows. - Incremental Backup External Hard Drive in Windows 7/8/10
You will learn how to perform automatic incremental backup of an external hard drive with best free incremental backup software - Qiling Disk Master.