One for All Guideline: How to Clone a Hard Drive
Ⅰ. Ideas You Should Know Before Cloning A Hard Drive
Cloning a hard drive is the process of creating an exact copy of the source disk to the target disk, which is often done for upgrading or backing up important data. Unlike copying, which can also create an exact copy, the main difference lies in the fact that cloning preserves the exact structure, including the partition, boot sector, and other metadata, making it a more precise and reliable method for data transfer.
Clone vs Copy
Clone: Cloning a hard drive involves not only copying files and data to the target disk but also replicating the partition layout, operating system, files, downloads, programs, and settings to the new drive.
Copy: When you copy a hard drive, you get a new hard drive with replicas of all the visible files.
Cloning a drive is not necessarily faster than copying, especially when dealing with large files or drives. In fact, cloning a drive can be slower than copying, especially if you're using a slow source drive or a network connection. This is because cloning a drive involves creating an exact replica of the source drive, including all its files, folders, and metadata, whereas copying only transfers the files themselves. If you only need to transfer or backup files from one drive to another, copying is usually the faster and more efficient method. However, if you need to create an exact replica of a drive, including all its settings and configurations, cloning might be a better option.
Copying is faster than cloning because cloning reads and writes every block, including empty ones, whereas copying only reads and writes the actual data.
Cloning a fragmented HDD is a better choice than copying it, as it takes less time and reduces physical seeking, which is the movement of the I/O head(s) to different locations on the disk, making the copying process faster.
Clone vs Entire Machine Backup
People often get confused between the terms "clone" and "backup" when they're used together. While they may seem like distinct concepts, they actually share a commonality: both are used to preserve data or systems in some way. A backup is a copy of data or a system, usually made for the purpose of restoring it in case of a loss or failure.
- Both can make a full copy of data and operating system.
- Both require an additional drive to save the source disk data.
- Either a backup image or a cloned drive can be used for the purpose of recovery.
Deciding between cloning a hard drive and making an entire backup can be challenging for non-IT professionals, as both methods have their own unique features. Cloning a hard drive creates an exact replica of the original, while making a backup only saves specific files or data. This can make it difficult to choose which method to use, especially if you're unsure of your needs.
- 1. Cloning and backup are two different methods of data preservation. Cloning creates an exact replica of a hard drive, resulting in two identical drives. On the other hand, backup saves selected files as an image file, such as a .pbd file, to another drive, preserving the data but not duplicating the entire drive.
- 2. Clone copies the entire disk, including the layout, to a new hard drive, whereas backup only copies the content, such as files or the operating system, to a separate storage device.
- 3. A clone requires a physical hard drive that is larger than the original drive, while a backup image is much smaller and can be saved to various storage locations.
- 4. A cloned hard drive with an operating system is bootable, but you can only use a system backup image to perform a recovery.
- 5. Clone is a one-time behavior and backup is continuous.
LEARN MORE
For a detailed explanation of the difference between a clone and a backup, you can visit the page "Disk Clone vs. Entire Machine Backup".
Ⅱ. Clone Procedure 1: Connect the Secondary Drive to Your Computer
To clone a hard drive, you need to connect both the source and target disk to one computer. This involves connecting the new hard drive, which can be an HDD or SSD, to your computer. The type of SSD you have, such as SATA, M.2, or NVMe, will determine the connection method, but all hard drives can be connected to a computer for cloning purposes.
1. Connect HDD to Your Computer
For those using desktops, an HDD (Hard Disk Drive) is a common storage device that can be installed to increase storage capacity. However, for laptop users, installing an HDD is not feasible due to limited space.
To connect a new HDD to your computer, you'll need a few tools: a power cable, a SATA cable, and a screwdriver to open your case. Make sure you have all these items before proceeding, and then follow the guide to install the HDD.
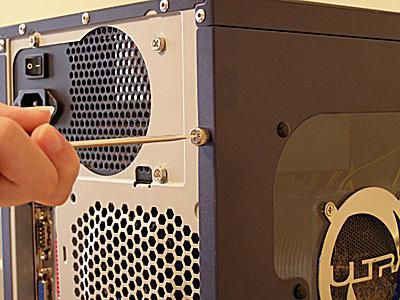
Step 1. Turn off your computer, remove all cables from the back, and open the computer case using a screwdriver. The tray may need to be removed and reattached with the screwdriver.
Step 2. The hard drive should be placed into the tray with the inputs facing the correct direction, usually indicated by a small icon or label on the tray itself. This ensures proper connection and function of the drive.
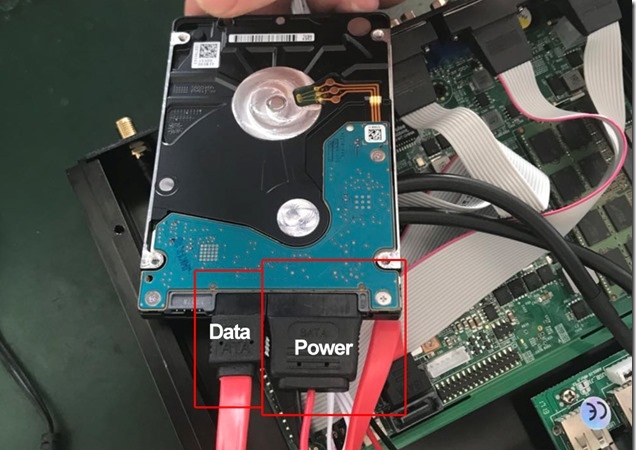
Step 3. Connect the power cable and SATA cable to the hard drive, which should be a straightforward task of matching the cables to the corresponding connectors.
Step 4. Once the cables are connected, slide your hard drive into the slot on the tray.
Step 5. Next, route the power and SATA cable into your case and through to the port.
Step 6. Now you can close the case and get ready with the cloning process.
2. Connect SSD to Your Computer
As a younger technology, Solid-State Drives (SSDs) outperform Hard Disk Drives (HDDs) in terms of speed and durability. With different connectors, such as SATA and M.2, SSDs can be connected to both desktops and laptops, and here's a brief guide on how to do it: for desktops, one can simply plug in the SSD into the SATA port, while for laptops, it's a bit more complicated, requiring a separate adapter or a specific M.2 slot.
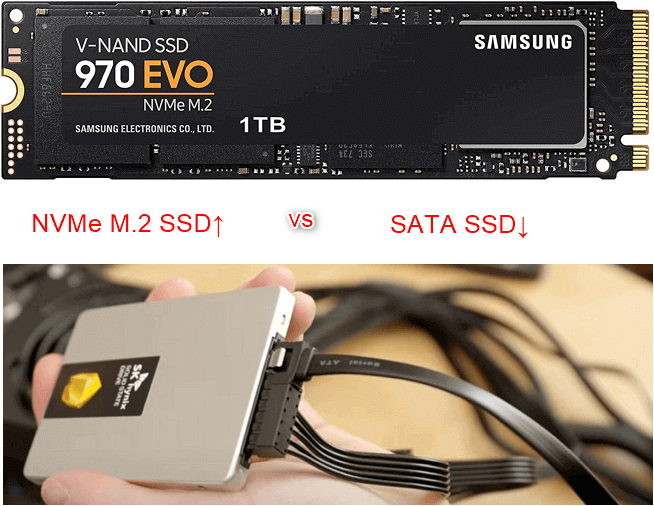
What's the Difference: NVMe vs SSD?
The NVMe SSD has emerged as a strong competitor to traditional SSDs, but what sets them apart? Unlike traditional SSDs, NVMe SSDs use a new interface called NVMe (Non-Volatile Memory Express) that allows for faster data transfer rates and lower latency. This results in significantly improved performance, making NVMe SSDs outperform traditional SSDs in terms of speed and efficiency. With NVMe SSDs, users can expect faster loading times, improved multitasking capabilities, and enhanced overall system performance.
On desktop:
Step 1. The process of connecting an SSD is similar to that of connecting a hard disk drive (HDD). You will need to use the power cable, SATA cable, and a screwdriver for the installation.
Step 2. To upgrade your computer's hard drive, turn off your computer, remove all cables from the back, and open the case with a screwdriver. Locate the old hard drive in the case, which may be accompanied by another drive bay nearby.
Step 3. Place the SSD into the drive bay with the SATA power connector facing outwards, ensuring the holes align for secure screwing into place.
Step 4. There should be an unused power cable inside the computer, connect it to the SSD.
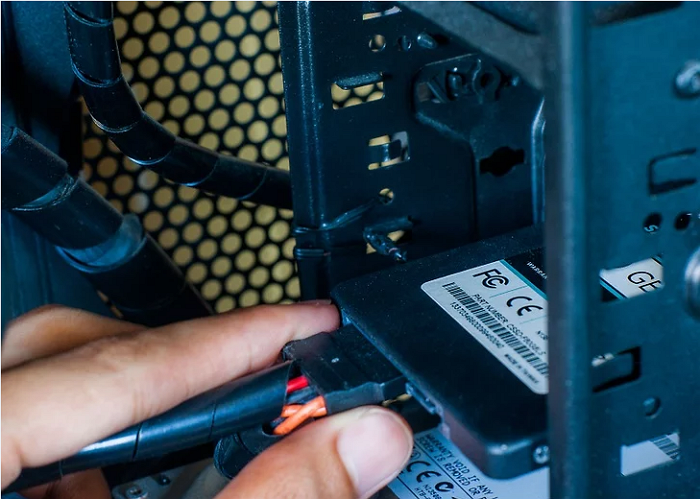
Step 5. Connect the SATA cable from the motherboard to the SSD. If you can't find the SATA connection, follow the SATA cable of your old hard drive, you might find another one available.
Step 6. Close your computer case with the screwdriver, and reconnect all removed cables. This completes the installation process.

On laptop:
To install a second SSD in a laptop, you typically need a USB adapter due to limited space. Most laptops now use NVMe SSDs with M.2 connectors, so when cloning a hard drive to replace the old one, look for an adapter with an M.2 port.
Step 1. Connect the USB adapter to your laptop. If the SSD to be cloned is a SATA SSD, a SATA adapter is needed, while an NVMe adapter is required for an NVMe SSD.
Step 2. Connect the SSD to the adapter using the provided connector.
Step 3. Then you can start the cloning process.
Note: The USB adapter is only for cloning a hard drive, requiring connection of both hard drives to a laptop. If replacing the old hard drive, the laptop case also needs to be opened with a screwdriver to install the new SSD.
Ⅲ. Clone Procedure 2: Choose the Best Hard Drive Cloning Software
To clone a hard drive, you'll need to use cloning software since Windows doesn't have a built-in utility. While manual cloning is possible, using software makes the process much easier and faster. Some cloning software also offers additional features, such as resizing partitions and compressing data. When selecting a product, ensure it's compatible with your operating system and meets your specific needs.
We've compared 5 hard drive cloning software options, evaluating them based on price, ease of use, additional features, and overall experience. A comparison chart is available, which can help you make an informed decision and choose the best software for your needs.
|
Comparison |
Price (Yearly) | Ease of Use | Additional Features | Overall Experience |
| #1. Qiling Backup | $39.95 | ★★★★★ | ★★★ | ★★★★★ |
| #2. Macrium Reflect | $69.95 | ★★★★ | ★★★ | ★★★★ |
| #3. Acronis Cyber Protect Home Office | $49.99 | ★★★★ | ★★★ | ★★★★ |
| #4. Paragon Hard Disk Manager | $79.95 | ★★★ | ★★★★★ | ★★★ |
| #5. Clonezilla | Open Source | ★★ | ★ | ★★ |
LEARN MORE
To choose the best cloning software, it's best to carefully read software reviews, as they provide information on how each software performs.
Ⅳ. Clone Procedure 3: How to Clone a Hard Drive From HDD to SSD
Now that you've connected the two hard drives and installed disk cloning software, it's time to execute the cloning process. Cloning a hard drive, often from an HDD to an SSD, involves five key procedures that can be completed with ease by following a clear guide.
#1. Initialize the Hard Drive
If your hard drive is a brand-To use a new hard drive, you need to initialize it first, which allows your computer to detect it. To do this, follow the steps to initialize the hard drive, which will make it ready for use.
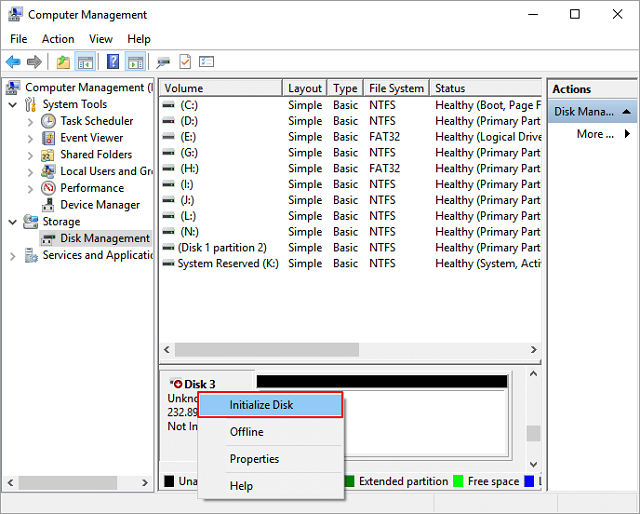
Step 1. Right-click the Start button and select Disk Management.
Step 2. To initialize a hard drive, open the Disk Management window, right-click the hard drive you want to initialize, and select "Initialize Disk". If the disk is listed as Offline, first right-click it and select Online before initializing it.
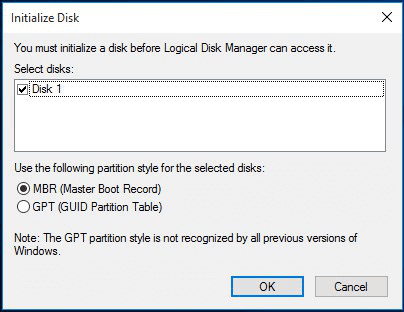
Step 3. When setting up a new hard drive, you'll need to choose a partition style: MBR (Master Boot Record) or GPT (GUID Partition Table). This decision is largely determined by whether your computer is BIOS-booted or UEFI-booted, with BIOS+MBR and UEFI+GPT being the most common configurations.
For Users Who Want to Clone from MBR to GPT or Vice Versa:
To ensure a smooth transition, keep the partition style of your old and new hard drives the same, especially if you plan to boot from the cloned hard drive. If your old drive is MBR, you can clone to a GPT disk, but you won't be able to boot from it since your computer is still BIOS-booted.
#2. Start Cloning with Qiling Backup
Now that both hard drives are detectable, you can start cloning them using Qiling Backup. This process allows you to create an exact copy of the original hard drive, which can be useful for backing up important data or preparing for a potential hardware failure.
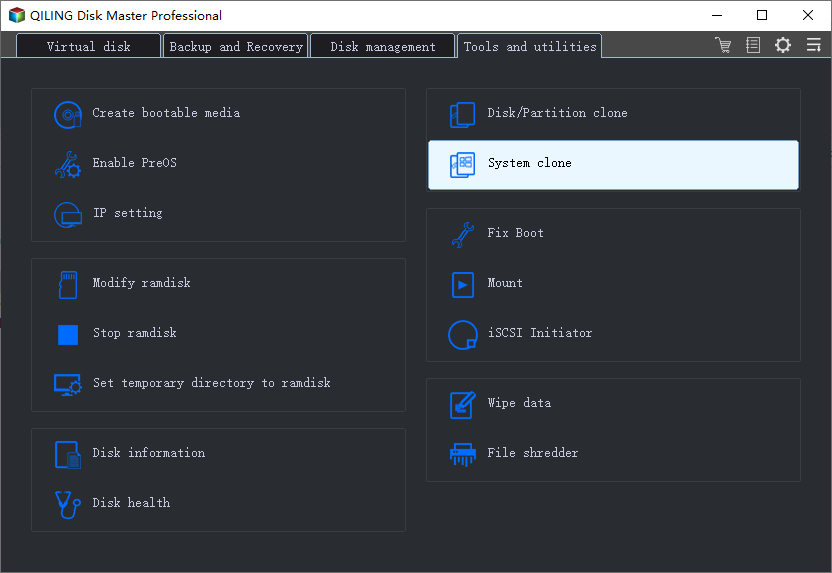
Qiling Backup offers two types of clone models: disk/partition clone and system clone. The system clone model automatically selects the system partition and disk, eliminating the need for manual selection.
Step 1. To clone your system, click on the "Tools" option located on the right side of the interface, and then select either "clone" or "system clone".
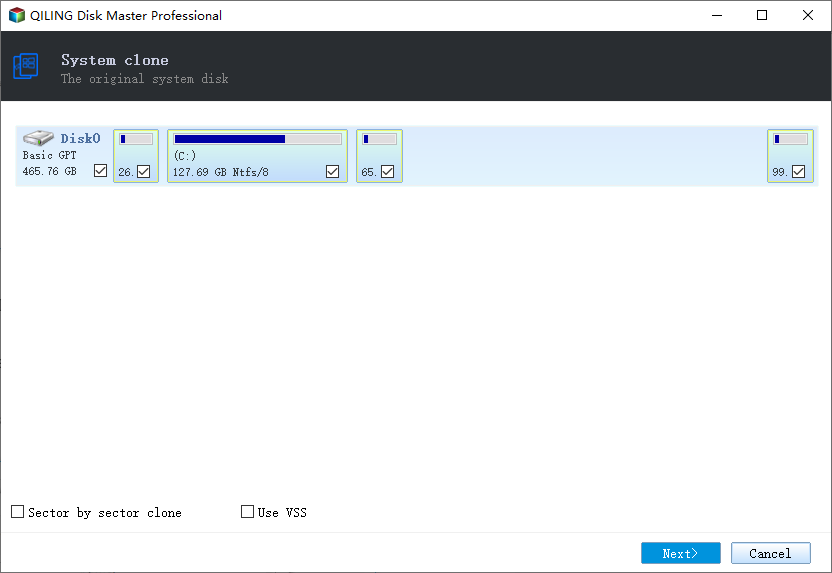
Step 2. Then Qiling backup will let you choose the source disk. Tick the source disk and click the Next button to continue.
#3. Confirm Clone Destination
Qiling Backup will inform you to choose the target disk, select the new attached hard drive as the destination.

#4. Data Loss Awareness
The software will inform you that cloning will erase and delete all data and disk layout on the target disk. If you're using an old hard drive with data, make a backup before cloning. Once you're aware of the risk, take precautions and click "Continue" to start the cloning process.

#5. Boot from the Cloned Hard Drive
When performing a system clone, the process makes sense whether you plan to keep both disks or only the new one. You can follow the guide to boot from the cloned hard drive.
Case 1. If you want to keep both the old disk and the new disk
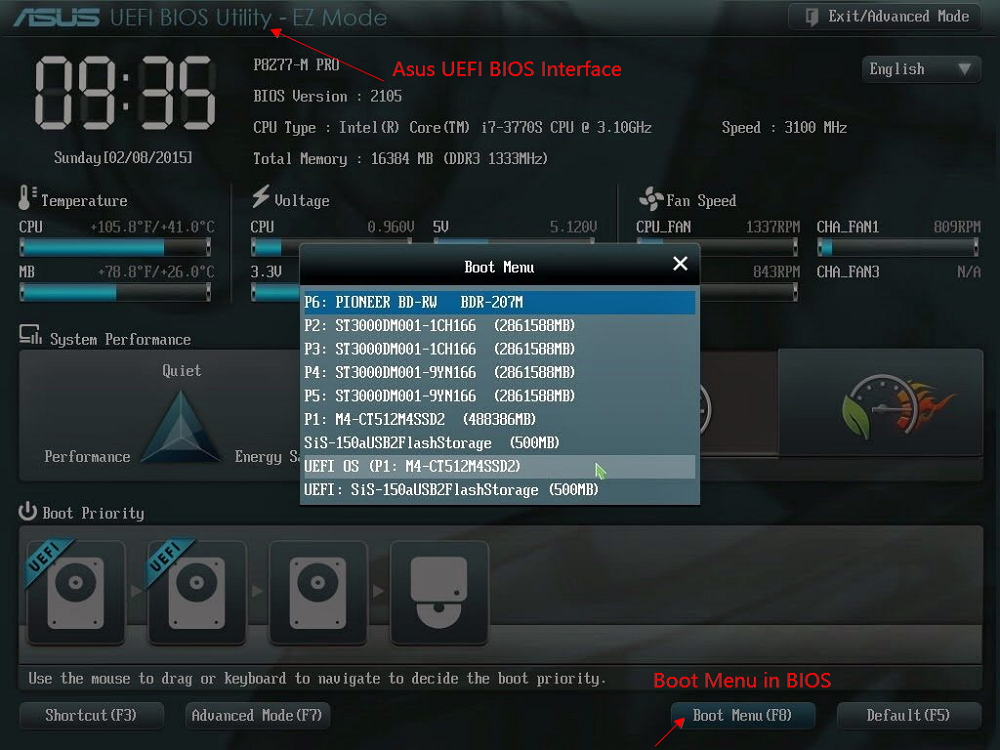
- To restart the PC and access the BIOS settings, simply shut down the computer, then press the corresponding key (usually F2, F8, F10, or DEL) as soon as the system starts booting again. This will allow you to enter the BIOS settings, where you can make necessary adjustments or changes.
- In the Boot option, select the new HDD/SSD as the primary boot device.
- Exit BIOS and restart the computer.
Case 2. If you want to only keep the new disk
- Unplug the old disk and ensure the new one is properly connected.
- To connect a new disk to a computer and ensure it can be detected, first physically connect the disk to the computer using a USB or SATA cable, depending on the type of disk. Next, turn on the computer and enter the BIOS settings by pressing a specific key (usually F2, F12, or Del) during boot-up.
- Restart your computer.
LEARN MORE
The guide above explains how to clone an HDD to an SSD, but if you're interested in learning more about the preparation process, you can click here to read about it in more detail. How to Clone HDD to SSD
Ⅴ. Clone Procedure 4: Clone From SSD to HDD (New Disk to Traditional Disk)
While SSDs have some advantages over HDDs, they don't outperform them in every way. HDDs are often preferred for their lower cost and larger capacity, making them a good choice for users who need more storage space. However, there are still three reasons why users might want to clone their SSD to an HDD, despite the latter's limitations.
Reasons to Clone from SSD to HDD:
- Upgrade to a larger HDD: When the SSD is full, consider upgrading to a larger one, but if cost is a concern, a traditional HDD can be a great and more affordable option.
- Replace a failed or damaged SSD: If your SSD is corrupted or damaged, you might need to clone it to an external HDD to recover your data.
- Completely erasing SSD before selling away: Cloning the SSD data to an HDD and then wiping the original SSD is a safe way to sell a computer, as it ensures that your data is protected and can't be accessed by the buyer. This method provides a secure way to erase all data from the original drive, making it ready for resale.
Although the purposes are different, you can use the same method and tool to start cloning, referring to this page to see how to clone SSD to HDD.
Ⅵ. Can You Clone A Hard Drive To New Computer
When cloning a hard drive, upgrading from an old to a new disk is just one option. Another scenario is when you're buying a new computer to replace the old one - in this case, cloning the hard drive to the new computer can be a convenient and efficient way to transfer all your files, settings, and programs to the new device. This can save you time and effort in reinstalling everything from scratch.
You have an old computer with all your familiar software and files, and you want to upgrade to a new one without losing any of that. To do this, we recommend cloning the old hard drive to the new one, so you can keep everything as it is. This way, you'll have the benefits of a newer computer with better hardware, while still having access to all your old files and programs.
Q1. Can You Copy the OS to the New Computer?
When users want to move files to a new computer, they often prioritize the operating system (OS). However, system files, which include system configuration, data, programs, and settings, cannot be synced or transferred through cloud services. Fortunately, it is possible to transfer the OS to the new computer, making it a viable solution for users looking to migrate their system files.
Q2. How to Clone a Hard Drive to the New Computer?
To clone a hard drive to a new computer, create a system image first and then restore it to the new computer. This method saves time and preserves the original system settings. You can use the Windows built-in tool, Backup and Restore (Windows 7), to create a system image, or third-party software like Qiling Backup to make the process easier and restore the system to the new computer.
LEARN MORE
Building a new computer can be a complicated and tedious process, but it's made easier by following a guide like "How to Move/Clone Windows 10 Hard Drive to A New Computer".
Ⅶ. How to Clone Hard Drive on Mac
Updating the SSD on a Mac is just as crucial as it is for Windows. To keep your data safe and replace a corrupted hard drive, cloning the hard drive is the best approach. Fortunately, Mac's built-in Disk Utility feature is powerful enough to handle this task. By following the steps outlined, you can easily clone a hard drive on your Mac.
Step 1. Prepare the SSD for cloning
To upgrade your Mac's storage, start by purchasing a compatible SSD that matches or exceeds the size of your current hard drive. Then, connect the new SSD to your Mac using a USB cable or external case, making sure it's properly set up and recognized by your computer. This will allow you to transfer your data and operating system to the faster SSD, significantly improving your Mac's performance.
Open Disk Utility, select your current hard drive from the left sidebar, click the Erase tab, select "Mac OS Extended (Journaled)" format, and click the "Erase" button.
Step 2. Clone the source drive to the destination drive
Now that your current hard drive has been wiped, select the SSD from the left sidebar and click the Recovery tab to clone it.
To clone your current hard drive to your SSD, drag your current hard drive into the "Source" field and your SSD into the "Destination" field, ensuring the "Erase Destination" box is checked, then click the "Recover" button.
Depending on the size of your hard drive, the process may take a while.
Step 3. Boot Mac from SSD after cloning
Once you've finished the cloning process, you can restart your Mac and hold down the Option key as it starts up. This will display a menu where you can select the drive to boot from, and choosing your new SSD will complete the process.
Ⅷ. Final Thought
Congratulations! By following our guide, you've successfully cloned your hard drive. This process ensures that all your important data is safely backed up in case of a disaster, giving you peace of mind knowing your information is secure.
Related Articles
- (2022) SD Card Backup and Restore on Android, PC and Raspberry Pi
- A Complete Guide to System Image Recovery in Windows 11/10/8.1/7
- [July 2022] Complete Guide on How to Back Up Computer (Windows & Mac)
- Overall Guide to Migrate/Move OS to SSD
- How to Create Acer eRecovery Management USB or Similar Disk
This article will show you how to create Acer eRecovery Management USB or similar disk in simple steps. - How to use Acer eRecovery Management in Windows 7
Acer eRecovery Management in Windows 7 is to help to back up operating system in case of accidents and restore system back after accident happens.