An Ultimate Guide: How to Use Backup and Restore in Windows 7/10
Overview of Backup and Restore (Windows 7)
Windows Backup and Restore is a tool that takes a snapshot of your hard drive, creates an image file, and allows you to restore your computer to a previous state. It was first introduced in Windows 7 and is a popular way to backup important files.
Windows Backup and Restore is a user-friendly tool that allows you to backup data on both local and external drives, including network drives, making it a convenient option for backing up data from multiple storage locations.
Backup and Restore on New Windows
Microsoft's Backup and Restore feature, introduced in Windows 7, was a built-in backup tool that took snapshots of the hard drive and created image files of those snapshots. Although a similar feature called File History was introduced in Windows 8, Backup and Restore was not completely removed and remains available in later Windows versions, with a note that it is for Windows 7 users.
You can use Backup and Restore to create backup images, even if your system is higher than Windows 7. In the next parts, we will explain how to use Backup and Restore in Windows 7 and higher Windows systems.
How to Use Backup and Restore in Windows 7
Windows 7 users can access the Backup and Restore utility directly from the Properties window to create a backup of their system. This built-in tool allows users to select the data they want to back up, choose a location for the backup, and schedule the backup to run automatically. By following the prompts and selecting the desired options, users can create a backup of their Windows 7 system using the Backup and Restore utility.
Here are the steps to use Backup and Restore in Windows 7 in one paragraph:
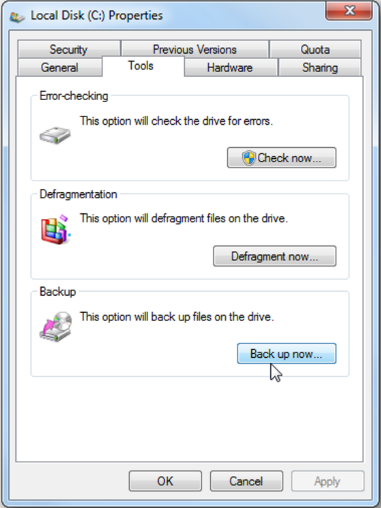
Step 1. To backup a local drive, open the computer and select the drive you want to backup. Right-click on it and select Properties.
Step 2. To back up your data, switch to the Tools tab and click on the "Back up now" option.
Step 3. To set up a backup, click on the "Backup and Restore" tab, then click on "Set up backup" to begin the process.
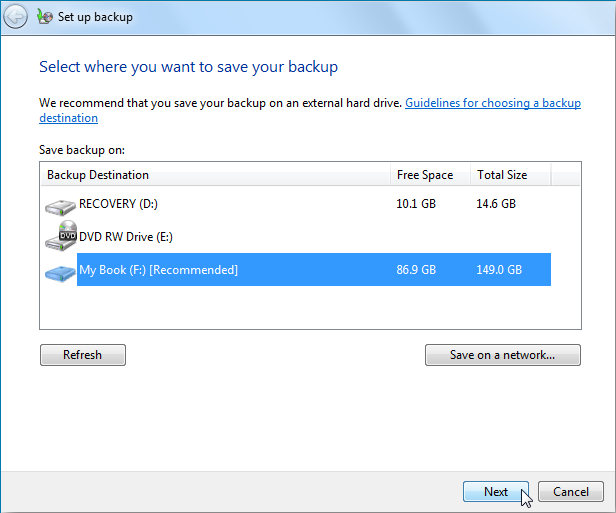
Step 4. Connect an external hard drive to your computer as the backup drive.
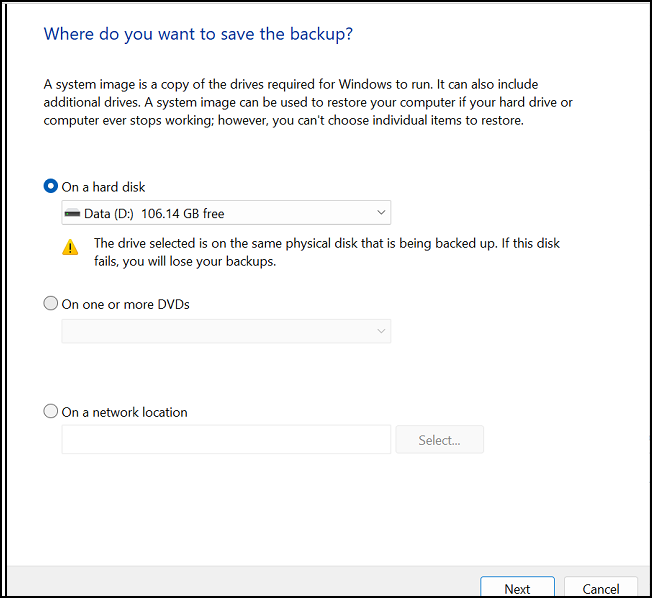
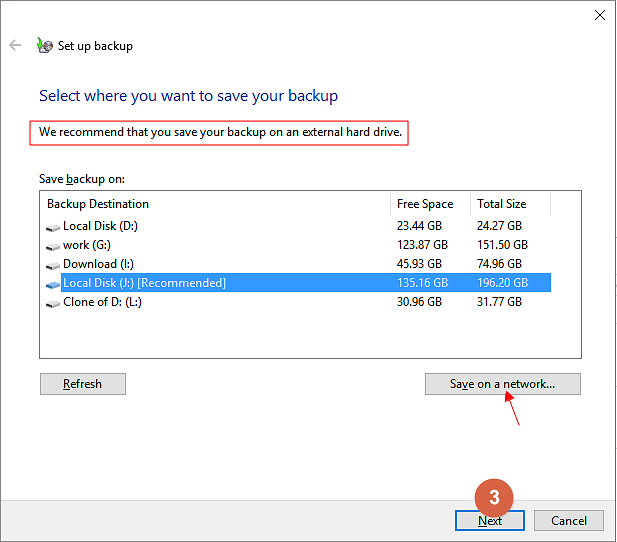
Step 5. Windows will scan and list all available drives on your computer, allowing you to select where you want to save the backup, including the option to choose a network drive as a backup location.
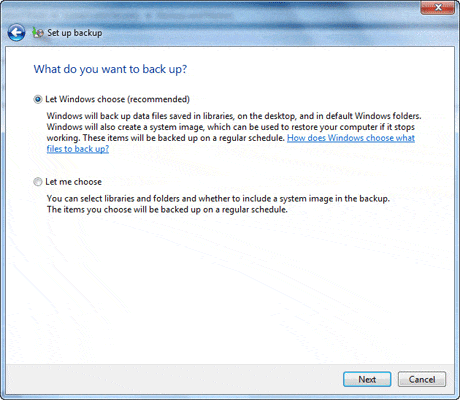
Step 6. Windows will automatically choose to back up files in Libraries, Desktop, and other default folders, and also create a system image by default. However, users have the option to choose what to back up, allowing them to customize their backup settings. This flexibility allows users to tailor their backups to their specific needs, ensuring that they are backing up the files and system components that are most important to them.
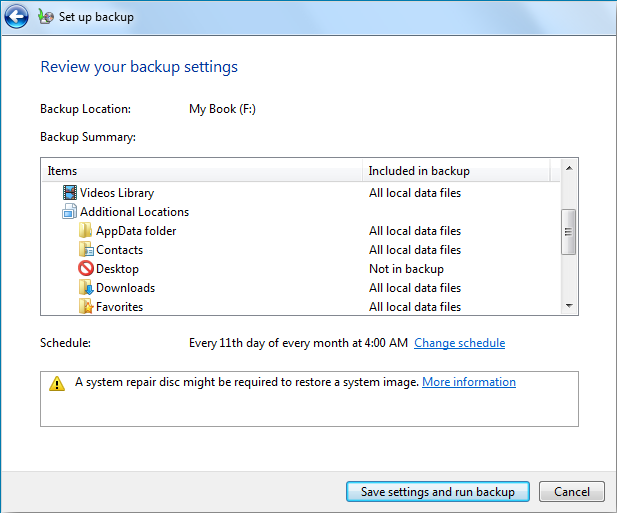
Step 7. To confirm backup settings, review the backup location, schedule, and any specific files or folders you want to include. Ensure the backup settings are correct and suitable for your needs. Once confirmed, initiate the backup process to start the backup operation.
How to Use Backup and Restore in Windows 8/10/11
In Windows 7 and later, the main difference between Backup and Restore is the access method. On Windows 8/10/11, users can no longer enter Backup and Restore by right-clicking local drives, but can still use Backup and Restore (Windows 7) to create a backup.
1. How to Enter Backup and Restore
On Windows 8/10/11: To access the Backup and Restore feature in Windows 7, go to the Control Panel, click on "System and Security", and then select "Backup and Restore".
2. How to Setup Backup and Restore
The setup process of Backup and Restore in Windows 8/10/11 is the same as that in Windows 7, allowing you to follow the same steps to set up and start a backup.
How to Restore Backup Files in Windows 7/8/10/11
Restoring a backup in Windows 7/8/10/11 is as straightforward as creating one. The backup setup steps remain the same across Windows 7 and later systems like Windows 10 and 11. To restore a backup, follow the same steps as creating a backup, which involve selecting the backup location, choosing the backup file, and confirming the restore process. This process allows you to recover your important files and data from a previously created backup.
Step 1. Enter Backup and Restore (Windows 7).
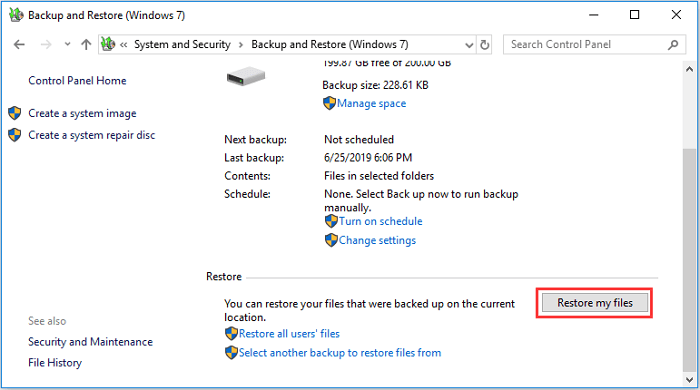
Step 2. Click Restore my files or Restore all users' files.
Step 3. To restore backup files, select the option that best suits your needs: Choose individual files to restore for specific files or Restore all users' files for a complete restoration. Follow the on-screen instructions for the chosen option.
Backup Full Guide: How to Backup Windows 10 (System&Files)
This comprehensive guide covers not just Windows Backup and Restore, but also other methods to backup Windows 10, including both built-in and third-party options.
Alternative to Backup and Restore - Qiling Backup
Windows' backup and restore feature has limitations, such as only being able to backup to NTFS partitions, and lacks backup management features, making third-party software like Qiling Backup necessary for more advanced backup needs.
Qiling Backup is a professional software that supports various backup types, including file, system, disk/partition, and email backup. It allows backing up to FAT32 partitions, external storage, and cloud drives like Google Drive or Dropbox, with scheduling and automatic backup options. This software offers more flexibility in choosing backup locations compared to Backup and Restore.
Key Features of Qiling Backup:
- Various backup options: create a full, incremental, and differential backup
- Easy-to-use: on-screen wizard guides you to create a full backup
- Highly customized software allows for backing up any desired data and saving the backup files in a preferred location.
- 100% free backup and restore software with no charges, offering more functions than expected.
Qiling Backup is the best choice for backing up files in Windows 7 or later systems. You can download it for free from the button below and follow the backup creation guide to get started.
Step 1.Launch Qiling Backup and choose "System Backup"on the home page.

Step 2.The system partition will be automatically selected, you only need to select the location to install the system.

Step 3.You can save the backup file to your local drive, cloud storage, or network-attached storage (NAS), or even connect an external hard drive to store system backup files.

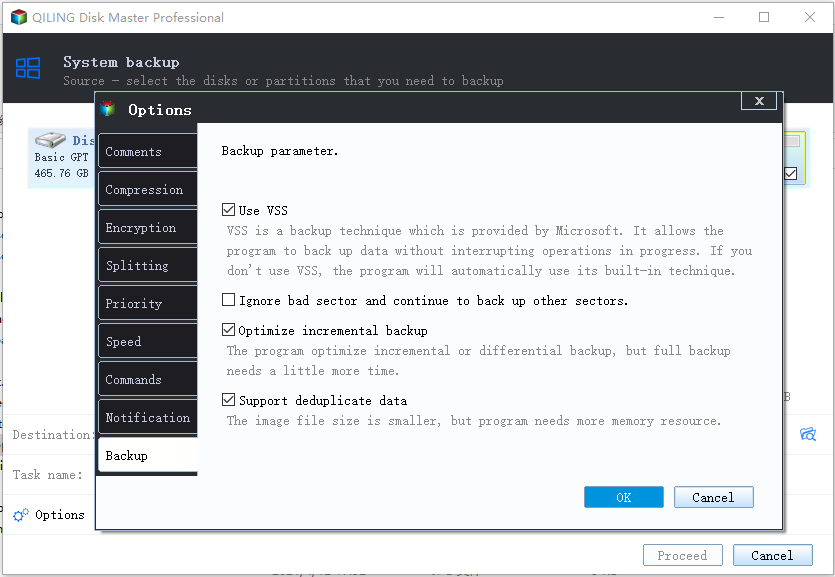
Step 4.To customize settings in "Options", click on it at the left bottom, then click "Proceed" to start the process.
After completing the backup process, you can check the backup status, recover, open, or delete the backup by right-clicking the backup task on the left.
You may be interested in Qiling Backup Free and Qiling Backup Home are two versions of the Qiling Backup software. The main difference between them is that the Free version has limitations on the number of backups and the size of the backup files, whereas the Home version offers more features and capabilities. The Free version is suitable for personal use, while the Home version is designed for small businesses and individuals who need more advanced features. The Home version also includes a 30-day money-back guarantee, giving users a chance to test the software before committing to a purchase.
FAQs
1. How do I Backup and Restore my computer Windows 7?
To backup and restore your computer data in Windows 7, follow these steps: you can use the built-in backup and restore feature, which can be accessed by going to Control Panel, then System and Security, and finally clicking on Backup and Restore. From there, you can create a backup of your files and settings, or restore from a previous backup. Alternatively, you can also use the File History feature to backup your files, and then restore them from the File History folder.
Step 1. Go to Control Panel, then click on System and Security, and then select Backup and Restore (Windows 7).
Step 2. To set up a backup, click on "Set up backup" and choose what you want to back up. You have two options: let Windows choose what to back up or let you choose specifically.
Step 3. Connect your backup drive to the computer, then select it as the destination for the backup process.
Step 4. Review and confirm the setting, then start the backup process.
2. Can I use Windows 7 Backup and Restore on Windows 10?
The backup and restore feature in Windows 7 is compatible with Windows 8/10, allowing you to backup data in Windows 7 and restore it to Windows 10. However, backing up files on Windows 10 and restoring them to Windows 7 is not possible due to the incompatibility of the backup file format.
3. Is Windows 7 backup any good?
Windows 7 backup is a user-friendly and free tool that comes with the Windows operating system, but it has some limitations, including a lack of backup management features and the inability to backup files to FAT32 partitions or external storage devices.
Related Articles
- USB External Hard Drive Not Showing Up in Windows 11 (99% Users Rated Useful)
- (Updated!) Top 5 Driver Backup Software for Windows 11/10/7/XP
- How to Backup Outlook Emails from Browser(OWA): Full Guide
- Macrium Reflect Guide | How to Boot from Rescue Media (with Alternative)
- How to Do System Restore in Safe Mode Windows 7
This article covers everything related to system restore in safe mode including a step by step guide. Swip to learn more. - How to Fix This Copy of Windows Is Not Genuine
After installing a Windows Update, there are chances that you might see the sign this copy of Windows is not genuine. Here are some fixes.