Macrium Reflect Guide | How to Boot from Rescue Media (with Alternative)
Macrium Reflect's rescue media allows users to recover their computer by booting from it, saving them time and simplifying the data recovery process when the Windows operating system fails. The rescue media can be saved on a CD/DVD or USB drive, enabling users to recover entire disks or specific files with just a few clicks.
To create rescue media, you'll need a USB drive with at least 8GB of free space. Download the rescue media creator from the manufacturer's website (e.g.
What Is Rescue Media?
When turning on your computer, it initializes all its components and loads the operating system from the hard drive. However, the boot process can sometimes fail due to various reasons.
Macrium Reflect is used to create a recovery image (snapshots) of your Windows operating system and the entire drive, which can be used to boot and restore your computer.
The rescue media is a simplified version of Windows created using Macrium Reflect and stored on a USB drive or CD/DVD.
Macrium Reflect offers both a free and paid version, with the paid version providing additional tools and features like incremental backups, ransomware protection, and encrypted backups.
How to Boot from Rescue Media
If your computer won't boot up and you need to recover important data, you can create rescue media to access and retrieve your files.
Here's how to boot your computer from rescue media:
Step 1. Turn on your PC, and before the Windows logo appears, press the key set by your PC manufacturer (usually F2, F10, or DEL) to enter the BIOS window, or press F8 if that's the key your PC uses.
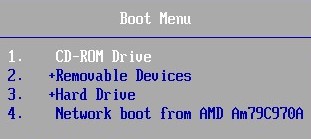
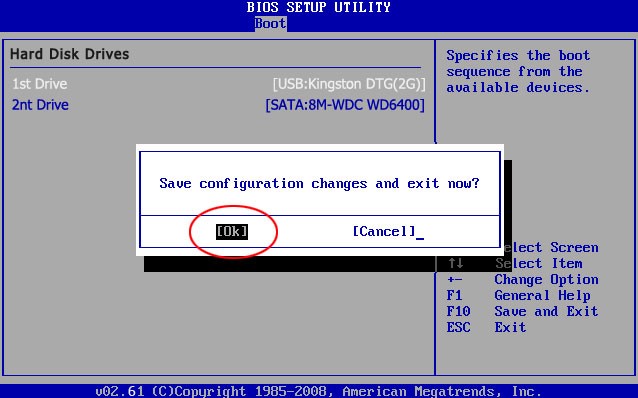
Step 2. Now, set the USB or CD/DVD as the initial boot device and the hard disk as the secondary boot device.
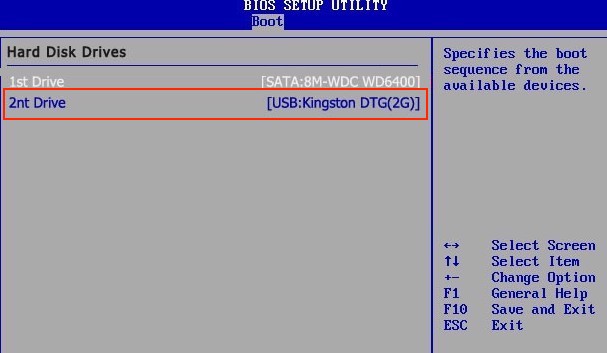
Step 3. Save the changes and exit the BIOS settings by pressing the "F10" key.
Step 4. Insert the Rescue Media into your computer's USB port or optical drive, then restart your computer.
Your computer will now boot from the rescue boot disk.
How to Create a Rescue Media with Macrium Reflect?
The content above shows you how to boot from rescue media. If you're curious about the creating process of a rescue media, you can follow the steps here to create one with Macrium Reflect, which is also demonstrated in the content.
- 1. Insert a USB flash drive or a blank CD/DVD into the computer's drive.
- 2. Click the "Other Tasks" button and select "Create Rescue Media."
- 3. The Rescue Media wizard will open with the default WinPE version. If you want to change it, select "Change PE Version". Confirm your version and click "Next".
- 4. If you're missing drivers needed to create a restore image, you can install them by selecting the "Update Drivers" option.
- 5. Select your Windows architecture, 32-bit or 64-bit, and click on "Next."
- 6. Now, select the device (CD/DVD or USB drive) and burn the bootable media, or you can also save it as an ISO image. Confirm your selection and then select "Finish" to complete the process.
Create Rescue Media with Qiling Backup - Macrium Reflect Alternative
Qiling Backup is a comprehensive program that allows you to back up your computer, create a bootable rescue media, encrypt and compress the backup image, and more.
Unlike Macrium Reflect, Qiling Backup allows you to back up your files to the cloud, giving you the option to choose from EauseUS's cloud service (AWS-based) or third-party services like OneDrive, Google Drive, Dropbox, and more.
Qiling Backup offers a Smart Backup feature that automatically backs up selected files and folders every 30 minutes, ensuring important files are accessible and never lost.
- Back up an entire disk, selected files, or partition.
- Set up Auto Backup tasks to run at a specific time, such as daily, weekly, or monthly, to ensure your data is backed up at a predetermined schedule.
- Save backup copies locally and on the cloud.
- Upgrade your hard drive to a solid state drive (SSD) by cloning your existing hard drive to the new SSD, which allows you to keep your operating system and all your files without having to reinstall them. This process requires a paid software or service.
If you're looking for an alternative to Macrium Reflect, Qiling Backup is a great option. You can download it for free from the button below and see how to create bootable media.
Step 1. Prepare a USB drive which can be written and read.
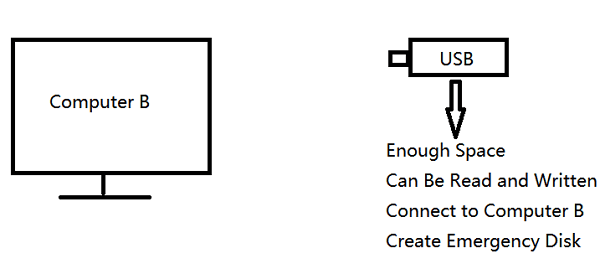
Step 2. Launch and install Qiling Backup on the Computer B.
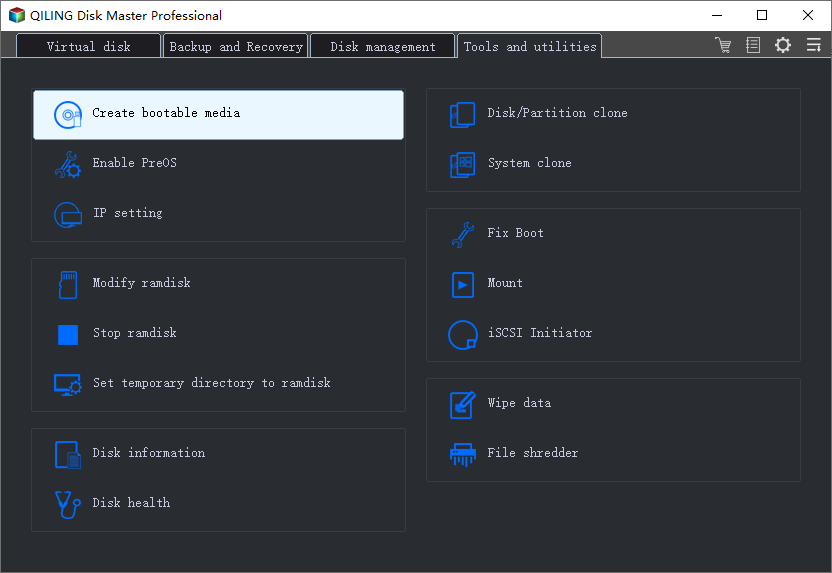
Step 3. Find and click "Tools" and choose "Create bootable Disk".
Step 4. To set up the boot disk location, you need to choose where you want to create the bootable disk. This can be done by creating an ISO file, a bootable USB drive, or a CD/DVD disc.
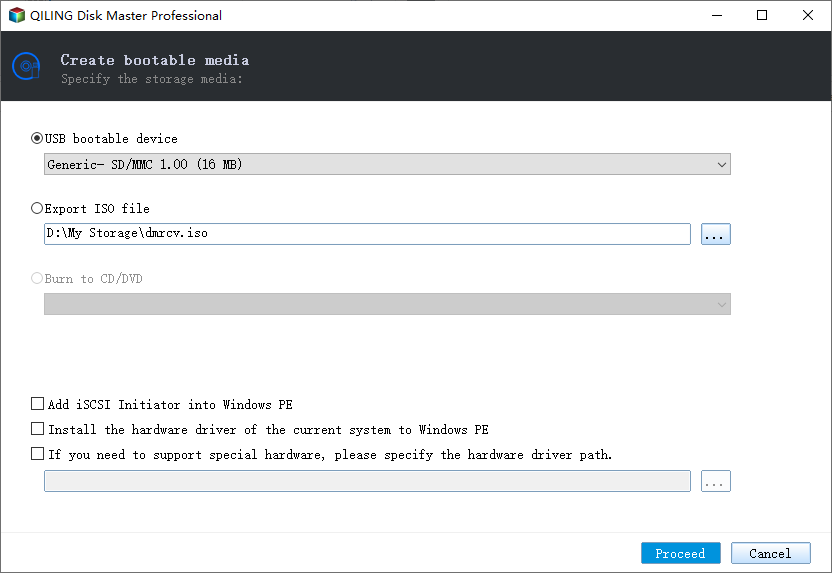
Step 5. Then click "Proceed" to start.
Qiling Backup vs. Macrium Reflect
When deciding between Qiling Backup and Macrium Reflect for creating a system image or data backup, consider their features, pros, and cons. Both software options offer robust backup and imaging capabilities, but they differ in their approach. Macrium Reflect is a more comprehensive tool that allows for system imaging, disk cloning, and file backup, making it ideal for creating a full system image or cloning a hard drive. On the other hand, Qiling Backup is a more streamlined option that focuses on file backup and system image creation, making it suitable for those who need a simple and efficient way to back up their data.
Tips for Troubleshooting a Computer that Won't Start
When a computer fails to boot, don't panic! The issue could be due to a power supply problem, a faulty hard drive, or a malfunctioning motherboard. To troubleshoot, try unplugging all peripherals, checking the power cord, and ensuring the computer is receiving power.
- Connect the power cord properly
- Insert the RAM properly
- Clear CMOS
1- Connect the loose power cord properly
If the power cable comes loose, it can cause the computer to lose power. To fix this, simply tighten the cable securely to ensure a stable power delivery to the computer. This will help prevent any potential issues and keep your computer running smoothly.
- If the power cord is loose, plug it in properly. If it's already plugged in, check the outlet for any issues. If the outlet is fine, try unplugging and plugging the power cord again.
- Wipe the male connector of the power cord with a clean cloth to remove dust, then insert it back into the device securely.
Regular cleaning of your PC and its components can help prevent damage from dust buildup, which can be costly and time-consuming to repair. You can use compressed air to gently blow out dust from the vents, fans, and other components. Additionally, cleaning the fans and heat sinks with a soft brush or cloth can help improve airflow and prevent overheating.
2- Clean and Insert RAM Properly
The most common reason for a PC not booting properly is usually due to either RAM misalignment or dust accumulation. The computer will not start properly unless the RAM functions correctly when you power on your PC.
You can fix this by following the below solutions:
- Remove RAM and reinsert it properly.
- With an air blower, clear dust from the RAM slot.
- Using a pencil eraser to clean the RAM module by giving it a few strokes on either side is an effective method.
Once you are done cleaning, re-insert the RAM into the RAM slot properly.
3- Windows Returns to the Startup Settings
If you're experiencing issues with your PC and have tried restarting and Safe Mode, but still can't get it to work, try booting in Safe Mode with Networking, or try booting with the last known good configuration, or even try booting in Last Known Good Configuration, or if all else fails, try booting in Safe Mode with Command Prompt, or if none of these work, you may need to try a System Restore, or if that doesn't work, you may need to try a System Recovery, or if that doesn't work, you may need to try reinstalling Windows.
Method 1. Run a system restore
In the Advanced Startup Options, you can run a System Restore to undo recent changes that may be causing issues with your computer. This feature allows you to revert your system to a previous state when it was working properly, effectively reversing any changes made since then.
In older versions of Windows, the Advanced Startup Options are also known as the System Recovery Options.
To resolve the issue, perform a System Restore on your Windows device, which will revert your system to a previous point in time when it was functioning properly. The specific steps for System Restore may vary depending on the Windows version you're running.
Method 2. Clear CMOS
In some cases, Windows may not start in Safe Mode due to a BIOS misconfiguration, even when in Safe Mode. This issue can be resolved by clearing the BIOS memory from the motherboard.
To reset the BIOS settings to their default values, you can navigate to the BIOS settings, select the option to reset the settings to their default values, and then save and exit the BIOS settings. This will restore the BIOS settings to their original factory settings.
FAQs
1. How do I make a rescue media bootable?
You can create a rescue media using the free version of Macrium Reflect or Qiling Backup software to create a rescue media.
2. How do I use Windows rescue media?
- Set the CD/DVD or flash drive with Windows rescue media as the initial boot device in the BIOS settings, save, and exit.
- Restart your PC, connect the USB drive, or insert the CD/DVD into the optical drive.
- Your PC will use the Windows rescue media.
The Bottom Line
Creating a rescue media and knowing how to boot from it can be a lifesaver when Windows OS fails due to various reasons. By having a rescue media, you can bypass any issues that may be preventing your computer from booting normally and access your system's files and settings.
Before using rescue media to boot your PC, perform basic troubleshooting steps such as ensuring the power cord is securely connected, checking the BIOS settings, and verifying that all cables are properly connected. If these steps fail, proceed with booting your PC using the rescue media.
Related Articles
- Windows Backup Problem: Windows Backup Stuck at 97%
- Why Is OneDrive Not Syncing on Windows PC? Answers and Fixes Are Here!
- Disk & System | How to Clone Windows 11 to SSD
- 5 Best Photo Backup Software for PC in 2022
- Perform Acer Boot System Recovery in 5 Steps
Quickly guide for Acer crushed operating system recovery when boot the machine up. - All the Acer eRecovery Management Problems: How to Fix It Easily
You will learn the potential causes of Acer eRecovery Management problems and 5 solutions to fix them easily. And you can learn an overall solution to fix them once and for all.