Restore Error 0x80070091: The Directory Is Not Empty
Quick Navigation:
- What the Code Means
- Save What Is Still There
- Clear the Target Volume
- Restore With Qiling Disk Master
- Frequently Asked Questions
A system image restore from the Windows recovery environment stops partway and reports 0x80070091 with the text that the directory is not empty. The image itself is usually fine. The restore engine is trying to create a folder that already exists on the target and already holds files, and it refuses to merge one tree into another. That situation is typical when you recover onto a disk that still carries the previous installation, when an upgrade has left a Windows.old tree behind, or when an earlier restore attempt stopped after it had created part of the layout. This page explains the code, how to keep the files that are still readable, and how to apply the image to a clean target.
What the Code Means
The restore works by writing the captured file system onto the chosen volume. It does not overwrite a folder that is already populated, because merging two trees can mix two versions of the same profile and produce a system that boots but behaves unpredictably. When the writer meets a directory where the image expects an empty slot, it stops with 0x80070091.
The most common target is the system partition itself. Windows Setup and the recovery tools keep the previous installation in a folder named Windows.old, along with support folders such as $Windows.~BT and $Windows.~WS. A restore to that same partition meets the old tree at the first directory it writes.
A previous failed attempt explains the rest. The engine creates the top-level layout before it copies content, so an interrupted restore leaves empty and half-filled directories behind. The retry then sees them as occupied, and the second attempt fails with the same code even though nothing in the image changed.
Two smaller cases are worth knowing. Restoring a newer image over a partition that already holds a newer build can hit the same check, and writing to a volume that carries a page file, a hibernation file, or a recovery folder is blocked for the same reason: those entries exist and cannot be replaced while Windows is not running.
Save What Is Still There
Stop before you format anything. A failed restore leaves the previous system intact on the disk in most cases, and that installation is often the only place where the newest documents exist.
Start the machine from a recovery drive or a bootable medium and copy the user profile to an external disk. If the old system no longer starts, mount the volume from the recovery environment and copy the profile folder from there before you clear the disk.
Check that the image you plan to apply is readable, and note its date. If the image was captured before the documents you just copied were written, the copy on the external disk is the newer data and must not be overwritten by the restore.
Clear the Target Volume
If you do not need the old installation, the cleanest route is to remove the blocking tree. From the recovery environment, rename or delete the Windows.old folder and the support folders beside it, then run the restore again. Renaming is safer than deleting, because it leaves a path back if the image turns out to be unusable.
If the old installation is still bootable, Disk Cleanup offers a supported way to remove the previous Windows installation. That route also updates the boot configuration, which a manual delete does not.
When the target partition holds nothing worth keeping, format it before the restore instead of clearing folders one by one. A formatted volume gives the engine the empty layout it expects, and the job proceeds past the point where it failed.
Creating the volume layout by hand is the other option, but it is easy to leave a partition active, a drive letter assigned, or a recovery partition in the wrong place. Disk Management, PowerShell, vssadmin, and wbadmin are built into Microsoft Windows and belong to Microsoft, not to Qiling Disk Master, and they change the same partition and snapshot structures that a restore depends on. Read the layout twice before you apply a change.
Restore With Qiling Disk Master
Qiling Disk Master restores an image at disk level, so the target is rebuilt from the image rather than merged into whatever the disk already holds. That removes the condition behind 0x80070091, and it also lets you pull single folders out of an image when a full restore is more than you need.
Operation 1: Restore the Whole Image to a Disk
Use this operation when the machine must boot from the image again and the data on the current system volume is already copied elsewhere.
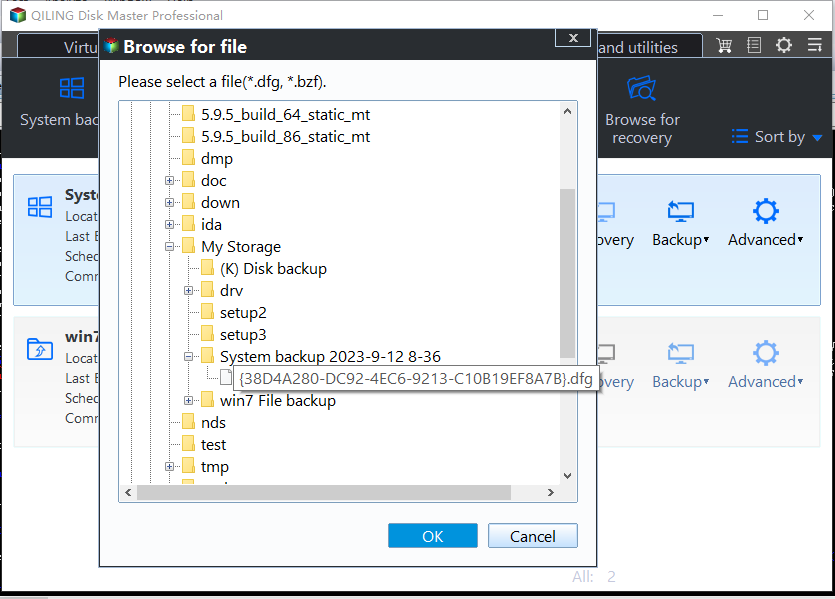
Step 1. Open System Restore and select the image. On the Backup and Recovery tab, click System Restore, then browse to the image file. The wizard lists the partitions stored inside it with their sizes and capture dates, which is the moment to confirm that you have the right set.
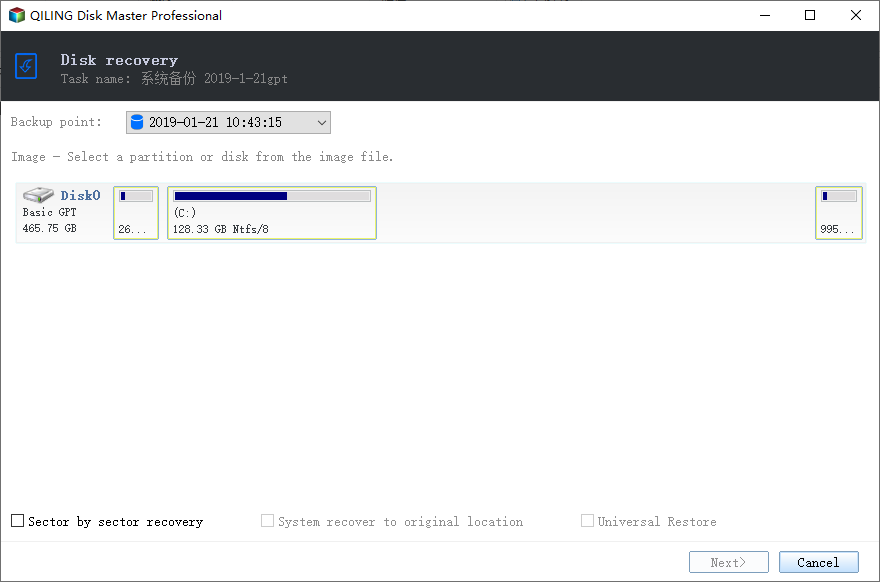
Step 2. Choose the source disk inside the image. The wizard shows the backup as it was captured: a whole disk with its partitions, or a single volume. Select the disk that holds the system you need back, then confirm the partition count, the sizes, and the capture date before you continue. Choosing one volume is enough only when the rest of that disk is still intact.
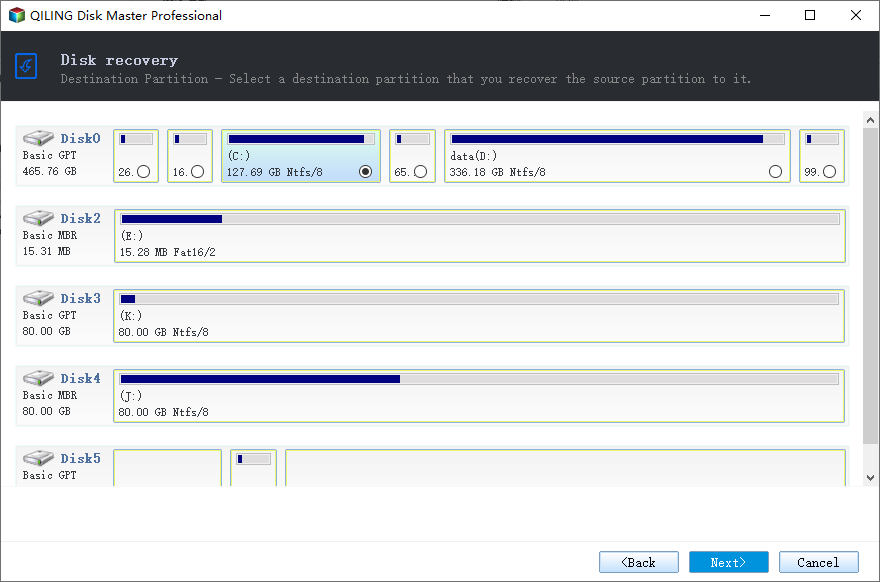
Step 3. Choose the target disk and review the layout. Pick the destination disk and compare the partition order with the source you selected above. A restore replaces the target layout, so any volume on that disk that is not in the image will be lost.
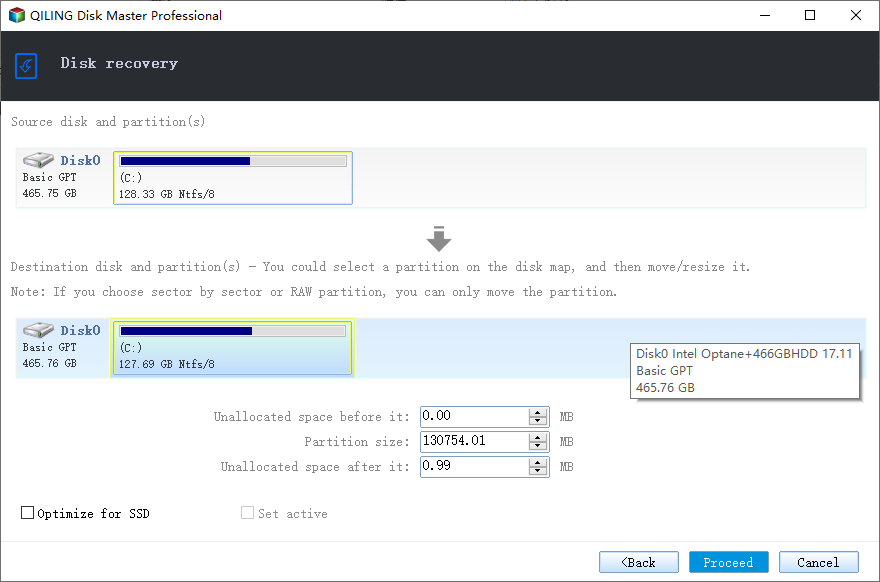
Step 4. Preview the restore and click Proceed. Open Preview to read the pending write on the target disk, click Proceed, and wait for the message that the restore has completed. Do not interrupt the machine while the progress window is active, because a stopped disk-level write leaves the target unusable.
Operation 2: Extract Only the Folders You Need
Use this operation when the old installation can be repaired or replaced later and you only need documents, photos, or a mail store out of the image.
Step 1. Open the backup point and browse its contents. Start File recovery, choose the backup task and the backup point that holds the files, then expand the tree under Computer until the folder you need appears. Ticking a folder instead of the whole partition keeps the operation small and leaves the current system untouched.
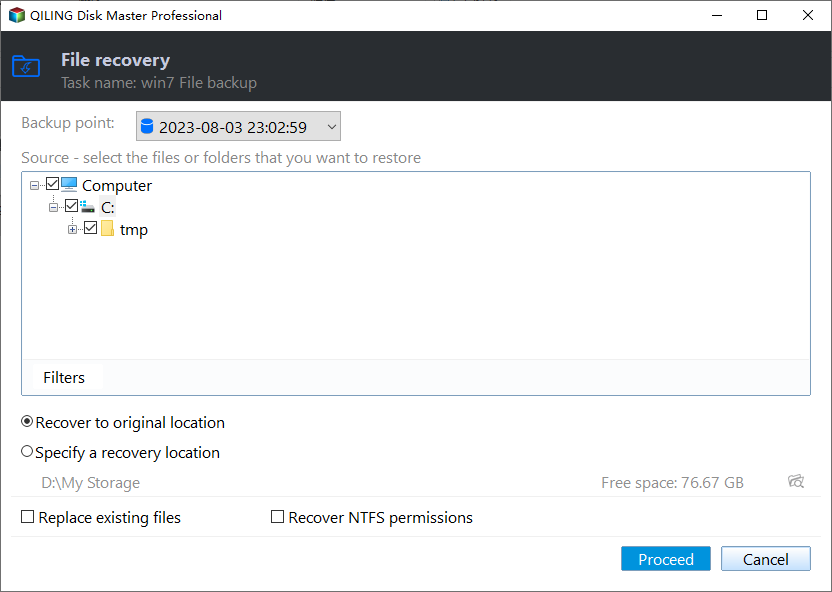
Step 2. Set an empty folder as the destination. Point the restore at a new folder on another disk, not at the live profile. An empty destination avoids the same naming conflict that the Windows restore engine reports as 0x80070091.
Step 3. Preview the extraction and click Proceed. Confirm the file count and the destination in Preview, click Proceed, and wait for the completion prompt. Open the folder afterwards and check that the files you expected are all there.
Frequently Asked Questions
Does 0x80070091 mean the image is damaged?
Usually not. The code describes the state of the target, not the image. Applying the same image to a formatted disk normally succeeds.
Can I just delete the Windows.old folder from File Explorer?
Only while the current system is running, and even then Disk Cleanup is the supported route because it also repairs the boot entries. From the recovery environment, rename the folder first.
Why does the error return after a second attempt?
Because the first attempt already created top-level folders. The retry meets those leftovers and stops at the same check, so the target has to be cleared before the next run.
Related Articles
- Windows 10: Restore From a Backup
- Run System Restore From Boot
- Windows 11 Backup and Restore
- Windows 7 Backup and Restore Opens Blank
- Windows 10 System Restore Stuck
Products
Articles & Tutorials
- Data Recovery
- Data Backup
- File Recovery
- File Backup
- System Backup and Restore
- Disk and Partition Clone
- Technical articles
- Mobile articles
- Disk Master Help
- Windows Data Recovery Tutorials
- Windows Secure Delete Tutorials
- Windows Partition Management Tutorials
- Windows File Backup and Restore Tutorials
- Windows System Backup and Restore Tutorials
- Windows Disk Backup and Restore Tutorials
- Windows Clone Tutorials