Windows 10 System Restore from Boot [Windows Tips]
If your Windows 10 PC is experiencing issues like slow boot, failed restart, or frequent crashing, you can try performing a system restore to revert your Windows OS or settings to a previous working state. If your system doesn't boot, you can use system restore to recover your PC from a previous point when it was working properly. The steps to perform system restore can be followed even if your system doesn't boot, and the solutions in these guides also work for Windows 11.
Can You Do a System Restore from Boot Menu
System restoration in Windows 10 is a feature that allows you to revert your system to a previous state, typically to resolve issues or uninstall unwanted changes. It can be used to restore your system to a specific point in time, often referred to as a "restore point.
System Restore is a built-in Windows tool that helps repair and recover the operating system by reversing certain changes to return it to its previous working state, acting as the "undo" feature of Windows.
It restores system settings, files, drivers, registry keys, and installed programs to their previous versions without reinstalling the operating system.
If you install a driver, Windows update, program, or modify system settings and encounter critical problems, a restore point can help you revert to an earlier working point, resolving the issue without needing a clean Windows install.
Windows 10 allows performing a system restore from the boot menu through the Windows recovery environment (WinRE). This can be done before logging into Windows 10, using system recovery in the WinRE.
To use Windows 10 System Restore, you must first enable it manually since it's no longer enabled by default. To do this, follow these steps:
Step 1. Open Windows Start. Search "Create a restore point."
Step 2. Click the top result, "System Properties," and select the primary "System" drive, usually the C:\ drive, where your operating system is installed.
Step 3. Navigate to the "Protection Settings" part and then click "Create."
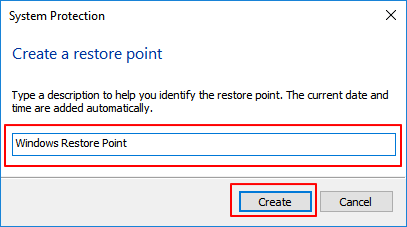
Step 4. Name the restore point using a descriptive name, such as "Before modifying the Registry settings".
Step 5. Click "Create" > "Close" > "Ok" > "Close" again.
When you enable system restore, the operating system automatically creates system restore points at various intervals, such as when installing new updates, software, or making significant system changes, allowing you to revert to a previous state if needed.
In the next parts of this article, we'll show you how to perform a Windows 10 System Restore from the boot menu.
How to Do Windows 10 System Restore from Boot
You can recover your system by running the Windows 10 system restore wizard at boot before logging into Windows 10 using your account.
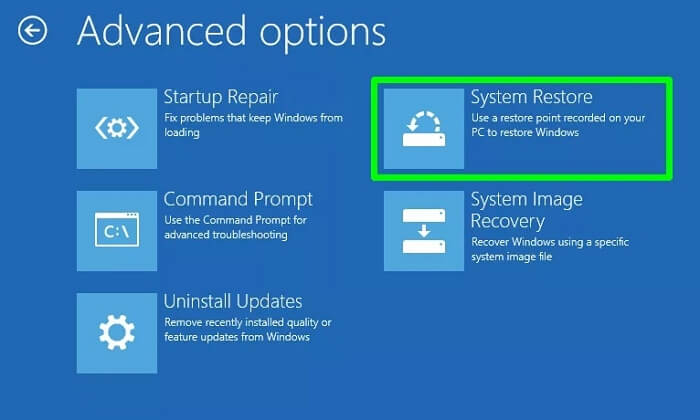
To perform a Windows 10 System Restore from the boot, follow these steps: boot your computer from a Windows installation media, such as a USB drive or CD/DVD, and select the language and other preferences, then click Next. On the "Choose an option" screen, select Troubleshoot, followed by Advanced options, and then System Restore.
Step 1. To restart your computer and open the "Advanced Startup" options, simply press the F11 key as soon as it powers on. This will allow you to access the advanced startup settings.
Step 2. On the Advanced Options screen, select "System Restore" and the computer will reboot.
Step 3. To access the administrator account, select it and confirm the password, then click "Continue" and "Next".
Step 4. Select the "Choose a different restore point" option and click "Next" to proceed. You can also choose the restore point you created on your PC. If you're experiencing issues with missing System Restore points, refer to the article for troubleshooting solutions.
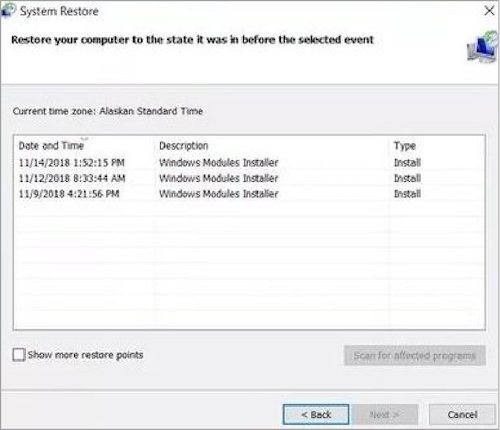
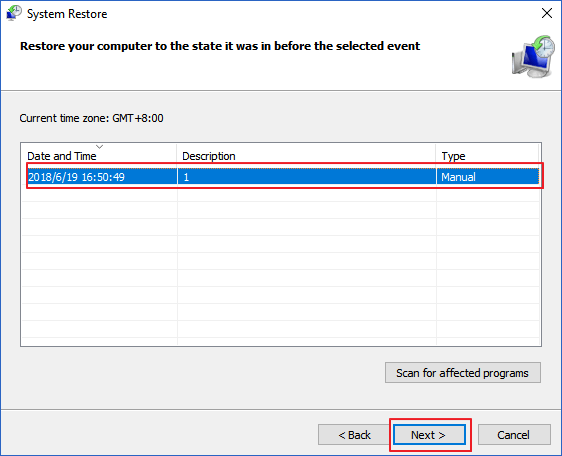
Step 5. To restore your PC to a previous state, select a particular restore point from the available list on your PC, and then click "Next" at the Confirm your restore point screen.
Step 6. To confirm which programs will be removed, click on "Scan for affected programs" after selecting the system restore point. This will list the apps installed after the chosen restore point, which will be removed if the restore point is used.
Step 7. Click "Yes" if a warning message appears.
Step 8. To complete the Windows 10 restore process, click "Next" on the "Welcome to System Restore" window, followed by "Finish". The restore tool will then proceed with the restoration process.
Step 9. Your computer will restart, meaning the restore is complete.
Step 10. After a System Restore, on the next boot, you'll see a confirmation message on your Desktop stating "System Restore completed successfully."
This process will restore any system changes or programs that may have caused problems or crashes, including those that prevented the system from booting correctly. It can be done by following the steps shown in a video about restoring Windows 10 from the boot.
Windows 10 System Restore with Windows Backup and Restore Tool
You can restore a Windows 10 system using a Windows backup and restore tool like the Qiling Backup, which allows you to recover your system to a previous state.
The Qiling Backup tool offers efficient and secure Backup and Recovery functionalities, providing a reliable solution for data protection and management. Its key features include a streamlined backup process, secure data storage, and robust recovery capabilities, making it an ideal choice for individuals and businesses seeking to safeguard their valuable data.
- Local and Cloud backup and recovery
- System backup and recovery
- Disk/Partition Backup and Recovery
- Files Backup and Recovery
Using a backup and restore tool like Qiling Backup and Restore makes the system restore process easy and straightforward, even for those who aren't experts in Windows system restore. The tool provides a clear and simple on-screen guide that you can follow to restore your system, eliminating the need for extensive technical knowledge.
The Qiling Backup and Restore tool has two primary functions: Windows System Backup and System Recovery. These functions enable users to create backups of their Windows system and recover their system in case of data loss or system failure.
How to Back UpWindows System Step by Step
Data backup is crucial as it protects against data loss due to system failures, software glitches, computer malfunctions, or malware attacks.
Qiling Backup creates a complete image of your system data, allowing for a full backup of your system, or provides critical file/folder backup to ensure your data is safe and protected at all times.
To back up your Windows system with Qiling Backup, you can follow these steps: First, download and install the Qiling Backup software from the official website. Next, launch the software and select the backup options you want to use, such as backing up your entire system or just specific files and folders.
Step 1. To start a system backup, click the "System backup" button on the main page.

Step 2. Qiling Backup will automatically select your system partition, so you only need to choose the backup destination.

Step 3. You have the option to save your backup file either on a local drive or on a Network-Attached Storage (NAS) device.

Step 4. After completing the backup process, you can check the backup status, recover, open, or delete the backup by right-clicking the task on the left.

How to Do System Recovery Step by Step
Qiling Backup software offers data and system recovery functionality, allowing you to recover your system in case of a malfunction or data loss, helping to prevent the devastating feeling of a system crash or lost data.
The Qiling Backup allows for easy system backup and restore, providing a solution for system crashes or failures to start.
To recover your system using the Qiling Backup tool, launch the tool and select the "System Recovery" option from the main menu. The tool will then scan your system for any existing backups and display them in a list.
*Try to boot the computer with the Qiling Backup emergency disk to accomplish system recovery on a non-bootable machine..
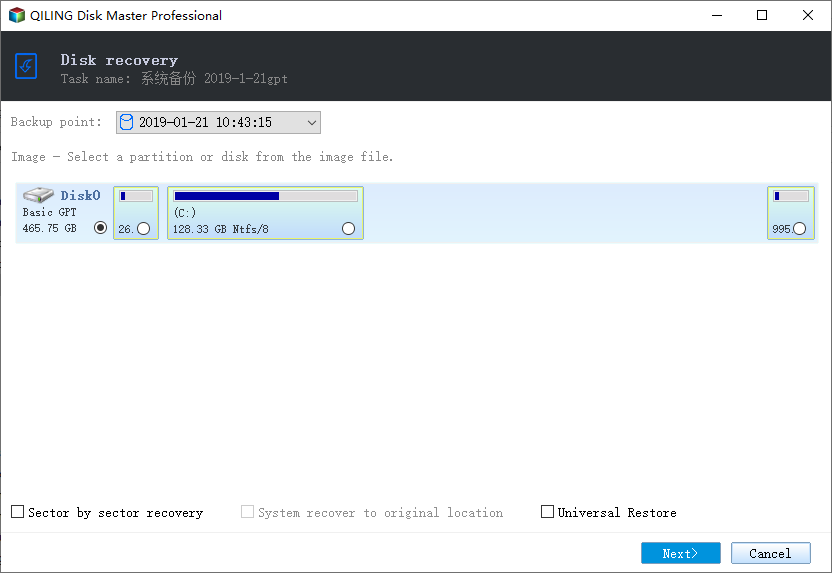
Step 1. LuanchQiling Backup, click Browse for Recovery button to start recovery.
Step 2. Navigate to the backup location, select the system backup file, which is a .fvd file created by Qiling Backup.

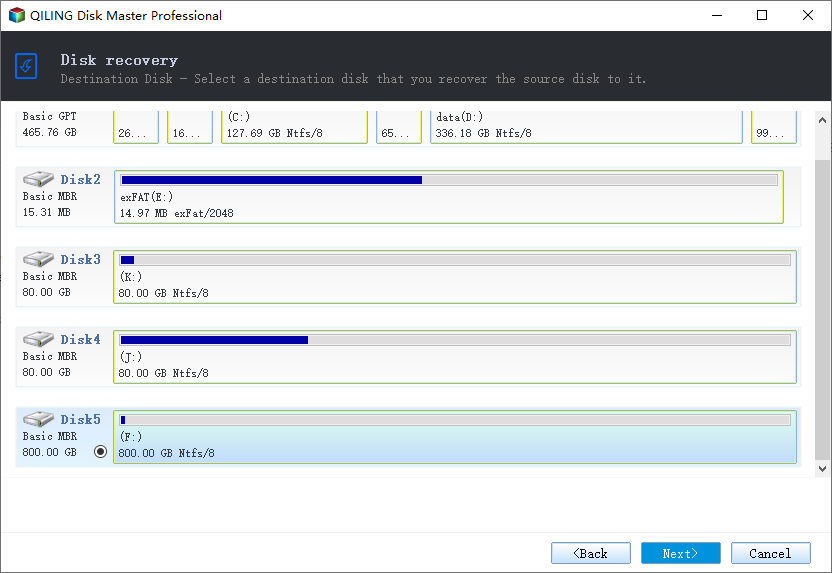
Step 3. Verify that the partition styles on the source and recovery disks are the same, and select a recovery disk.
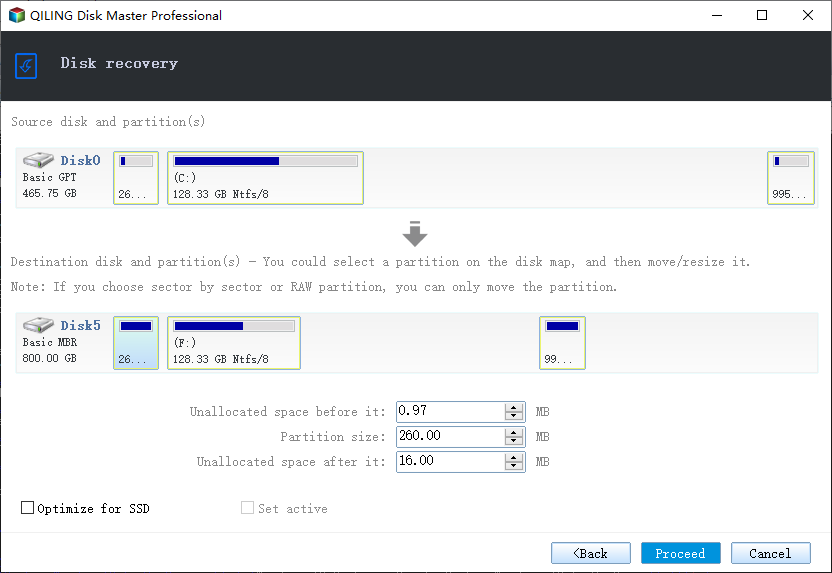
Step 4. To begin system backup recovery, select the Proceed button after changing the disk layout to suit your requirements.
Windows 10 System Restore from Boot FAQs
Some users have questions about using Windows 10 system restore from boot, such as how to access the feature, what it can restore, and how to use it to fix problems. They may wonder if system restore can restore the operating system to a point before a specific event or issue occurred, and how to use it to troubleshoot common problems like system crashes or freezes.
1. What does Windows 10 System Restore actually do?
System Restore copies system files, registry, and programs, saving them as Restore Points. If the system experiences issues, it can be returned to a previous working condition without reinstalling the OS.
2. How do I restore Windows from boot?
To restore Windows from the boot, use the following steps:
- Step 1. To resolve the issue, restart your computer and immediately press the F11 key to access the Advanced Startup options. From there, select System Restore, and the computer will reboot again.
- Step 2. Select a user name (administrator account) and enter the password, then click "Continue."
- Step 3. Select a restore point from the list of options provided.
- Step 4. Follow the prompts to restore your computer to its previous working condition.
3. How to Start System Restore From the Command Prompt?
To start system restore from the command prompt, follow these steps: type "rstrui.exe" and press enter, or type "system restore" and press enter, or type "systempropertiesprotection" and press enter, and then follow the prompts to select a restore point and complete the restore process.
- Step 1. Open the command prompt. Press Windows Key and type CMD.
- Step 2. To restore Windows 10 to its previous state, type the command "rstrui.exe" in the command prompt text box and press "Enter."
- Step 3. To complete a system restore, follow the on-screen instructions in the System Restore wizard, which will be immediately opened after running the command.
4. Can I restore Windows 10 from BIOS?
You cannot restore Windows 10 from the computer's BIOS, as BIOS controls hardware devices and not the Windows system. Instead, you can only restore Windows 10 from within the system itself.
Final Thoughts
To restore Windows 10, you can do it from the boot or through Qiling Disk Master Windows Backup and Restore Tool. From the boot, enter the system's Advanced Startup and select System Restore. Alternatively, use Qiling Backup to quickly back up and restore your Windows OS.
Related Articles
- How to Get Windows Activation Key and Start Windows 11
- [2022 Updated] 5 Best cloud backup Software Recommended
- Backup WD Hard Drive with Best Free Backup Software
- Full Comparison: SeagateOneTouchvsBackupPlusSlim
- NVMe vs SSD: Is NVMe Faster Than SSD?
The Solid State Disk (SSD) has significantly improved computer performance, leading many users to consider replacing Hard Drive Disk (HDD) with SSD. However, a new type of hard drive called NVMe SSD has emerged as a strong competitor to traditional SSDs. - Exclude OneDrive from Antivirus Software Scan
To resolve the issue of OneDrive files being flagged as viruses by antivirus software, you can add the OneDrive folder to the antivirus's exclusion list. This will prevent the antivirus from scanning the files in the OneDrive folder, thereby avoiding false positives.