Windows File Backup - 4 Efficient Ways for You to Protect Data
Backing up your Windows files regularly can save you from a daunting experience if your hard drive fails or gets damaged, and it's extremely simple and easy to do.
To avoid future regret, it's essential to back up your files regularly. This can be done using cloud storage services like Google Drive, Dropbox, or OneDrive, which allow you to store your files online and access them from anywhere.
Windows File Backup - Why It Is Necessary?
Restoring data after permanent loss can be a time-consuming and sometimes impossible task, as some data may be unrecoverable.
To avoid losing thousands of dollars worth of data, it's essential to back up your computer regularly, which can prevent the financial and emotional stress that comes with a hard disk crash or damage.
In today's digital age, losing files can be frustrating, but recovering them is possible with the right tools and techniques.
Today, we are going to let you know how to backup your Windows files. Keep reading.
What Are the Types of File Backup?
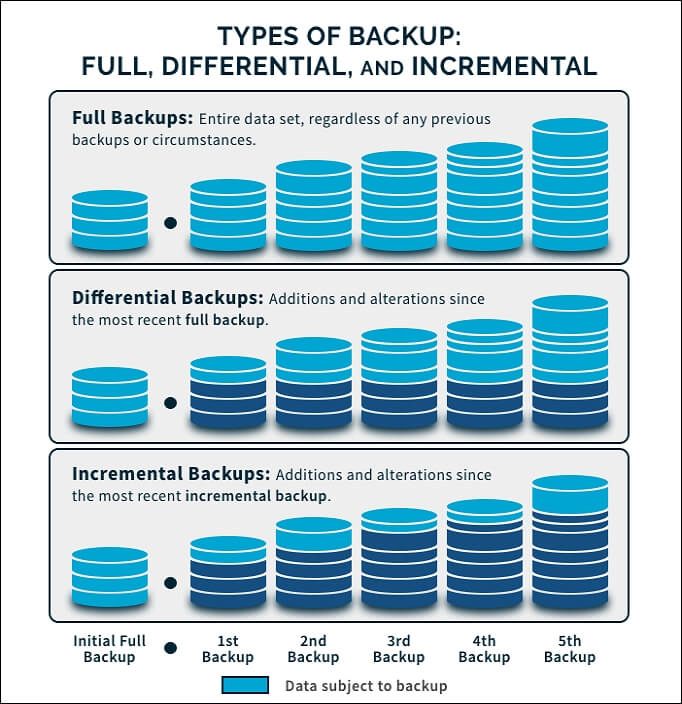
There are three main types of file backups: incremental, differential, and full. Incremental backups save only the changes made since the last backup, while differential backups save all changes since the last full backup.
Full backup:
A full backup is a type of backup where all data is backed up, taking the longest to complete, but is the easiest to recover from.
Incremental backup:
Incremental backup refers to the process of backing up data from the previous time it was created or changed.
Let's suppose you made a backup of your computer two months ago. If you chose to create another backup today, the computer would take snapshots of all the new information created since the last backup and create a backup of the changes made in the past 2 months.
A full backup will be performed when setting up the incremental backup as it is necessary.
Differential backup:
The differential backup is similar to the incremental backup, with the main difference being that differential backups capture all changes made since the last full backup, whereas incremental backups capture all changes since the last incremental or full backup.
Incremental and differential backups are two types of backups that differ in what they back up. Incremental backup saves all the changes made since the previous backup, while differential backup saves everything since the last full backup.
The differential backup saves changes made between one full backup and another, while the incremental backup saves changes since the last backup.
Types of Backup: Full vs. Incremental vs. Differential Explained
Before choosing a backup type, it's essential to understand the three main options: full, incremental, and differential backups. Each type has its own advantages and disadvantages, making one more suitable than the others depending on your specific needs. Understanding these differences will help you make an informed decision and ensure your data is properly protected.
How to Create a Windows File Backup?
Regardless of whether you're still using Windows 7, 8, 10, or 11, the goal is to learn how to backup your Windows files effectively.
1. Windows File Backup - File History
Windows 8 and later versions have a feature called File History that automatically backs up specific file folders to a backup device, providing a convenient way to keep files safe.
You can use the File History feature to restore an earlier version of a file if it's lost, corrupted, or becomes useless, providing a safety net for your important documents.
The process of configuring file history on Windows 10 is significantly more manageable compared to its Windows 11 counterpart.
Here's how to enable file history on Windows 10:
Step 1. Connect a USB hard drive.
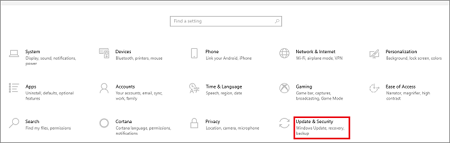
Step 2. Click on the "Start" button and search for "Settings".
Step 3. Select "Update & Security", and then select "Backup".
Step 4. To activate File History, click on "Add a drive" under "Back up using File History" and select your external drive as a backup location.
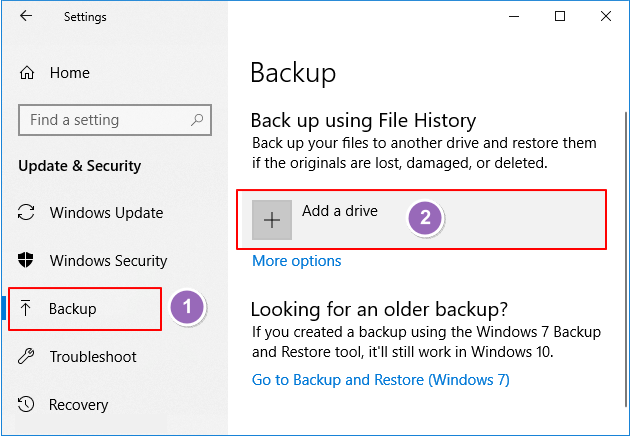
Step 5. To start backing up your files with File History, you need to set up a drive to store the backups, which can be an external drive or a network location. Once you've set up the drive, File History will start automatically backing up your files.
Step 6. Click on "More options".
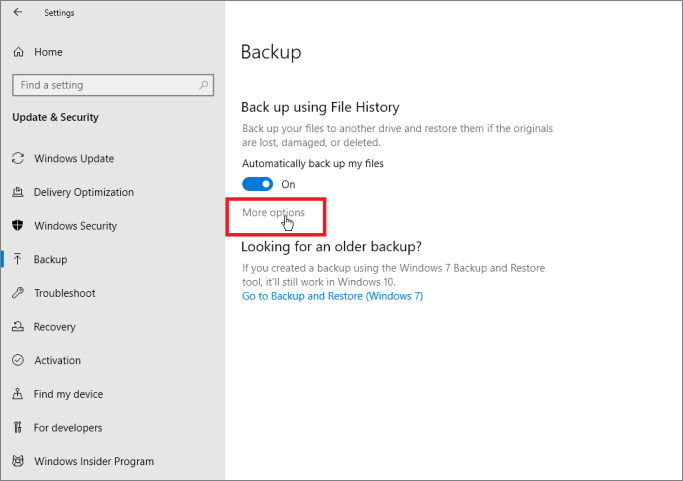
Step 7. Select the "Back up my files" option and choose the desired frequency for backing up your files.
Step 8. Keep my backups for a certain period of time on an external hard drive. This ensures that your backups are stored securely and can be accessed when needed.
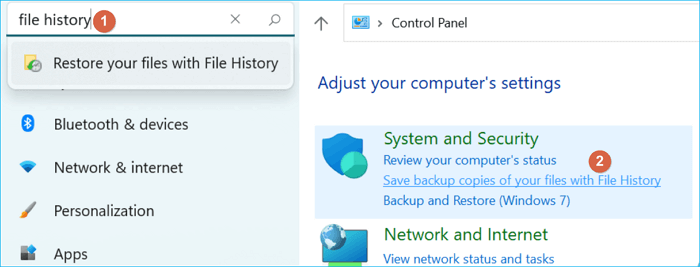
Follow the below steps to enable File History on Windows 11:
Step 1. Connect your external hard drive to your PC.
Step 2. Click on the "Search" button, and search for "File History".
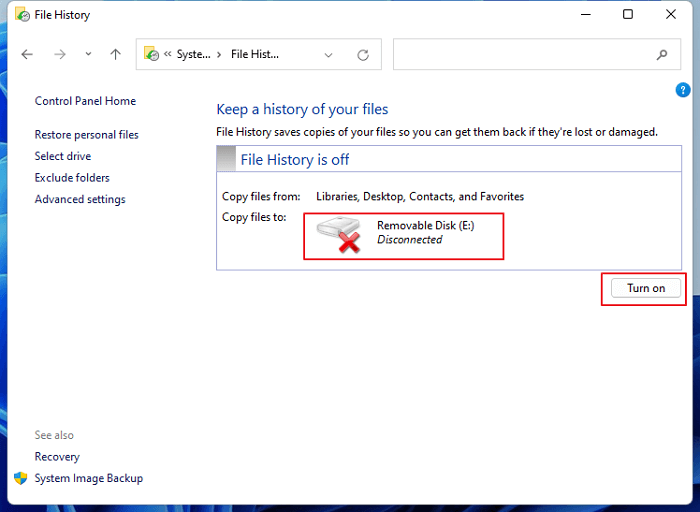
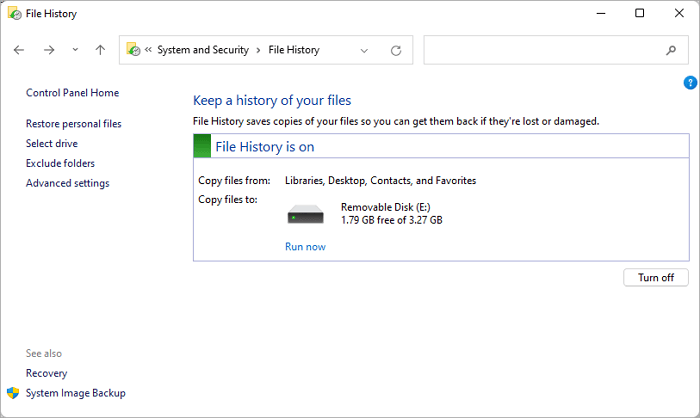
Step 3. To activate File History, click on the "Turn on" button in the File History window. This will start backing up your files.
Step 4. To back up files in Windows 11, users can select the files they want to save, such as those from Libraries, Desktop, Contacts, and Favorites, and then choose a location to save the backup files. Unfortunately, users do not have the option to customize the backup content, limiting the types of files that can be included in the backup.
Step 5. Windows 11 keeps all the File History settings and allows you to set up the backup frequency through Advanced settings.
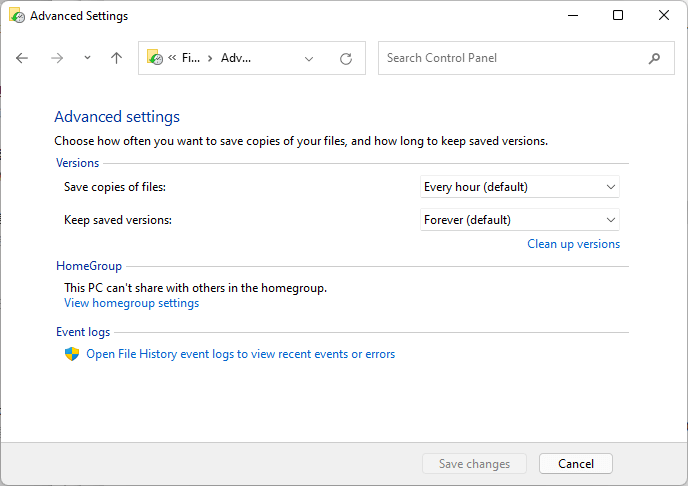
Step 6. Once changes have been made, click on "Save changes" to save the changes.
2. Windows File Backup - OneDrive
OneDrive is Microsoft's cloud storage platform that allows users to back up files and folders to the cloud, preventing accidental deletion or loss. It's incredibly easy to use and integrates smoothly with Microsoft products, making it a convenient and reliable option for storing and accessing important files.
To turn on file backup to OneDrive, go to Settings > System > Backup options, and toggle the switch to On. This will enable automatic file backups to your OneDrive account, allowing you to access and restore your files from any device.
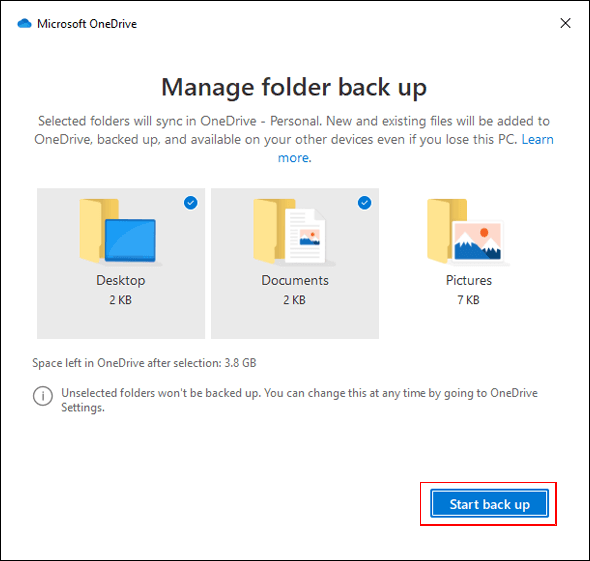
Step 1. Click on the cloud icon in the notification area.
Step 2. To access the backup settings, click on the gear icon, then select "Settings," followed by "Backup," and finally choose "Manage Backup".
Step 3. Select the files you want to back up and then click "Start backup".
3. Windows File Backup - Windows 7 Solution
To backup your Windows 7 computer, you can use the built-in tool called Windows Backup. This tool allows you to create a backup of your files, documents, and other important data.
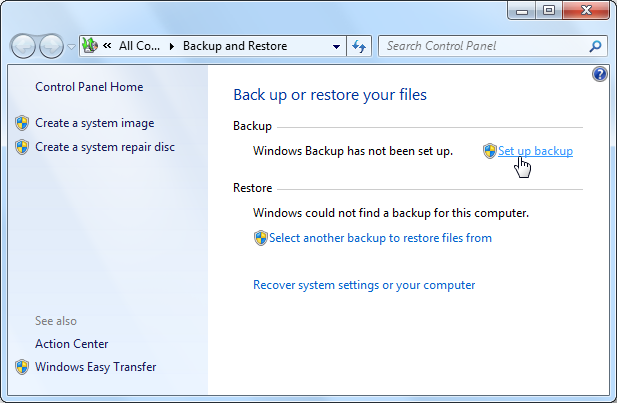
Step 1. Click on the "Start" button, and open the "Control Panel".
Step 2. Select "System and Security" and then choose "Backup and Restore".
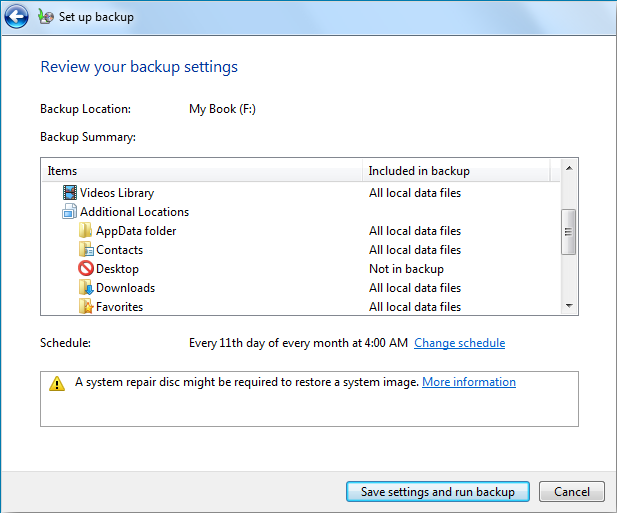
Step 3. Click on "Set up backup".
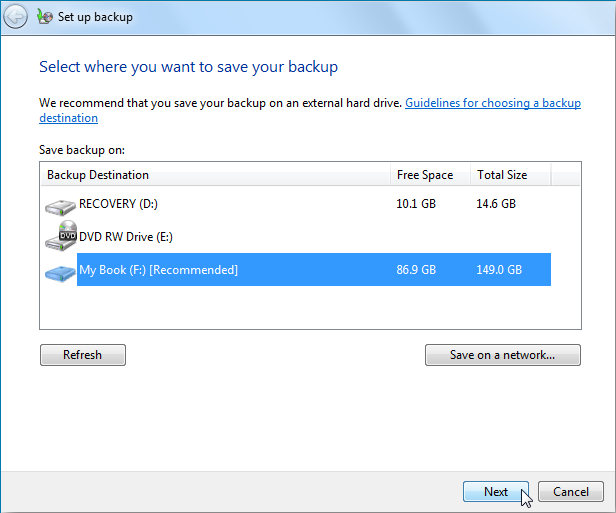
Step 4. Choose a location to save your backup, like a USB drive, CD/DVD, or network location, and then click Next.
Step 5. Select "Let Windows choose (recommended)".
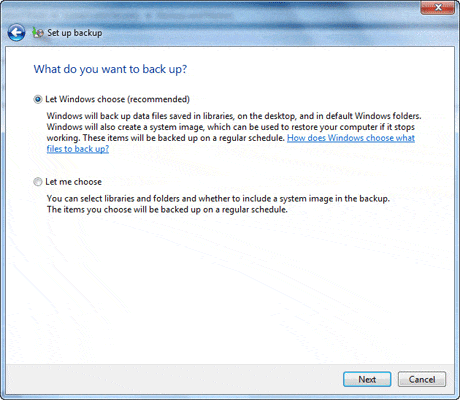
Step 6. Click "Next", schedule backup timings, click "Save settings and run backup" to start the backup process.
All-in-One Windows File Backup Creator - Qiling Backup
Qiling Backup is a simple and easy-to-use solution for all your backup needs, compatible with both Windows 7 and Windows 11, allowing for quick file backups and password-protected system image creation.
Rich backup options for users to create better backup plans
Clear and friendly user interface
Clone and upgrade HDD/SSD
If you want to simplify the backup process, the free version of Qiling Backup can help you backup your files. To get started, simply download the software from the provided button, and follow the guide to see how to back up your files.
Step 1. To start backup, click the "File backup" button.

Step 2. On the top tree view, you can see a list of local and network files by expanding the directory, which allows you to select the files to be backed up.

Step 3. Follow the instructions on the screen to select the desired location for storing the backup.

Step 4. In Backup Options, click Options to encrypt the backup with a password. This allows you to customize the backup operation to meet your specific needs.

To set up a backup schedule, specify the frequency of backups, such as daily, weekly, or monthly, and choose whether to start the backup at a specific event, like a system restart or a user login. This allows you to automate the backup process and ensure data is protected at regular intervals.

Step 5. Backups can be stored on a local disk, in Qiling's cloud service, or on a network attached storage device (NAS).

Step 6. Qiling Backup enables customers to back up their data to either a third-party cloud drive or the company's own cloud storage.
To back up your data to a third-party cloud drive, select the option for Local Drive, scroll down to add Cloud Device, and enter your account information.
Step 7. To start a backup, select Proceed. Once initiated, the backup process will be displayed as a card on the left-hand panel when it's completed. For more detailed management of the backup job, right-click on it.

FAQs
1. Does Windows 10 have a file backup program?
Yes, Windows 10 has a file backup program.
2. How does Windows file backup work?
Setting up file backups on Windows can be a bit of a process, requiring some time and patience. However, with the right tools and a clear understanding of the steps involved, it's a manageable task.
3. Where does Windows 10 save backup files?
You can save the backup files on an external drive or in the cloud.
Related Articles
- [All-in-One] Create Windows 11 Backup to NAS (Network drive)
- How to Create Portable Windows 10 to USB Drive (Windows 11 Support)
- How to Automatically Backup Files to An External Hard Drive | 3 Ways
- How to Install Windows 10/8/7 on Multiple Computers at The Same Time | System Deployment Solution
- File History vs. Backup and Restore | Which Is Better?
Windows has two inbuilt backup and recovery utilities: File History and Backup. Both tools offer benefits and drawbacks, and a comparison between them is warranted. - Top 5 Best Free Registry Backup Software [Updated 2024]
You can easily create a backup of the Windows registry using free registry backup software. There are several options available, including a comprehensive solution, that can be downloaded to your Windows computer to back up your registry.