[All-in-One] Create Windows 11 Backup to NAS (Network drive)
[Definition You Need to Know] What is NAS?
NAS, or Network Attached Storage, is a data storage device that connects to a network, allowing users to store and share data. It's a popular choice for backing up data due to its affordability, ease of use, and features like built-in RAID support, which protects against data loss in case of a drive failure. NAS devices have become increasingly popular as a backup solution, especially for small businesses and home users, due to their cost-effectiveness and user-friendly setup.
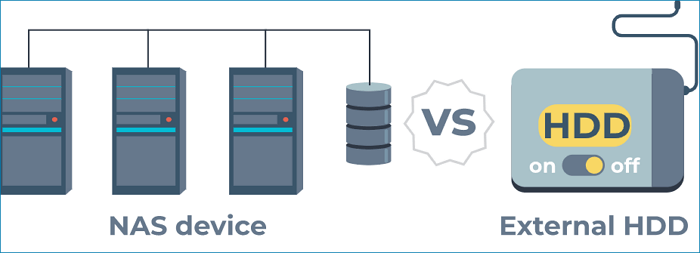
Backup Locations | NAS vs. Local Drive: What's the Advantage?
Creating a Windows 11 backup offers two primary options: backing up data to a local drive or a NAS (Network Attached Storage) device. Both methods have their advantages and disadvantages, with local drive backups being convenient but potentially vulnerable to physical damage, while NAS backups offer greater security and accessibility but may require additional hardware and setup.
#1. Backup to Local Drive
| Advantages | Disadvantages |
|---|---|
|
|
#2. Backup to NAS
| Advantages | Disadvantages |
|---|---|
|
|
How to Backup Windows 11 to NAS - Files & OS
With the pros and cons of backing up data to NAS in mind, it's time to put it into practice by storing backup files. Many Windows users have upgraded to Windows 11, which brings a range of new features and refreshes the user experience, but surprisingly, it falls short in the aspect of backing up data.
Windows 11 enhances the OneDrive sync feature, but users can still make a basic data protection move using built-in backup utilities. There are two methods to back up Windows 11 to NAS: backing up files only or backing up the entire system. Additionally, a third-party helper may be needed, aside from Windows' built-in backup tools.
Method 1. Back up Windows 11 Files Only to NAS
To back up specific files or folders, you can either manually copy and paste them to your NAS drive or use Windows 11's File History feature to save different versions. If you want to back up the entire system, you can skip to Method 2. To use File History
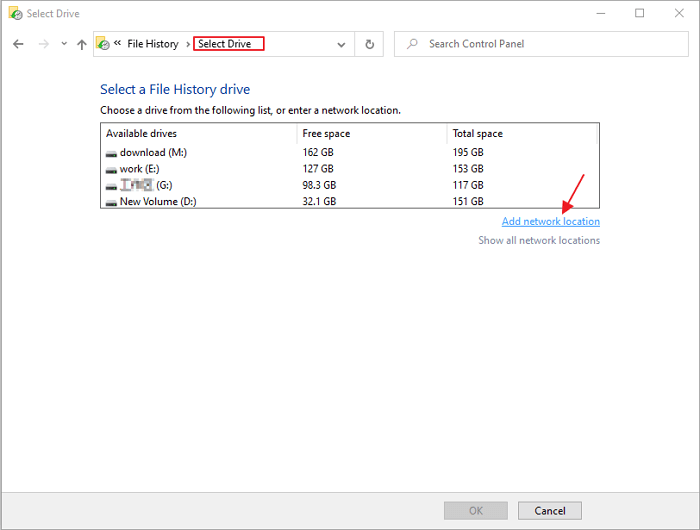
Step 1. To access the File History feature, go to the Control Panel, click on System and Security, and then select File History.
Step 2. Connect your NAS device to your computer and ensure it is turned on.
Step 3. Click on "Select drive" on the left side and choose "Add a network location" to set your NAS drive as the backup location.
Step 4. To enable File History, go to Control Panel > System and Security > File History. Turn on File History and select your NAS drive as the backup location.
2. Windows users can now only access File History from the Control Panel in Windows 11, previously it was accessible from both Control Panel and Settings.
What's New: Windows 11 File History
To back up Windows 11 system files to NAS, you can use the built-in tool "Backup and Restore (Windows Backup)" or third-party software like Qiling Disk Master. You'll need to create a system image and save it to a network location, such as a NAS device. This will allow you to restore your system to its current state in case of a disaster or system failure.
Method 2. Backup Windows 11 System to NAS
In Windows 11, creating a system backup is not just about copying system files, but rather creating an image file that includes files, configurations, and disk structure. Users can utilize the built-in Backup and Restore feature to create a disk image, or opt for a free third-party tool like Qiling Backup to simplify the process.
Qiling Backup
- A completely free backup tool for Windows users, this software allows for the backup of files, the entire system, disks/partitions, and even emails.
- One-Click backup saves time and reduces learning costs to the greatest extent.
- Always committed to data security, verified by over 20,000,000 users
- The system allows users to store backups anywhere, providing flexibility and convenience. Users can back up their data to local drives, such as external hard drives or USB drives, for immediate access and control.
Qiling Backup is a professional backup software that allows for simple backups of systems, hard drives, files, and applications. To use Qiling Backup to back up Windows 11 to a NAS, start by downloading and installing the software on your computer. Once installed, follow the steps to complete the backup process.
Step 1. Launch Qiling Backup and select "System Backup" from the home page.

Step 2. The system partition will be automatically selected, you just need to choose the location for it.

Step 3. You can save backup files to your local drive, cloud storage, or network-attached storage (NAS), and even connect an external hard drive to store system backup files.

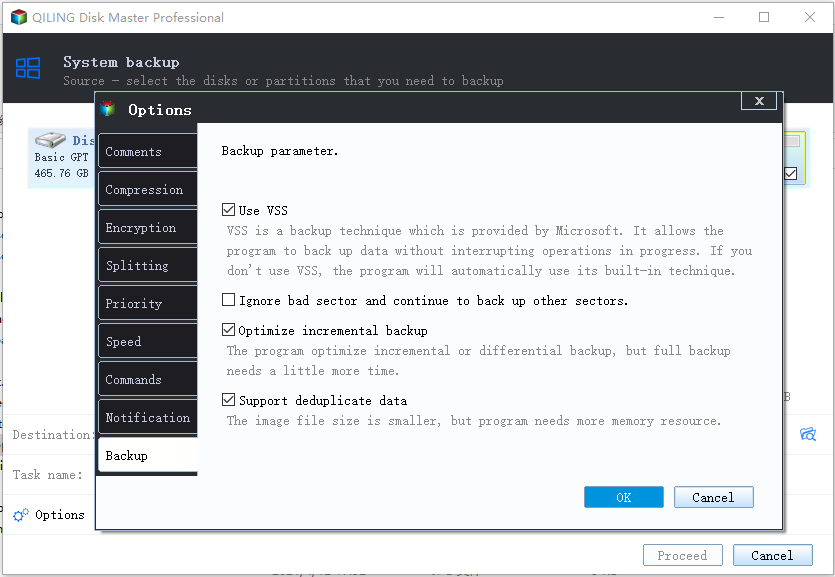
Step 4. To customize the settings, go to the left bottom and click on "Options". Then, click "Proceed" to start the process.
After completing the backup process, you can view the backup status, restore, access, or remove the backup by clicking on the backup task in the list.
FAQs
1. How do I backup to a network drive in Windows 11?
To backup data to NAS on Windows 11, you can either backup specific files or the entire system. Both Windows built-in tools and third-party backup software allow you to select a network drive as the backup location, making it easy to connect your NAS and start backing up your files.
Windows built-in tools: File History and Backup and Restore
Third-party backup software: Qiling Backup, Paragon Backup and Recovery, etc.
2. Does Windows 11 have a backup program?
Windows 11 has two built-Windows offers two backup programs: File History and Backup and Restore. File History can be used to backup specific files, whereas Backup and Restore can create a system image file containing all computer data. Users can choose either option based on their needs.
Final Thought
With Qiling Backup, you can easily backup your Windows 11 files and system to a network-attached storage (NAS) device. This guide provides a step-by-step process to ensure a smooth and secure backup experience. By following the instructions, you can protect your important data and system settings. If you have any questions or need further assistance, don't hesitate to contact us for support.
Related Articles
- How to Backup Data without Booting into Windows
- Things to Backup Before Reinstalling Windows, Don't Forget!
- [Backup Question] How Often Should I Create A System Image
- 2 Ways: How to Backup Partition to Image File for Free
- Should I Backup Before Windows 10 Upgrade/Reinstallation? 2022 New!
This guide helps individual users determine whether to back up their data before upgrading to Windows 10, and provides preparation and backup steps using Qiling Backup. - (1+1>2 Solution) How to Use/Set up SSD as Boot Drive and HDD Storage
You can set up your computer with an SSD as the boot drive and HDD for storage in two ways. You can either clone your HDD OS to your SSD, or you can clean install Windows on your SSD and use your HDD for storage. The choice between these methods depends on your specific needs, and the instructions for each can be found below.