How to Run Windows on Mac for Games
Mac users often find it difficult to play video games on their devices, as many popular titles are not compatible with macOS. This limits their gaming options, making it harder to relax and have fun with games like Grand Theft Auto and Call of Duty.
Windows 11 has the right features to play powerful games, with new gaming features embedded in the latest operating system, such as.
- Auto-4K resolution is not needed for HDR, and it's possible to have HDR on a 1080p display. However, the best experience is usually seen on 4K or higher resolutions. HDR can also be used on lower resolutions, but the effect may not be as noticeable.
- Microsoft's DirectStorage API enables faster game loading by bypassing CPU processing, allowing the GPU to directly access and load games from the SSD.
- Built- The Xbox app and Game Pass allow users to quickly access a vast video game gallery, streamlining their gaming experience.
If you're a gamer who's made the switch to a Mac, don't worry! While Macs are not as popular among gamers as Windows PCs, they can still handle demanding games and offer a more streamlined user experience. You can play popular games like Fortnite, League of Legends, and Overwatch on your Mac, and many games are now optimized for Mac.
If you're getting frustrated with your Mac because it can't run your favorite games, don't worry! Instead of getting annoyed, try running Windows on your Mac. While Macs may not be ideal for gaming, they're perfect for running Windows, which means you can still play your favorite Windows games on your Mac. So, simply run Windows on your Mac and you'll be able to play all your favorite games without any issues.
3 Ways to Run Windows on Mac to Play Games
You can easily install Windows on your Mac, allowing you to run Windows-specific programs and games. This option is also more cost-effective than having two separate devices, one for Mac and one for Windows.
You can easily run Windows on a Mac for gaming or other purposes without needing extensive technical knowledge. There are several options available, but the top three choices are ideal for this purpose.
- Install Wine on Mac
- Create a portable Windows USB drive
- Install the virtual machine on Mac
Let's discuss all three methods in detail.
1. Install Wine on Mac
Wine, also known as Wine Is Not an Emulator, is a free tool that allows Mac users to run Windows on their machine. It works by wrapping the Windows operating system in macOS and interpreting Windows API calls, but is notoriously difficult to set up.
Using Wine to run Windows on a Mac is not recommended if you don't have adequate technical knowledge.
| Pros | Cons |
|---|---|
|
Free solution. No Windows ISO file is required. |
Doesn't support macOS Catalina. Complicated to use. Doesn't support all Windows OS. Doesn't work with Apple Silicone M1 Macs. |
2. Create a portable Windows USB drive
This method is easier than using Wine to install Windows on Mac, as you're not actually installing Windows on your device. Instead, you create a portable copy of Windows on a USB drive and boot it on your Mac, making it a convenient alternative.
You can run Windows on your computer without any installation hassle and also easily add Windows OS on a portable device to run on Mac using software like Qiling OS2Go.
| Pros | Cons |
|---|---|
|
Easy to set up. No hard disk space consumption. Simple to use. |
Authentic Windows copy is required. |
3. Install the virtual machine on Mac
A virtual machine lets you run Windows programs on a Mac by creating a software environment that mimics a real computer, allowing Windows to think it's running on a physical machine while actually running inside a program on your Mac.
Running Windows on a Mac for gaming purposes is not feasible due to poor 3D graphics performance and some games, like Valorant, not supporting virtual machines.
| Pros | Cons |
|---|---|
|
Easy to install Windows. Fast processing. Supports Windows on M1 Macs. |
Updates aren't free. Doesn't allow boosting graphics cards for gaming. VMs are expensive. |
The most effective method to run Windows on a Mac is by installing Windows on a USB drive, as it saves hard disk space, time, and is easy to set up, making it a more practical option compared to using Wine which requires intense knowledge and virtual machines which can be expensive.
How to Create A Portable Windows USB Drive for Mac
To create a portable Windows USB for Mac, you have options like Microsoft's Windows To Go feature, but it's only for Windows Enterprise and has been terminated. Instead, we recommend using Qiling OS2Go, which allows you to easily create a Windows USB for Mac with simple clicks.
Qiling OS2Go supports leading Windows systems, including Windows 11/10/8/7, as well as MacBook, Mac mini, and iMac. This software also brings other notable features, including.
- With this feature, you can access and run all Windows apps and games on your Mac, giving you a seamless and unified computing experience across both platforms.
- Easy to set up and run Windows on Mac
- Supports all the leading USB drives
- Seamless integration with almost all Windows and Mac devices
To create a portable Windows drive using Qiling OS2Go, download the tool from the button below and follow the instructions to create a portable Windows drive.
Step 1. To install Qiling OS2Go, plug in a USB drive that is larger than your system drive's used space. Once installed, the software will display the used space on your system drive. Select the target USB drive and click Next to continue with the installation process.
Step 2. Qiling OS2Go will notify you that the following operation would delete all data on your drive. Be sure to back up all important data before clicking the Continue button to proceed.
Step 3. The disk layout on the target drive will be identical to the resource drive, but you can also customize it to your liking. If using a Solid State Drive as the Windows boot drive, select that option. Then, click Proceed.
Step 4. Qiling OS2Go will start to create the portable USB drive, which may take a while depending on your OS and network condition. Once the progress reaches 100%, the USB drive will be bootable.
Step 5. To install Windows on a new computer, insert the portable Windows USB drive and start your computer. Press the required key (usually F2, DEL, or F10) to access the BIOS settings and select the USB drive as the boot device. This will allow you to install Windows from the USB drive.
Note: To ensure a smooth booting process, it's essential that the boot mode of your portable USB drive and the target computer match, otherwise you might encounter issues with booting.
How to Install Wine on Mac to Run Windows
Here are the steps to run Windows on Mac using Wine:
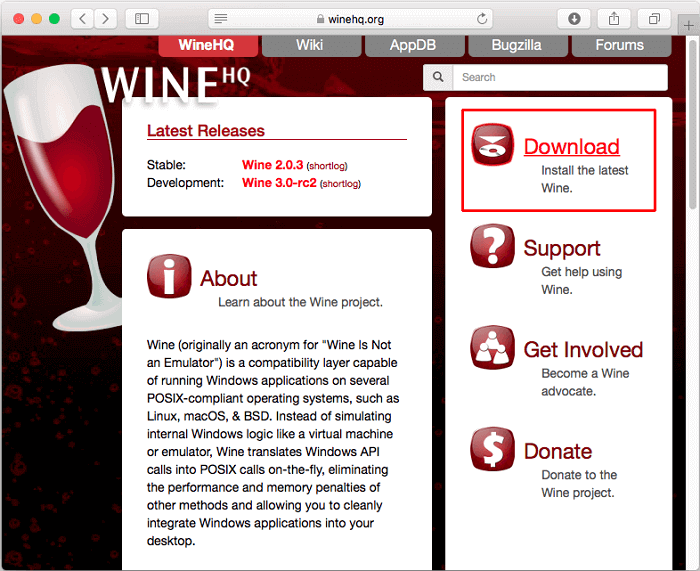
Step 1. To download Wine, open your web browser and navigate to the official Wine website. Once you're on the site, click on the "Download" button to begin the installation process.
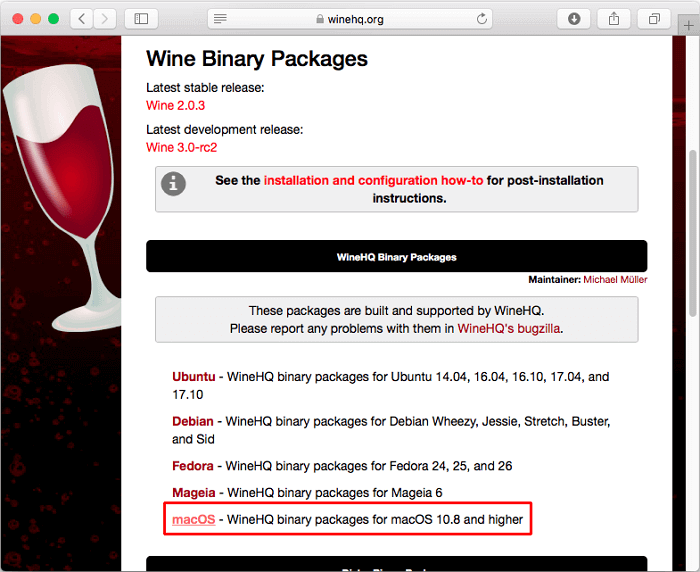
Step 2. Choose the macOS to download the Wine package for Mac.
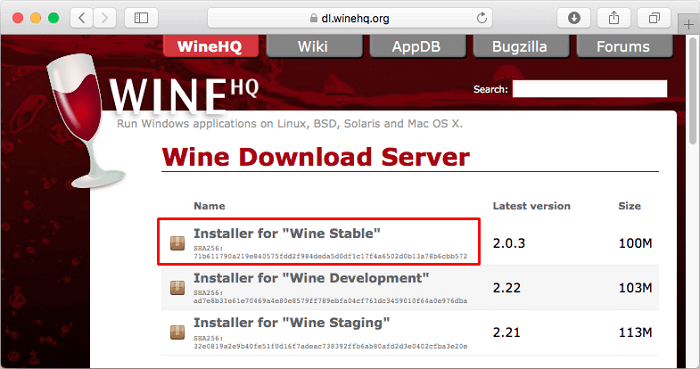
Step 3. To download the Wine Stable installer on your Mac, tap on the link to .pkg files. This will initiate the download process, allowing you to install Wine on your device.
Step 4. Run the "winehq-stable-2.0.3.pkg" file from the Downloads folder, follow the instructions, and click the Continue button.

Step 5. To enable 64-bit support in Windows, turn on the 64-bit support option and then click on the Continue button.
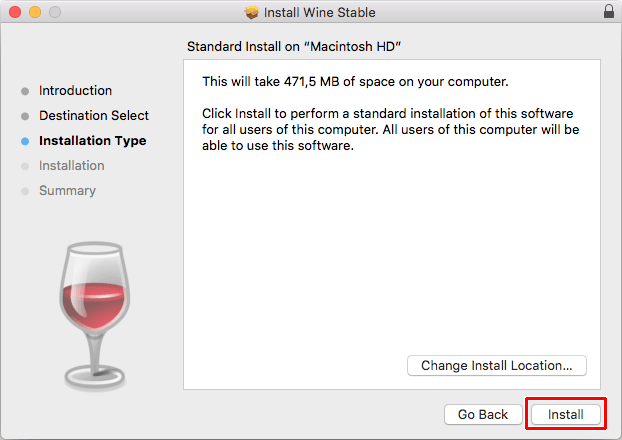
Step 6. To install Wine, click on the Install button to begin the installation process, and then enter your password in the Installer to proceed.
Step 7. Wait for a few minutes for the installation to complete.
Sum Up
Gamers, you can still enjoy your favorite PC games on your Mac, even if it's not designed for robust gaming. By running Windows on your Mac, you can play a wide range of games, and it's easier than you think. Simply choose the right method to run Windows on your Mac, and you'll be gaming in no time.
Using a Windows USB drive is the best solution to operate Windows on Mac, as it provides a seamless and efficient experience. This option allows you to run Windows directly from the USB drive, eliminating the need for a separate installation and minimizing the risk of conflicts with your Mac's operating system. By booting your Mac from the USB drive, you can access Windows and its applications without compromising your Mac's performance or security.
- It is cheaper than running virtual machines
- It is less complicated than using Wine Software
- Importantly, you can use a simple tool like Qiling OS2Go to create a Windows USB drive, which allows you to boot up Windows on any computer without needing to install it.
To play games on your Mac without consuming hard disk space, install Windows OS on a portable drive today.
Related Articles
- Can You Run Windows from a USB Without Installing? 2 Ways Available
- What Is Bootable USB Drive? All You Should Know About Bootable USB Drive
- How To - How to Install and Run Windows 11 on USB
- How to Play Windows Games on Chromebook [Latest Guide]
- SSD Upgrade Software Free Download Yet Still Reliable
Upgrading an SSD can be challenging, but a free SSD upgrade tool like Qiling Disk Copy can make the process easier and more efficient. You can download this software and use it to upgrade your SSD. - Backup Guide: System Image Backup on Windows 7
To do a system image backup of Windows 7. This guide will show you the accurate steps below and how to restore Windows 7 with a system image.