Fixed | Windows 10 Backup Is Disabled? 3 Tricks for Activating Backup
What Are Windows 10 Backup Options?
Creating regular backups of Windows 10 helps prevent data loss in case of errors or hardware failures. Microsoft offers two backup tools: File History and Backup & Restore, designed to protect your system and ensure data recovery.
Microsoft's integrated backup tools sometimes fail unexpectedly, causing Windows backup to be disabled. This can lead to users being unable to access the tools, resulting in blank boxes with no options.
You can experience issues when Windows 10 backup is not functioning properly or is disabled, leaving your data unprotected. To address this, you can check and fix the issue using various methods, which will be explained in this article.
How to Tell If Windows 10 Backup Is Disabled?
If you're unsure whether Windows Backup is disabled or if you've checked the backup status and still can't find any file backups, check the File History to see if Windows 10 backup is disabled.
You can find the File History in Windows through either Windows Settings or Control Panel. To check and set up File History, you can follow the instructions for either setting, which we will introduce to you.
- Method 1. Find File History in Windows Settings
- Method 2. Set up Windows 10 Backup from File History in Control Panel
Method 1. Find File History in Windows Settings
To check the status of File History in Windows, you can follow these steps:
Step 1.To access settings on Windows, click on the Windows icon in the bottom left corner of the taskbar or press the Windows key, and select "Settings".
Step 2.Click on the "Update & Security" option in the Settings Window.
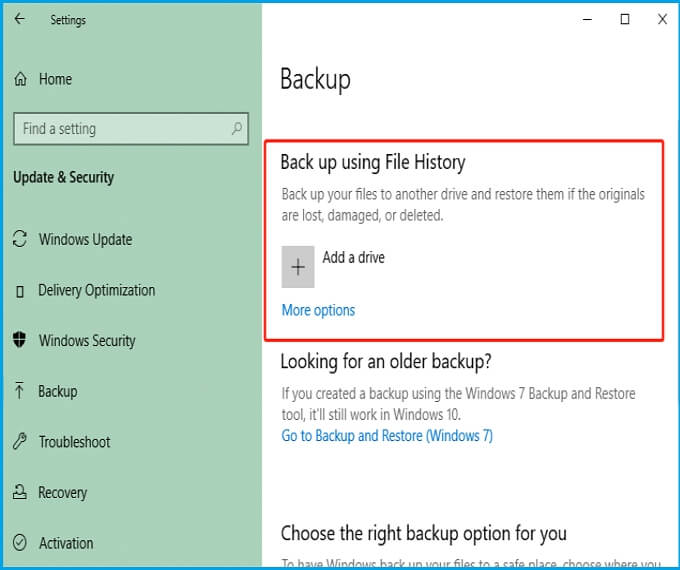
Step 3.On the next screen, navigate the "Backup" option in the left panel, then click on "Back up using File History" at the top right area.
Step 4.If no folder is selected, click the "plus icon" under "Add a Drive" to choose your desired backup destination.
Method 2. Set up Windows 10 Backup from File History in Control Panel
The Control Panel is a convenient method to customize computer settings, but many people quickly search through the search bar feature instead. However, it's still easy to find most computer settings through the Control Panel. To check the File History anytime, simply follow these quick steps through the Control Panel.
Step 1.Go to the search bar and type Control Panel.
Step 2.To access the control panel, click on it, and under the "Sort by" option, select "View by" and then choose "Small icons".
![]()
Step 3.Once all the control panel settings appear, choose the "File History" setting.
Step 4.If the File History is currently on, check the backup location. If it's turned off, turn it on and choose the drive to back up files.
If you've checked the File history using both settings and even the Windows 10 backup is disabled, you'll need to fix the errors using any of the methods mentioned below.
Three Methods for Activating Windows 10 Backup
- Method 1. Download Fail-proof and Free Backup Software - Qiling Backup
- Method 2. Turn on Windows Search
- Method 3. Run DISM to Repair Corrupted System Files
To activate the disabled backup in Windows 10, you can use one of three methods. We've provided all the necessary details to help you, but if you're unfamiliar with Windows settings or Command Prompt, we recommend using the first method for quick and reliable backup results.
Method 1. Download Fail-proof and Free Backup Software - Qiling Backup
Manually fixing Windows backup issues can be time-consuming, so it's recommended to use free, reliable backup software like Qiling Backup, which offers top-notch features to easily back up files, systems, partitions, external drives, backup drives, and disks.
When you download the software, you'll encounter its simple user interface, designed for ease of use and minimal hassle. It's a top solution for creating standard backup solutions if the Windows 10 backup is disabled.
This backup software provides advanced features for free, including incremental backup, encrypted backup, and customizable backup frequency, as well as scheduling capabilities for daily, weekly, or monthly backups.
Using Qiling Backup, you can bypass the hassle of manually fixing Windows 10's built-in backup utilities. This tool offers all the standard backup features for free, plus more advanced and quick options, making it a convenient alternative to the built-in backup utilities.
Step 1. On the main page, click "System backup" button to start.

Step 2. Qiling Backup automatically selects the system partition and only requires you to choose a backup destination.

Step 3. You can save the backup file to either a local drive on your computer or a Network Attached Storage (NAS) device for safekeeping.

Step 4. After completing the backup process, you can view the backup status, restore, access, or remove the backup by clicking on the backup task on the left.

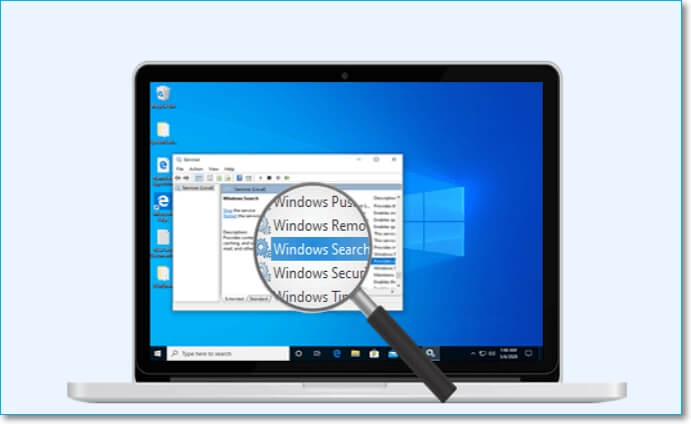
Method 2. Turn on Windows Search
Windows Search is a convenient feature that allows users to quickly find specific files, including Windows backups, by typing in the search box. This feature is useful for locating any content on the computer.
If you're a Windows user, ensure that the Windows search option is enabled, as you won't be able to navigate any function under File History if it's disabled. To turn on Windows Search, follow these steps.
Step 1.To delete the File History folder on the C Drive in Windows Explorer, navigate to the C Drive, then go to the File History folder located at "users/username/AppData/Local/Microsoft/Windows/FileHistory", and delete it.
- Notice:
- You canbackup onedrive to external hard drive.
Step 2.To access the Services window on your Windows PC, navigate to the lower-left corner and open the search bar or press the "Windows key + S", then type "Services" and open it.
Step 3.Windows Search is a feature in Windows that allows you to search for files, folders, and other content on your computer. It's a useful tool for finding specific files or information quickly.

Step 4.Double click it to open the Windows Search Properties.
Step 5.To expand the Startup type drop menu, simply click on the down arrow icon located next to it. This will allow you to view and select from the available startup options.
Step 6.To enable automatic updates in Windows, select the option for "Automatic (Delayed Start)" and click "Apply".
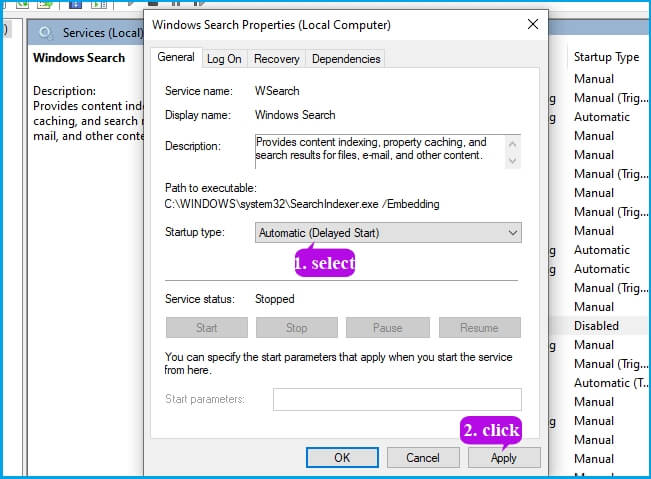
Step 7: Click the"Start" button and then select "OK".
If you're unable to access your backed-up data, try restarting your computer and then check the File History to see if the data is available. If it still doesn't work, try running the File History troubleshooter to resolve any issues. You can also try checking the File History settings to ensure that the correct drive is selected and that the backup is set to run regularly.
Method 3. Run DISM to Repair Corrupted System Files
If you notice that the backup is disabled in Windows 10, it may be due to missing or corrupted system files. To fix this issue, you can use DISM (Deployment Image Servicing and Management) to check and repair the system. By following these steps, you can use DISM to identify and resolve the problem, enabling Windows backup to work properly again.
Step 1.Go to the search bar and type cmd.
Step 2.Right-click on the "Command Prompt" to select "Run" as administrator.
Step 3.Type the command DISM /Online /Cleanup-Image /ScanHealth and press "Enter".
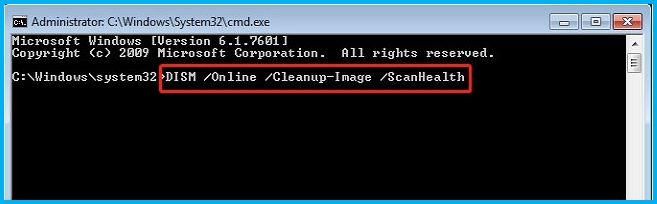
- Notice:
- It will check corrupted system files on your computer.
Step 4.fsck /dev/sda1
DISM /Online /Cleanup-Image /CheckHealth
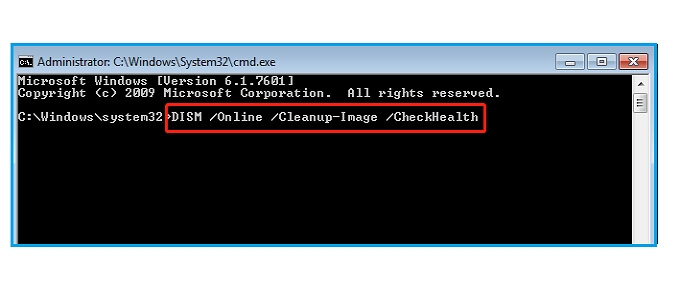
After running the given commands, you will be able to see the health status of your system, including whether files are healthy, repairable, or irreparable, providing you with a clear understanding of the system's overall condition.
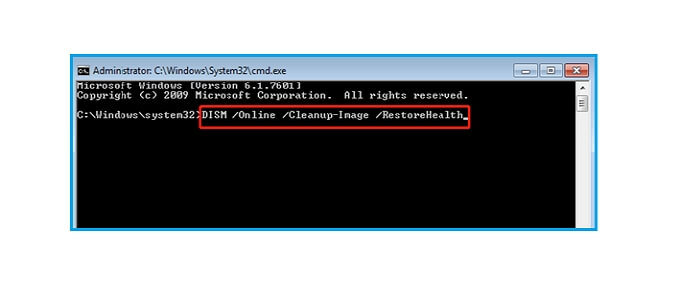
Step 5.If your system is experiencing issues, you can use the DISM command with the RestoreHealth option to scan and repair common problems. Simply type DISM /Online /Cleanup-Image /RestoreHealth and press Enter.
- Tip:
- Please do not turn off or restart the computer until the process is complete, which may take around 10-20 minutes, as it will repair the corrupted files.
More Problems Found Because Windows 10 Is Disabled
If your Windows 10 backup is disabled, it can cause various errors in your system, including issues with system restore, file recovery, and overall system stability. This can lead to data loss and other problems.
-
Windows 10 backup does not recognize the external hard drive.
The issue occurs when there's an inappropriate connection or drive corruption during the backup process, causing the Windows system to fail to recognize the hard drive.
-
Windows 10 backup starts and stops.
The error is caused by an incomplete backup process, file format, or file corruption that prevents the backup from being saved.
-
Windows 10 backup cannot select a drive.
File history does not recognize this drive, which may also be due to a corrupt drive, improper connection, or Windows 10 issues.
-
Windows 10 backup add folder not working.
A backup process may fail to back up all files if the file format or file corruption is the cause, leading to incomplete backups.
Disabled Windows 10 Backup FAQs
We have tried to resolve your different queries related to the problem of Windows 10 backup here in this guide. If you still have some, hopefully, the given FAQs will solve those perfectly.
1. How do I enable Windows backup?
To create a backup of all your files, go to the search box on the taskbar, or press Windows + s, and type Control Panel. Then, click on it to open and choose System and Security > Backup and Restore (Windows 7). Next, choose another backup to restore files from, select the destination of your storage drive, and create the backup of all your files.
2. Why is my Windows 10 backup not working?
If your Windows Backup process is failing unexpectedly, it may be due to errors causing file corruption. To resolve this issue, try removing the root folder of Windows Backup from the C drive. Once removed, create a new folder, and this should resolve the problem.
3. How to enable File History backup in Windows 10?
To enable the File History backup in Windows 10, open the Start menu, click on Settings, then Update & Security, followed by Backup, and finally Add a drive. This will allow you to start using the disabled Windows backup feature.
Conclusion
We have high hopes that you've learned how to identify if Windows 10 backup is disabled and also mastered 3 quick fixes for this issue. The best solution, however, is to use the free backup software, Qiling Backup.
Related Articles
- Is Windows Defender Good Enough to Protect My PC? Check the Best Answer
- Windows Backup Problem: Windows Backup Stuck at 97%
- For Beginner's: Put a Windows 11 PC to Sleep
- 2022 Best 5 Free Virus Removal for Windows 11/10
- How to Move League of Legends to Another Drive (Support Windows 11)
If your SSD or HDD is running out of space, you can move League of Legends to another drive to free up space. You can easily transfer the game to a new HDD or SSD with the help of Qiling Disk Master, a tool that can assist with moving any game's location. This is especially useful with the launch of Windows 11, and Qiling pc transfer tool can be a helpful resource in this process. - How to Move McAfee from one Computer/Drive to Another Without Reinstalling
You can transfer McAfee from one computer to another without re-downloading by using a PC data transfer tool, or move it from one drive to another with an App Migration Utility.