How to Set Up and Backup Mac with Time Machine [Best Answer]
Worried about losing data due to cyberattacks? Setting up Time Machine on your Mac can help ensure valuable information is kept safe, even if the system gets damaged. Knowing how to back up data and restore files is also crucial for peace of mind.
The Mac's Time Machine feature allows for easy backup of important data, and in this post, we'll explain how to set it up and use it to back up your Mac.
- What Is Time Machine & What Are Its Features?
- How to Set Up And Backup Mac Using Time Machine?
- Why It Is Important to Back Up Mac Regularly?
- How to Restore Files from A Time Machine Backup?
- Tips for Ensuring A Successful Time Machine Backup
- Troubleshooting Common Problems with Time Machine Backups
What Is Time Machine & What Are Its Features?
Time Machine is a feature in macOS that allows users to back up their data to an external hard drive, introduced in 2008 and available on all Macs. It enables users to back up their complete hard drive, individual files, or photos.
Time Machine can be used to back up personal data such as photos, apps, email, music, documents, and videos, allowing for quick restoration of the data to its original location.
You can set up Time Machine to run automatic backups on your system, which occur on a scheduled basis, or you can perform backups manually using the Time Machine app on macOS 10.5 and later.
If you want to know more about Time Machine backup, check out the articles below:
How to Set Up And Backup Mac Using Time Machine?
To set up Time Machine, start by plugging in an external hard drive, which will serve as the backup device. Then, go to System Preferences, click on Time Machine, and select the external drive as the backup destination. Next, choose the options you want Time Machine to back up, such as your entire Mac or specific folders. Finally, click on Select Backup Disk and Time Machine will start backing up your data.
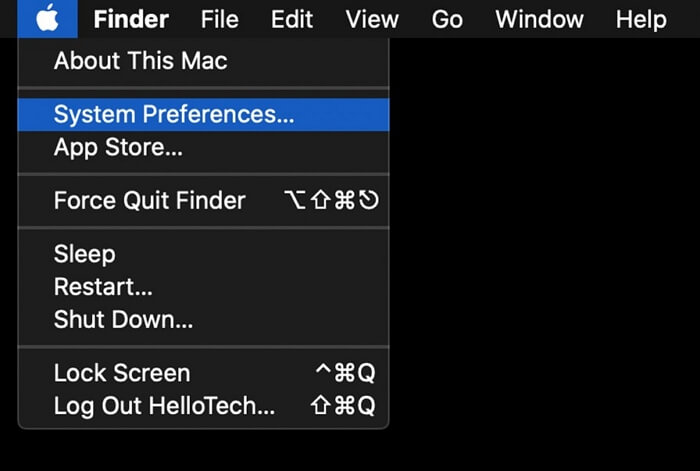
Step 1.Select the Apple icon in the menu bar, then click on "System Preferences".
![]()
Step 2. Now, select the "Time Machine" icon.
![]()
Step 3. To back up your Mac using Time Machine, press the "Select Backup Disk" tab and choose the disk where you want to store the backup.
Step 4. Now, remember to select the "Back Up Automatically" box. That way, the backup will be done automatically to the disk of your choice.
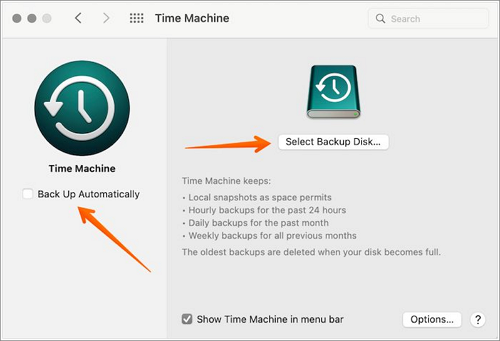
Step 5.If the Time Machine backup doesn't start automatically, you can manually initiate it by selecting the box beside "Show Time Machine icon in the menu bar" to display the Time Machine icon in the menu bar, allowing you to start the backup process.
Step 6. To set up Time Machine, select the "Time Machine" icon, then press the "Back Up Now" option. This will activate Time Machine and begin backing up your Mac.
- Notice
- The Time Machine automatically backs up your data every hour, and only deletes the oldest backup when the chosen backup disk is full, with the first backup taking a significant amount of time.
While running Time Machine backup in the background, you can still use your Mac as usual, but make sure to have an external hard drive connected to it.
Why It is Important to Back up Mac Regularly?
Many Mac users may underestimate the importance of backing up their data, leaving them vulnerable to losing crucial files due to a lack of backup. This can be a nightmare scenario, causing anxiety and nervousness, and it's not uncommon for colleagues to share horror stories of data loss. Regularly backing up data is essential to prevent such a disaster, and it's a simple yet crucial step to ensure peace of mind and avoid the stress of losing important files.
Here are the reasons why regularly backing up your Mac is crucial in one paragraph:
- The unexpected failure of a solid-state drive (SSD) can cause difficulties in recovering data from it.
- Even though you use iCloud to sync data, backup is still essential because not everything can be synced.
- Liquid damage can indeed cause issues with your Mac's system, but the severity of the damage depends on the type of liquid, the amount spilled, and how quickly you act to clean and dry the device. If you've experienced a liquid spillage, it's essential to turn off your Mac immediately, unplug it, and let it air dry. If the liquid was a conductive substance like water or juice, it's possible that the logic board or other internal components may have been damaged, which could require professional repair or even replacement.
- Malware attacks, although rare, can still cause significant damage by wiping away valuable data.
- Upgrading to a new operating system version can sometimes result in data loss due to compatibility issues.
- Photos and videos with sentimental value should be backed up to prevent loss due to technical issues or other unforeseen circumstances, as their emotional value can be irreplaceable.
- Backing up your data makes it easy to set up your latest system, allowing you to restore the data on the new Mac and start working with minimal hassle.
How to Restore Files from a Time Machine Backup?
To restore files from a Time Machine backup, locate the backup disk in the Finder, select the backup you want to restore from, and click on the "Restore" button. You can also use the Time Machine interface to browse through the backup and select specific files or folders to restore. If you're restoring to a different Mac, make sure it's compatible with the backup disk and that you have the necessary permissions.
Step 1. To access System Preferences, click on the Apple icon located at the top-left corner of the screen, then select the "System Preferences" option from the dropdown menu.
Step 2. To access the Time Machine feature, tap the "Time Machine" icon, and select the option to show Time Machine in the menu bar.
Step 3. To enter Time Machine, select the Time Machine icon in the Menu bar and press the Enter Time Machine option.

Step 4. To restore a file or folder, choose the one you want and select the "Restore" option from the Time Machine, which will then restore it to its original location.
To learn more about restoring from Time Machine, check this out:
To restore from Time Machine, connect your Time Machine backup drive to your Mac, then restart your computer and hold down the power button until the startup options menu appears. Select your Mac's startup disk and click "Continue".
Lost some essential files on your Mac? Don't worry, you can restore them using Time Machine. This article provides a step-by-step guide on how to do that, making it easy for you to recover your lost files and get back to work.
Tips for Ensuring A Successful Time Machine Backup
Here are the tips to ensure a smooth Time Machine backup: You can adopt the following tips to ensure a smooth Time Machine backup: Ensure that the backup disk is connected to the computer before starting the backup process. Also, make sure that the backup disk has enough free space to accommodate the size of the data you want to back up. Additionally, you can set up the Time Machine to automatically back up at regular intervals, such as daily or weekly, to ensure that your data is always up to date.
- To ensure a successful backup, you need to use an external storage device with sufficient space, and dedicate it solely to storing backup data from your Mac, excluding any other files or data.
- Time Machine is not compatible with external storage systems, but it can be used with AirPort Time Capsule, another Mac, USB, hard drive, or external drives connected to an AirPort Extreme Base Station.
- On a Mac, a typically formatted hard disk cannot be used for data backup because the computer will automatically prompt the user to format the disk in the MacOS format, making it unusable for other operating systems.
- If your Mac's SSD has FileVault encryption enabled, you'll need to select the "Encrypt Backup Disk" option during the backup process. Otherwise, you can proceed with encryption.
- To enable automatic Time Machine backups on a Mac, it must be connected to a power adapter. However, for manual backups, a power adapter is not required.
- To improve the performance of Time Machine, upgrading to the latest macOS version, specifically Big Sur, is recommended. Additionally, using AFPS-formatted drives is suggested for the best results.
- If you notice your Time Machine backup speed slowing down, check if any apps are running in the background that might be affecting its performance, such as antivirus software.
Troubleshooting Common Problems with Time Machine Backups
Knowing the common issues that can arise when using Time Machine for backing up data is essential. Different scenarios, such as running out of disk space, encountering errors during the backup process, or having issues with the backup destination, can cause problems. To avoid these issues, it's better to be aware of these potential problems and apply the suggested solutions, ensuring a smooth and reliable backup experience.
Problem 1. Failure of the Time Machine to back up data
Interference with Time Machine backups can occur due to various reasons, including being updated to a newer macOS version or failing to update the OS, as well as issues with the backup drive itself, such as it being faulty or running out of storage space.
Solution: A variety of solutions can resolve this issue.
- Make sure you update your macOS.
- Reboot Mac to see if the issue is resolved.
- Update the Airport Time Capsule firmware to the latest version, ensuring compatibility with the latest security patches and features. To do this, go to the AirPort Utility app on your Mac, select your Time Capsule, and click the "Update Firmware" button, following the on-screen instructions.
- Check out the file system of the extremal hard drive.
Problem 2. Damaged permission in the external hard drive
If there's a permission issue with an external hard drive, users won't be able to back up data to it, and it's essential to resolve the problem as soon as possible to avoid any data loss or corruption.
Solution: Use diskutil in Terminal.
For this, you need to follow the steps given below:
- In the Spotlight search bar, type Terminal.
- Type diskutil list.
- Find the partition for Time Machine backup.
- You can use the command "diskutil verifyvolume [volume name]" to verify the volume.
- Run diskutil repairVolume [volume name] to find problems.
To recover deleted Time Machine backup, you'll need to use third-party data recovery software. For example, you can use Deep Data Recovery for Mac, which can help you recover deleted files. To do this, download the software, connect your Time Machine disk to your Mac, and follow the step-by-step guide to recover your deleted files.
Step 1. Launch Deep Data Recovery on your computer, select the desired file types, and click "Next" to initiate the recovery process.

Step 2. Select the disk location where you lost data and click the "Scan" button.

Step 3. Deep Data Recovery for Mac will immediately scan your selected disk volume and display the scanning results on the left pane.

Step 4. In the scan results, select the file(s) and click the "Recover" button to restore them.
Conclusion
The Time Machine feature on Mac allows users to easily backup images, videos, documents, and more, but knowing how to use it is essential to utilize this convenient backup feature.
Setting up Time Machine and enabling it for backup is essential to prevent data loss. In addition to setting it up, it's also important to know how to restore backup files. By following the tips outlined in the article, you can complete a successful Time Machine backup quickly.
However, multiple problems can arise while using Time Machine, which is why it's essential to be aware of them to resolve them calmly. To avoid any issues, start backing up your Mac today!
FAQ About Time Machine Backup
1. Why can't I restore my Mac from Time Machine?
To ensure a successful Time Machine backup, use a backup disk that is supported by Time Machine, and connect it directly to your Mac, not through a USB hub or other device. If connected directly, use Disk Utility to repair the disk, if necessary.
2. How long should a Mac backup take?
The first backup of a computer with a lot of files and apps may take some time, but for a new Mac with minimal content, it should only take around 5-10 minutes. Our experience with a 10 GB backup took around 10 minutes for Time Machine to complete its first backup.
3. Is Time Machine slowing my Mac down?
Time Machine runs in the background without interfering with your computer's regular operation, slowing down only when your Mac is busy, hot, or running low on battery power.
Related Articles
- How to Copy and Paste on Mac
- Mac is slow! How to fix a Mac running slow, laggy, and freezing a lot
- Mac Users' Guide - Fix Mac Black Screen of Death with 6 Solutions
- Beginner's Guide: Learning Mac from the Compatible Formats
- Top 10 Best USB Repair Tool 2022 Update
Sometimes USB drives can get errors, but fortunately, there are several USB repair tools that can easily fix USB corruption. Qiling data recovery software can also help with USB data loss problems. Among the top 10 best USB repair tools, there are several options available to fix USB issues. - 7 Quick Ways to Reduce Chrome High Memory Usage Windows 10/11
Is Google Chrome using too much RAM on Windows 10/11? Learn 7 quick fixes to reduce Chrome's high memory usage, including closing tabs, disabling extensions, enabling hardware acceleration, clearing cache, and more.