Multiple Choices - Fix macOS Can't Repair the Disk
Quick Navigation:
| Workable Solutions | Step-by-step Troubleshooting |
|---|---|
| 1. Restart the Mac |
Click the Apple icon from the menu...Full steps |
|
2. Use FSCK Command |
Restart your Mac and boot into Single User...Full steps |
|
3. Reformat Disk |
Get another empty external hard drive as...Full steps |
Disk Utility is a macOS built-Disk Utility is a tool that offers a range of functions, including disk erasing, formatting, and emergency repairing. While it shares some similarities with Disk Management in Windows, the two tools do not have identical functions. Instead, Disk Utility provides features such as mounting and unmounting external drives that Finder has trouble with, formatting flash drives and hard drives to specific formats, and checking and repairing disk errors.
Overview of macOS Can't Repair the Disk
First Aid in Disk Utility is a tool designed to repair and diagnose issues with disks and other storage devices, making it useful in various scenarios such as app crashes, file corruption, external device damage, or when a computer won't start normally.
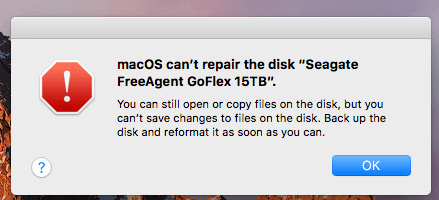
Disk Utility may not be able to detect or repair all disk problems, and in some cases, running First Aid may result in an error message saying "Can't repair the disk". However, if you can still access and copy files on the disk, but are unable to save changes to them, there may be a different issue at play.
Why Disk Utility Can't Repair My Disk?
Disk Utility may stop repairing a disk due to a First Aid failure, which can occur when trying to fix the Macintosh HD or other external storage devices like USB flash drives, SD cards, or external hard drives, resulting in an error message such as "The volume Macintosh HD could not be repaired".
If your disk is badly damaged and is beyond the repair ability of First Aid, you would also see the error message. In this situation, all you can do is to back up the disk data as much as possible or to recover the data using data recovery software.
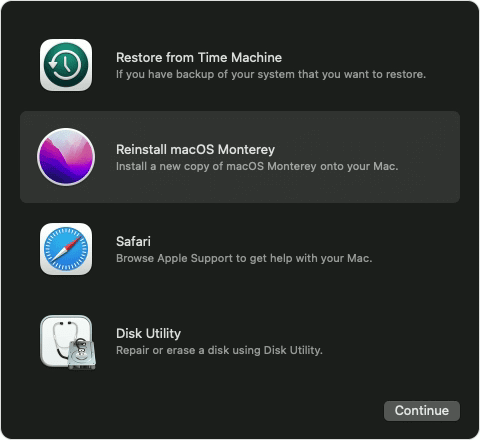
macOS Recovery - What Can Recovery Mode Do when macOS Breakdown?
Mac's recovery mode is a feature that allows users to troubleshoot and resolve serious problems with their Mac, such as a frozen system or a failed startup. It provides a safe and secure environment for users to run diagnostic tests, reinstall macOS, and perform other crucial tasks to get their Mac up and running again. By entering recovery mode, users can bypass the normal startup process and access a simplified menu that offers various options for resolving issues and restoring their Mac to a working state. This feature is particularly useful for users who are experiencing persistent problems or are unable to boot their Mac normally, and it can be accessed by restarting the computer and immediately holding down the 'Command + R' keys.
How to Fix Disk Utility Can't Repair the Disk?
There are three ways to fix the problem, and they won't cause data loss. However, it's still recommended to make a backup of your disk. These solutions are:
Solution 1. Restart the Mac and Repair the Disk with First Aid Again
If you're experiencing the "macOS can't repair disk" issue, try retrying the repair process, as a simple retry can sometimes resolve temporary First Aid failures. To do this, go to Disk Utility, select the affected disk, and click "First Aid". Wait for the process to complete, and if it still fails, try running the repair process in verbose mode by adding the "-v" flag to the command. If the issue persists, you may need to consider more advanced solutions, such as reinstalling macOS or seeking professional assistance. However, in most cases, a simple retry can resolve the issue.
Step 1. Click the Apple icon from the menu bar and select Restart.
Step 2. Click Restart again when the confirmation alert appears.
Step 3. Then your Mac will restart automatically, please wait with patience.
Step 4. After your Mac is turning on again, go to Applications > Disk Utility.
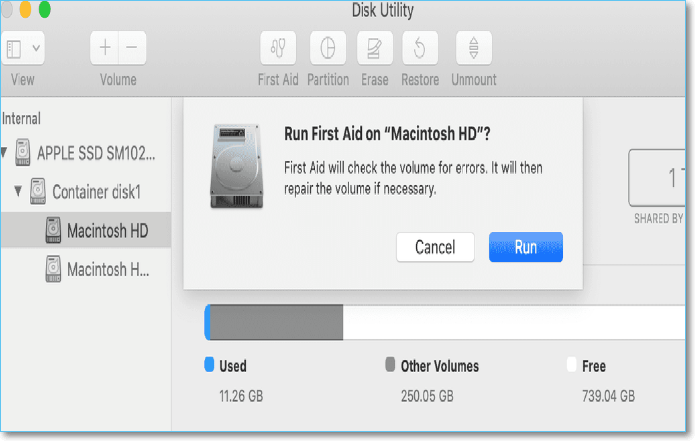
Step 5. To repair a disk using Disk Utility on a Mac, select the disk you want to repair from the sidebar, click the "First Aid" button at the top bar, and follow the on-screen instructions. This process will scan the disk for errors and attempt to repair them.
Step 6. Click Run to confirm. And wait for the new round of First Aid repair to be finished.
Solution 2. Use FSCK Command to Repair Disk
If First Aid doesn't work, you can try using the command line as an alternative. This method may seem complicated, but following the steps carefully makes it simple. To use the command line, you can follow the guide step by step.
Step 1. To boot into Single User mode on your Mac, restart your Mac and press and hold the correct key combination, either Command + S for older Macs or Command + R for M1 Macs, during the startup sound. Once in Single User mode, you can access Utilities and Terminal. This allows you to perform system maintenance and repairs. Note: The exact key combination may vary depending on your Mac model.
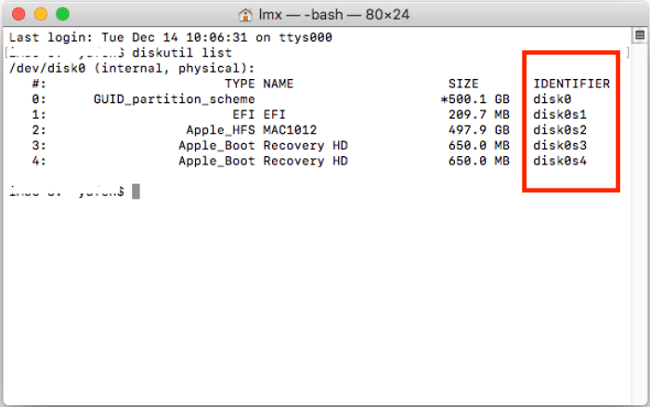
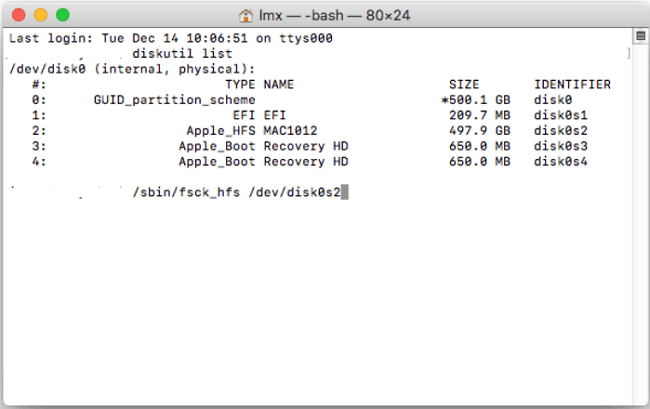
Step 2. To list all connected external hard drives, enter the command line "diskutil list" and press Enter in the Terminal app on your Mac. This will display a list of all connected disks, including external hard drives.

Step 3. The identifier in the last column represents the number of all external devices, remember the number of the external hard drive you want to repair.
Step 4. To run a file system check and repair on a specific drive, enter the command `/sbin/fsck_file system –fy /dev/drive identifier` and press Enter. For example, if the drive identifier is `disk0s2`, you would enter `/sbin/fsck_file system –fy /dev/disk0s2`. This command will initiate the file system check and repair process on the specified drive.
Step 5. Input Reboot and press Enter to restart your Mac.
If you see a line saying "The volume (the name of your drive) could not be verified completely", it means the FSCK tool can't repair the disk. Don't panic and try the next solution.
Solution 3. Back-Up Disk Data and Reformat it With Disk Utility
If the above methods don't work, try backing up the data on the target disk and then reformatting it. If it's an internal hard drive, use Time Machine to create a backup. If it's an external drive, check if there's any backup software available. If not, use Mac data recovery software to recover data after formatting.
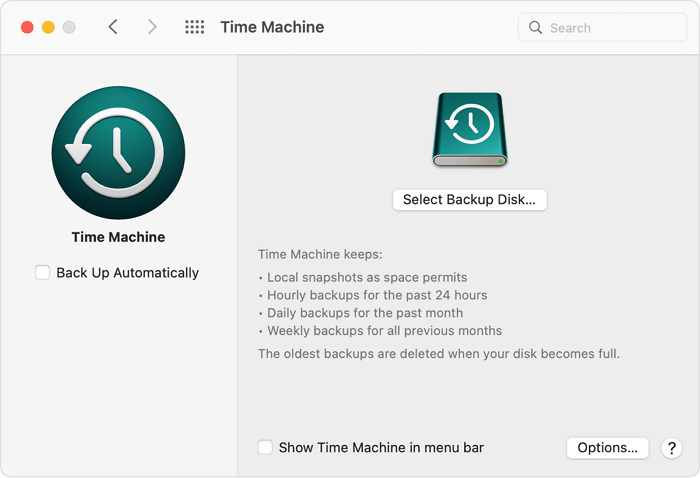
Backup with Time Machine
Step 1. To create a backup of your data, get another empty external hard drive that is larger than the data you need to back up. This will ensure that you have enough space to store all of your important files and information.
Step 2. Connect an empty drive to your Mac and click "Use as Backup Disk" when prompted to use it for backup.
Step 3. To initiate the backup process, first select the backup disk by clicking on "Select Backup Disk" and choosing the prepared disk. Then, click on "Use Disk" to proceed.
Step 4. To back up your entire Macintosh HD automatically, select the "Back Up Automatically" option on the left column, and Time Machine will take care of the rest.
Format Disk with Disk Utility
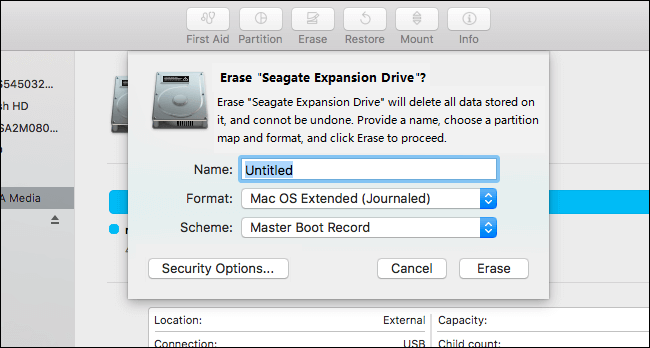
Step 1. Go to Applications > Disk Utility.
Step 2. Select the disk you need to format from the left side.
Step 3. Click Erase, enter the disk name, and choose a format. There will be a given format, generally, you don't need to change.
Step 4. Click Erase to start formatting.
Restore Time Machine Backup
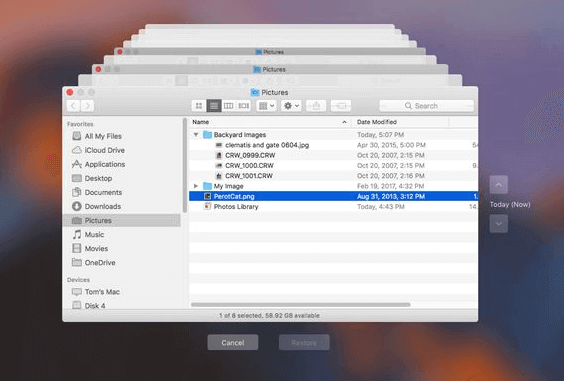
Step 1. Connect the Time Machine drive to your Mac and run Time Machine.
Step 2. To recover a previous version of a file, go to the "Previous Versions" tab, select the latest version prior to the reformatting of your disk, and click the "Restore" button.
Recover Data from Formatted External Drive
If you've formatted an external drive, we recommend using Mac data recovery software to retrieve your data. A suitable option is Deep Data Recovery for Mac, which can recover data from emptied Trash, formatted external drives, or recover data after an OS crash.
To recover data from a formatted drive, download the software from the button below and follow the guide provided by Qiling, which will walk you through the process step by step.
Step 1. To recover data from your external hard drive on a Mac, correctly connect the drive to your computer, then launch Deep Data Recovery for Mac. Select the desired file types and click "Next" to initiate the recovery process.

Step 2. Select the external disk and click "Scan" to let the software search lost files on it.

Step 3. After a quick scan and deep scan, all files will be presented in the left panel in the scan results.

Step 4. Select the files you want to recover and click the "Recover" button. Do not save the recoverable files to the external hard drive to avoid data overwriting.
Conclusion
If you see the message that macOS can't repair disk, don't panic. Try running First Aid again, and if that doesn't work, you can try using the FSCK command or formatting the disk. Always remember to back up your data to protect it.
Related Articles
- 10 Steps to Fix "There is No Connected Camera" on MacBook Air/Pro/iMac 2022
- Mac Desktop Empty: How to Restore Missing/Disappeared Mac Desktop Files and Icons
- APFS Data Recovery: How to Recover APFS Files on Mac/Windows
- Repair and Recover Your Corrupted SD Card on Mac
- The Best Data Recovery Software to Recover Deleted File
It's common to accidentally delete some important files on Windows computer. In such a case, you may want to find the professional data recovery software to recover deleted file. Here you will get a best file recovery tool and learn how to use it. - Solid State Drive Data Recovery: How to Retrieve Your Lost Files
How can you make Solid State Drive data recovery? In this article, we will explore the world of SSD data recovery and guide you on how to retrieve your lost files effectively.