0x803F7001 After a Disk Clone: Reactivating Windows
Quick Navigation:
- What the Code Reports
- Record the License State and Back Up
- Check the License, the Key, and the Hardware
- Clone Again with Qiling Disk Master
- Frequently Asked Questions
Windows starts from the new disk, the desktop loads, and Settings reports 0x803F7001 under Activation. The copy is intact and every file sits where it should. What changed is the hardware the license is checked against, and on a machine that was activated by a digital license tied to the old disk, that change is enough to lose the entitlement. The recovery is usually a matter of signing in with the right account and telling Microsoft which device the license belongs to, but the order of the steps decides whether it works on the first attempt.
What the Code Reports
0x803F7001 is returned when the licensing service finds neither a product key nor a digital license that matches the current device. Windows shows it as a message that this device does not have a valid digital license, sometimes with a link that opens the activation troubleshooter. The installed edition keeps working with a watermark and blocked personalization settings, so the machine is usable while the license question is open.
A digital license is an entitlement recorded by Microsoft against a hardware fingerprint. That fingerprint is built from board identifiers, the key stored in firmware on an OEM machine, the processor, the TPM state, and the system disk. A single component change is tolerated, which is why memory upgrades and graphics cards do not break activation. A new system disk with a new signature, combined with a boot path that now comes from a different device, can move past that tolerance and leave the service unable to confirm the match.
The license channel decides how much repair is possible. An OEM license carries its key in firmware, so the new disk normally activates on its own once the network is reachable. A retail license belongs to the Microsoft account that first activated the machine and can be reassigned to the new disk from that account. A volume license depends on a key management server or an Active Directory domain and usually needs an administrator rather than a consumer repair.
Other codes point elsewhere and should not be treated the same way. A hardware change message with a different number usually means the fingerprint moved beyond tolerance, while an invalid key message means the edition and the key do not belong together. A cloned image of Windows Pro restored onto a machine licensed for Home, or the reverse, fails no matter how many times the troubleshooter is run.
Record the License State and Back Up
Before touching activation, write down four things: the installed edition, the activation state shown in Settings, the license channel, and whether the Microsoft account linked to the machine is the one that activated it. Those four facts decide which of the repairs below applies, and each of them is easier to read now than after a failed attempt.
Create an image of the disk before any troubleshooting. Activation repairs rewrite the licensing store inside the Windows volume, and a run that is interrupted halfway can leave the copy in a state where activation fails with a different message each time. The image is also the fastest way back if the account work goes wrong.
Keep the old disk untouched until the new one is activated. It holds the original licensing store and the identifiers the entitlement was last matched against, and it is the only rollback available if the account route turns out to be blocked.
Check the License, the Key, and the Hardware
Open Settings, go to System and then Activation, and read the state before changing anything. Sign in with the Microsoft account that owns the digital license, then run the activation troubleshooter and choose the option that says this device had a hardware change. The troubleshooter lists devices linked to the account, and picking the right one moves the entitlement to the new disk.
The Software Protection Management tool, slmgr, is the command-line view of the same information: it reports the channel and the last five characters of the installed key, which is how an OEM key from firmware is told apart from a retail key typed by hand. Disk Management and diskpart identify which physical disk Windows is actually running from, a detail that matters when both disks are still attached and the machine silently starts the old one.
slmgr, the activation troubleshooter, Disk Management, diskpart, bcdboot, and bootrec all ship with Windows and are Microsoft components. None of them is part of Qiling Disk Master, and the clone tool never changes, resets, or transfers a license. Its job ends when the files are copied, and everything that follows belongs to the Windows licensing service.
When the troubleshooter cannot help, the next step depends on the channel. A retail license can be moved once the old device is no longer using it, a firmware key activates as soon as the correct edition is installed, and a volume license needs the administrator who runs the key management server. A machine whose board was replaced together with the disk is a new device for licensing purposes, no matter how complete the clone is.
Clone Again with Qiling Disk Master
Qiling Disk Master is worth a second run when the first copy was a partition-level job that left the licensing store or the recovery environment behind. Disk Clone moves the EFI partition, the Windows volume, and the recovery partition together, so the new disk presents the same installation the license was last matched against rather than a repaired remnant of it.
Operation 1: Select the Source and the Target
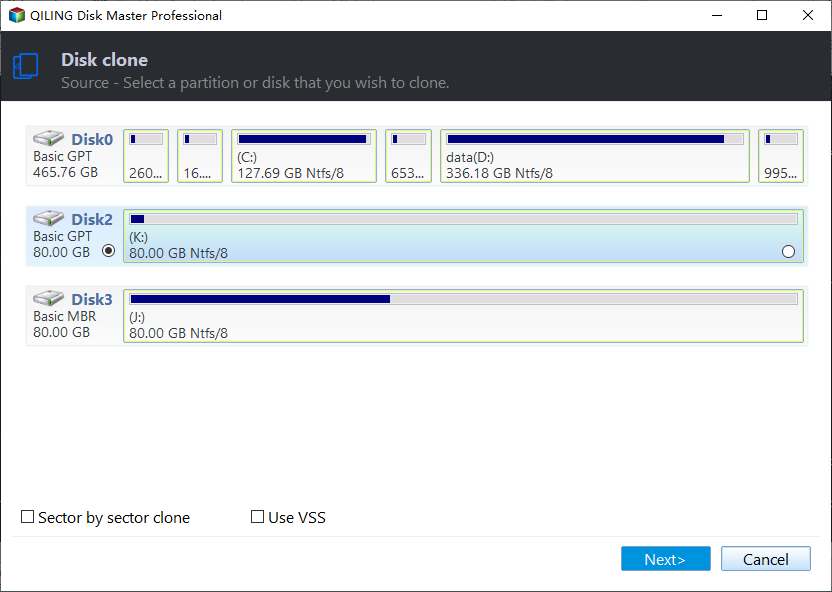
Step 1. Select the source disk or partition. Open Disk Clone from the Tools and utilities tab and look at the source list, where every attached disk already appears. Tick the disk that currently boots and activates, and check its number and capacity against the physical labels before moving on. Leave Sector by Sector Clone off on a healthy drive.
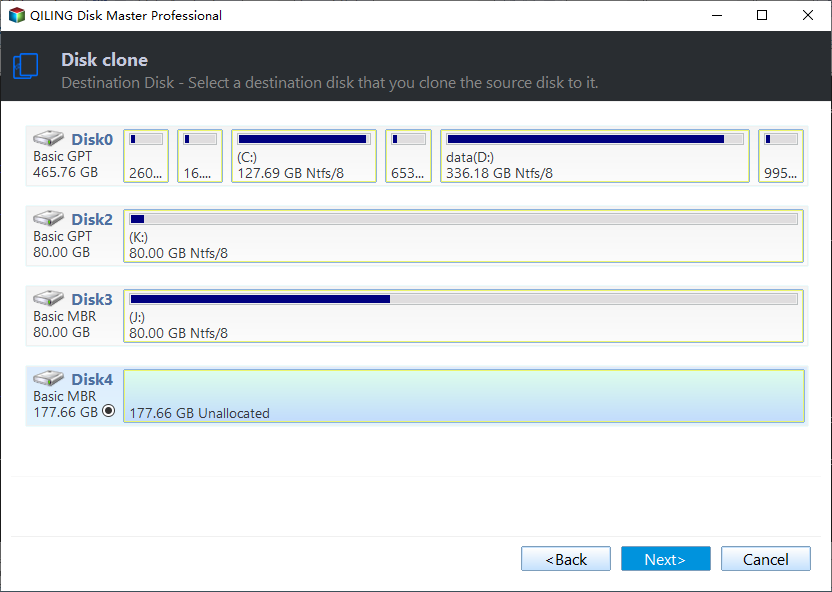
Step 2. Select the target disk. Pick the SSD that will hold the new installation and compare its number and capacity with the labels on the drives. The target loses its current partitions when the job starts, so an external backup disk must not be chosen by mistake.
Operation 2: Preview, Align, and Size the Target
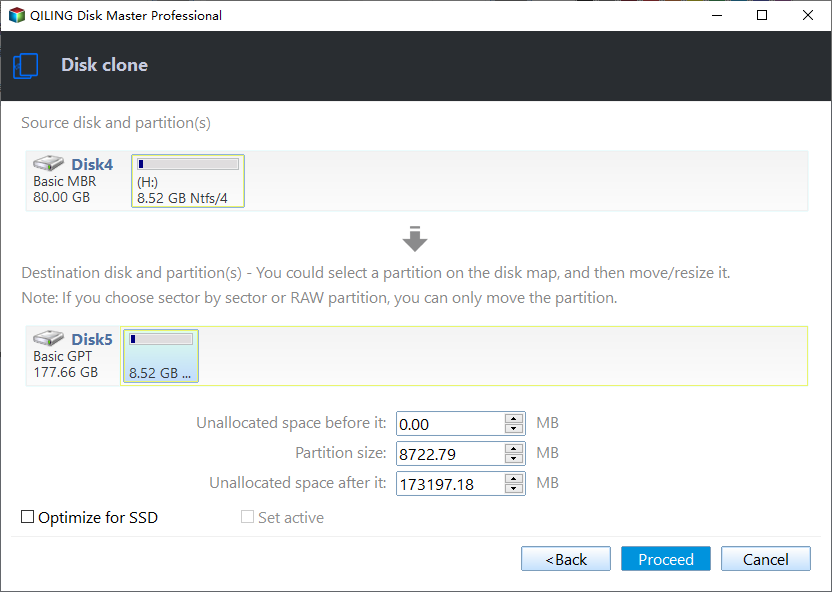
Step 3. Preview the layout, align the SSD, and adjust the partitions. The preview shows the source partitions on the left and the planned target on the right. Turn on SSD alignment so each partition begins on a 4K boundary, use the free space on a larger target to widen the Windows volume, and confirm that the EFI, reserved, Windows, and recovery partitions all appear. The recovery partition matters here, because an installation without it can drop into a repair state that recreates licensing files.
Operation 3: Proceed and Activate the Copy
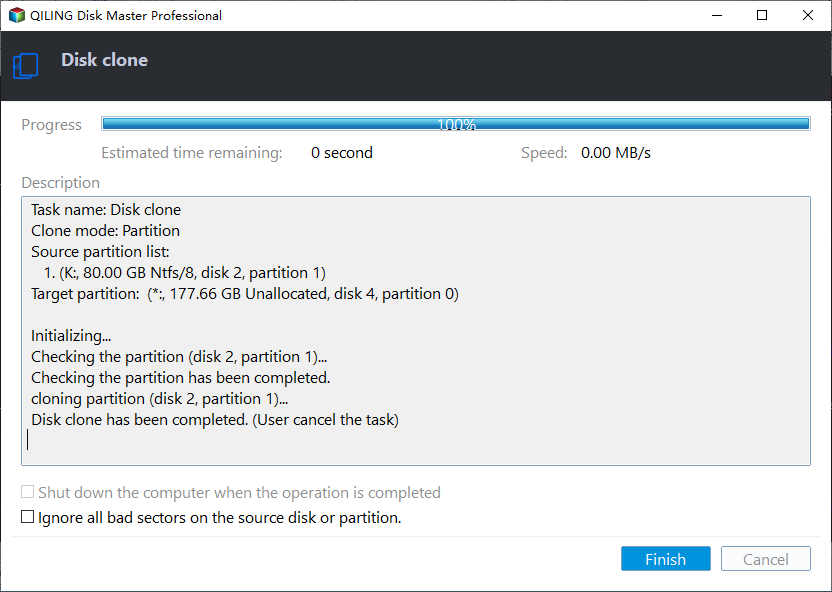
Step 4. Click Proceed and watch the progress to the end. Accept the overwrite warning and leave the machine running until the completion window appears with Finish enabled. Then shut down, disconnect the old disk, and start from the new one so the licensing service sees a single system disk.
Connect to the network on the first boot, wait a few minutes for the service to run, and only then open Activation. A machine that is already online when the new disk starts often activates without any prompt at all, while a manual attempt made offline can leave a pending state that confuses the next check.
Frequently Asked Questions
Do I need to buy a new license after cloning to a new SSD?
Normally no. The board, the firmware key, and the account that holds the entitlement did not change, so the license can be matched to the new disk through the activation troubleshooter. A new purchase is needed only when the license has already been moved to another device.
Does cloning to another computer move the license?
No. A digital license is bound to the device it was activated on, and a copy of the disk carries the files but not the entitlement. Moving a retail license to a different machine is a separate transfer with its own rules, and an OEM license stays with the original hardware.
Why does activation only fail once the old disk is removed?
Because the old disk still supplied identifiers that kept the fingerprint inside tolerance, and the boot path changed when it disappeared. Start with the new disk alone, sign in with the account, and run the troubleshooter so the service records the change once instead of twice.
Related Articles
- Windows Not Activated After Cloning
- Clone Windows to Another PC
- Migrate Windows 10 From One PC to Another
- Clone a Drive Before a Motherboard Upgrade
- Clone a Drive with Secure Boot and TPM
Products
Articles & Tutorials
- Data Recovery
- Data Backup
- File Recovery
- File Backup
- System Backup and Restore
- Disk and Partition Clone
- Technical articles
- Mobile articles
- Disk Master Help
- Windows Data Recovery Tutorials
- Windows Secure Delete Tutorials
- Windows Partition Management Tutorials
- Windows File Backup and Restore Tutorials
- Windows System Backup and Restore Tutorials
- Windows Disk Backup and Restore Tutorials
- Windows Clone Tutorials