Clone Fails Because Antivirus Blocks the Snapshot
Quick Navigation:
- Why the Snapshot Matters
- How Security Software Interferes
- Exclude, Pause, or Go Offline
- Clone from Qiling Bootable Media
- Frequently Asked Questions
A clone that fails while preparing, or sits at a fixed percentage with no disk activity, is often blocked by security software rather than by the disk. Cloning a running Windows volume requires a snapshot, and a snapshot requires the cooperation of every driver that filters file and volume activity. When antivirus holds a file open or refuses the snapshot request, the clone never reaches the copy stage.
Why the Snapshot Matters
Windows is writing to its system volume constantly, even when no user program is open. Copying that volume sector by sector while it changes would capture an inconsistent mix of old and new data, and the result would fail to boot. The clone tool therefore asks the volume snapshot service to freeze a consistent point in time and reads from that frozen view.
Creating the snapshot is a privileged operation that passes through filter drivers installed by backup tools, encryption products, and security suites. Each driver can inspect, delay, or reject the request. A driver that holds a handle to a system file, or that scans a newly created volume before releasing it, can leave the snapshot pending until the clone times out.
The symptom is easy to recognize. Preparation either stops with a snapshot or volume shadow copy error, or the progress bar never moves while the drive light stays dark. A raw disk that is not the running system often clones fine, which confirms that the operating system volume and its filters are the obstacle.
How Security Software Interferes
Real-time scanning is the first layer. Every file the clone tool opens is inspected, and a scan that takes a lock on a system file can prevent the snapshot from reaching a clean state. The heavier the scan policy, the longer the window in which the clone can time out.
The second layer is the filter driver itself. Security products insert themselves into the storage stack to watch reads and writes, and a driver that does not expect a raw volume read can return an error. Some suites also protect their own folders so aggressively that the snapshot cannot include them, and the request is rejected rather than partially fulfilled.
The third layer is behavioral protection. A process that reads an entire disk in a short time looks like ransomware to a heuristic engine, so the clone tool is suspended mid-job. The user sees a freeze with no error at all, and the security log records a blocked action only if the suite was configured to log it.
Exclude, Pause, or Go Offline
The quickest test is to pause real-time protection for the duration of the clone, then turn it back on when the job finishes. Disconnect the network first and do not browse or open mail during that window. If the clone completes with protection paused, the cause is confirmed and no further diagnosis is needed.
A better long-term fix is an exclusion. Add the clone program and its working folder to the allowed list, and exclude the destination disk from scanning. Excluding the whole source volume is not recommended, because that leaves the system unprotected; the tool and the target are enough to stop the interference.
When policy forbids disabling protection, or when the suite cannot be configured, clone from outside Windows. A bootable rescue environment loads only its own drivers, so no third-party filter sits between the tool and the disk. The snapshot is no longer needed either, because nothing is writing to the source while the rescue system runs.
Clone from Qiling Bootable Media
Qiling Disk Master can build that rescue environment on a USB drive from its Tools menu. Create the media on a working machine, boot the target PC from it, and run the same clone wizard without the installed security stack in the way.
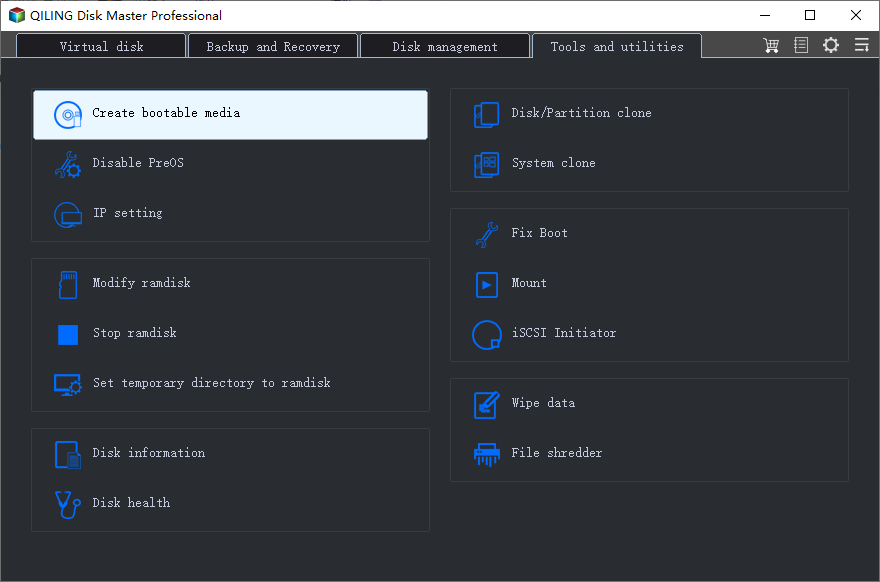
Step 1. Open Create Bootable Media
On the Tools and utilities tab, click Create bootable media. The wizard offers a USB drive and an ISO file; choose the USB option when you intend to start the machine directly from the stick. A blank drive of at least 8 GB is enough for the rescue system.
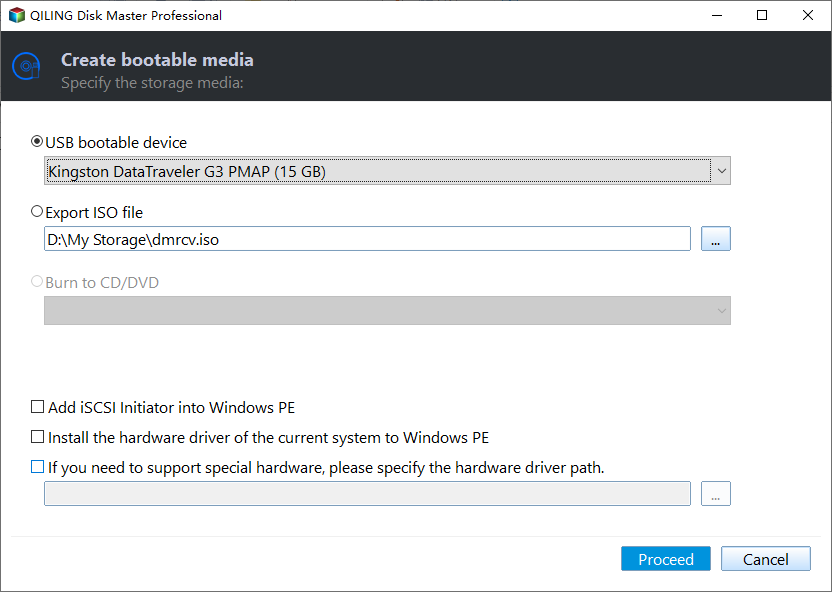
Step 2. Select the Device and Confirm the Capacity
Tick the USB device you want to use and read its capacity in the list before continuing. The drive will be erased, so confirm that it holds nothing you need. Check the summary on the next page, then click Proceed and wait for the media to finish writing.
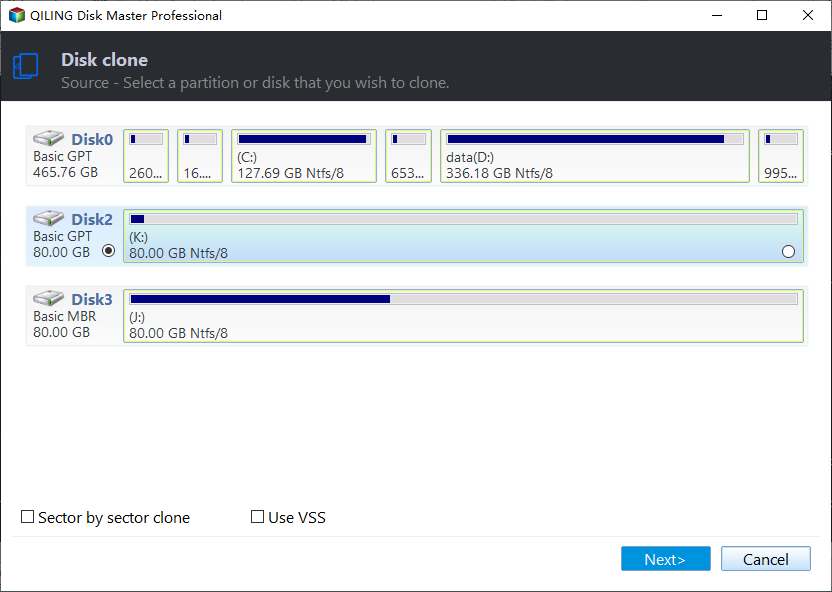
Step 3. Boot from the Media and Select the Source Disk
Restart the machine, open the one-time boot menu, and pick the USB drive. Once the rescue desktop appears, start Disk/Partition clone, choose Disk Clone, and select the disk that holds Windows as the source. Leave Sector by Sector Clone off for a healthy drive.
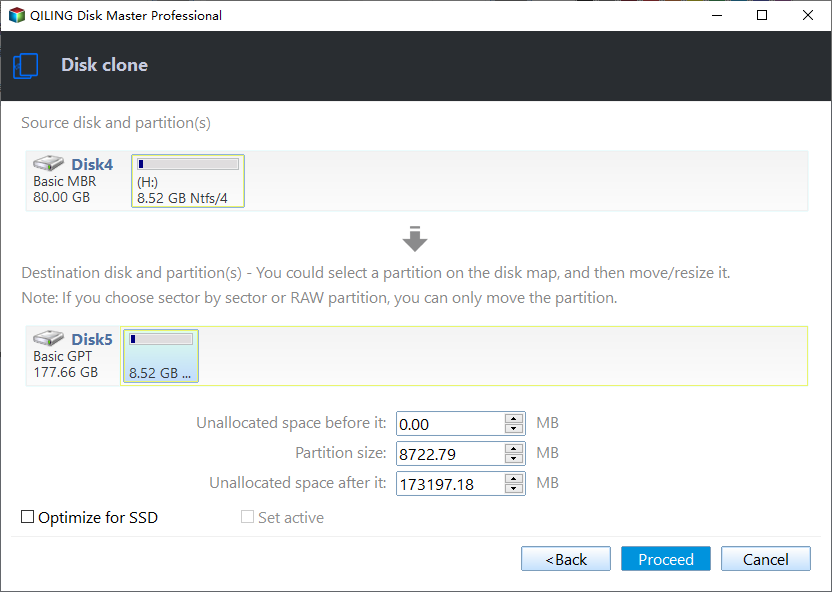
Step 4. Set the Destination, Preview, and Click Proceed
Pick the new SSD as the destination and confirm its full capacity. On the preview page, tick Optimize for SSD if the target is solid state, adjust a partition edge only when the sizes differ, then click Proceed. The job now runs without antivirus filters, so it should pass the preparation stage immediately.
Frequently Asked Questions
Is it safe to disable antivirus during a clone?
For a short, offline window it is acceptable. Disconnect the network, do not open downloads or mail, and re-enable protection as soon as the job ends. The clone itself does not need internet access.
Why does the clone freeze at preparing rather than fail?
Because the snapshot request is pending, not rejected. A filter driver is holding a file or scanning a volume, and the tool waits for a state that never arrives. Pausing real-time protection usually releases it at once.
Does the rescue environment need the same product key?
The bootable media is created by the installed program and carries its edition. Run the clone from the rescue desktop as you would in Windows, and keep the destination disk connected until the finish window appears.
Related Articles
- Clone Stuck at 0 Percent: Fixes
- Clone Stuck at Preparing
- Clone a Disk with WinPE
- Clone a Hard Drive Without Booting Windows
- Clone a Drive with Secure Boot and TPM
Products
Articles & Tutorials
- Data Recovery
- Data Backup
- File Recovery
- File Backup
- System Backup and Restore
- Disk and Partition Clone
- Technical articles
- Mobile articles
- Disk Master Help
- Windows Data Recovery Tutorials
- Windows Secure Delete Tutorials
- Windows Partition Management Tutorials
- Windows File Backup and Restore Tutorials
- Windows System Backup and Restore Tutorials
- Windows Disk Backup and Restore Tutorials
- Windows Clone Tutorials