HDD to SSD Clone Stuck at Preparing: Causes and Fixes
Quick Navigation:
- What the Preparing Stage Does
- A Source That Answers Slowly
- Tell a Hang From Slow I/O
- Clone Again with Qiling Disk Master
- Frequently Asked Questions
A clone that shows preparing for a long time has not started copying yet, so the progress bar has nothing to show. The stage that runs first reads the disk layout, checks the target, and plans the job, and any one of those steps can hold the task without ever failing.
What the Preparing Stage Does
Before any data moves, the tool reads the partition table of the source, checks that the destination has room for it, and examines the file system that each partition carries. It also mounts the destination and reads its geometry, which is why a target that answers slowly delays this stage rather than the copy.
On a system disk the tool also takes a snapshot of the volume that is in use. That snapshot lets Windows keep running while the clone reads a consistent view, and it takes a minute or more on a busy drive.
The result of all this work is the plan shown on the preview page. No sector is copied until you click Proceed, so preparing is entirely a reading and checking stage.
A Source That Answers Slowly
A drive with weak sectors retries each unreadable block several times before it reports a failure, and each retry costs seconds. The preparing stage reads the areas that describe the disk, so a bad patch there delays everything that follows.
Listen to the drive and watch the activity light. Regular head movement or a flickering LED means the job is working through something, while silence with a solid light for many minutes points at retries or at a device that has dropped off the bus.
A failing source repeats the same delay on every attempt, which is the clearest sign that the disk, not the software, is the problem. Cloning a failing HDD before it dies explains how to read the data first and copy from a stable source instead.
Tell a Hang From Slow I/O
Task Manager shows whether the disk queue is active. A queue depth above zero with read bytes still climbing means slow progress; a queue that stays at zero while the tool reports no response means the job is waiting for something that will not arrive.
Security software produces the same symptom. Real-time scanning inspects the new partition table and the first writes, and on-access filters can hold the target volume for minutes. Pause the protection for the length of the job, or exclude the tool and the destination disk from scanning.
An unrecognized target is the third common cause. An offline or uninitialized disk, a hub that drops the link, or an enclosure that reports the wrong capacity can leave the tool waiting for a device that never fully appears, and the stage never ends.
Disk Management shows whether the target is online, initialized, and free of a read-only flag. Disk Management is a Windows tool that does not belong to Qiling Disk Master; it only tells you what the clone is seeing, and any change it offers should be made before the task starts.
If the job really is stuck, cancel it. A cancelled clone leaves the destination incomplete and the source untouched, and the destination can be reused once its partition table is written again.
Clone Again with Qiling Disk Master
Qiling Disk Master shows the preparation work as a separate phase, so a stall is visible before the copy starts. The steps below keep the job short: a healthy source, a direct connection, and a destination that is confirmed before the task begins.
Restarting is safe for the source, because a clone only reads it. Do not power off the machine while the tool is writing, since a hard stop in the middle of the partition table is what turns an incomplete destination into an unreadable one.
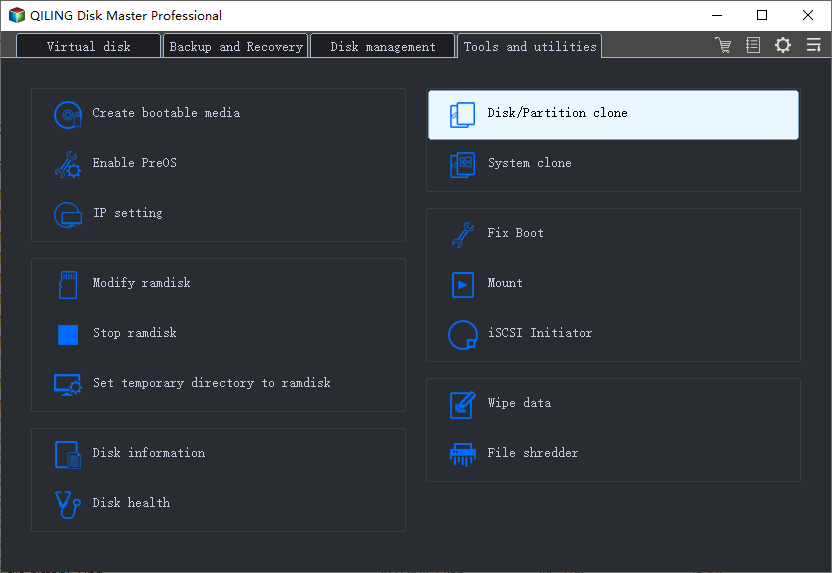
Step 1. Open Disk/Partition Clone
On the Tools and utilities tab, click Disk/Partition clone. This is the entry for a full disk copy; System clone copies only the Windows partition and is not what you want for a new SSD.
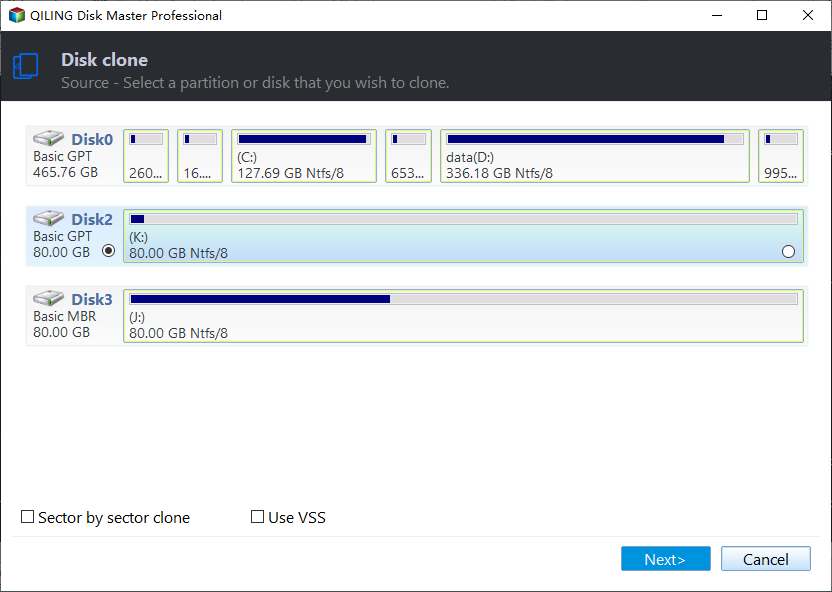
Step 2. Select the Source and the Destination
Select the source disk and click Next. Tick Sector by sector clone only when the source has read errors, and use the default copy for a healthy drive so that the job stays short.
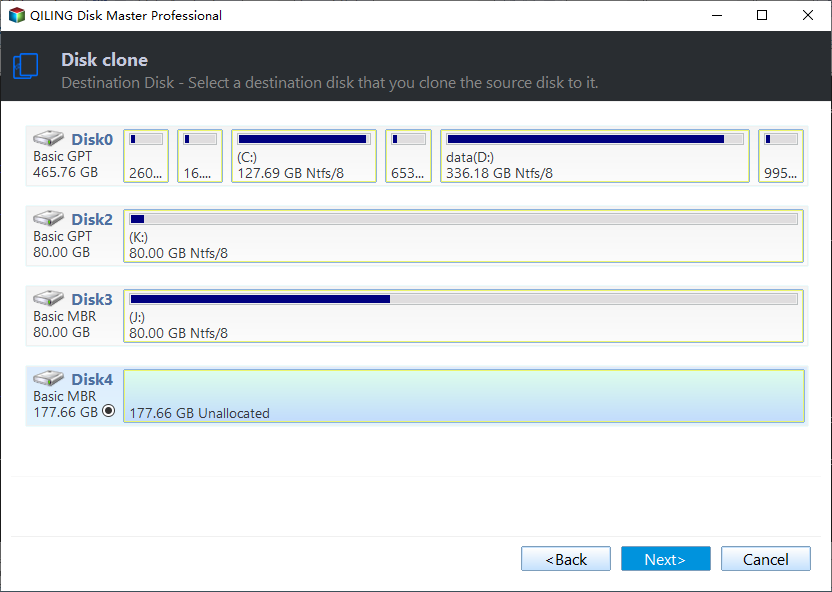
Pick the destination next. The page lists capacity and partitions for each candidate, so a new SSD with the wrong capacity or an enclosure that reports a size of zero is visible here rather than halfway through the copy.
Step 3. Confirm the Preview and Click Proceed
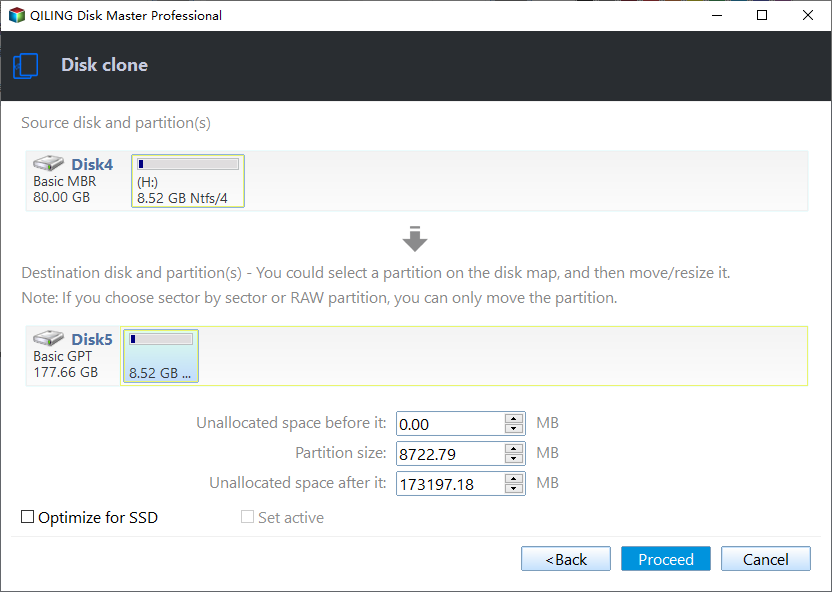
The preview page shows the planned layout for the new disk. Autofit the disk stretches the partitions to the SSD capacity, Copy as the source keeps the original sizes, and Edit disk layout lets you drag a boundary.
Tick the SSD option when the destination is solid state, check that every partition appears on the destination side, then click Proceed and accept the overwrite warning. The copy and its closing steps run from that point without further input.
Step 4. Check the Finish Message
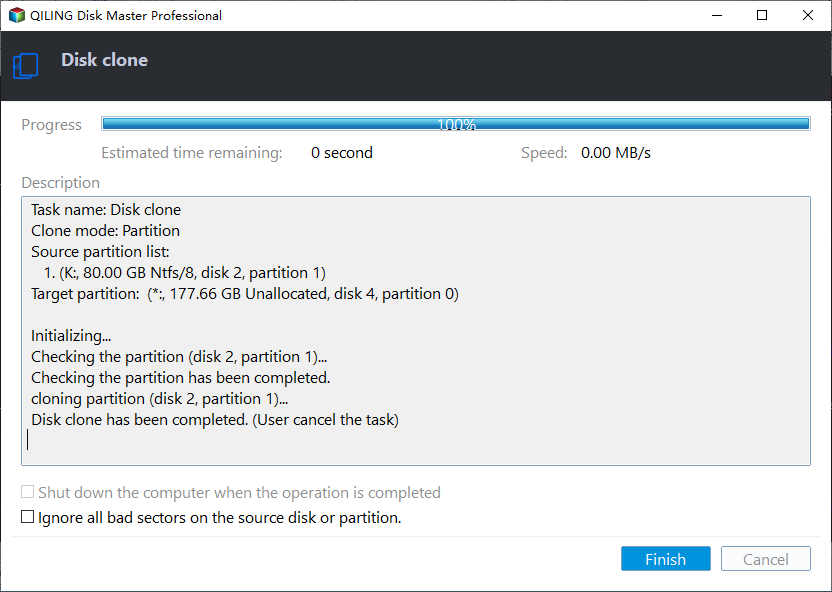
A finished run reports 100 percent, the line Disk clone has been completed, and an enabled Finish button. If the window opens without those, read the description, which names the phase that stopped.
For a realistic estimate on a healthy pair of disks, see how long a disk clone takes at each interface speed.
Frequently Asked Questions
How long should preparing take?
Seconds on a healthy pair of disks, and a minute or two for a system volume that needs a snapshot. Fifteen minutes with no disk activity is a stall rather than a slow start.
Is it safe to close the tool while it says preparing?
Closing cancels the task. The destination is left partly prepared and must be prepared again before it can be used, while the source is never written.
Why does the job stall only when the SSD is in a USB enclosure?
The bridge may drop or report the wrong capacity during the geometry check. Connect the SSD to the board, or use the enclosure only for reading after the clone is done.
Related Articles
- Disk Clone Stuck at 0% or 99%: Causes and Fixes
- How Long Does a Disk Clone Take?
- How to Clone a Failing HDD Before It Dies
- How to Clone a Hard Drive with Bad Sectors
- External Hard Drive Disconnects During Large File Copies
Products
Articles & Tutorials
- Data Recovery
- Data Backup
- File Recovery
- File Backup
- System Backup and Restore
- Disk and Partition Clone
- Technical articles
- Mobile articles
- Disk Master Help
- Windows Data Recovery Tutorials
- Windows Secure Delete Tutorials
- Windows Partition Management Tutorials
- Windows File Backup and Restore Tutorials
- Windows System Backup and Restore Tutorials
- Windows Disk Backup and Restore Tutorials
- Windows Clone Tutorials