Clone Fails at Finalizing: Causes and Fixes
Quick Navigation:
- What Finalizing Does
- Check the Destination Disk
- Remove Interference and Retry
- Verify the Clone
- Frequently Asked Questions
A clone that copies for an hour and then stops near the end with a vague error has usually copied the data already. Finalizing is the phase after the copy, when the tool writes the partition table, the boot records, and the backup structures at the end of the disk. One read or write error in that phase ends the task when almost all of the work is done, and the message often says nothing about the cause.
What Finalizing Does
During the copy phase the tool writes the bytes of each partition. Finalizing then closes the file system, writes the partition table and the boot configuration, updates the backup header in the final sectors of the disk, and flushes the write cache so the drive confirms that everything landed.
That last part is where many drives fail. A GPT disk keeps a copy of its partition table at the very end of the disk, so a destination with a weak or remapped area there fails in finalizing and nowhere else. An enclosure that drops the link while the cache is flushed produces the same symptom at the same point.
The error text is worth reading before a retry, because the tool usually names the device and the phase rather than a file. A write error, a timeout, and a locked volume point at three different causes, and only one of them is solved by running the clone again.
Check the Destination Disk
Compare capacities first. A 500 GB source cannot be finalized onto a 480 GB destination, and some tools notice the overflow only when they write the table, which is why the failure appears at the end.
Run a full surface or health check on the destination. A drive that returns errors on its own sectors near the end will fail every clone at the same percentage, and reinstalling the software will not change that result.
Windows Disk Management is enough to confirm the basic state: the destination must be online, initialized, and free of a read-only flag. If the row says the disk is not initialized, the destination lost its partition table, which points at the hardware rather than at a setting in the cloning tool.
Check the real capacity of the destination as well. Counterfeit USB drives and some enclosures report more space than they hold, so writes land in a wrap-around area that fails only when the task reaches the end of the disk.
Remove Interference and Retry
Security software is a frequent cause when the message names the boot sector or a locked volume. Real-time protection inspects writes to the first sectors of a disk, so pause it for the length of the clone or add the tool to its exclusions, then retry.
Change the connection at the same time. A hub, a front-panel port, or an older enclosure can time out while the cache flushes; connect the destination directly to the board, use the cable that shipped with the drive, and avoid USB 2.0 for a large copy.
Close every program that holds a handle on the destination and disconnect the disks you do not need. Retry with the same settings: a second failure at the same percentage confirms that the cause sits on the destination rather than in the software.
Verify the Clone
Qiling Disk Master writes the partition table and the boot data as part of the same task and reports the phase that stopped in its description pane, which makes a failed finalizing step easy to identify. The steps below run a clean copy and confirm the result.
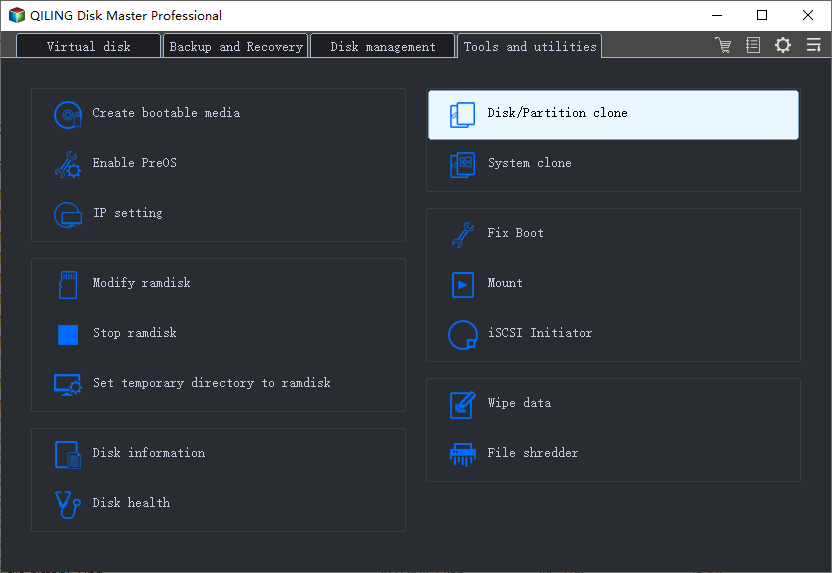
Step 1. Open Disk/Partition Clone
On the Tools and utilities tab, click Disk/Partition clone. System clone sits beside it and copies only the Windows partition, so choose it only when the destination already has a boot partition.
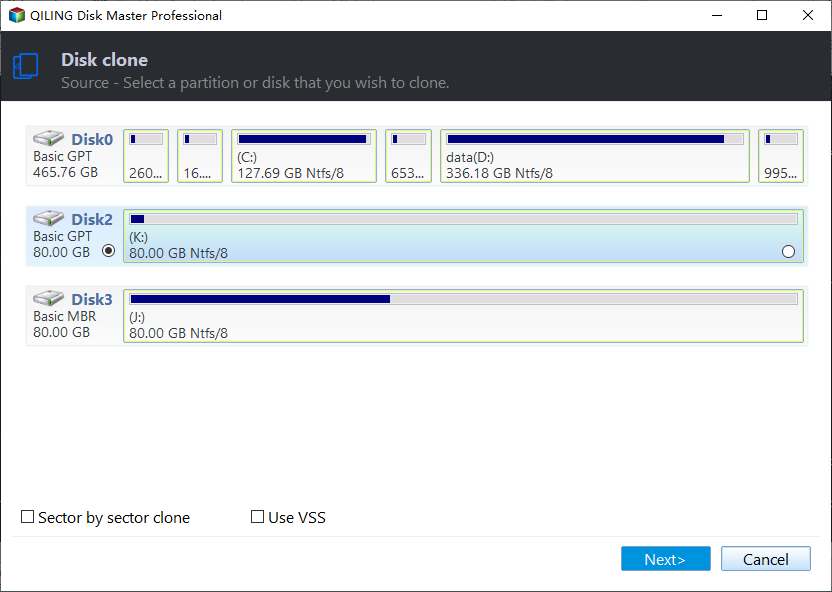
Step 2. Select the Source and the Destination
The first page asks which disk or partition to copy. Select the source with the radio button and click Next; leave Sector by sector clone clear for a healthy source, tick it only when the source returns read errors, and use VSS when the source is in use.
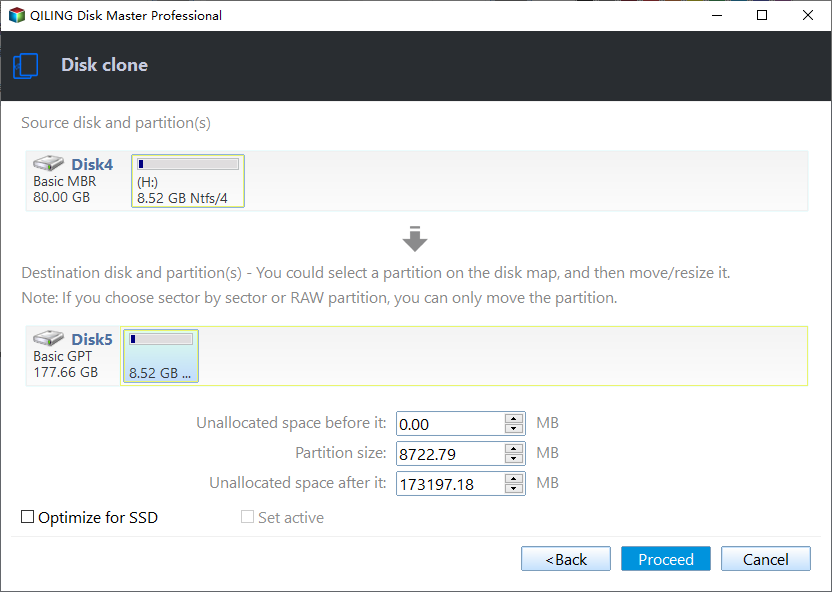
On the destination page, check the target disk and read the note above the size fields, which explains that a sector-by-sector or RAW copy can only be moved. Click Next, and the two disks are compared on the preview page.
Step 3. Check the Preview and Proceed
The preview page puts the source and the destination side by side and shows the layout that will be written. Three options control it: Autofit the disk adjusts the partitions to the new capacity, Copy as the source keeps the original sizes, and Edit disk layout lets you drag a boundary by hand.
Tick the SSD option when the destination is a solid-state drive, confirm that the boot and system partitions appear on the destination side, and check that no partition is missing. Click Proceed, then accept the overwrite warning only after the target disk has been confirmed. The copy and the finalizing phase then run inside the same task from that point.
Step 4. Read the Finish Message
The finish window repeats the task name, the source partition, and the target disk, and its description lists the last step that ran. A run that ends with an error still opens this window, so copy the description before you close it.
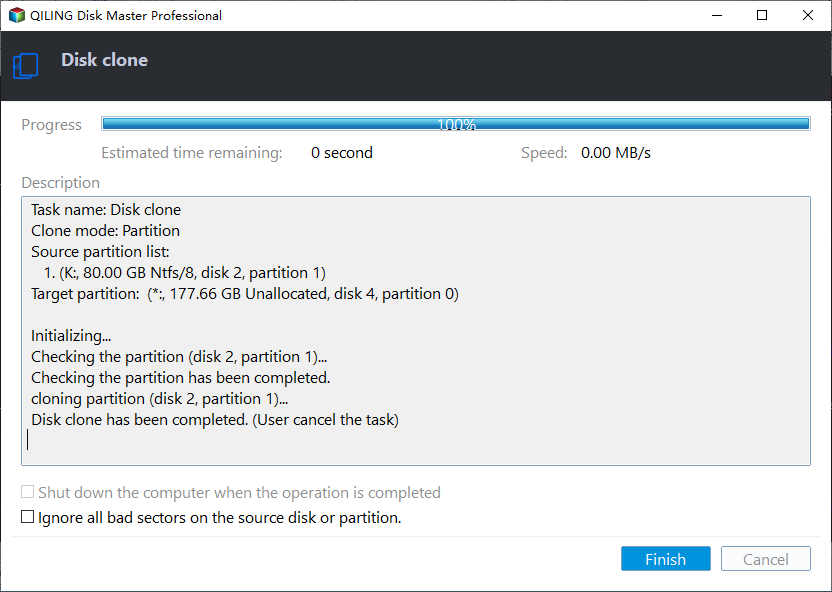
A successful run shows the progress at 100%, the line Disk clone has been completed, and an enabled Finish button. The option to shut down the computer when the operation is completed is optional and only decides what happens after you click Finish.
Frequently Asked Questions
Does a failed finalizing step damage the source disk?
No. The source is read only during a clone and every write goes to the destination. A power loss in that phase can leave the destination unmountable, not the source.
Can I simply run the clone again?
Only after checking the destination. A repeat on the same drive in the same state fails at the same point; a repeat after a health check and a cable change often succeeds.
Is the copy usable if I close the error and ignore it?
No. Without the partition table and the boot records written in finalizing, the result is a set of files rather than a bootable disk.
Related Articles
- No Bootable Device After Cloning: BIOS and BCD Fixes
- Cloned Drive Shows 0xc000000e and Will Not Boot
- How to Clone an SSD with Bad Sectors
- Clone a Drive with an NVMe Enclosure
- Cloned Drive Shows as RAW: Recover Data and Fix It
Products
Articles & Tutorials
- Data Recovery
- Data Backup
- File Recovery
- File Backup
- System Backup and Restore
- Disk and Partition Clone
- Technical articles
- Mobile articles
- Disk Master Help
- Windows Data Recovery Tutorials
- Windows Secure Delete Tutorials
- Windows Partition Management Tutorials
- Windows File Backup and Restore Tutorials
- Windows System Backup and Restore Tutorials
- Windows Disk Backup and Restore Tutorials
- Windows Clone Tutorials