Cloned 26H2 SSD Fails Update 0x800f0922 on 100MB ESP
Quick Navigation:
- What 0x800f0922 Says About the Boot Partition
- Why a Clone Leaves a 100MB ESP
- Confirm the Size and the Partition Order
- Rebuild the Layout with Qiling Disk Master
- Frequently Asked Questions
A cloned SSD that runs Windows 11 26H2 but refuses every update with 0x800f0922 looks like a software fault, yet the cause is often a partition size. The cloned disk kept the small EFI system partition of the old installation, and 26H2 needs room there for the files it rewrites during servicing. The error returns at the same percentage on every attempt, the rollback succeeds, and the desktop comes back unchanged. This guide explains what the code measures, why a clone leaves the partition small, and how to rebuild the layout with enough space before the next update.
What 0x800f0922 Says About the Boot Partition
The code is reported when an update cannot finish staging its files. A feature update unpacks a servicing stack and a set of boot files before the restart, and those files go to the boot partition and the recovery area rather than to the Windows volume. When the free space is missing, the installation stops instead of continuing.
The result is a pattern rather than a crash. The download completes, the install reaches the same percentage, the machine restarts and reports that it is undoing changes, and the previous build comes back. Disk space on C: has no effect on that outcome, which is why freeing gigabytes there changes nothing.
26H2 also refreshes the recovery environment. A recovery partition that is too small, missing, or placed after a partition that was moved during the clone leaves the update without a valid target for that step, and the same code appears again.
Why a Clone Leaves a 100MB ESP
A clone reproduces the layout of the source. If the original installation was created years ago, its EFI system partition is 100MB, and the copy on the new SSD is 100MB as well, no matter how large the new drive is. The automatic fit option stretches the Windows volume into the extra space and leaves the small partitions untouched.
An installation created by 26H2 setups uses a wider boot partition, because the servicing files that arrive with each release no longer fit comfortably in 100MB. A cloned disk carries the old figure forward, so it can boot perfectly and still fail every cumulative update.
Partition order matters too. On a healthy disk the EFI partition comes first, the reserved partition follows, then Windows, then the recovery volume. A clone that merges unallocated space at the front, or drops the recovery volume to fit a smaller target, breaks that order and produces the same failure.
Confirm the Size and the Partition Order
Open Disk Management and count the partitions at the start of the disk. A 100MB EFI system partition is visible there by size and label, and a Recovery partition should appear at the end of the disk with a size of roughly a gigabyte. Write the numbers down before you change anything.
Disk Management is a Windows tool, not a feature of Qiling Disk Master. Use it to read the layout only; the resize that fixes the problem belongs in the clone, because Windows cannot enlarge an EFI partition on a running system.
If the volume also reports errors, or the recovery partition is absent, plan a full clone rather than a repair. A cloned SSD that does not show its full capacity covers the other half of the same layout problem.
Rebuild the Layout with Qiling Disk Master
Qiling Disk Master lets you set the size of each destination partition before the copy starts, which is exactly what the update needs. Clone onto the same SSD or onto a spare one, then boot from the result and run the 26H2 update again.
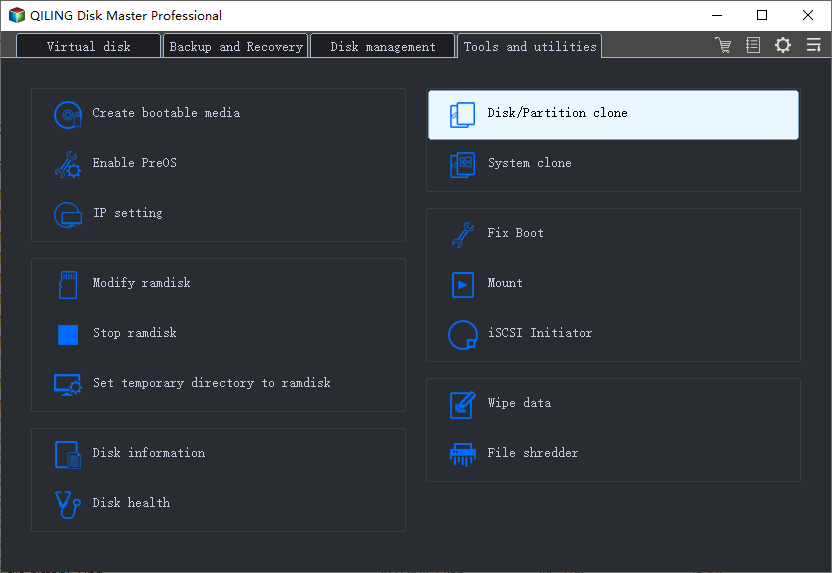
Step 1. Open Disk/Partition Clone
On the Tools and utilities tab, click Disk/Partition clone. Stay away from System clone here, because a system-only copy carries the partition sizes with it and cannot widen the EFI partition that the update is missing.
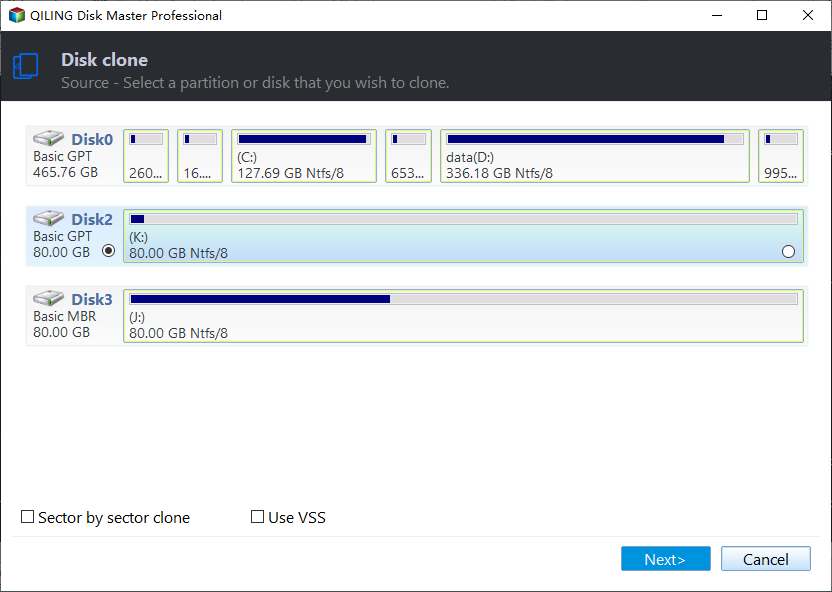
Step 2. Select the Cloned System Disk
Choose the disk that currently boots 26H2 and click Next. Read the partition strip on its row: the small first partition is the EFI system partition, and its size is the number you are about to change.
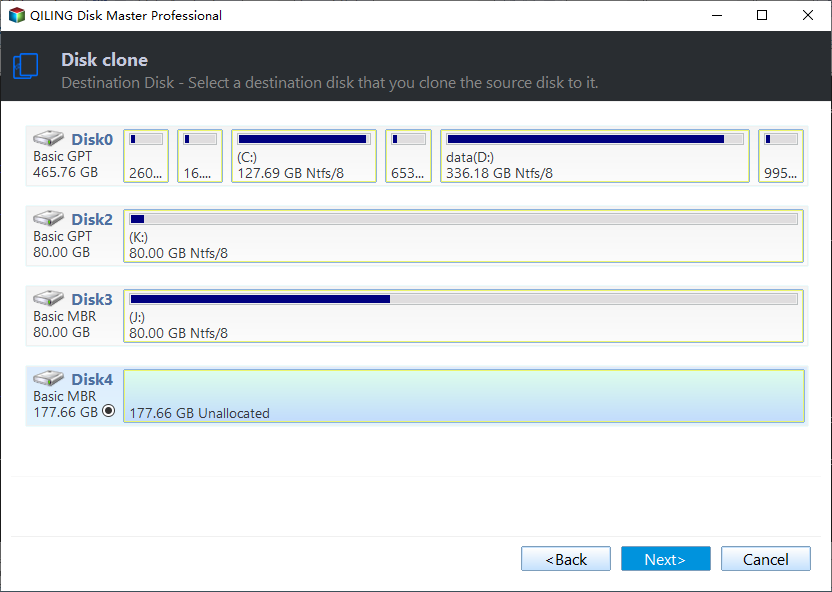
Step 3. Choose the Destination SSD
Pick the SSD that will hold the new layout. If you are cloning back onto the same drive, connect it through a second machine or use the tool from bootable media, since a disk cannot be written while Windows is running from it.
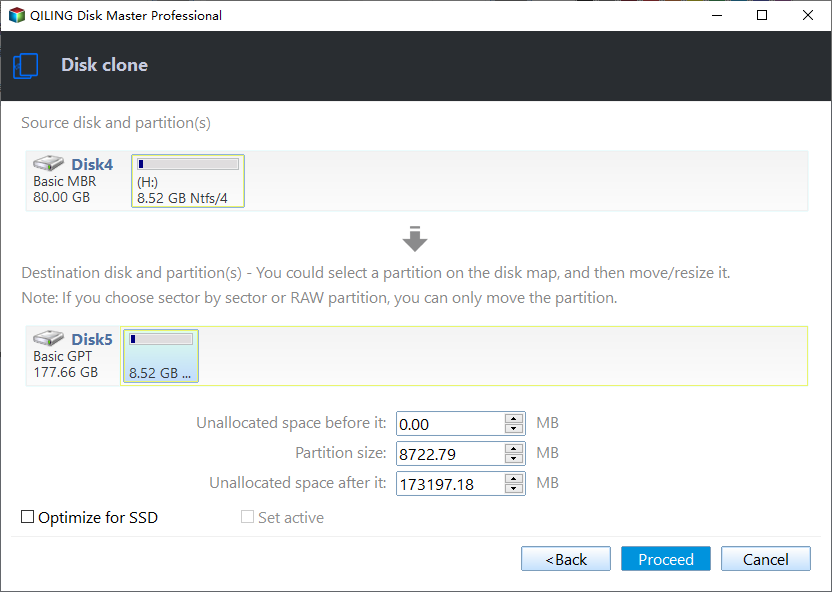
Step 4. Widen the Boot Partition and Proceed
In the preview, drag the boundary of the EFI partition until it holds at least 300MB, keep the reserved partition next to it, and leave the recovery volume at the end with a gigabyte or more. Then preview the pending operation and click Proceed, accept the overwrite warning, and start the update after the first boot from the new disk.
Frequently Asked Questions
Will freeing space on C: clear 0x800f0922?
No. The update needs free space in the boot and recovery partitions, not on the Windows volume. A drive with hundreds of gigabytes free on C: fails with the same code when the EFI partition is full.
Can I enlarge the EFI partition in place?
Not while Windows is running, and the built-in tools do not resize that partition at all. Rebuilding the layout during a clone is the reliable route, and it also repairs a moved recovery volume.
Does the update need a new installation?
No. A clone with a wider EFI partition and a correct partition order boots the existing installation, keeps the installed programs, and lets 26H2 finish the update it could not stage.
Related Articles
- How to Clone Windows 11 26H2 to an SSD
- Cloning Windows 11 with the System Reserved Partition
- Cloning a Boot Drive with Multiple EFI Partitions
- Cloned SSD Not Showing Full Capacity
- Cloned Drive Reports 0xc000000e at Boot
Products
Articles & Tutorials
- Data Recovery
- Data Backup
- File Recovery
- File Backup
- System Backup and Restore
- Disk and Partition Clone
- Technical articles
- Mobile articles
- Disk Master Help
- Windows Data Recovery Tutorials
- Windows Secure Delete Tutorials
- Windows Partition Management Tutorials
- Windows File Backup and Restore Tutorials
- Windows System Backup and Restore Tutorials
- Windows Disk Backup and Restore Tutorials
- Windows Clone Tutorials