USB Drive Keeps Disconnecting in Windows 11: How to Fix It
Quick Navigation:
- Why the Drive Drops and Returns
- Copy the Files While It Is Connected
- Check the Port, the Power Plan, and the Log
- Copy, Test, and Replace the Drive
- Frequently Asked Questions
The drive appears in File Explorer, disappears, and comes back a few seconds later with the same letter. Windows plays the device connect sound each time. A USB drive that keeps reconnecting in Windows 11 is rarely failing on its own: the link between the drive and the port is being reset, and power is the most common reason. The order that works is to copy the data first, find out where the link breaks, and only then decide whether the disk has to be replaced.
Why the Drive Drops and Returns
A portable drive draws its current from the port. A port that shares a controller with a camera, a dock, or a second drive can fall below what the motor needs at spin-up, and the controller resets the port instead of failing the write. The same drive on a rear port of the desktop often runs for hours without a single drop.
USB selective suspend is the second cause, and it is the one that makes the problem look random. Windows may power down an idle port while the machine is fully awake. Some bridges do not wake fast enough for the timeout, so the device is dropped and enumerated again, and the cycle repeats every time the drive goes idle.
A hub without its own power supply splits the available current between every device on it. A cable that has been bent sharply, or a connector that no longer grips the socket, lets the link drop under vibration, heat, or the small movement of the drive on the desk. The drive itself is usually the last suspect.
Bridge firmware and the drive can still be at fault. Some enclosure chips reset when the host asks for a power state they do not handle well, and a drive with rising reallocated sectors may stop answering for a moment while it retries a bad area. A drive that clicks or beeps at the same moment it disconnects is a hardware problem, not a setting.
Copy the Files While It Is Connected
Each disconnect interrupts a write. A copy that fails halfway can leave a truncated file, and a file system that is interrupted often enough will need a repair. Copy the folders you need while the drive is connected and idle, and do not start a repair on the external drive before that copy is finished and verified.
Use a destination on the internal disk, not on another portable drive on the same hub, because one power event would then interrupt both ends of the copy. Sort by size and move large files in small batches, so a drop costs you minutes rather than an hour. If the drive returns as RAW, leave the format prompt alone until the contents have been copied with recovery software.
Check the Port, the Power Plan, and the Log
Device Manager, Disk Management, Event Viewer, and PowerShell are Microsoft tools and are not part of Qiling Disk Master. They are described here only so the state of the link can be read correctly; every copy, test, and clone later in this guide is done with Qiling Disk Master.
Move the drive to a port on the rear panel of a desktop or directly to the laptop, without a hub, and use the shortest cable you own. Front-panel ports sit behind an internal extension cable, which adds a connector that can go marginal. Test the drive alone on the port before anything else is attached to it.
In Power Options, open Change plan settings, then Change advanced power settings, then USB settings, and set USB selective suspend to Disabled for both battery and plugged-in. In Device Manager, open the properties of each USB root hub, and on the Power Management tab clear the box that allows Windows to turn the device off to save power. Change one setting at a time, then use the drive for an hour, so you know which change helped.
Open Event Viewer and read the System log around the time of a drop. Warnings from the disk and controller record the reset, and the interval tells you the cause: a drop every ten minutes of idle time points at power saving, while a drop during a large copy points at current or a cable. Disk Management confirms whether the disk leaves the list entirely or stays with its partitions and loses only the letter.
Copy, Test, and Replace the Drive
Qiling Disk Master works on the drive while Windows still sees it. The three operations below are separate tools, not one repair button. Back up first, because it is the only one that protects the data; test the surface only to find out whether the disk is worth keeping; clone only when the contents have to move to another disk.
Operation 1: Back Up the Drive's Contents
This operation applies while the drive is connected and readable, and it is the one to finish before any cable or port is changed.
Step 1. Select the drive and a destination on the internal disk. Open Backup and Recovery, choose Disk/Partition backup, and tick the external drive. Set the destination to a folder on the internal disk, not to another portable drive on the same hub.
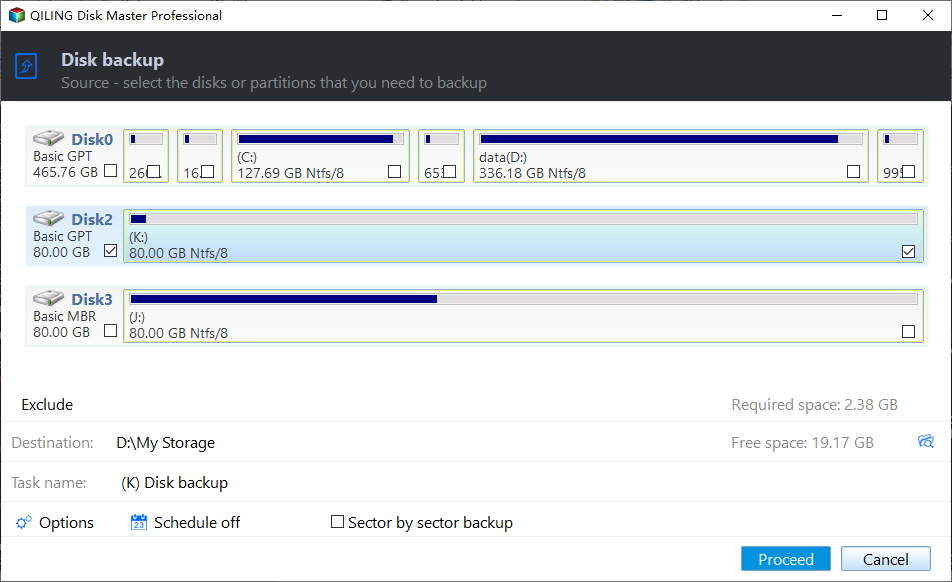
Step 2. Preview the task, click Proceed, and verify the image. Read the source and destination in the preview, run the task to completion, then open the image and restore a single folder from it. A backup that has never been read back is not yet a backup.
Operation 2: Test the Disk Surface
This operation applies when the drive disconnects without a pattern and you need to know whether the platters or the link are at fault. It is a read test and does not overwrite your files.
Step 1. Run the surface test on the external disk. Choose the disk in the main window, open Disk Surface Test, and start the scan. Keep the drive still on the desk and stop the test if Windows drops the device, because a drop during a scan hides the result.
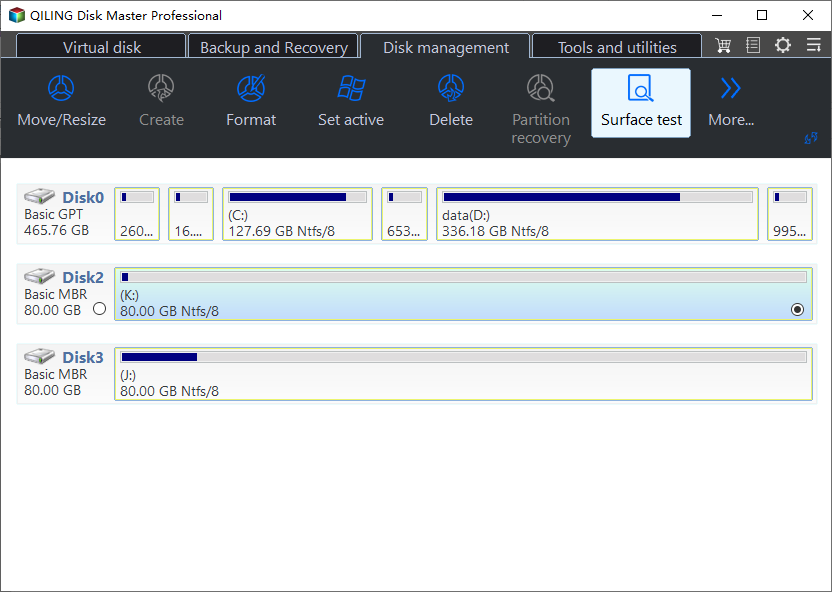
Step 2. Read the result before you decide. Red or unreadable blocks mean the drive is failing and the copy in Operation 1 has to be kept. A completely clean scan moves the fault back to the cable, the port, or the power path.
Operation 3: Clone the Drive to a New Disk
Clone only when the test found errors or the drive is old enough that its data should live somewhere else. The destination is overwritten, so pick a disk that holds nothing you still need.
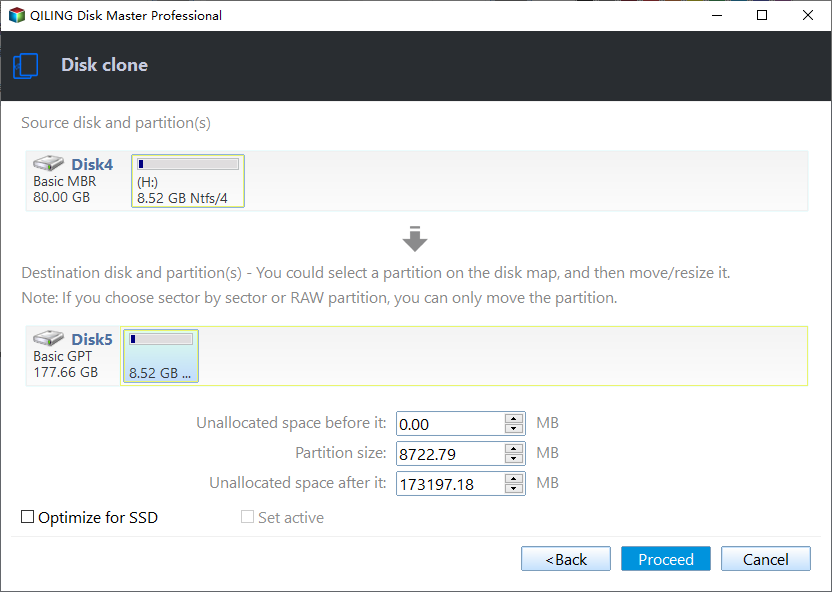
Step 1. Choose the external drive as the source and the new disk as the destination. Open Disk/Partition clone, select the external drive, then the destination disk. A larger destination keeps the extra space unallocated until you use it.
Step 2. Preview the task and click Proceed. Check both disks in the preview, then run the clone and leave both connected until it reports that it has finished. Read a few folders from the new disk before the old one is set aside.
Frequently Asked Questions
Why does the drive reconnect every few minutes?
A regular interval that matches idle time is power saving, not a failing disk. Disable USB selective suspend for the plan in use and clear the power management option on each USB root hub, then test again before you replace any hardware.
Does a powered USB hub help?
It helps when the port cannot supply the current the drive needs at spin-up, and a hub with its own adapter is the version to use. A bus-powered hub makes the problem worse, because it divides the same current between more devices.
Can I keep using a drive that disconnects?
Only long enough to copy the data. A drive that drops during writes can corrupt its file system, and the next failure may leave the volume unreadable. Back up, run the surface test, and replace the drive or the enclosure when either one fails.
Related Articles
- External Hard Drive Disconnects During a Copy
- USB Drive Not Recognized After a Windows Update
- USB4 80Gbps SSD Falls Back to USB 3
- Cannot Safely Eject an External Hard Drive
- Disk Event ID 153 Timeout
Products
Articles & Tutorials
- Data Recovery
- Data Backup
- File Recovery
- File Backup
- System Backup and Restore
- Disk and Partition Clone
- Technical articles
- Mobile articles
- Disk Master Help
- Windows Data Recovery Tutorials
- Windows Secure Delete Tutorials
- Windows Partition Management Tutorials
- Windows File Backup and Restore Tutorials
- Windows System Backup and Restore Tutorials
- Windows Disk Backup and Restore Tutorials
- Windows Clone Tutorials