How to Transfer Data from One iPad to Another in 5 Ways
Getting a new iPad is awesome, but transferring files from the old iPad to the new iPad isn't. In contrast to backing up the iPad, moving files between iPads will be much more difficult. This is an individual need, and each individual may have different requirements for data transfer. Some users may want to transfer everything, including settings, from one iPad to another. While others may want to transfer specific apps or files to another device.
Depending on different demands for data transfer, we collect some possible ways to transfer files from iPad to iPad without any obstacles.
- 1. Transfer Data from One Old iPad to New iPad using Automatic Setup
- 2. Transfer Data from One iPad to Another with Qiling MobiMover
- 3. Transfer Files from iPad to iPad via iCloud
- 4. Transfer Data from iPad to iPad via iTunes
- 5. Move Files Between iPads via AirDrop
Method 1. Transfer Data from One Old iPad to New iPad using Automatic Setup
Starting from iOS 11, all iOS devices come with a new feature that allows users to transfer files from the old iDevice to the new iDevice directly while setting up. To use this feature, you'll first need to create an iCloud or iTunes backup. If you've made one, just follow the steps below to transfer data from one old iPad to the new one.
Step 1. Turn on your new iPad and bring it near your current iPad.
Step 2. On your new iPad, select your preferred language and tap "Continue."
Step 3. An animation will pop up to let you know that you can use Automatic Setup. Tap "Continue" to start.
Step 4. Then, an Apple Watch style image will appear on your iPad. Scan it with your current iPad's camera.
Step 5. Enter your passcode on the new iPad.
Step 6. When the process completes, your iPad will walk you through the process of setting up. Then, enter your Touch ID and Face ID.
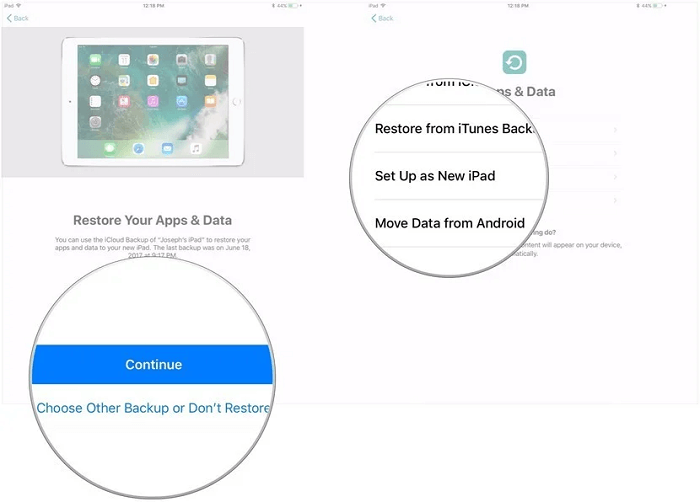
Step 7. Choose whether to restore your iPad from your recent compatible backup or not.
Step 8. Choose to restore your new device from an iCloud or iTunes backup, set it up as a new iPad, or move data from an Android device.
Step 9. Then, you can follow the on-screen prompts to complete the setup process for your new iPad.
Method 2. Transfer Data from One iPad to Another with Qiling MobiMover
Does the process of transferring data to the new iPad via Automatic Setup feel tedious? If so, just try this quick iOS data transfer tool - Qiling MobiMover. It can help you transfer data to the new iPad in a quicker, easier, and more flexible way.
It offers two transfer options: transfer all files or transfer only selected files from iPad to iPad. This, undoubtedly, makes transferring data more flexible.
Not only that, there are many other benefits you can gain from this tool, such as:
- Transfer 20+ popular iOS data like audio files, images, videos, contacts, messages, notes, books, etc.
- Move stuff between two iOS devices and transferring files from iPad to PC or vice versa.
- Download videos from over 1000 video-sharing websites. Thus, you can download your favorite videos to the new device for offline view.
Here we will show you how to transfer photos from one iPad to another as an example:
Step 1. Connect both of your iOS devices to your computer (Mac/PC). Launch Qiling MobiMover, and choose "Phone to Phone" on the screen. Correctly check your source device and target device, and click the "Next" button to continue.
Step 2. Check the category/categories you want to transfer from your source device to target device. As you can see, in addition to photos, you can also copy videos, audios, contacts, messages, and more between your iDevices.
Step 3. After checking the settings, click the "Transfer" button to start moving photos between your devices. When it has completed, go to the "Photos" app on your target device to check the newly imported items.
It is also a professional iPhone manager and can manage your data and files on your iOS devices, i.g. you can use MobiMover to delete or add ringtones to the iPhone.
Method 3. Transfer Files from iPad to iPad via iCloud
If you're a faithful Apple fan who dislikes using any non-Apple programs to transfer data, then iCloud is your best choice. iCloud offers two options for data transfer: iCloud backup or iCloud sync. The former one aims to migrate all files to the new device and the latter one is used to sync specific items like Photos (only Photo Stream), Email, Contacts, Calendar, Notes, Reminders, etc between two iDevices.
1. Transfer Data from One iPad to Another with iCloud Backup
First of all, you'll need to make sure that you've made a backup with iCloud. If not, just follow the steps below to make one.
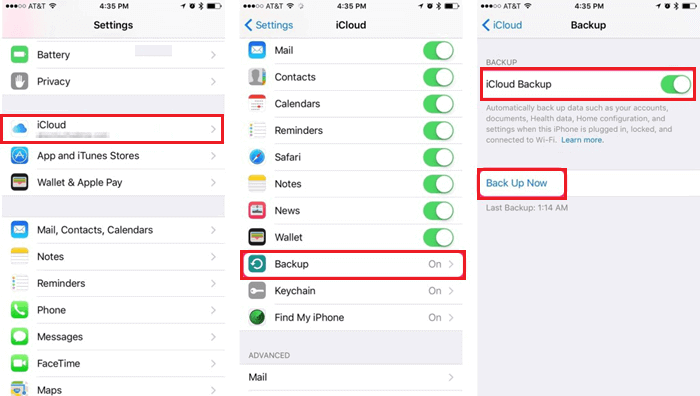
Step 1. Back up your old iPad with iCloud
Go to the Settings on your old iPad > [Your Name] > iCloud > iCloud Backup > Enable the "iCloud Backup" option > Tap on "Create backup now."
Step 2. Restore your new iPad from iCloud backup
There are two options to restore your iPad from iCloud backup, depending on whether you've set up your iPad or not.
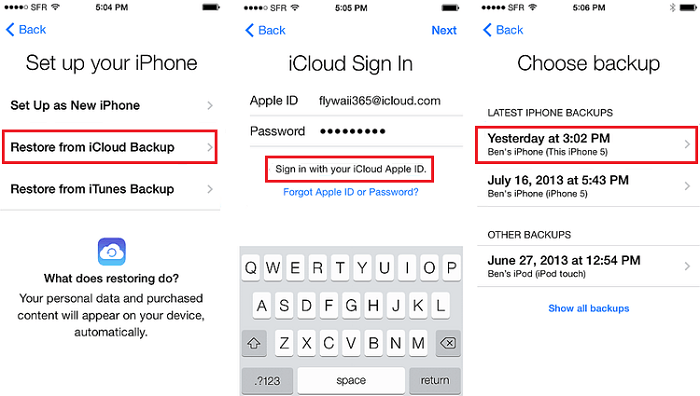
If you haven't set up your iPad, then you can:
Step 1. Turn on your new device. A welcome screen should appear.
Step 2. Follow the instructions until you reach your wireless settings.
Step 3.Tap a wireless network to connect and then choose to "Restore from iCloud backup."
Step 4. Log in to iCloud using your Apple ID and password.
Step 5. When prompted, select a backup. If you purchased content from the iTunes Store or App Store with multiple Apple IDs, you will be prompted to log in with each Apple ID.
Step 6. Wait until the recovery process is complete.
If you have already set up your iPad, you'll need to factory reset it before performing the following steps.
Step 1. On your new iPhone, go to Settings > General > Reset.
Step 2. Tap on Erase All Content and Settings > Erase iPhone.
Step 3. Set up your iPhone again by following the steps above.
2. Transfer Data from iPad to iPad with iCloud Syncing
Step 1. On your old iPad, tap on Settings apps.
Step 2. Click your Apple ID's profile and then select iCloud.
Step 3. Select the categories you want to transfer and then tap on it to turn it on one by one.
Step 4. Wait for the process to finish.
Method 4. Transfer Data from iPad to iPad via iTunes
Like iCloud, you'll also need to create an iTunes backup of your existing device at first, and then restore the backup to your new iPad.
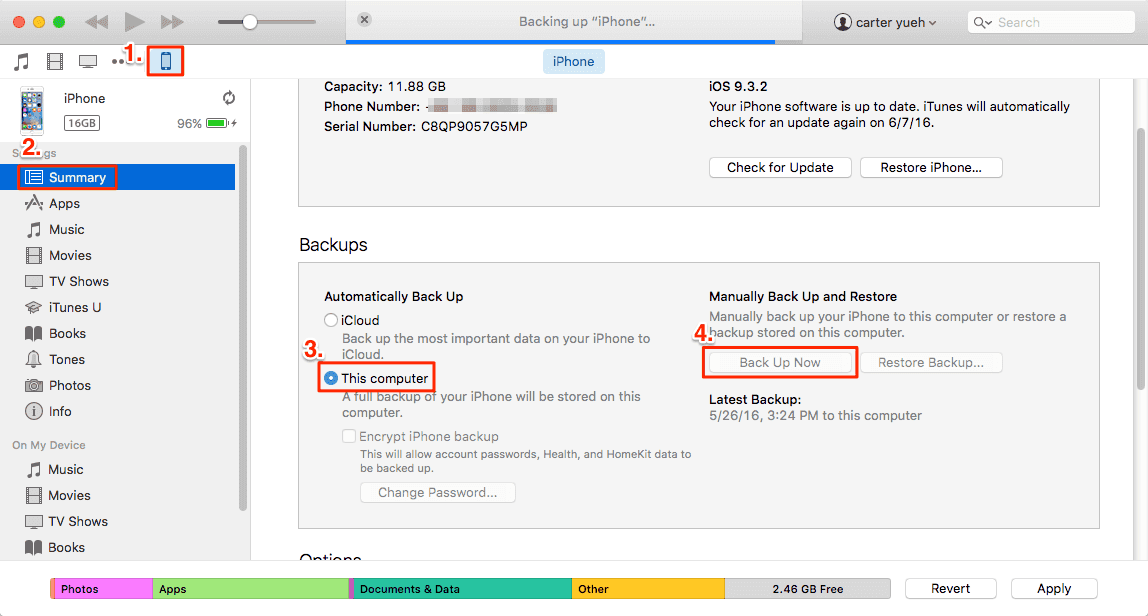
Step 1. Create an iTunes backup of your existing device
Connect your old iPad to your computer and run iTunes > Check your iPad icon > Click on the Summary > Select This Computer > Click on Back Up Now.
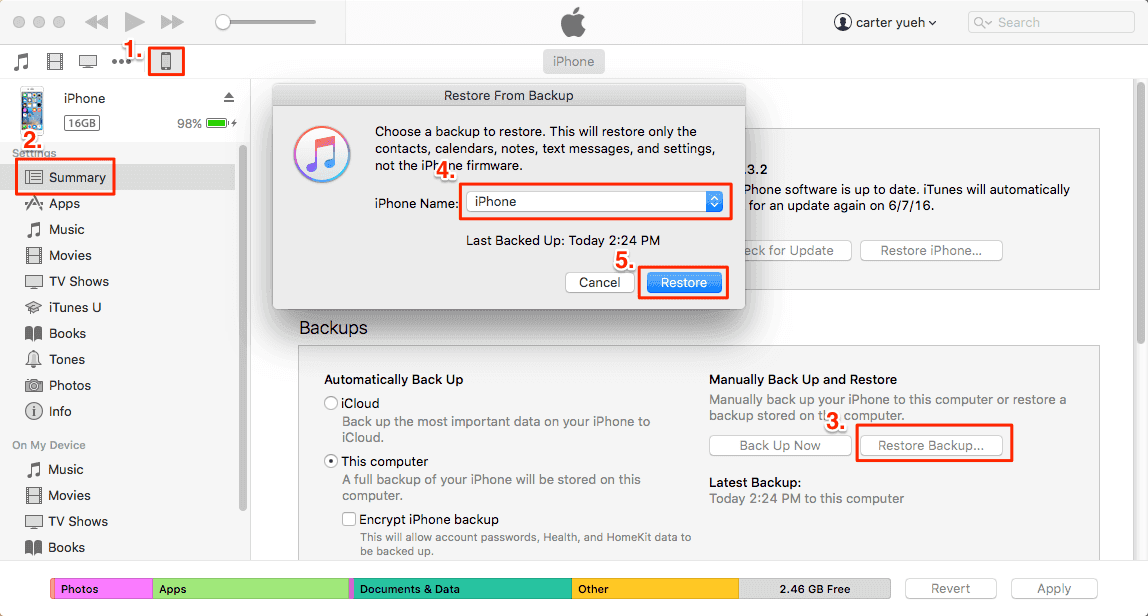
Step 2. Restore the iTunes Backup on the new iPad
Connect your new iPad to the computer and run iTunes > Click your iPhone icon > Click Summary > Click Restore Backup... > Choose your iPad > Click on Restore.
Method 5. Move Files Between iPads via AirDrop
Using AirDrop is another easy and convenient way to move data between iOS devices. You can complete the process through your iPads, without using a computer or any third-party software. But on the downside, AirDrop has some limitations as listed below.
- It requires both WLAN and Bluetooth to be enabled on both devices.
- It only works with devices that are within about 10 meters or 30 feet.
- It only works on iPhone 5 or later, iPad (fourth generation or later), iPad mini, iPad touch (fifth generation or later), and Mac running OS X Lion.
- It is only compatible with iOS 7 and later.
If you've got everything ready, now you can follow the steps to airdrop files between Apple devices. Here we take photos as an example.
Step 1. Go to the Photos App on your old iPad and select the photos you'd like to send to your new iPad.
Step 2. Tap on the "Share" button, click "AirDrop" and choose your new iPad.
Step 3. On your new iPad, click "Accept" when a prompt asking you whether to accept the photos from your old iPad.
When somehow you have the AirDrop not working problem, you can also try the following methods to transfer files between iPads.
The Bottom Line
That's a wrap! We hope you have transferred files from iPad to iPad successfully. If you want to transfer only wanted files from one iPad to another, you can use Qiling MobiMover to do it. While if you don't want to download any third-party software, you can also use the other three methods to get the job done.
Anyway, each method has its advantages and disadvantages, depending on your needs. You can choose one that works best for you.
Related Articles
- How to Turn on AirDrop on iPhone X/XS/11/12
- Best 5 YouTube to MP4 Converters for iPhone
- How to Access iPhone Files on Mac or PC in 4 Ways
- How to Turn HEIC to JPG on Mac & PC