How to Back Up iPhone 7/7 Plus in 5 Ways
How Do I Back Up My iPhone Before I Get a New One
When you switch to a new iPhone, it's necessary for you to back up your old iPhone. Why? With the backup, you can restore your new iPhone from it to keep your precious data available on your new device, and then you can switch to your new iPhone seamlessly.
Even if you are not planning to get a new iPhone, it's also a good habit to back up your iPhone regularly to avoid data loss.
Given that, here I'd like to show you four ways how to back up iPhone 7 (or iPhone 7 Plus).
Part 1. How to Back Up iPhone 7 to Computer in 3 Ways
There are generally two options for you to back up an iPhone: You can either back up your iPhone 7 to computer or cloud storage, especially iCloud.
First of all, I will show you how to back up iPhone 7 to computer in three ways.
Method 1. How to Back Up iPhone 7 with Qiling MobiMover
Neither iTunes nor Finder allows you to back up specific items from the iPhone to the computer. If you want to selectively back up your iPhone contacts, photos, videos, music, messages, and more to a computer, you will like this iPhone backup software - Qiling MobiMover.
This tool will backup your iPhone data to computer in a more flexible and efficient way. It is 100% safe. During the backup process, you won't lose any important files. After making a copy of your data to the computer, you can restore them to your device whenever you like to.
To back up your iPhone 7 to a computer without iTunes:
Step 1. Connect your iPhone to your PC and trust the computer. Launch Qiling MobiMover and go to "Backup Manager" > "Back up".
Step 2. Since all the supported files are selected by default, click "One-Click Backup" directly to start backing up your iPhone to computer.
Step 3. Wait patiently until the backup process completes. When you need to restore the backup, go to "Backup Manager" > "Restore" and follow the onscreen instructions to continue.
Backup is not the only thing that Qiling MobiMover can do for you. Except for backing up your iPhone or iPad, it also allows you to manage your WhatsApp messages by backing up your WhatsApp chat history to your computer or transferring WhatsApp messages to a new iPhone.
Method 2. How to Back Up iPhone 7 to iTunes
Using iTunes is the official way for Apple to make a backup of an iPhone, iPad, or iPod Touch. An iTunes backup includes almost all the data and settings on your iPhone, except for content like the items you bought from iTunes/App Store, data you synced from iTunes, data that is stored in iCloud, and more. Thus, if you want to back up everything on your iPhone to computer, using iTunes is a good choice.
To back up iPhone 7 to iTunes:
Step 1. Download and install the latest version of iTunes on your PC.
Step 2. Connect your iPhone 7 to your computer and wait for iTunes to launch automatically.
Step 3. Unlock your iPhone and trust the computer. If required, enter your iPhone passcode to continue.
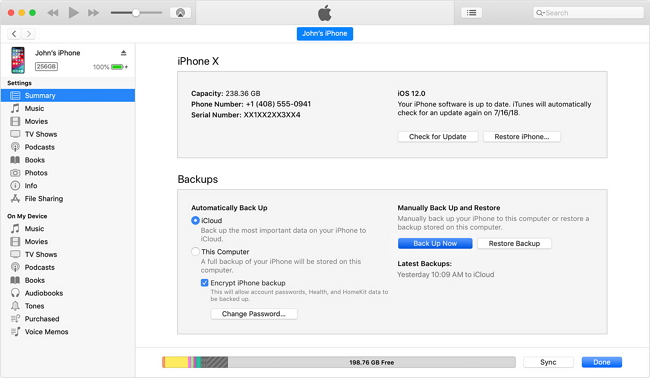
Step 4. Click the "Device" icon in the iTunes window and choose "Summy."
Step 5. In the "Backups" section, check "This computer" and click "Back Up Now" to start backing up your iPhone to iTunes.
By backing up your iPhone using iTunes, you can back up your iPhone 7 to your computer and restore an iPhone, iPad, or iPod with the backup. Besides, you are able to manage your iPhone backups on the computer:
Step 1. Open iTunes.
Step 2. Go to "Preferences" > "Devices."
Step 3. Right-click the backup you want to manage and choose "Delete" or "Archive."
Although you can access the iPhone backup location on your computer, you are not recommended to edit, relocate, rename, or extract content from your backup files. That's because these actions might ruin the files. What's more, in spite that you can access the contents of the backup, the contents are generally unreadable. All you can do with the backup is to restore an iOS device from it.
Method 3. How to Backup My iPhone 7 to Mac Using Finder
Since macOS Catalina, iTunes is no longer available and Finder becomes the default way to perform device backups and data syncing. Using Finder to back up your iPhone to the computer is quite similar to using iTunes.
To back up your iPhone 7 to a computer via Finder:
Step 1. Connect your iPhone 7 to your Mac and open Finder.
Step 2. On your iOS device, choose to trust this computer in the prompt.
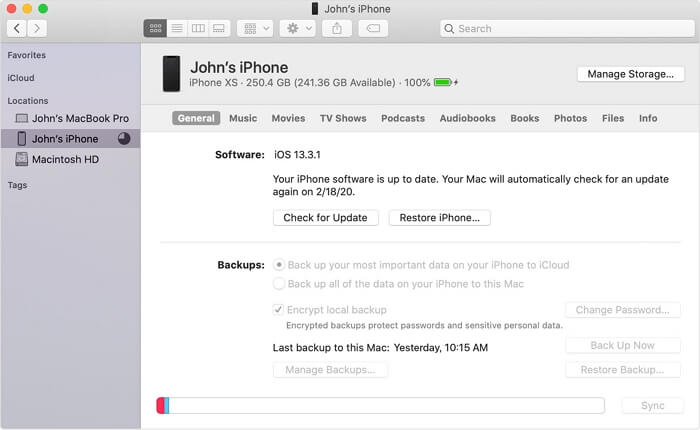
Step 3. Choose your device from the left panel and make sure you are under the "General" tab.
Step 4. Click "Back Up Now" to start backing up your iPhone 7 to the computer.
After you back up your iPhone 7 using Finder, you can also manage your iPhone backup by going to "Finder" > "General" > "Manage Backups."
These are the common ways how to back up iPhone 7 to the computer. Conclusively, iTunes and Finder work well to back up almost everything on your iPhone 7 but you can't read the files from your computer. While Qiling MobiMover allows you to make a copy of your iPhone contacts, photos, videos, music, ringtones, books, and more to a computer and read these contents.
Part 2. How to Back Up iPhone 7 to iCloud
Apple provides two official ways for you to back up your iPhone: iTunes and iCloud. Some users choose to back up iPhone 7 to iTunes while others prefer to back up the iPhone to iCloud. Like an iTunes backup, and iCloud backup also includes almost all of your iPhone data and settings. If you prefer the latter solution, you should know that, to you back up iPhone 7 successfully, you need to make sure:
- There is enough iCloud storage for you to save your iPhone content
- Your iPhone 7 is under a stable and reliable Wi-Fi connection
Ready? Follow the steps below to learn how to back up your iPhone 7 to iCloud:
Step 1. Go to "Settings."
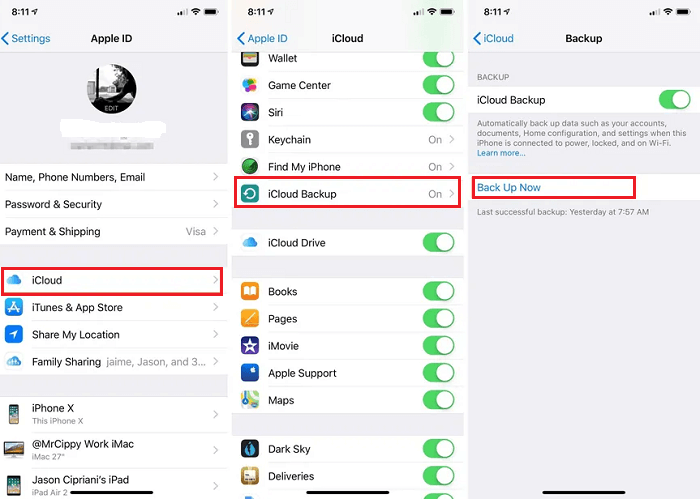
Step 2. Tap [your name] > "iCloud" > "iCloud Backup".
Step 3. Toggle on "iCloud Backup" and click "Back Up Now" to back up your iPhone 7 to iCloud.
You can't access the iCloud backup you made. All you can do is restore your iPhone from the iCloud backup, which is only available when you set up your iOS device.
Part 3. How to Back up iPhone to an External Hard Drive
To add an extra security layer to keep your data safe, you may also want to make a copy of important iOS data to an external hard drive. In that way, you can find your data back when your iTunes backup corrupts on your computer or your iCloud backup crashes or disappear for unknown reasons.
Currently, there are two ways you can use to back up your iPhone to an external hard drive. One is directly used Qiling MobiMover, an iOS data transfer that allows you to back up your iPhone to an external hard drive. Another method is by copying the iTunes backup you made on your computer and pasting it on your external hard drive. But we don't recommend you relocate the iTunes backup folder because it may ruin your backup files. So a better option for this purpose should be using Qiling MobiMover.
Bonus Tip. How to Make A Perfectly Backup Plan for an iPhone
Actually, it is hard to say which plan is perfect because different users may have different backup needs. Therefore, the first thing you should do is to know your needs for backup. That is to understand the type of data you have and what should be included in your backup plan. You can classify your data by following these categories:
- System data. This includes your passwords, settings, and other operating system data.
- Application data. This includes both data from your native apps and those from third-party apps.
- Documents. This refers to files, numbers, or keynotes.
Next, you'll need to learn about all backup solutions and their pros and cons.
1. Back up your iPhone locally on your computer
You can either use iTunes or a third-party iPhone data backup tool like Qiling MobiMover to get the job done. The advantage of doing this is that you can safely and quickly store your data without worrying about virus attacks because the whole process doesn't require an internet connection. Additionally, there is no limit to the size of your backup. But there is a shortcoming of using iTunes, that is - you can't view the backup file. But if you want to back up everything on your iPhone, including the settings, iTunes would be better.
2. Back up your iOS data to iCloud services
This method is convenient and flexible. You can complete the whole backup process directly without any extra software. The whole process is safe. But iCloud only offers 5GB storage space for free. What's more, it requires you to have a stable WiFi connection. If you want to back up all data stored on your native apps, this is a great way.
3. Back up your iPhone to an external hard drive
Needless to say, this is the least recommended backup way for iOS devices because the external hard drive is small and you could lose it easily. But if you want to add an extra security layer to keep your data safe, you can also make a backup to an external hard drive.
All in all, there is no standard answer to what is a perfect backup plan. What you need is to figure out your backup needs and choose one or two backup solutions above to back up your data.
The Bottom Line
Now you know how to back up iPhone 7 in five different ways. Whether you are using a PC or Mac, or want to back up your iPhone to a computer or cloud storage, you can find the corresponding solution in this guide.
Carry out the way best suited to your needs to back up your iPhone 7 or iPhone 7 Plus with ease.
Related Articles
- How to Import Outlook Contacts to iPhone
- How to Move Music from iPhone to iTunes
- How to Back Up iPhone to Mac With/Without iTunes
- How to Transfer Photos from iPhone to Flash Drive on Mac