How to Transfer Photos from iPhone to Laptop
In our other article, we have detailed the ways on how to transfer photos from laptop to iPhone, which has helped many users. Considering that many users also need to transfer photos from iPhone to computer, here we'd like to show you how to transfer photos from iPhone to laptop (Windows/Mac) in every possible way.
Let me guess: The photos on your iPhone is the biggest occupier of your device space and is eating up your iPhone storage. Thus, for reasons like backing up the precious photos, freeing up the iPhone storage, or others, you want to transfer photos from iPhone to laptop. Then how do you transfer photos from iPhone to laptop? Use the Photos app in Windows 10 or iCloud? Yes, they are the solutions but not the only ones. Read on to explore all the workable ways on how to transfer photos from iPhone to laptop.
How to transfer photos from iPhone to laptop in 5 ways
Depending on the operating system of your laptop (most of them running Windows I guess), the ways to import photos from iPhone to computer differ. Some of the methods below are workable on both PC and Mac, while others may be exclusive to Windows or macOS.
Method 1. Transfer photos from iPhone to laptop with Qiling MobiMover (Win & Mac)
Whether you are using a Windows PC or Mac, the iOS data transfer software - Qiling MobiMover, will help you transfer photos from your iPhone to the laptop. With it, you can:
- Back up iPhone content to computer
- Transfer files from computer to iPhone/iPad
- Copy data from one iPhone to another
- Download videos from YouTube, Vimeo, Metacafe, and more to your computer or iOS device
Unlike the Photos app which can only transfer photos in Camera Roll on your iOS device, this tool can transfer any photo from any album. Isn't it great? Follow to have a try.
To transfer photos from iPhone to laptop with Qiling MobiMover:
Step 1. Connect your iPhone to your laptop with a USB cable and run Qiling MobiMover. Choose "Phone to PC" on the main screen and click the "Next" button to continue. You can also go to "Content Management" > "Pictures" > "Photos" to transfer photos from iPhone to laptop selectively.
Step 2. Make sure the "Pictures" category is selected. Other than photos, you can also transfer videos, music, ringtones, contacts, messages, and more from your iPhone to the laptop. You can change the storage path for exported files or save them on the desktop by default.
Step 3. Click the "Transfer" button to start transferring photos from your iPhone to the laptop at a fast speed. Depending on the size of the files, it may take seconds or a while to complete the process.
Method 2. Import photos from iPhone to laptop with the Photos app (Win & Mac)
There is an app called Photos on both Windows and Mac. Although they are different apps, they both can help you manage and organize photos on the computer or from other supported devices. The Photos app also allows you to transfer iPhone photos to computer via a USB cable.
The drawback of using Photos is that it can only import photos in Camera Roll from an iPhone/iPad. If you have other albums to copy, the Photos app won't help. Besides, the Photos app is only available on Windows 8 or later and OS X Yosemite 10.10.3 or later. Therefore, if your computer doesn't meet the requirement, you need to upgrade to the latest version of OS on the computer or try other ways instead.
To transfer photos from iPhone to PC with the Photos app:
Step 1. Make sure you have installed the latest version of iTunes on your PC. (You need iTunes to help the computer recognize the iOS device.)
Step 2. Connect your iPhone/iPad to your laptop with a USB cable.
Step 3. Unlock the iOS device and click "Trust" in the prompt on the iPhone/iPad to trust the computer.
Step 4. Click the "Start" menu and choose "Photos".
Step 5. In Photos, click "Import" in the top-right corner of the window, and select "From a USB device".
Step 6. Then Photos will look for a device to import from automatically. When it has done, it will show you the new photos and videos it found.
Step 7. Since the new items will be imported to the PC by default, you need to uncheck the photos you don't want to transfer.
Step 8. Click the "Continue" button to start transferring photos from iPhone to the laptop.

To transfer photos from iPhone to laptop running macOS via Photos:
Step 1. Unlock your iPhone and connect your iPhone to the laptop. (You may need to go through a verifying process.)
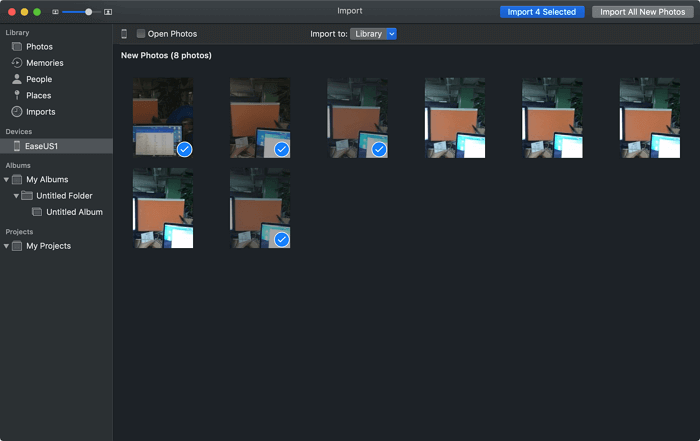
Step 2. Run Photos for Mac, go to the "Devices" section and select your iOS device.
Step 3. Click "Import All New Photos" or select the photos you want to transfer to the Mac and then click "Import XXX Selected". Note: You can use "Command + A" to choose all the photos and videos or use the Shift key or Fn key for bulk selection. (You can customize the picture folder that is used to store the imported pictures.)
Convenient as it is, there are some issues that may occur while using Photos. Many users have encountered problems like "Windows 10 Photos app not working" or "can't import photos from iPhone to Mac". If you are faced with such issues, learn how to fix it from the solutions provided.
Method 3. Transfer photos from iPhone to laptop via iCloud (Win & Mac)
The cloud storage service iCloud allows you to sync data across your devices using the same Apple ID, including iPhone, iPad, Mac, and even Windows PC. Make sure there is enough storage in iCloud to store all your photos, then follow to learn how to upload photos from iPhone to laptop via iCloud.
Step 1. On the iOS device, go to "Settings" > [your name] > "iCloud" > "Photos" and tap to switch on "iCloud Photos".
Step 2. Turn on iCloud Photos.
On PC:
- Download and install iCloud for Windows.
- Sign in with the Apple ID you use on the iOS device.
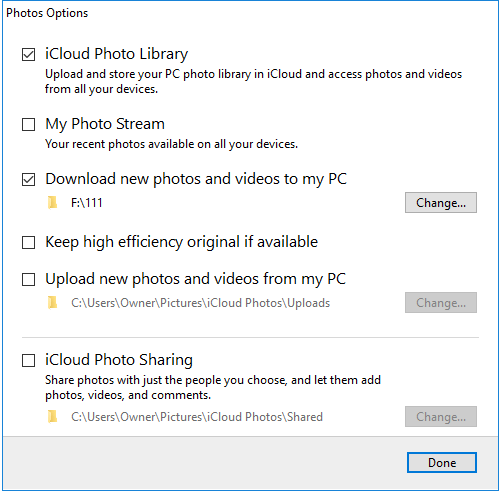
- Click "Options" next to Photos and check the "iCloud Photo Library" option.
- Click "Done" > "Apply".
- After the syncing process, check your iPhone photos from "This PC" > "iCloud Photos" > "Downloads".
On Mac:
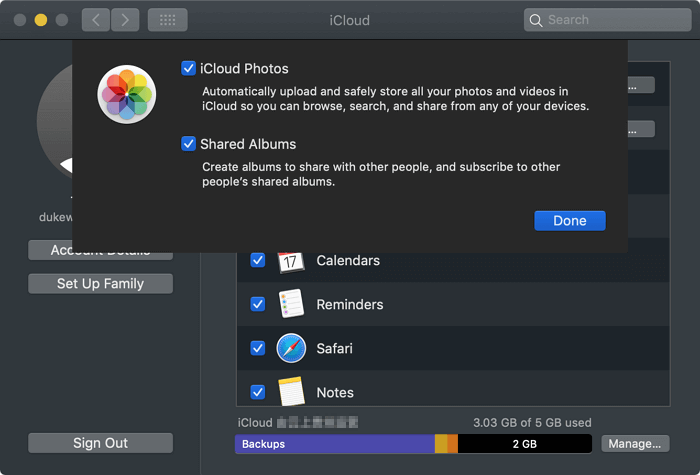
- Go to the Apple menu and click "System Preferences".
- Click "iCloud" and sign in with the Apple ID you use on your iPhone.
- Check the "Photos" option and turn on "iCloud Photos".
- Then all your iPhone photos will emerge on the Photos app.
Method 4. Import photos from iPhone to laptop via Windows Explorer (Windows)
You can also import photos from iPhone to laptop running Windows via Windows Explorer (called File Explorer in Windows 10), on condition that you install iTunes on the computer. Like using the Photos app on Windows 10, you are able to import photos from Camera Roll only. If you want to transfer iPhone photos to laptop all at once, use Qiling MobiMover or iCloud instead.
To import photos from iPhone to laptop via File Explorer:
Step 1. Connect your iPhone to the laptop with a USB cable.
Step 2. Unlock the iOS device and click "Trust" in the prompt on the iPhone to trust the computer.
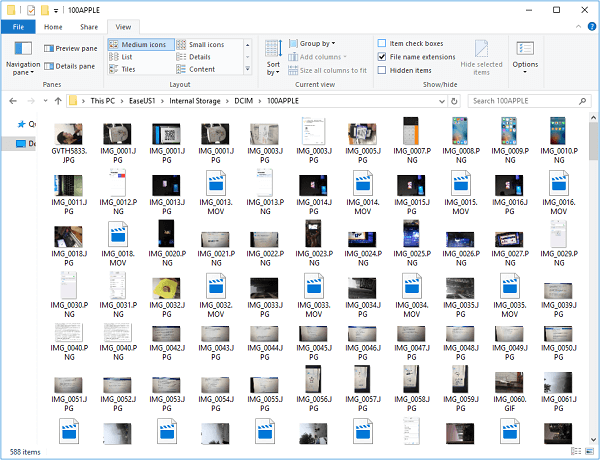
Step 3. In the prompt on the laptop, select "Open device to view files" and go to "Internal Storage" > the "DCIM" folder > the "100APPLE" folder.
Step 4. Select the iPhone photos you'd like to transfer and copy them to your computer.
Method 5. Send photos from iPhone to laptop via AirDrop (Mac)
To transfer photos wirelessly and selectively, you need AirDrop. However, AirDrop is a file-sharing utility that's only available on iOS devices and Mac computers. Thus, if your laptop is running Windows, follow one of the four ways above to learn how to transfer photos from iPhone to PC.
To import pictures from iPhone to laptop with AirDrop:
Step 1. Make sure Bluetooth and Wi-Fi are enabled on your iPhone and then turn on AirDrop from the Control Center on your iPhone.
Step 2. Turn on AirDrop on the Mac by going to "Finder" > "AirDrop". Then set the option "Allow me to be discovered by:" to "Contacts Only" or "Everyone".
Step 3. Transfer pictures from iPhone to the laptop running macOS via AirDrop.
- Go to the "Photos" app on your iPhone.
- Select the images you'd like to import and click the "Share" button on the device.
- Choose "AirDrop" > "your Mac's name" and click "Accept" on your laptop to receive the photos.

The Bottom Line
For you to choose the best way for yourself:
| Method | Qiling MobMover | iCloud | Photos/Windows Explorer | AirDrop |
|---|---|---|---|---|
| Features |
|
|
|
|
Other than "how to transfer photos from iPhone to laptop", the methods are also the solutions to related questions like "How to transfer photos from iPhone to computer" and "How to transfer photos from iPhone to PC in Windows". Of course, these tips can also be applied to iPad or iPod Touch.
I hope this guide can help you solve the problem successfully.
Related Articles
- Best Free Method to Import TV Shows to iPhone/iPad from PC and iTunes
- How to Print Photos from iPhone
- Three Simple Ways to Print out Text Messages from iPhone
- How to Transfer Large Videos from iPhone to PC in Detail