How to Transfer Photos from iPhone to MacBook Air
Photos are probably the files that are transferred most frequently on your iPhone, for the purpose of making a backup or data sharing. Thus, it's necessary for you to know how to transfer photos from iPhone to Mac so that you can save your precious iPhone photos somewhere else.
Luckily, since both iPhone and MacBook are Apple products, there are many built-in or third-party services or programs that allow you to transfer photos from iPhone to MacBook Air easily. Read on to check the details.
How to Transfer Photos from iPhone to MacBook Air via Qiling MobiMover
I know there are built-in programs on macOS that allow you to import photos from iPhone to Mac directly without third-party software. But there are reasons why I recommend you try the iPhone transfer software - Qiling MobiMover.
As an iOS data transfer tool, Qiling MobiMover supports not only photos but also many other types of content, like videos, music, ringtones, contacts, books, and more. Besides, it allows you to transfer files between an iPhone/iPad/iPod and a Mac or between two iDevices. Other than data transfer features, it can also be used to back up iPhone data, transfer WhatsApp messages, and convert HEIC to JPG in bulk. When it comes to transferring photos from iPhone to Macbook Air, this tool provides flexible solutions for you to transfer photos by item or album.
Thus, compared with the built-in programs on Mac, Qiling MobMover is more powerful in its features and more flexible during data transfer.
To transfer photos from iPhone to MacBook Air:
Step 1. Connect your iPhone to Mac with a USB cable. Run Qiling MobiMover, choose "Phone to Mac" and click the "Next" button to continue.
Step 2. Check the category/categories you want to copy from your iPhone to Mac. As you can see, you can copy other supported files together with photos from your iPhone to Mac all at once. After that, don't forget to customize the storage path for the exported photos unless you want to save them on your desktop.
Step 3. Now, click the "Transfer" button to start transferring photos or other files from your iPhone to Mac without iTunes. Exporting files from iPhone to Mac with MobiMover is the right way for backup to avoid unexpected data loss.
By the way, if you are using a MacBook running macOS Sierra and earlier and your iPhone photos are HEIC files, you won't be able to open HEIC on your MacBook. Luckily, you can choose to save these pictures as JPG in Settings in Qiling MobiMover before the data transfer. Afterward, you can view your iPhone photos freely on the Mac. You can also go to the guide on how to convert HEIC to JPG on Mac for more details.
How to Import Photos from iPhone to Mac via Photos
If you prefer to use an existing app on your MacBook, you may like Photos. It works to import photos from iPhone to Mac using a USB cable. Although you can't select specific albums to transfer, you can choose to transfer all new photos since Photos can distinguish all new items from your photo library.
Therefore, if you are going to import all new photos from your iPhone to your Macbook, using Photos will get it done quickly.
To transfer photos from iPhone to MacBook:
Step 1. Connect the iPhone to the Mac and unlock the iOS device.
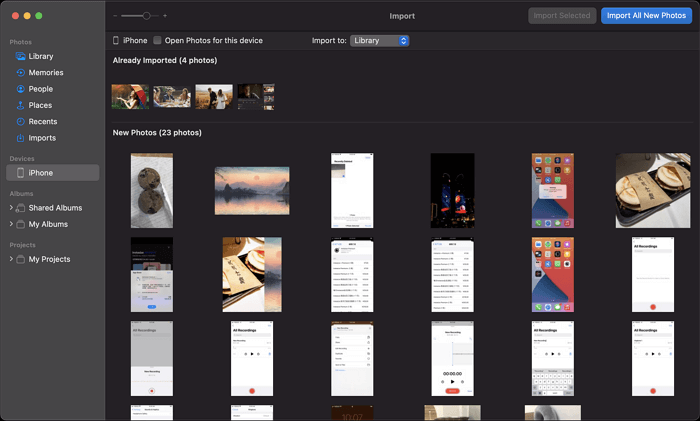
Step 2. Launch Photos on the MacBook Air, then click your iPhone under "Devices."
Step 3. Click "Trust" on your iPhone and then enter the passcode as required.
Step 4. Now you can see all your photos on your iPhone. Click "Import to" to choose a folder to save the photos.
Step 5. Click "Import All New Photos" or select the items you want to transfer and then click "Import [number] Selected" to transfer photos from iPhone to Mac.
How to Transfer Photos from iPhone to MacBook via Image Capture
Another app that works similarly to Photos on Mac is Image Capture. It also helps to import photos from an external device that has a camera, including your iPhone, to Mac. When it comes to photo transfer, both apps perform equivalently well. Thus, choose any of them according to your preference.
To transfer photos from iPhone to MacBook Air using Image Capture:
Step 1. Connect your iPhone to the Mac via a USB cable.
Step 2. Make sure your iPhone is unlocked and allowed to trust the computer.
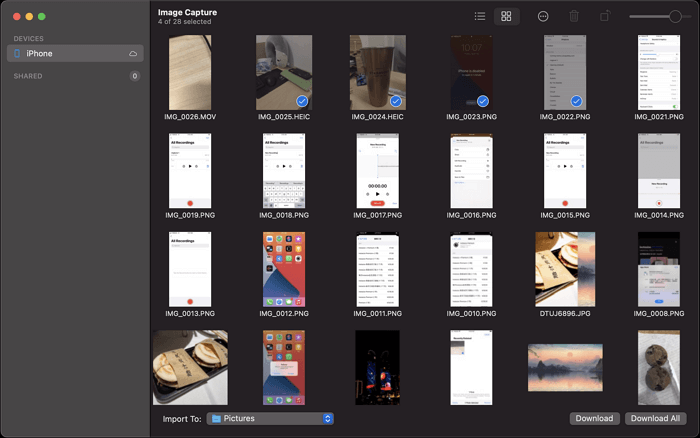
Step 3. Launch Image Capture and select your iPhone from the left panel.
Step 4. Click "Import to" and select a folder to save your iPhone photos.
Step 5. Select photos and click "Download" or click "Download All" to import photos from your iPhone to the Mac.
How to Download Photos from iPhone to MacBook Air via AirDrop
It's no doubt that AirDrop is also a solution to get pictures from iPhone to Mac. It is available on both iPhone and Mac and supports photo transfer. With it, you will be able to send photos, videos, contacts, websites, and more from your iPhone to your Mac or vice versa wirelessly over Wi-Fi.
To send photos from iPhone to MacBook Air:
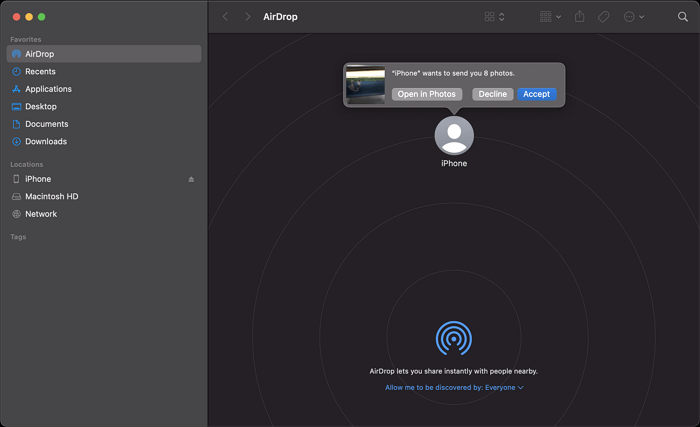
Step 1. Turn on AirDrop on both devices.
Step 2. On your iPhone, go to the Photos app and select the items you want to transfer.
Step 3. Tap the "Share" button, choose "AirDrop," and then tap the name of the MacBook Air.
Step 4. On the MacBook, click "Accept" in the AirDrop window to receive these photos from your iPhone.
If you have lots of photos to transfer, AirDrop may not be the optimal choice for you given the time it may take. In such a case, you are recommended to try one of the ways detailed above.
How to Sync Photos from iPhone to Macbook Air Using iCloud
If you prefer a wireless solution, iCloud also comes to help. iCloud is available on both iPhone and Mac and thus enables you to sync photos, contacts, and many other types of content wirelessly.
To use iCloud or any other similar cloud-based services, you should make preparations including:
- Make sure you have using the same Apple ID on both the iPhone and Macbook.
- Make sure there is enough iCloud storage left to store the iPhone photos.
- Make sure there are stable and fast network connections on both devices.
Afterward, follow the steps below to transfer photos from your iPhone to the Macbook Air.
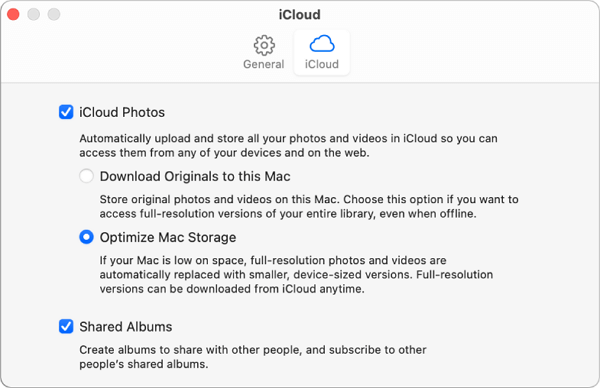
Step 1. Enable iCloud photos on your iPhone via Settings.
Step 2. Launch the Photos app from Mac.
Step 3. From the menu bar, go to "Photos" and click "Preferences."
Step 4. Enable "iCloud Photos" and check "Download Originals to this Mac" or "Optimise Mac Storage."
Step 5. After the syncing process, your iPhone photos will be synced to your Macbook Air automatically. Then you can access these pictures from the photo library in the Photos app on your Mac.
The Bottom Line
There are many easy and proven ways to import photos from iPhone to MacBook Air. You can also apply these tips to transfer pictures from your iPhone/iPad/iPod to your iMac or MacBook Pro. If you need to transfer other types of content from the iOS device to the Mac, only Qiling MobiMover will still help.
Related Articles
- How to Back Up iPhone XR/XS/XS Max in 4 Ways
- 2 Simple Ways to Print Notes from iPhone
- How to Save WhatsApp Chats on iPhone & Android
- How to Download Streamable Videos on the Computer or Mobile Phone