How to Transfer Photos from iPhone to PC in Windows 10
Why Do You Need to Transfer Photos from iPhone to PC in Windows 10
The photos on your iPhone generally take most of your device storage. To free up your iPhone storage and make it run faster, you may want to remove the biggest occupier from your iOS device. However, photos are so important that you don't want to directly remove them without making a backup. Thus, to avoid data loss, you need to transfer photos from iPhone to PC first.
If you are looking to copy photos from iPhone to Windows 10, read on and learn four proven ways to do it.
Method 1. How to Transfer Photos from iPhone to PC in Windows 10 via File Explorer
Compared with transferring photos from PC to iPhone, it's much easier to import photos from iPhone to PC, because you can transfer photos from iPhone to Windows 10 directly using a USB cable, and no third-party software is needed.
By connecting your iOS device to PC, you can access the DCIM folder in your iPhone internal storage via File Explorer (called Windows Explorer in earlier versions), and then you can copy the photos and videos in that folder to your desktop.
The only flaw of manually copying photos from your iPhone to PC is that: If you are going to transfer photos selectively, it will take you a long time to select the items, since all the photos and videos are all stored in the folder in an unorganized way.
To transfer photos from iPhone to Windows 10:
Step 1. Connect your iPhone to your PC using a USB cable.
Step 2. Unlock your device and trust the computer.
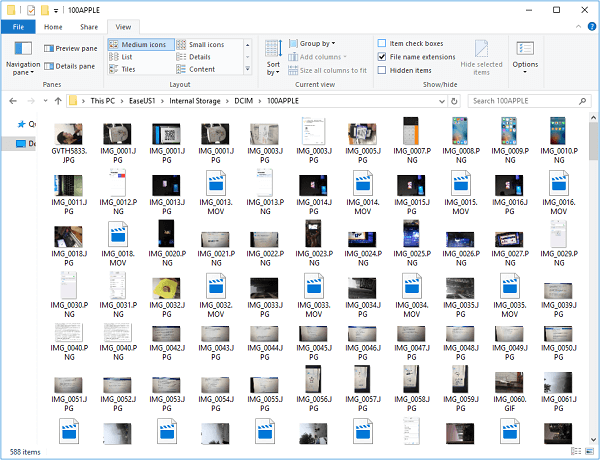
Step 3. Head over to "This PC" > "Internal Storage" > "DCIM" > "100APPLE" and now you could see all the photos and videos on your iPhone.
Step 4. Copy and paste the pictures you want to transfer to your computer.
Method 2. How to Transfer Photos from iPhone to Windows 10 PC via Photos
Since you are looking to transfer photos from iPhone to Windows 10 PC, you can also apply the Windows Photos app to help you get things done. The Photos app is available on Windows PCs since the release of Windows 8. It is designed to help you view and manage photos on your computer or an external device, including your iPhone. With it, you will be able to import photos from your iPhone to PC using a USB cable.
To transfer iPhone photos to PC in Windows 10 via the Photos app:
Step 1. Connect your iOS device to your Windows 10 PC with a USB cable.
Step 2. Unlock your device and trust the computer in the pop-up.
Step 3. Launch the Photos app on your PC. (If you don't know where it is, go to the Start menu and search for it.)
Step 4. In the program, click "Import" in the top-right corner of the window, and choose "From a USB device".
Step 5. Then Photos will look for a device to import photos from. When it has done, it will show you the new photos and videos it found.
Step 6. Uncheck the items you don't want to import and click "Continue" to start transferring iPhone photos to PC.
If the Windows 10 Photos app is not working, learn how to fix it from the troubleshooting guide.

Both File Explorer and Photos are applicable to import photos from iPhone to PC only. If you want to put photos on iPhone from the computer, they won't help.
Method 3. How to Transfer iPhone Photos to PC in Windows 10 with iPhone Transfer Software
Convenient as they are, the two methods above can only import your iPhone photos and videos to your Windows PC. If you also need to transfer other types of content, like music, contacts, messages, books, and more, you will need free iPhone data transfer software, like Qiling MobiMover. This tool works well to:
- Transfer files between iPhone/iPad and computer
- Transfer data from one iPhone/iPad to another
- View and manage iDevice content from computer
Moreover, it is also a free video & audio downloader that allows you to download online video & audio to your computer or iPhone/iPad directly.
To transfer photos from iPhone to PC in Windows 10:
Step 1. Connect your iPhone to PC running Windows 7 or later. Run Qiling MobiMover and click "Phone to PC" on the screen. Then, click the "Next" button to continue.
Step 2. Check the category/categories you want to transfer from your iPhone to PC running Windows 10/8/7. As you can see, you can copy other supported files together with photos from your iPhone to PC at once.
Step 3. Now, click the "Transfer" button to transfer the photos from iPhone to your PC in one-click. If you've customized the storage path, find the files there. If not, you can check them on your desktop.
Method 4. How to Transfer Photos from iPhone to PC Wirelessly
The three ways above all need a USB cable to work. If you want to import photos from iPhone to Windows 10 PC wirelessly, iCloud is a good choice for you.
Unlike iTunes that can only sync photos from PC to iPhone, iCloud helps whether you want to transfer photos from Windows 10 to iPhone or vice versa. It will sync all photos from iPhone to PC in Windows 10 at once. If you prefer to copy some specific items, using iCloud won't meet your needs.
To import photos from iPhone to PC in Windows 10 via iCloud, you have two ways to choose from, depending on whether you have installed iCloud for Windows. Make sure you have enough iCloud storage to save your iPhone photos and follow one of the tips below to continue.
If you have installed iCloud for Windows:
Step 1. Turn on "iCloud Photos" on your iPhone via the Settings app.
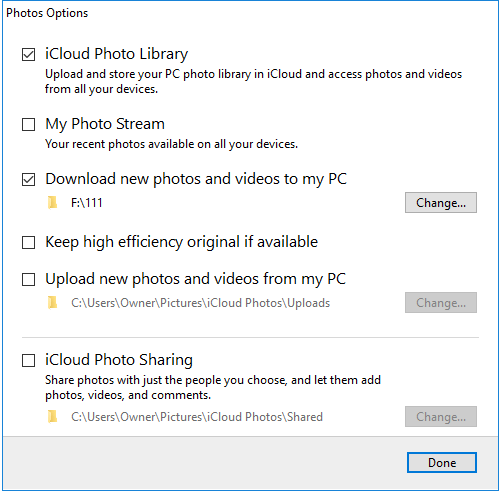
Step 2. On your PC, go to iCloud settings and click "Options" next to Photos.
Step 3. Enable "iCloud Photo Library" > "Download new photos and videos to my PC".
Step 4. Go to the folder shown under the option to check the photos and videos from your iPhone.
If you don't want to install iCloud control panel:
Step 1. Switch on "iCloud Photos" via Settings on your iPhone.
Step 2. On your PC, open a browser and visit iCloud.com.
Step 3. Sign in with the Apple ID account you use on your mobile device.
Step 4. Choose "Photos" among the options.
Step 5. Now you could see the items from your iPhone.
Step 6. Download iCloud Photos to your PC. By doing so, you can transfer photos from your iPhone to PC in Windows 10.

Bonus Tip: How Do I Transfer Photos from iPhone to PC Using iTunes
As mentioned, iTunes is helpful to transfer photos from PC to iPhone but not from iPhone to PC. There is no direct way to import iPhone photos to PC. If you have to, you can back up your iPhone with iTunes, which will back up almost all your iPhone and settings, including photos, to your computer.
The Bottom Line
It's easy to transfer photos from iPhone to Windows computer with the ways provided above.
If you want to transfer photos and videos only, using Windows File Explorer or the Photos app could solve the problem. If you want to transfer other files together with pictures, use a tool like Qiling MobiMover instead. While if you want to get things done wirelessly, applying cloud storage services, e.g. iCloud, Dropbox, Google Photos, is advisable.
Carry out the way you like best to get your iPhone photos to PC in Windows 10 within minutes.
Related Articles
- How to Download Videos from Twitter in Every Possible Way
- How to Delete Contacts on iPad
- How to Connect iPhone to iPad
- How to Export iPhone/iPad Contacts to Computer (Mac/PC)