What Is Mac First Aid in Disk Utility | Repair Your Disk
What Is First Aid Mac in Disk Utility
The Mac First Aid tool, located within Disk Utility, scans the health of volumes and disks, identifying and potentially fixing issues with internal and external hard drives.
The tool identifies issues and aids in repairing minor errors, preventing more severe problems from affecting the disk.
To run First Aid in Disk Utility, you need to open Disk Utility on your Mac, select the startup disk from the left-hand sidebar, and click the "First Aid" button at the top of the Disk Utility window. This will scan your disk for errors and automatically repair any issues it finds. If you're prompted to quit any applications that are using the disk, do so before proceeding.
Step 1. To access the Terminal application, go to the Finder, click on "Applications", and then select the "Utilities" option.
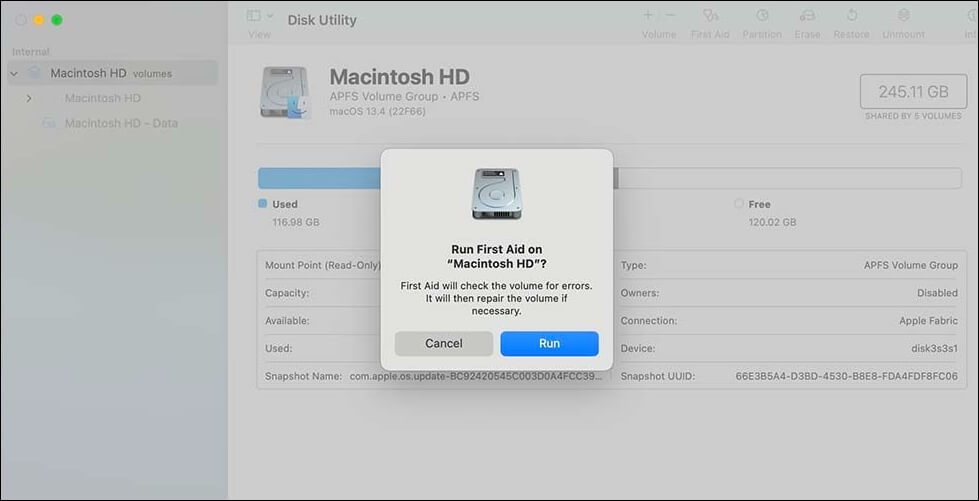
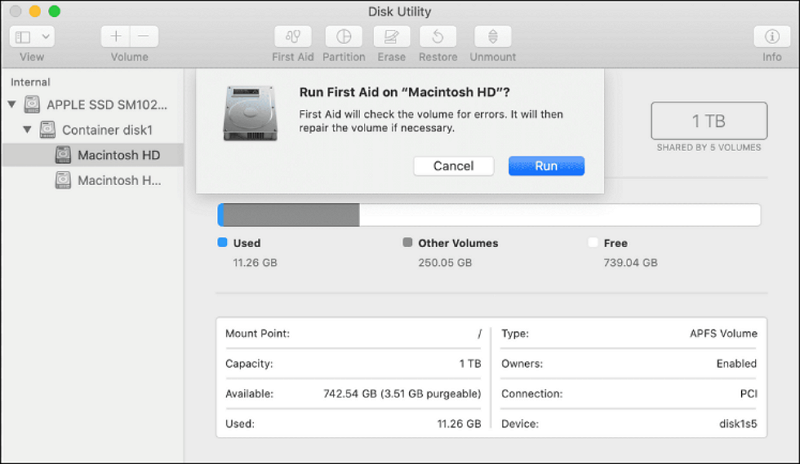
Step 2. To run the First Aid feature in Disk Utility, open the Utilities folder in the Applications folder and select the Disk Utility app. Select the disk you want to run First Aid on from the list on the left side of the Disk Utility window, click the "First Aid" button, and then click "Run" to start the process. Wait for it to complete, which may take several minutes depending on the size of your disk and the speed of your computer.

What Does First Aid Mac Do
The First Aid utility in Mac OS helps identify and fix issues with disk formatting and directory structure, ensuring the system runs smoothly by detecting and repairing errors promptly.
When Should You Use First Aid from Disk Utility
Repairing a Mac's disk with Disk Utility's First Aid feature is not a complex process, but knowing when to use it can be helpful. You might need to run First Aid in various situations, such as when your Mac is experiencing issues with its startup disk, you've installed new software or drivers, or you've noticed strange behavior from your computer. Additionally, if you've encountered errors or inconsistencies during the disk repair process, or if your Mac is running slowly or crashing frequently, running First Aid might be in order. By using First Aid, you can ensure your Mac's disk is in good working order and prevent potential problems from arising.
- Corrupt files: Running First Aid on a Mac is a good idea if you have corrupt files in your system, as it can help repair and fix them. However, if you don't have any corrupt files, running First Aid might not be necessary and could potentially crash the system.
- Error messages: If you're experiencing error messages that are unclear, running First Aid on your Mac can help diagnose and potentially fix the issue. This tool can detect and repair problems, making it a useful troubleshooting step.
- App crashes: Sometimes, the app gets frozen or crashes. Running First Aid can help diagnose the issue.
- Trouble while starting Mac: If your Mac is having issues starting up, try running the built-in First Aid utility to diagnose and potentially fix the problem. First Aid is a tool that checks the integrity of your startup disk and attempts to repair any issues it finds. To run First Aid, restart your Mac and immediately hold down the Command (⌘) and R keys. This will boot your Mac into Recovery Mode, where you can access the Utilities menu and select Disk Utility.
- Improper working of external devices: If you're experiencing issues with external devices, such as being unable to access, read, or even mount them, you might encounter an error like "couldn't unmount disk 69888 Mac." In such cases, running First Aid is a good idea to detect and potentially resolve the issue.
If you receive the error message "First Aid found corruption that needs to be repaired", you can try to fix it by restarting your iPhone in recovery mode, then using iTunes to restore your device. Alternatively, you can try to repair the corruption using the "First Aid" feature in the Settings app, or by booting your iPhone in recovery mode and using the "Restore iPhone" option in iTunes. If none of these methods work, you may need to perform a factory reset or seek further assistance from Apple support.
If you've discovered corruption in a first aid situation, prioritize the victim's immediate needs and safety. Ensure they receive proper medical attention, if necessary.
The issue of First Aid found corruption that needs to be repaired can be a frustrating problem to encounter. To fix this issue, you can try repairing the corruption by running the built-in First Aid tool on your device. This tool can often detect and repair corrupted files, restoring your device to a stable state.
How to Use First Aid on Mac
Once the above-If you're experiencing situations where your Mac's disk is not responding or you're getting error messages, running First Aid to check for disk errors is necessary. You can access Disk Utility through the Applications/Utilities folder, then select your startup disk and click on the "First Aid" button to scan for issues. Alternatively, you can boot from the Recovery mode and select Disk Utility from the Utilities window, then click on "First Aid" to run the check.
Method 1. Run First Aid from Disk Utility to Repair Disk Error
To run First Aid via Disk Utility, open the application, select the disk you want to repair from the left-hand sidebar, click the "First Aid" button at the top, and follow the prompts to complete the process. This will scan the disk for errors and attempt to repair them. Be sure to back up your data before running First Aid, as it may delete or move files that are no longer needed.
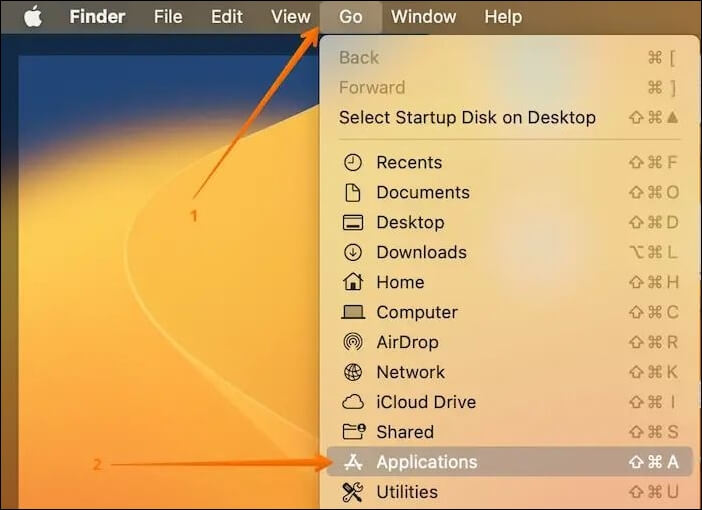
Step 1. Open "Finder" and click on "Go" from the Menu.
Step 2. Go to the "Applications" menu and select "Utilities" from the drop-down, then navigate to the "Utilities" folder.
Step 3. To erase and reinstall macOS, choose "Disk Utility" from the Utilities window. Alternatively, you can boot your Mac directly into Disk Utility by restarting your Mac and immediately holding down the "Command" + "R" keys.
Step 4. To view all devices, go to the "View" menu in the upper-left corner and select "Show All Devices".
Step 5. Go to the disk you want to scan, and click on the "First Aid" option.
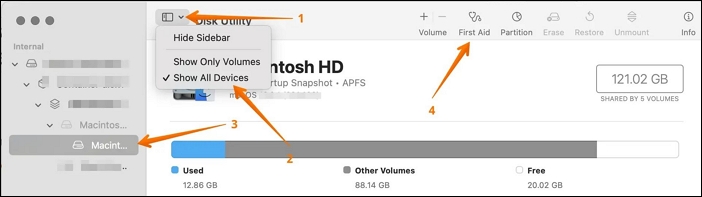
Step 6. Select the "Run" button and wait for the process to complete.
Mac's First Aid is a built-in tool that helps repair disk permissions and rebuild the launch services database. It's essential to run First Aid regularly to maintain your Mac's overall health and prevent potential issues.
Method 2. Run First Aid from Recovery Mode to Fix Mac Crashes
If it's not possible to run First Aid normally, you can use Recovery Mode to troubleshoot and fix various issues. To do this, follow these steps:
Step 1. Start Mac in Recovery Mode.
Step 2. Choose "Disk Utility" in the macOS Utilities window.
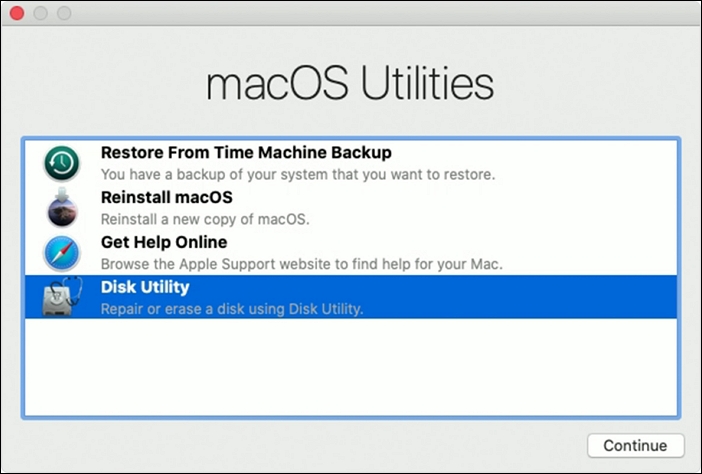
Step 3. Click "Continue".
Step 4. Go to "View > Show All Devices".
Step 5. To repair a corrupted disk, choose the disk you want to scan and click on "First Aid" in Disk Utility.
Step 6. Click "Run" and then "Done" after the process is completed.
If you're experiencing macOS Sonoma or earlier startup disk issues, don't worry - sometimes these problems can be resolved. However, if you're still having trouble, the article provides guidance on fixing startup disk errors in different situations.
Fix No Startup Disk on Mac Without Losing Data
If you're experiencing the "no startup disk" issue on your Mac, there are several effective solutions to resolve the problem. Firstly, you can try booting your Mac in safe mode by restarting it and immediately holding down the Shift key, which can help identify if a third-party software is causing the issue. Secondly, you can try resetting the System Management Controller (SMC) and Power Management Unit (PMU) by shutting down your Mac, unplugging the power cord, pressing the power button for 10 seconds, and then plugging the power cord back in.
First Aid Failed: What Can I Do
If running First Aid fails to check the disk error or can't solve the disk problem, you can protect your essential data by using professional data recovery software like Deep Data Recovery for Mac.
Deep Data Recovery for Mac is a user-friendly software that enables users to recover data from formatted Mac hard drives, offering features like scan mode, file filter, and preview, making it an effective tool for Sonoma data recovery.
If your Mac's hard drive becomes corrupted, you can use Qiling recovery software to fix it, regardless of the reason for the data loss, such as a virus attack, human error, or system crash.
Using Deep Data Recovery for Mac is easy. To recover lost or deleted data on the Mac disk, simply follow these simple steps: follow the prompts to select the disk you want to recover data from, scan the disk to locate the deleted files, preview the recoverable files, and finally, save the recovered files to a safe location. That's it!
Step 1. Scan for lost data on the fusion drive
To recover lost data and files from a Fusion Drive, select the Fusion Drive partition where the data was lost. Click the "Search for lost files" button. If unsure, click "Search from your disk" to identify the partition name.
Note: Before attempting data recovery, it's recommended to click "Disk Backup" from the left sidebar to create a backup of your Fusion drive, which will help prevent further data loss. Once a backup is created, the software can then recover data from the backup, allowing you to use your Fusion Drive again.

Step 2. Find lost files after the scan
Deep Data Recovery for Mac will immediately scan your Fusion disk partition and display the scanning results, allowing you to filter files by type and path.

Step 3. Recover files on the fusion drive
Select the file(s) you want to recover from the scan results, then click the "Recover" button to retrieve them.

Conclusion
First Aid is a handy in-On a Mac, the built-in tool "First Aid" is used to detect and repair disk errors. It can be run in two different ways, but in some cases, it may not work.
Choosing a powerful recovery software is a good idea, and Deep Data Recovery for Mac is a suitable option. This tool allows you to easily retrieve data, regardless of size, making it a convenient solution for recovering lost files.
First Aid Mac FAQs
Look at these questions and answers to learn more about First Aid Mac.
1. What does First Aid on Mac do?
The First Aid Mac utility is used to locate and repair errors on a disk, focusing on correcting issues with the directory structure and disk formatting.
2. Is it safe to use First Aid on Mac?
First Aid is a built-in tool on Mac that is safe to use and helps locate and repair errors related to internal and external disks, ensuring your data is secure and accessible.
3. Where is First Aid on a Mac?
The First Aid feature in Disk Utility on a Mac allows users to access and run it easily, and can be used to identify and repair disk errors whenever needed.
4. Will First Aid on Mac erase files?
First Aid, a built-in tool on Macs, scans and repairs errors in the operating system without deleting any files. It does not erase data, but rather identifies and fixes issues, allowing the system to run smoothly.
Related Articles
- Where Is Task Manager Mac | Tips for Optimizing Mac Usage
- Windows 11 Games Crash or Freeze? Don't Miss Quick Fixes Here!
- M2 Pro vs M2 Max | Price, Battery Life, CPU, and GPU
- ReFS vs NTFS: Which Is a Better File System?
- How to Fix Lenovo Laptop Stuck in Boot Loop in Windows 10/11 [Quick and Easy]
A Lenovo laptop stuck in a boot loop in Windows 10/11 can be caused by various factors, including corrupted system files, outdated BIOS, or issues with the boot order. To resolve the issue, users can try booting in safe mode, disabling fast startup, checking for corrupted system files, updating the BIOS, and resetting the laptop to its default settings. Additionally, users can also try booting from a USB drive or a CD/DVD, and running a system file checker to identify and fix any corrupted files. - How to Solve LG TV Not Recognizing USB [Ultimate Guide]
LG TV not recognizing USB can be caused by a variety of reasons, including loose connections, outdated firmware, or corrupted software. To resolve this issue, try restarting your TV, checking the USB port for any blockages or debris, and ensuring that the USB device is properly formatted and compatible with your TV. You can also try updating your TV's firmware or resetting it to its default settings. If none of these solutions work, consider contacting LG customer support for further assistance.