How to Boot From NVMe [2024 Easy Tutorial]
Overview of how to boot from NVMe SSD:
| ⚙️Complex Level | Low, Beginners |
| ⏱️Duration | 4-8 minutes |
| 💻Applies to | Set NVMe SSD as a boot drive |
| ✏️Stages |
Stage 1. Put NVMe SSD into Your Computer |
NVMe or Non-Volatile Memory Express SSDs have become a popular choice for modern computers, offering high speeds, performance, and compact size compared to traditional drives, resulting in excellent gaming speeds, fast boot times, and improved productivity.
NAND flash memory and NVMe SSDs have significantly decreased in price, making them a no-brainer for computer upgrades, providing future-proofing and top-notch performance.
This tutorial from Qiling provides a detailed guide on how to boot from NVMe SSDs. By making an NVMe SSD your primary drive, you can unlock its full benefits. Let's get started and explore the process together.
Is Booting From an NVMe SSD Possible
Booting from an NVMe SSD is possible and provides the best and fastest boot times for Windows or Mac computers. NVMe drives are relatively affordable and can be integrated into your system through an M.2 interface.
Transitioning to NVMe SSDs may seem daunting at first, but the process is surprisingly straightforward. Booting from an SSD is a simple process, and the benefits are numerous, including improved performance and efficiency.
- Fast data transfer rates
- Improved performance
- Enhanced gaming experience
- Lower loading times
- Improved productivity
- Fast booting times
To boot from an NVMe SSD, you'll need to ensure that your system's BIOS or UEFI firmware is set to prioritize the SSD as the primary boot device. This is usually done by entering the BIOS settings during boot-up and selecting the SSD as the primary boot device.
How to Boot From NVMe SSD - 3 Stages
Booting from NVMe SSDs is a relatively straightforward process if you follow the correct steps. It involves three stages that are easy to follow, and going through them in order will ensure a smooth experience.
Stage 1. Put NVMe SSD into Your Computer
Step 1. Unplug your computer's power source, open the case by unscrewing the thumbscrews at the back, and proceed with the next steps.
Step 2. Locate the M.2 slot on your motherboard, typically found below the PCIE connector, or behind the board for mini-ITX motherboards.
Step 3. Insert the NVMe SSD into the slot at an angle, then secure it down with the mounting screw.
💡Note: If your SSD is new, you need to learn how to initialize an SSD.
Stage 2. Install OS on NVMe Drive
The most complicated stage of the process involves cloning or migrating your old boot drive to the new NVMe SSD, as inserting the drive with the standard process can result in data loss.
Guide 1. Migrate OS to NVMe SSD
Migrating the current OS to the NVMe SSD is the best way to get a clean install of Windows for your new drive, which can be achieved using Qiling Disk Master to simplify the process.
To migrate your Windows OS to a new NVMe SSD, follow these steps: First, make sure your system is compatible with the new SSD, then purchase and install the new drive. Next, download and run the Samsung Magician or Intel SSD Toolbox software, depending on your SSD brand, to clone your existing drive to the new one.
Note: When migrating an operating system to an SSD or HDD, be aware that the process will delete and remove existing partitions and data on the target disk if there's not enough unallocated space. If you have important data on the target disk, back it up to an external hard drive before proceeding.
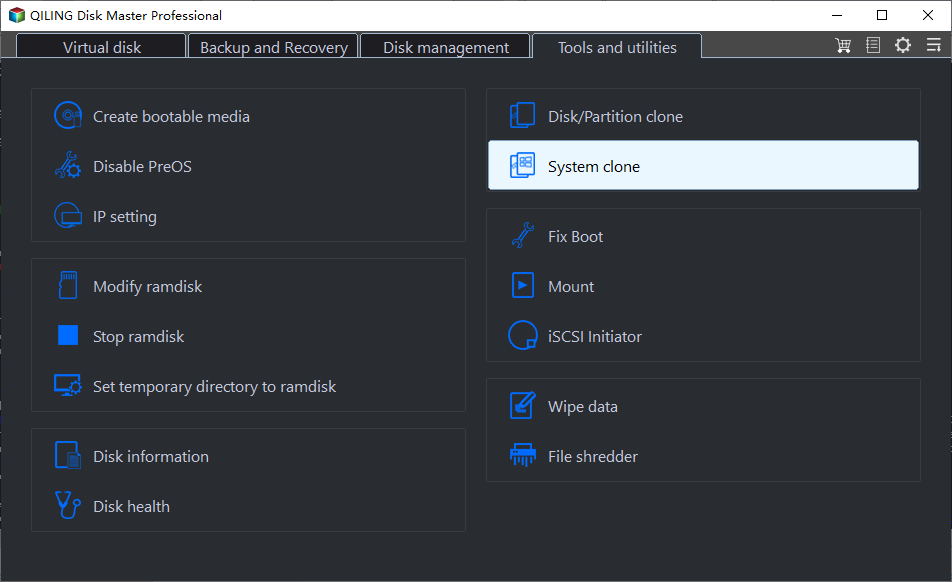
Step 1. To select the "Tools" tab page and proceed with the system clone, navigate to the specified section, select the "System Clone" option, and then click the "Next" button to continue with the process.
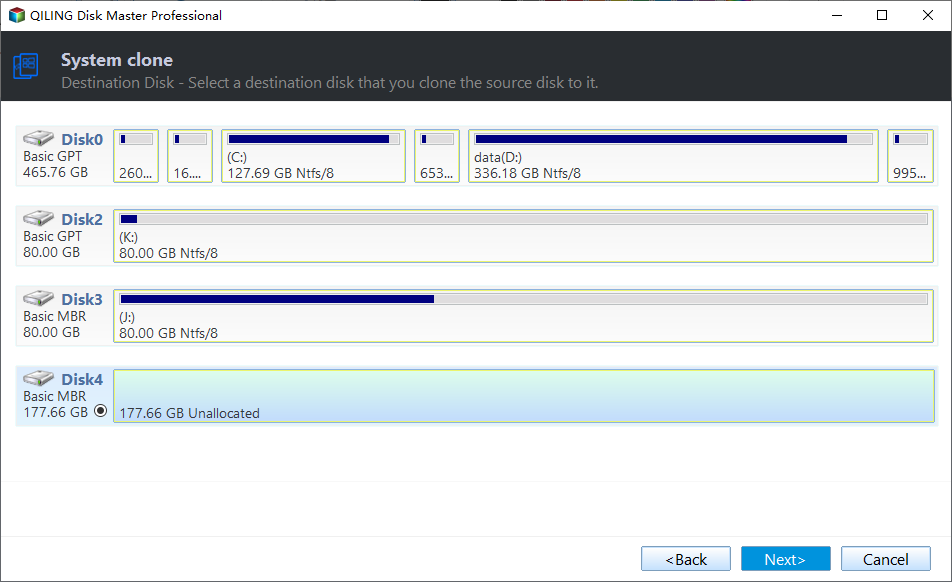
Step 2. Select the target disk you want to clone. Click "Next".
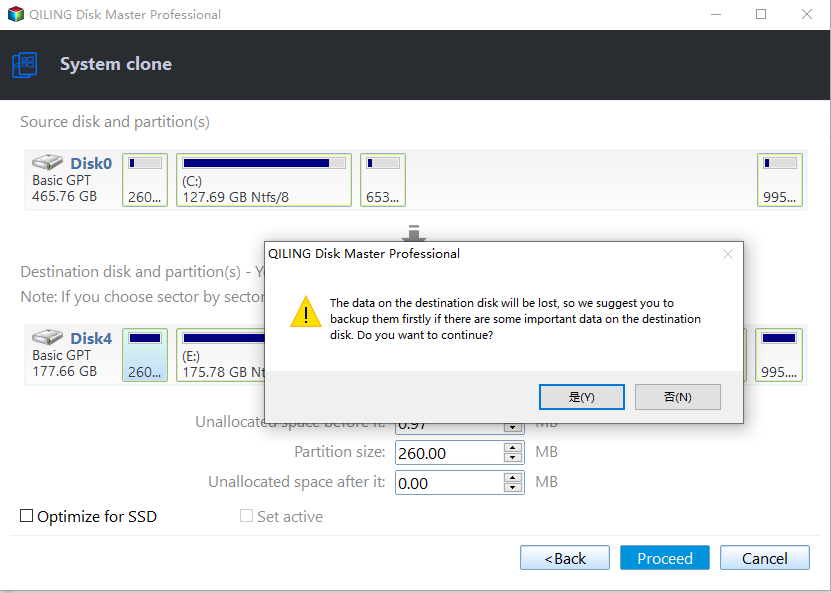
Step 3. To proceed with the process, click "Yes" on the warning message after verifying the intended deletion of data and partitions on the target disk. Ensure that all important data has been backed up beforehand, and if not, do it immediately to avoid any potential loss.
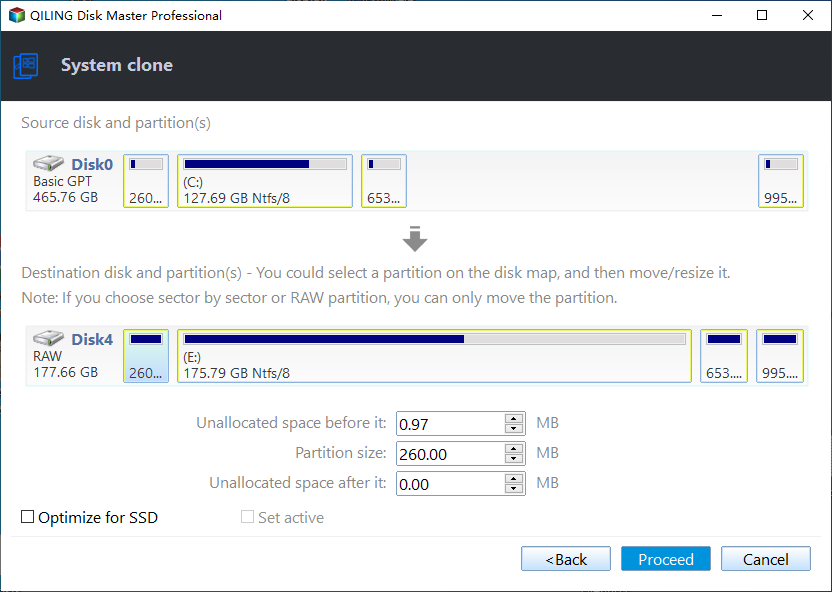
Step 4. Preview the layout of your target disk, and customize it if needed, then click "Start" to initiate the OS migration to the new disk.
Step 5. When you see a confirming message, select "Adjust the order to boot from the clone target disk" and click the respective button to start the computer from the cloned disk.
- Reboot Now: It means to reboot the PC and boot OS from the new disk immediately.
- Done: it means to make the changes later.
Guide 2. Clone the Old Boot Drive to NVMe SSD
Cloning your old boot drive is a great way to make your NVMe SSD work normally, preserving your data and keeping everything as it previously was, resulting in an exact copy of files, apps, and media on your new NVMe drive.
To clone your old boot drive to your NVMe SSD using Qiling Disk Master, simply follow these steps: First, download and install Qiling Disk Master on your computer. Next, launch the software and select the source drive (your old boot drive) and the destination drive (your NVMe SSD) from the list of available drives.
Step 1. Select the source disk.
- To clone a disk, click the "Clone" button from the left menu, select the desired cloning option (either "Clone OS Disk" or "Clone Data Disk") and proceed with the next step by clicking "Next".
- Choose the source disk and click "Next".
Step 2. Select the target disk.
- Select the desired hard drive or solid state drive as the destination, then click "Next" to proceed.
- Read Warning message and confirm "Yes" button.
Step 3. View the disk layout and edit the target disk partition size.
To reformat a disk, open the Disk Management tool, select the target disk, and click "Delete Volume" or "Wipe Disk" depending on the system. The program will then warn that it will delete all data on the disk, so be sure to back up any valuable data beforehand. After confirming, the disk will be reformatted and all data will be erased.
You can customize your disk layout by selecting "Autofit the disk", "Clone as the source", or "Edit disk layout" - the last option being best if you want to leave more space for the C drive.
Step 4. Click "Start" to start the disk cloning process.
Qiling Disk Master offers many benefits and helps you optimize and manage your storage drives, including features such as disk cleanup, disk cloning, and disk partitioning, among others.
- You can upgrade to the latest Windows 11 build or your current Windows 10 build using the Windows Update feature.
- Fixing low disk space and disk partition problems can improve performance by freeing up storage space for other files and ensuring that your system has enough room to operate efficiently.
- Format storage drives. This helps you format new and old drives to the latest format.
- To enable the default Windows bootable partition manager option, you can use the built-in feature in Windows to create a bootable partition manager. This feature allows you to manage your partitions and enable the bootable partition manager option, which is typically used to create a bootable USB drive or CD/DVD. To access this feature, go to the Start menu, type "partition manager" in the search bar, and select the "Create and format hard disk partitions" option. From there, you can create a new partition, format an existing one, or enable the bootable partition manager option.
- Aligning your SSD to the 4K format can improve its performance and extend its lifespan by keeping your PC running smoothly.
Don't hesitate to install it on your PC. Let's head to the final stage to set your SSD as the boot drive.
Stage 3. Set NVMe SSD as Boot Drive
After finishing the previous two stages, you must set the NVMe SSD as the new boot drive. To do so, follow the steps below:
Step 1. To restart your computer and enter the BIOS, simply shut down your computer, wait a few seconds, and then press and hold one of the following keys as your computer is booting up: F2, F10, or Delete. The specific key may vary depending on your computer's manufacturer and model, so you may need to check your user manual or online documentation for guidance.
💡Note: The key to enter BIOS may vary depending on the PC or laptop model. It's best to check online for the specific key for your device before attempting to access the BIOS.
Step 2. Navigate to the boot order settings in the BIOS panel.
Step 3. Set your NVMe SSD as the primary boot device and click "Save" to save the changes.
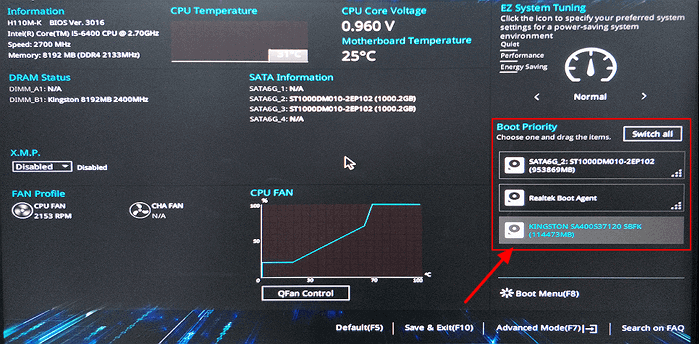
Step 4. Finally, exit the BIOS screen and reboot your PC.
That's it. You've successfully swapped your boot drive to your new NVMe SSD.
You may also like:
Conclusion
This guide offers an easy-To set up your NVMe SSD as the primary boot drive, follow this straightforward method with three stages. First, prepare your system by shutting down your computer and physically installing the NVMe SSD into your motherboard. Next, boot up your system and enter your BIOS or UEFI settings to configure your NVMe SSD as the primary boot drive. Finally, save your changes and exit the BIOS or UEFI settings, and your system should now boot from the NVMe SSD, offering you the best performance for your games and productivity apps, as well as the fastest boot times.
Whether you're new to NVMe SSDs or looking to optimize your existing setup, this guide has provided you with the necessary information and practical steps to get started. To take your setup to the next level, download Qiling Disk Master and set your NVMe SSD as the primary boot drive today, and feel free to share this article with others who may benefit from it.
Boot From NVMe SSD FAQs
If you have questions about booting from an NVMe SSD or setting it as the primary drive, you can check our FAQ section which may have the answers you're looking for.
1. Why doesn't BIOS recognize NVMe SSD as a boot drive?
There may be multiple factors that can cause the issue of the BIOS not recognizing the NVMe SSD as a boot drive, with common reasons including incorrect BIOS settings, outdated BIOS, or an NVMe SSD that is not properly connected or configured.
- Outdated BIOS version
- Incorrect BIOS settings
- Faulty NVMe SSD
Updating your BIOS version and ensuring the NVMe SSD is properly seated in the slot can resolve this problem.
2. How to boot NVMe SSD from legacy BIOS?
To boot from your NVMe SSD using the legacy BIOS, enable the "Legacy Boot" option and set your drive as the primary boot option, then save the settings and reboot your PC.
3. Why can't I boot from M.2 NVMe SSD?
You're unable to boot from your M.2 NVMe SSD drive, which could be due to several reasons. The drive might not be recognized by your system, or the boot order might be set incorrectly.
- M.2 slot not working
- Incorrect BIOS settings
- The drive is not formatted correctly
To ensure the M.2 SSD is compatible with your system, verify that your motherboard supports the NVMe standard and that the M.2 port is rated for NVMe, not just SATA.
Related Articles
- How to Format M.2 SSD in Windows 10 [Detailed Instruction]
- Top 8 Best Free Windows 10 Disk Management Tools (2024 Update)
- How Do I Open/Access Disk Management In Windows 11? All Methods You Can Get
- Free Format Hard Drive Partition with Qiling Disk Master
To free format a hard drive partition, you can use Qiling Disk Master, a software that allows you to separately format each partition on a hard drive. - ASUS Laptop Slow in Windows 11/10? 7 Effective Fixes!
If your brand new ASUS laptop is running slow on Windows 11/10, this post provides effective solutions to fix the problem. The methods provided can be applied to various ASUS models, including the a53u, i7, x541u lento, x102b, and more. - 2 Effective Ways to Fix Asus Recovery Partition Missing Problem
If you've deleted the Asus recovery partition or it's missing. You can recover or recreate it using a professional partition recovery tool or manually create a new recovery partition.
Products
Articles & Tutorials
- Data Recovery
- Data Backup
- File Recovery
- File Backup
- System Backup and Restore
- Disk and Partition Clone
- Technical articles
- Mobile articles
- Disk Master Help
- Windows Data Recovery Tutorials
- Windows Secure Delete Tutorials
- Windows Partition Management Tutorials
- Windows File Backup and Restore Tutorials
- Windows System Backup and Restore Tutorials
- Windows Disk Backup and Restore Tutorials
- Windows Clone Tutorials