Disk Queue Length and Latency: Is the Drive the Bottleneck?
Quick Navigation:
- The Three Numbers That Describe a Disk
- What Good and Bad Values Look Like
- Measure at the Right Time
- Replace the Slow Drive with Qiling
- Frequently Asked Questions
A slow computer is blamed on the disk far more often than the disk is actually at fault. Three counters settle the question: how long each request waits, how many requests are waiting, and how much of the time the disk is busy.
The Three Numbers That Describe a Disk
Avg. Disk sec/Transfer is the average time a request takes from arrival to completion, in seconds. Read it as milliseconds by multiplying by 1,000. The Read and Write variants show whether one direction is worse, which is common on a drive that is failing or on a volume that is being written heavily.
Avg. Disk Queue Length is the average number of requests waiting for the disk, including the one in service. A queue by itself is not a fault: a disk that serves requests quickly can keep a short queue and still be healthy. The number only becomes meaningful when it stays high while latency also stays high.
% Idle Time shows how much of the sample window the disk spent with nothing to do. Near zero means the disk is busy all the time; near 100 with a slow application means the bottleneck is somewhere else, usually memory or the network.
All three are available under the PhysicalDisk counter set, which reports the hardware. The LogicalDisk set reports volumes and is useful when several volumes share one physical drive.
What Good and Bad Values Look Like
For a mechanical drive, average latency below 10 ms is healthy, 10 to 20 ms is normal under load, and anything sustained above 25 ms is felt by users. Above 50 ms, applications start to time out and the drive is the bottleneck by any definition.
For a SATA SSD, latency should stay under 1 ms; an NVMe drive should stay well under that. Sustained latency above 5 ms on an SSD points to overload, thermal throttling, or a drive that is retrying failing blocks rather than to normal behaviour.
Queue length has to be read per spindle. A single mechanical drive that sustains a queue above two per spindle is saturated; an array of eight drives can carry roughly sixteen outstanding requests before the same pressure appears. SSDs accept much deeper queues, so a large queue on an SSD is only a warning when latency rises with it.
Look for the shape of the graph, not only for one spike. Regular spikes every few seconds suggest a background job or an antivirus scan. A slow, rising trend with a rising queue points to a drive that is falling behind. Isolated spikes with normal averages usually come from a single large copy.
Measure at the Right Time
Collect during the period users complain about, not during a quiet hour. Add the PhysicalDisk counters to Performance Monitor with a one-second sample for a short test, or a fifteen-second sample for an hour-long capture, and keep the machine's own workload in mind while you read the result.
Resource Monitor is faster for a first look. Its Disk tab lists response time and queue length per file, which often names the process responsible without any further work.
Inside a virtual machine, measure both layers. A guest can show a long queue simply because the host is busy with other guests, in which case replacing the guest's virtual disk changes nothing.
Before you conclude that the drive is too slow, rule out paging and background scanning. Both create the same pattern of high queue and high latency, and both disappear once memory is added or the scan is rescheduled. A drive that is simply too small for the workload is the last explanation, not the first.
Replace the Slow Drive with Qiling
When the counters show a healthy but underpowered drive, the fix is hardware. Qiling Disk Master clones the existing installation to a larger or faster disk so the system, the applications, and the settings move together without a reinstall.
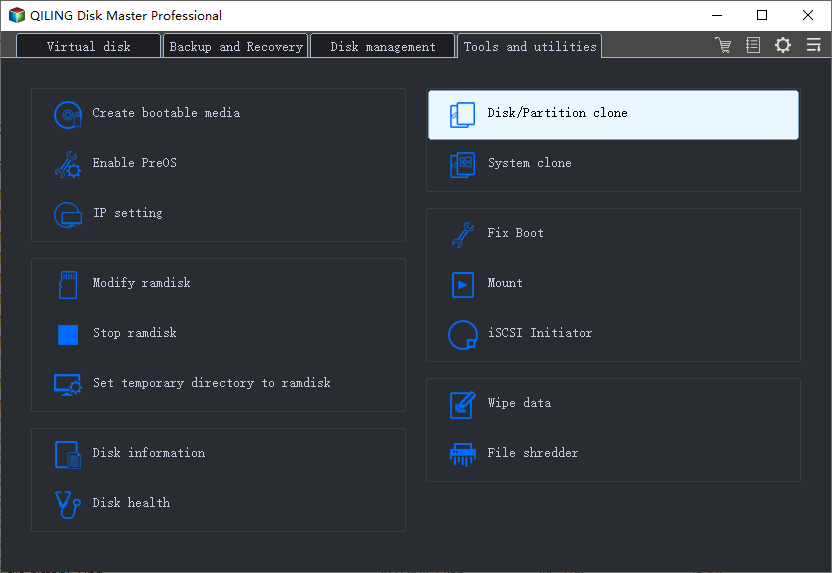
Step 1. Choose Disk Clone
Connect the new drive, open the program, and choose Clone > Disk Clone. A full disk clone copies the boot configuration as well as the data, which is what allows the new drive to start Windows on its own.
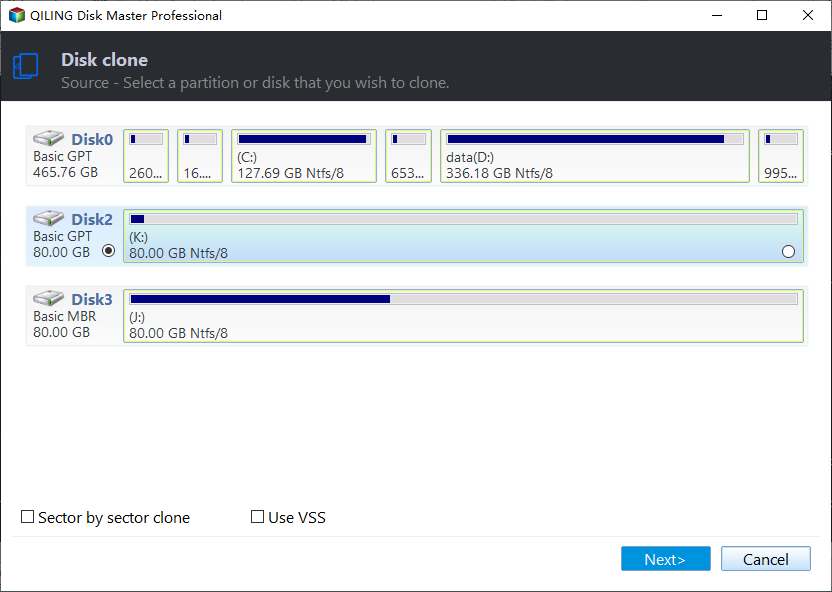
Step 2. Select the Source Disk
Pick the disk that currently holds Windows and confirm its capacity and model. On a machine with more than one drive, check the disk number and size against the values you noted before the clone, so the source is the slow system disk and not a data-only drive.
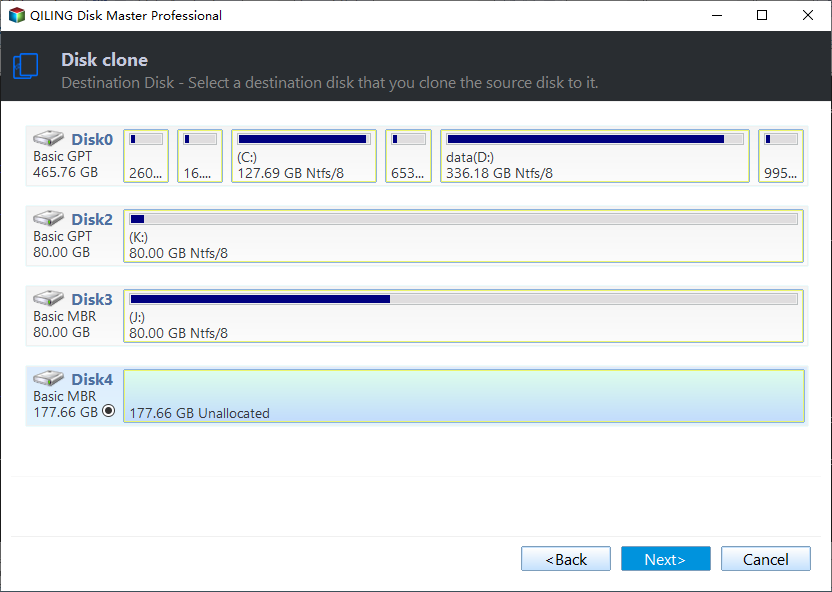
Step 3. Select the Destination
Pick the target disk and confirm its capacity and model. Everything already on the destination is removed, so a drive that still holds data must be copied off first.
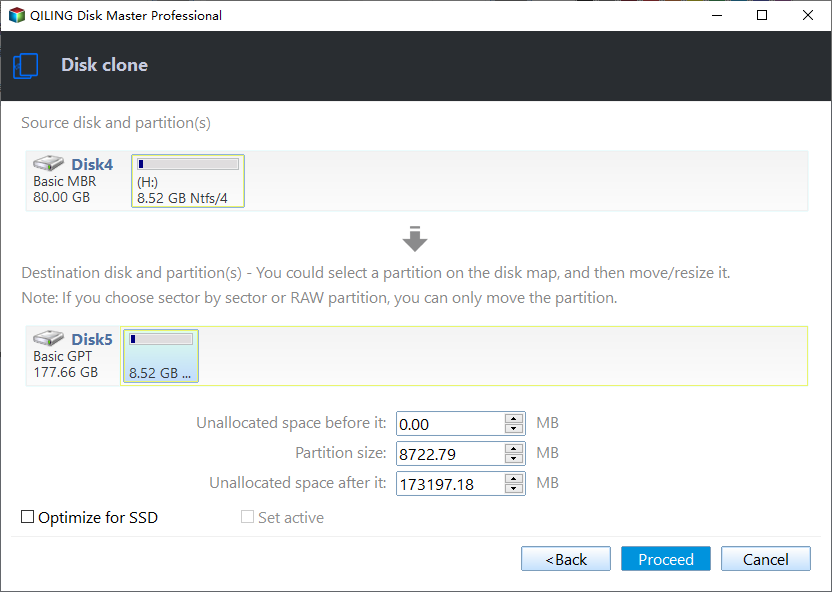
Step 4. Preview, Proceed, and Boot
Check the clone options, especially the choice to let the target use the full capacity, then click Proceed. Shut the machine down, change the boot order, and confirm the new drive starts before the old one is wiped or reused.
Frequently Asked Questions
Is a long queue always a problem?
No. A queue means work is waiting, not that the disk is failing. It only matters when latency rises at the same time.
Which counter should I watch first?
Average disk seconds per transfer. It maps directly to how long a user waits, and it is easy to compare between machines.
Can a cache hide a slow disk?
It can hide repeated reads, which is why a benchmark may look fine while the workload still stalls. See thermal throttling and cache behaviour for the other pattern.
Why does throughput collapse on large copies?
A shingled drive or a full SLC cache explains a fast start followed by a long slow tail. The average latency then rises even though the drive is not failing.
If the drive is old enough to be replaced, check its health first with a disk health check in Windows.
Related Articles
- How to Check Disk Health in Windows
- How to Check If a Hard Drive Is Failing Using SMART
- Check SSD TBW and Total Bytes Written on Windows
- Clone a Windows Server 2025 System Disk to an SSD
Products
Articles & Tutorials
- Data Recovery
- Data Backup
- File Recovery
- File Backup
- System Backup and Restore
- Disk and Partition Clone
- Technical articles
- Mobile articles
- Disk Master Help
- Windows Data Recovery Tutorials
- Windows Secure Delete Tutorials
- Windows Partition Management Tutorials
- Windows File Backup and Restore Tutorials
- Windows System Backup and Restore Tutorials
- Windows Disk Backup and Restore Tutorials
- Windows Clone Tutorials