Tutorial: Install a New Hard Drive on Windows 11 Safely
In this short how-To install a new hard drive on Windows 11 and Windows 10 without data loss or performance issues, follow this guide. Upgrading your hard drive can be a tricky task for non-technical individuals, but with this guide, you'll be able to perform the task on your own. By reading this short how-to guide, you'll learn the complete procedure and understand everything to avoid any potential loss. This guide will walk you through the process step-by-step, ensuring a smooth and successful installation of your new hard drive on your Windows 11 or Windows 10 system.
| ⚙️Complex Level | Technical knowledge is required |
| ⏱️Duration | 10-20 Minutes |
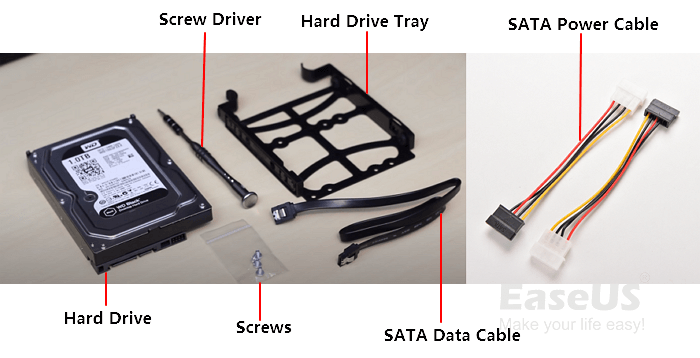
| 💻Tools | The items needed for the hard drive installation include a new hard drive, SATA data cable, power cable, screwdriver, and some screws, which will be used to secure the hard drive tray. |
| ✏️Stages |
Please look at the picture below for a better of the necessary tools.
Stage 1. Install a New Hard Drive on Windows 11
To install a new hard drive on Windows 11, first, you need to prepare the necessary tools and equipment such as a screwdriver, a can of compressed air, a Torx screwdriver, and the new hard drive itself. Next, shut down your computer and unplug the power cord.
Kindly carefully follow these instructional steps:
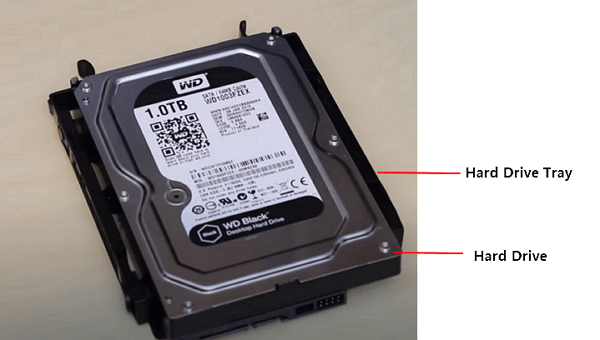
Step 1. Insert your hard drive into the hard drive tray and tie it using screws.
Step 2. To connect the SATA data cable to your computer's motherboard, you'll need to access the computer case and locate the SATA ports on the motherboard. Once you've found the correct port, carefully insert the other end of the SATA cable into the port, making sure it's securely seated.

Step 3. To prepare for the installation of a hard drive, set the SATA cable and Power cable in the designated area where the drive will be installed. This typically involves locating the available SATA ports and power connectors on the computer's motherboard and connecting the cables from the drive to these ports, ensuring a secure fit and proper alignment.
Step 4. Connect the power cable and SATA cable to your hard drive.

After installing a new hard drive on Windows 11, you need to initialize and partition it to make it usable and avoid the "Windows 11 hard drive not showing up" error. This involves formatting the drive and creating a partition scheme to store data. By following these steps, you can successfully utilize your new hard drive and ensure it's properly integrated with your Windows 11 system.
To proceed, follow the 2nd stage steps to initialize and partition the new hard drive for use. This will make the drive accessible and ready for use.
Stage 2. Initialize and Partition the New Hard Drive for Use
To successfully install an operating system on your PC, you must initialize and partition the hard drive. This stage is critical as it is necessary to initialize and partition after installation to ensure the OS functions correctly and usually.
To initialize and partition a new hard drive, we use a simple and easy method with Qiling Disk Master, a tool that allows us to easily initialize and partition a new hard drive and offers additional features to manage partitions completely. This makes it a convenient option for anyone looking to quickly and effortlessly initialize and partition a new hard drive.
To initialize and partition a new hard drive, follow these steps. First, initialize the hard drive by booting from a Windows installation media, navigating to the "Troubleshoot" section, and selecting "Command Prompt." Then, type "diskpart" and press Enter to open the Disk Management utility.
Guide 1. Initialize a New Hard Drive on Windows 11
Step 1. Open Qiling Disk Master and got to Partition Manager.
Step 2. Right-click the target disk, select "Initialize to MBR" or "Initialize to GPT" depending on the disk type, whether it's an HDD or SSD.
There is no article to read. This conversation just started.

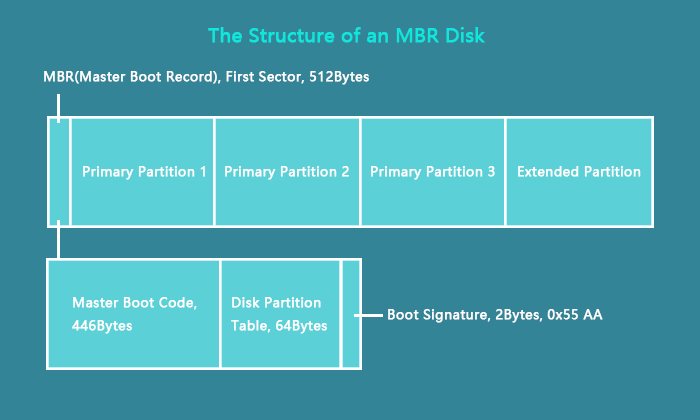
The main difference between Master Boot Record (MBR) and GUID Partition Table (GPT) lies in their approach to disk partitioning. MBR, used in older systems, stores a single partition table in the first sector of the disk, which can lead to limitations such as a maximum of 4 primary partitions per disk.
MBR (Master Boot Record) and GPT (GUID Partition Table) are two popular partition styles used on Windows-based computers. They define the layout of storage devices like HDDs (Hard Disk Drives) or SSDs (Solid-State Drives).
Guide 2. Partition a New Hard Disk on Windows 11
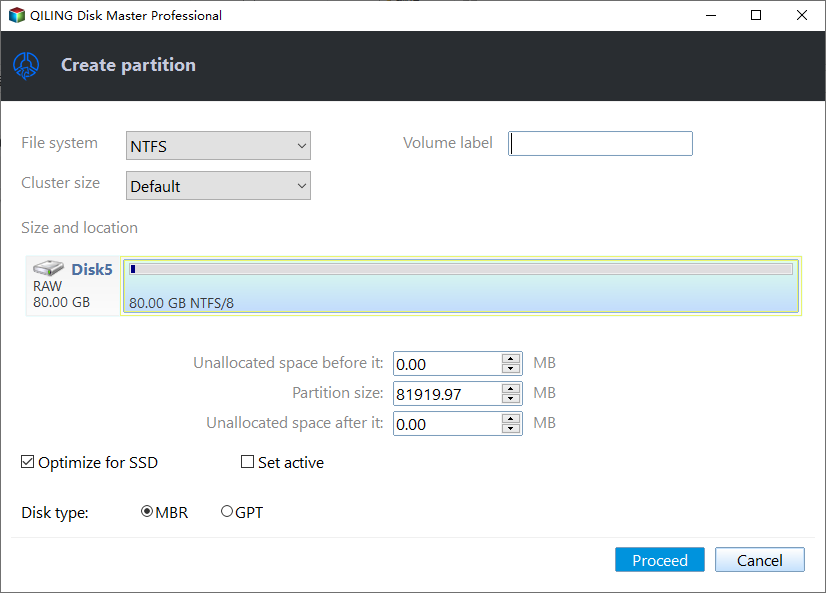
Step 1. To create a new partition on the empty disk, open Qiling Disk Master and navigate to the Partition Manager. Right-click on the empty disk and select the "Create" menu from the context menu.

Step 2. Set the type of partitions you need to create, and set the partition style to your disk - MBR or GPT, which will determine the maximum number of partitions you can have.
You can either manually configure the settings in Qiling Disk Master or accept the default settings offered by the program. If you choose to accept the default settings, click "Proceed" once you're done.
Step 3.Waiting to finalize partitioning the new HDD/SSD or external disk.
Key Features of Qiling Disk Master:
- Initialize a hard drive
- Migrate Windows 11 to the new SSD/HDD
- Install a second hard drive on Windows PC
- Initialize disk to MBR/GPT
- Format the hard drive to FAT32/exFAT/NTFS for Windows 11
You can download the Qiling Disk Master to initialize and partition your new hard drive and enjoy other valuable features.
BONUS Tips for Moving Windows 11 to New Disk Drive
To move Windows 11 to a new hard drive without professional help, you can utilize the Migrate OS feature in Qiling Disk Master. This process allows you to transfer the operating system to the new drive, making it a convenient option for those who prefer to do it themselves. For a step-by-step guide on how to accomplish this, you can visit the provided link, which details the process of moving Windows 11 to another drive.
Customize an online service to help professionals execute this task.
Qiling experts offer one-on-one manual services 24/7 to resolve various Windows configuration issues, providing free evaluation services and utilizing their expertise to diagnose and fix Windows update errors, installation issues, and other daily OS problems.
- 1. To fix Windows update errors, such as update failure or unable to upgrade Windows, try restarting your computer, running the Windows Update troubleshooter, checking for disk space issues, and ensuring your internet connection is stable. You can also try disabling any third-party security software that may be interfering with the update, and checking the Windows Update history to see if there are any pending updates.
- 2. To successfully download and install the latest Windows operating system on your PC, follow these steps: Ensure your computer meets the minimum system requirements for Windows. Check the official Microsoft website for the latest version of Windows and its system requirements.
- 3. To resolve daily Windows system errors, focus on updating drivers, adjusting permission settings, and tweaking account configurations. Ensure that all drivers are up-to-date to prevent compatibility issues, and run the built-in System File Checker (SFC) to scan for corrupted system files. Also, check and adjust permission settings for files and folders to avoid access denied errors.
Why Install a New Hard Drive on Windows 11
Upgrading your hard drive can provide increased storage capacity, improved performance, and a more efficient gaming experience, as well as better file management and backup options.
Here are some reasons/advantages of installing a new hard drive:
- Expanded Storage Capacity: Installing a new hard drive provides more space for files, applications, and multimedia content.
- Upgrading to a faster solid-state drive (SSD) can significantly improve performance by reducing boot times, launching applications quickly, and enhancing overall system responsiveness.
- Enhanced Gaming Experience: A new SSD (solid-state drive) can significantly enhance gaming performance by reducing loading screens and providing faster data transfer, resulting in a smoother and more enjoyable gaming experience.
- Efficient File Management: Professionals with large files can store more data, allowing for better organization and easier access to their work files.
- Backup and Redundancy: Installing a new hard drive allows for dedicated backup storage, protecting valuable data from loss or corruption, and can also enable redundancy measures.
After installing a new drive on your PC, you can start using it. This includes installing Windows on the new drive, allowing you to utilize its storage capacity and potentially improve your computer's performance. For more information on how to proceed, you can click the provided link.
How to Install Windows 10 on Second Hard Drive
This tutorial will guide you through the process of installing Windows 10 on a second hard drive or SSD. You can use either Qiling Disk Master for a quick OS migration or the Windows Media Creation Tool to create a bootable installation CD.
If you found this article helpful, please share it with your friends who may benefit from the tips and tricks for optimizing storage, improving system performance, and enjoying seamless computer use.
Conclusion
Installing a new hard drive on Windows 11 or 10 can upgrade your computer's storage capacity, performance, and gaming experience, while also improving file management and backup options, and can be done safely by following proper procedures.
After physically installing a new hard drive, it's essential to initialize and partition it to make it usable. Qiling Disk Master is a helpful tool that can assist with this process efficiently. By following this guide, you can empower yourself and others to optimize their storage solutions and enhance their overall computing experience.
You may also like:
Install a New Hard Drive on Windows 11 FAQs
Let's read the below frequently asked questions if you have any queries or questions about how to install a new hard drive on your Windows 11:
1. Why is my Windows 11 new hard drive not showing up?
If your new hard drive isn't appearing in Windows 11, check that it's properly connected and powered, then access Disk Management to see if it's recognized but needs initializing and partitioning. If it still doesn't show, try updating system drivers or seek professional help.
2. How to format a new hard drive on Windows 11?
To format a new hard drive on Windows 11, insert the hard drive and connect it to your computer. Open the Disk Management tool by typing `diskmgmt.
Step 1. Go t Disk Management.
Step 2. Right-click on a new drive and choose the Format option.
Step 3. Confirm the name of the drive in the 'Volume label' section and select NTFS in the 'File System' setting.
Step 4. Check the 'Perform a quick format' option and optionally 'Enable file and folder compression' to optimize storage on your device. Then, click the OK button.
3. How to install Windows 11 on a new hard drive?
To install Windows 11 on a new hard drive, start by creating a bootable USB drive or CD/DVD with the Windows 11 installation media. Next, connect the new hard drive to your computer and ensure it's recognized by your system.
Step 1. Create a bootable USB with the Windows 11 installation media.
Step 2. Insert the USB drive into your laptop/PC and restart it.
Step 3. To boot from a USB, enter the boot menu, select your USB using the arrow keys from your keyboard, and press the Enter button.
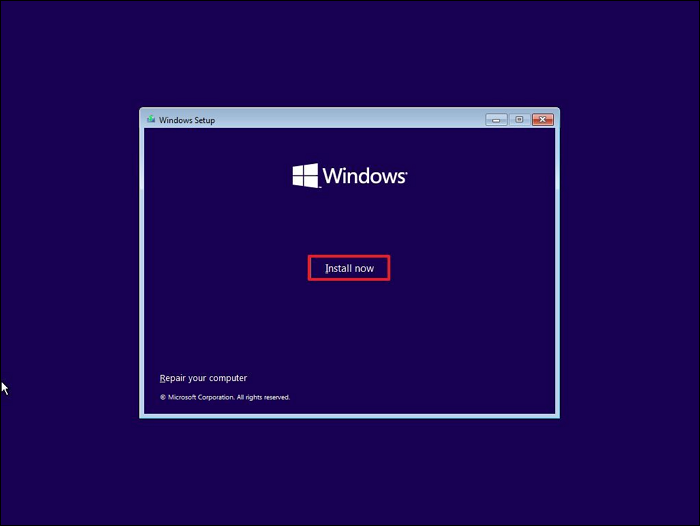
Step 4. You'll be taken to the installation screen, where you can set up Windows.
Step 5. Hit Next and then Install Now. Follow further on-screen instructions.
Related Articles
- Fix The File or Directory Is Corrupted and Unreadable in Windows 10/8/7
- Solved: SSD Not Showing Up in Disk Management on Windows 10/11/8/7
- How to Burn ISO to DVD on Windows 10/11 (Step-by-Step Tutorial)
- Need to Delete the Recovery Partition in Windows 8.1, How?
If you want to delete the recovery partition in Windows 8.1 to free up space for your C drive, you are using the right guide. By reading this post, you will learn two applicable methods. - How to Format DVR Hard Drive for PC
You can easily format a DVR hard drive to NTFS, FAT32, EXT2, EXT3 file system for normal use on a PC! This article provides you with four effective solutions on how to format a DVR hard drive with a hard drive formatter, Disk Management, Windows explorer, and CMD. Follow the detailed guide here and format a DVR hard drive for PC all by yourself. - How to Increase C Drive in Windows Server
Are you running low on space on your C drive? there are several default and built-in methods to increase your C drive space. You can try deleting unnecessary files, uninstalling unused programs, and cleaning up temporary files to free up some space.