Lenovo SSD Upgrade: 2024 Step-by-Step Tutorial on How
Lenovo SSD upgrades are a popular choice for boosting computer performance and dependability. SSDs offer several benefits over traditional hard disk drives (HDDs), including faster speeds, greater robustness, and lower power consumption. Many users seek a straightforward guide to upgrade their Lenovo system with an SSD, and here's a real-life example.
You can replace your laptop's hard drive with an SSD using a few simple tools and following some straightforward steps. Here's a brief guide to get you started: First, back up your important files and data to an external drive or cloud storage. Next, purchase an SSD that is compatible with your laptop's model and size. Then, shut down your laptop and unplug it. Remove the screws that hold the hard drive in place, and gently pull it out. Disconnect the SATA and power cables, and remove the hard drive.
Qiling will help you solve this problem. First, see the table of the SSD upgrade process for your Lenovo Laptop: 1. Shut down your laptop.
| 🚩Stage | 🔨Tools Required | 🔎Duration |
|---|---|---|
| 💡Preparation | Screwdriver, antistatic wrist strap | 3-5 minutes |
| 💻Cloning | Qiling Disk Master | 3-5 minutes |
| 💽Physical Upgrade | New SSD, SATA cable (if necessary) | 10-20 minutes |
| 🔦Verification | BIOS check, Change boot | 5-7 minutes |
To upgrade your Lenovo IdeaPad 3, Thinkpad, IdeaPad L340, or IdeaPad 330 with a new SSD without risking your data, follow these steps. First, ensure you have backed up all your important files to an external drive or cloud storage. Next, shut down your laptop and unplug the power cord. Remove the bottom panel to access the SSD slot, taking care not to damage any cables or components.
Before diving into the topic, you need to ensure that you have essential tools at hand.
Preparation before Lenovo SSD upgrade:
- Screwdriver, Antistatic wrist strap, New SSD, SATA cable (if necessary)
- Disk cloning tool
To upgrade your Lenovo laptop to an SSD, you can download Qiling Disk Master to clone your data from the old drive to the new SSD, transferring your files and operating system without losing any original data.
After the preparations, let's get started!
Stage 1. Connect the SSD to Lenovo Laptop
If you're considering upgrading your Lenovo laptop's SSD, look for an M.2 or SATA SSD with a large capacity and high performance to improve lifespan, storage, and overall performance.
Step 1: To connect your SSD to your laptop, you may need an external adapter that supports your M.2 or SATA drive, depending on the type of SSD you have.
Step 2: Connect your New SSD via a USB port and check if it is showing in the file explorer. If it does, you're good to go!
- Notice:
- If it's a brand-To use a new SSD, you need to initialize it before you can use it. This process, also known as formatting, prepares the drive for use by erasing any data that may have been left on it by the manufacturer.
To clone the data from the old drive to the new SSD, you can use a cloning software such as Qiling Backup. These tools will create an exact copy of the old drive's contents on the new SSD, including the operating system, programs, and files.
Stage 2. Clone the Lenovo to the New SSD
Cloning software can transfer files, applications, and operating systems, making Qiling Disk Master a useful tool for cloning everything, including files, applications, and the entire operating system, with minimal data loss.
This cloning tool is a great resource for upgrading or replacing a faulty SSD, offering a user-friendly interface that makes it easy for newbies to navigate the cloning process. With detailed instructions, the software guides you through the data transfer process, making it effortless to understand and execute. Whether you're looking to boost performance or simply replace a faulty drive, this tool can help.
To clone your data, download the trial version of this disk cloning software and follow this step-by-step guide. The process involves using the software to create an exact copy of your data, which can be useful for backing up important files or transferring data to a new device.
Step 1. Select the source disk.
- To clone a disk, click the "Clone" button in the left menu, select "Clone OS Disk" or "Clone Data Disk" depending on your needs, and then click "Next".
- Choose the source disk and click "Next".
Step 2. Select the target disk.
- Select the desired hard drive or solid-state drive as the destination and click "Next" to proceed.
- Read Warning message and confirm "Yes" button.
Step 3. View the disk layout and edit the target disk partition size.
Then click "Continue" when the program warns it will wipe out all data on the target disk. (If you have valuable data on the target disk, back up it in advance.)
You can customize your disk layout by selecting "Autofit the disk", "Clone as the source", or "Edit disk layout", with the last option being ideal if you want to leave more space for the C drive.
Step 4. Click "Proceed" to start the disk cloning process.
Qiling Disk Master has successfully transferred all original data, including the OS, to a new SSD. This tool offers a range of features, including data transfer capabilities.
Key Features
- High-speed cloning saves time and effort.
- Clones entire operating systems and applications
- Creates precise images of drives or partitions via Sector-by-Sector cloning
- Customizes partition size during the cloning process
- Advanced algorithms to protect cloned data
- Generates bootable clones to recover data in a disaster situation
Install this clinging tool on your laptop. It will help a lot when you want to upgrade your laptop.
Stage 3. Replace the Lenovo Disk with the Cloned SSD
To replace your old Lenovo disk with the new cloned SSD, carefully follow these steps: First, shut down your Lenovo device. Next, disconnect the power cord and any other cables from the old disk.
Step 1: Turn off your laptop and detach the charger, battery, external SSD, etc.
Step 2: To discharge the power from the system, hold the "Power button" for at least five seconds. This is the first step in the process of resetting the system.
Step 3: Carefully place the laptop upside down on a flat surface and remove the screws to open the backup panel.
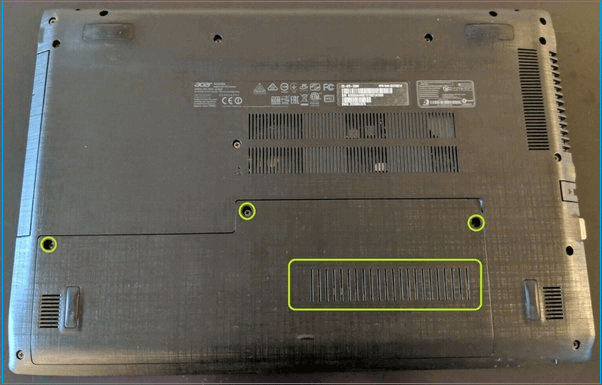
Step 4: Move the laptop upside and remove the keyboard.
💡Note: Please check your laptop manual for specific instructions to remove the keyboard.
Step 5: Make sure the screws, access panel, and keyboard are stored in a safe place.
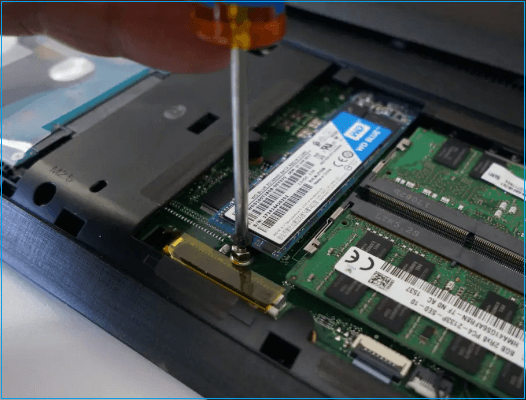
Step 6: The exact SSD removal procedure may vary depending on your SSD type, so we'll provide separate instructions for M.2 SSDs and SATA SSDs to make things easier.
M.2 - To replace an M.2 SSD, remove the screws holding the old one in place, then gently slide it out of the slot. Insert the new M.2 SSD into the slot, making sure it's securely seated and the screws are tightened. The slot is usually labeled "M.2," "NVMe," or "SSD" on the motherboard.
SATA SSD - The storage bay of the SATA SSD in a Lenovo laptop can be located either under the keyboard or at the bottom of the motherboard, depending on the specific model of the laptop.
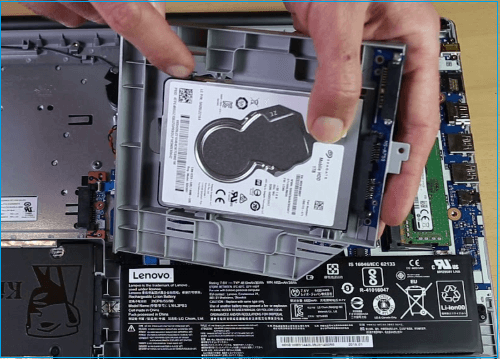
- SATA SSDs are typically secured by manufacturers due to their size, often using safe mechanisms such as metal brackets.
- To replace a new SSD, remove any fasteners or clips holding the old SSD in place. Then, take the new SSD and attach it to the device, ensuring it's securely fastened with the original fasteners or clips. Finally, connect the new SSD with SATA and power cables.
Step 7: Assemble the backup panel and keyboard, securing them with screws.
Step 8: Once the new SSD is installed, plug in the power cord and reconnect the battery. Then, power on the device to verify that it boots normally and the new SSD is recognized.
The video from UFIXTEK provides more information on upgrading the Lenovo SSD.
You May Also Like:
The system should automatically boot from the cloned drive and run the cloned operating system without requiring any user intervention.
Stage 4. Set the New SSD as Boot Drive on Lenovo Laptop
If the drive isn't recognized, you might need to change the boot order in the BIOS settings manually.
Follow these quick steps to change the boot order:
Step 1: To access the BIOS configuration, restart your computer and press the correct key, which is usually F2, F12, Del, or Esc, depending on your computer model.
💡Note: The key can be Del or any function key between F2 to F12.
To find the BIOS key for your Lenovo laptop, you can search online for the specific model number of your laptop along with the keywords "BIOS key" or "BIOS password reset." This will likely yield results from Lenovo's official support website or other reputable sources that provide the BIOS key for your particular laptop model.
Step 2: Once you enter the BIOS settings, look for the "Boot" or "Boot Order" options and use the arrow keys to browse the BIOS menu.

Step 3: To move the SSD to the first top of the list, you can use the "+" key to move it up and the "-" key to move it down. Simply navigate to the SSD in the list, press the "+" key until it reaches the top, and then press the "-" key to move any other items below it. This will ensure the SSD is at the top of the list.
Step 4: Press the "F10" key to save changes or select the "Save and Exit" option.
You can enjoy using the upgraded SSD on your Lenovo laptop.
Conclusion
To upgrade your Lenovo SSD, follow the essential steps and instructions outlined, using recommended cloning software to copy your data and manage your needs. Note that the steps for assembling and disassembling may vary depending on your laptop model, so check your handbook or contact the manufacturer for specific guidance.
Lenovo SSD upgrade can be a great way to improve the performance of your laptop. If you're considering upgrading your Lenovo laptop's storage to a Solid-State Drive (SSD), you'll want to make sure you have the right tools and follow the correct steps.
Lenovo SSD Upgrade FAQs
To upgrade your Lenovo SSD safely, follow these steps: first, ensure you have the correct tools and a compatible SSD model for your device. Next, back up your data to an external drive or cloud storage to prevent loss in case something goes wrong. Then, shut down your computer and unplug the power cord to prevent any accidental startups.
1. Can a Lenovo laptop SSD be upgraded?
Lenovo laptops generally allow SSD upgrades, but it's recommended to check the specific model's compatibility or visit Lenovo's support page for detailed guidelines.
2. How to add an SSD to my Lenovo laptop?
To add a new SSD to your Lenovo laptop, open the laptop's chassis, locate the storage bay or slot, remove the old drive, and connect the new SSD using the proper connectors or cables, with detailed instructions available on Lenovo's support website.
3. What SSDs are compatible with my Lenovo laptop?
If you're looking for a compatible SSD for your Lenovo laptop, you can check Lenovo's support page or the laptop's manual to find a list of compatible models. The specific model and characteristics of the SSD will determine whether it works with your laptop.
Related Articles
- Fix "We could not complete the Updates/Undoing changes" Error Windows 11
- How to Use Clonezilla on Windows 10/11 [2024 Guide]
- How to Stop Programs from Running in the Background on Windows 10/11
- 2 Ways to Partition C Drive in Windows 7 Without Formatting
- Lenovo VS Dell: Which Is Better Laptop in Terms of Price, Performance, and Much More?
If you're in the market for a new laptop but can't decide between Lenovo and Dell, this guide is for you. We'll compare the two brands and provide a recommendation to help you make an informed decision. - 4 Tools to Low Level Format Disk in Windows 11
Some people might be unfamiliar with low-level formatting. They might think that formatting a drive is enough to clear all the data and remove it. However, formatted data can still be recovered. Therefore it is necessary to low-level format a drive and wipes out its data forever. This article tells in detail about how to low-level format a drive.