How to Fix Windows 10 Won't Boot After Update 2016 [Effective]
Windows 10, despite its continuous development, can sometimes fail to start up after a critical update, causing frustration for users due to unexpected issues arising from these updates.
For those who've encountered the Windows 10 won't boot after update 2016 issue, it may have initially seemed daunting. Fortunately, Qiling offers a comprehensive guide on resolving this problem and restoring the functionality of your Windows 10 system.
How to Fix Windows 10 Won't Boot After Update 2016
To address the issue of Windows 10 failing to boot after the 2016 update, you'll need to have certain items ready, including the Windows 10 installation media, a USB drive, and the Windows 10 ISO file. With these items, you can try various solutions, such as booting from the installation media, using the System File Checker, and running the Windows 10 Update Troubleshooter. Additionally, you may need to create a bootable USB drive or repair the boot sector using the Command Prompt.
- A Computer: You'll need another device with internet access to get the information, download tools, and possibly ask for help online.
- USB Storage Device: To create a bootable Windows 10 recovery tool on a USB drive, ensure the drive has sufficient storage space, typically at least 8 GB, as it will be used to store the Windows 10 installation files and other necessary tools. This process allows you to recover your Windows 10 installation in case of a system failure or corruption, by booting from the USB drive and running a system repair or reinstall.
- Windows 10 Installation Media: You can either generate Windows 10 installation media using a different computer or obtain it from the official Microsoft website if you don't have it already.
- Data Backup: Before attempting to troubleshoot an issue, it's a good idea to back up your important files and data to an external drive or cloud storage service to prevent any potential data loss.
The solutions include a variety of options, each with its own unique characteristics. There's the first solution, which is not specified, and the second solution, which is also not detailed.
| ⏱️Duration | 5-10 Minutes |
| 💻Goal | Fix Windows 10 Won't Boot After Update 2016 |
| 👩💻Suitable User | From beginners to experienced users |
| 🧲Methods |
Way 1. Run Boot Repair of Qiling Disk Master
When Windows 10 won't boot after an update, Qiling Disk Master Professional can be a lifesaver. This powerful tool allows you to incorporate a bootable Partition Manager choice into the Windows boot menu, or create a WinPE bootable medium to resolve PC boot issues like BOOTMGR is missing or operating system not found. Additionally, Qiling Disk Master enables you to convert between different disk and partition types, ensuring compatibility with your system.
Given below are the step-by-step instructions to run Boot Repair using Qiling Disk Master:
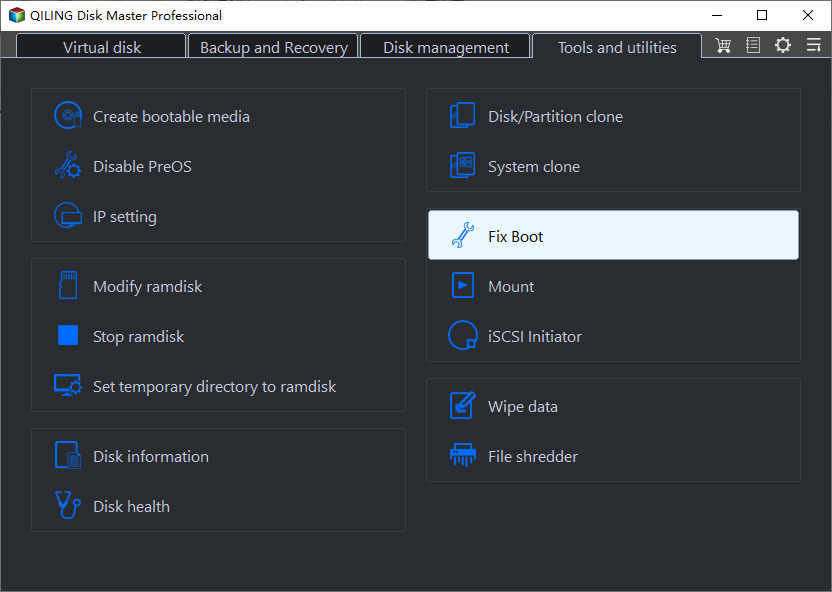
Step 1. After connecting the external drive/USB to your computer, start Qiling Disk Master and navigate to the "Tools and utilities" section, where you can click on "Create bootable media."

Step 2. Select an available USB drive or CD/DVD to install Windows on. You can also burn the Windows ISO file to the storage media.

Step 3. Connect a bootable drive to a new computer, reboot it by holding F2/Del to enter the BIOS, set the bootable drive as the boot disk, and exit the BIOS by pressing F10.
Step 4. Boot the computer again and enter the WinPE interface. Open Qiling Disk Master, then click "Fix boot" under the "Tools and utilities" tab page.
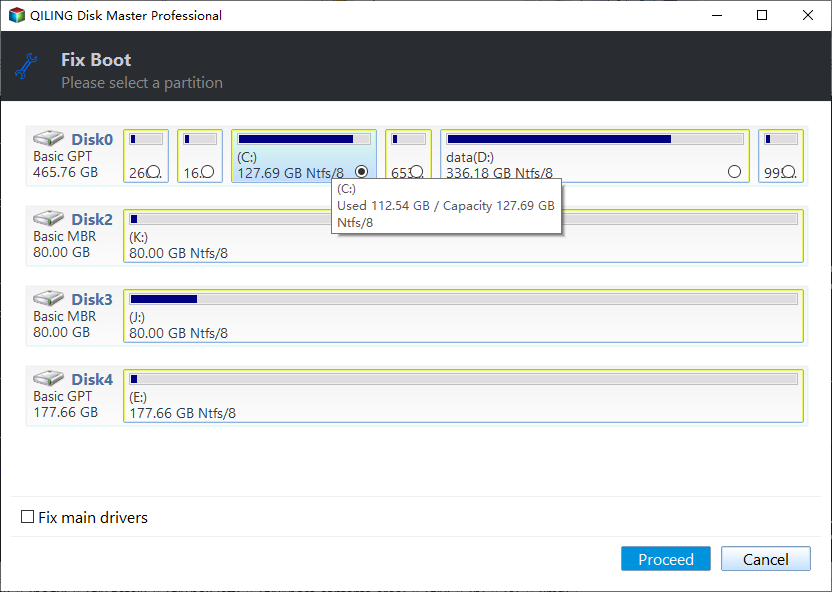
Step 5: Select the system you want to repair and click "Proceed".
Step 6. After the repair process, you will receive an alert that the system has been successfully repaired. To complete the boot repair process, simply click "OK".
Other Features of Qiling Disk Master
- Fix the hard drive will not boot.
- Identify and repair file system errors contributing to boot issues.
- Rebuild MBR to fix boot problems.
- Partition Recovery: A safe and effective solution to recover lost or deleted partitions, allowing users to retrieve valuable data that was previously inaccessible.
- Check the hard drive health to ensure it's not the source of the boot problem by running a diagnostic test using the built-in tools in your operating system, such as the Check Disk utility in Windows or the Disk Utility app in macOS. This will scan the hard drive for any errors or issues that might be preventing the computer from booting properly.
We highly recommend trying Qiling Disk Master to resolve your Windows 10 boot issue after the 2016 update. You can download this Windows manager from the official website.
Way 2. Rebuild MBR
The Master Boot Record (MBR) is essential for your computer's boot sequence, containing critical data about your hard drive's partitions and associated boot sectors. If the MBR becomes corrupted or damaged, it can cause Windows 10 to fail to boot after the 2016 update. To rebuild the MBR, you can use Qiling Disk Master, following the steps that involve rebuilding the MBR.
Step 1. Create a WinPE bootable disk
- Launch Qiling Disk Master, click "Bootable Media" on the toolbar, and select "Create bootable media".
- Click "Next" to finish the process.
Step 2. Boot Qiling Disk Master Bootable USB
- Connect the bootable USB or CD/DVD to your PC.
- To access the BIOS screen, press F2 or Del when restarting the computer. Then, set your computer to boot from a removable device or CD-ROM drive. This will allow Qiling Disk Master to run automatically.
Step 3. Rebuild MBR
- Click "Tools" and choose "Fix Boot".
- Select the disk and the type of MBR. Then, click "Proceed".
- After running the command, you can see the message "MBR has been successfully rebuilt on Disk X".
Way 3. Perform Startup Repair
Startup Repair is a built-in Windows feature that helps diagnose and fix problems preventing your computer from starting up correctly. It's particularly useful for addressing typical boot-related issues and can be run to identify and resolve these problems. To use Startup Repair, you can follow these steps:
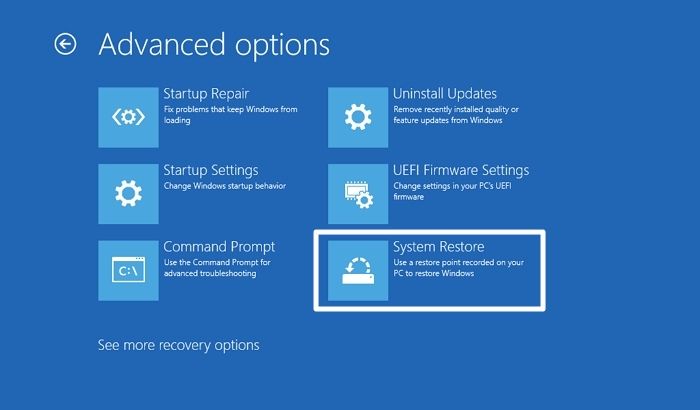
Step 1. To initiate the Windows Recovery Environment, click the "Repair Your Computer" option, then proceed to the 'Troubleshoot' section and select "Advanced Options."
Step 2. Select "Startup Repair" to initiate the repair process and your Windows will automatically reboot once the process is completed.

If you're unable to apply Startup Repair, you can try the following steps to resolve the issue:

FIXED: Windows 10 Startup Repair Not Working
Windows 10's startup repair feature can sometimes fail to work, leaving users with a non-booting system. This can be caused by various issues, including corrupted system files, driver problems, or hardware malfunctions.
Way 4. Apply a System Restore
System Restore is a valuable feature in Windows that allows you to roll back your system to a previous state, undoing recent changes such as updates that may have caused issues, and can be a lifesaver when facing boot problems after the 2016 update. To perform a system restore on your problematic PC, you can follow the steps to roll back your system to a previous state, effectively undoing the recent changes.
Step 1. To restore your Windows computer to a previous working state, navigate to the Windows Recovery Environment, select "Troubleshoot," then "Advanced Options," and finally "System Restore" - choose a point in time to restore from.
Step 2. Wait for the system restoration to complete, then reboot your computer and verify if the issue is resolved.
Way 5. Use DISM Tool
The Deployment Image Service and Management Tool, commonly referred to as DISM, is a powerful command-line utility in Windows that services and repairs Windows images, including the operating system. It can be used to address complex issues, such as Windows 10 not booting after an update, by running specific commands. These commands can be used to troubleshoot and resolve problems with the operating system.
Step 1. To access the Command Prompt, navigate to the "Advanced Options" menu within the "Troubleshoot" tab in the Windows Recovery Environment, and proceed from there.
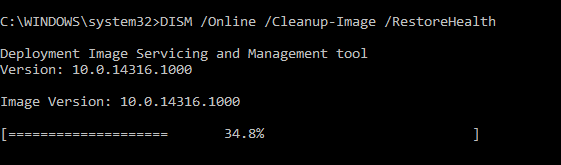
Step 2. To check for issues in the Windows image, launch the Command Prompt (CMD) and run the command: `chkdsk /f`
- DISM /Online /Cleanup-Image /CheckHealth
Step 3. Once issues are detected, execute the following command to repair them: `sudo apt update && sudo apt full-upgrade && sudo apt autoremove && sudo apt autoclean`
- DISM /Online /Cleanup-Image /RestoreHealth
Way 6. Boot Safe Mode
Windows Safe Mode is a startup mode that uses a minimal set of drivers and services, allowing you to identify and resolve issues by starting your computer with a basic configuration. This mode is designed to help diagnose and fix problems, such as those that may occur after a Windows 10 update. To boot into Safe Mode, follow these steps:
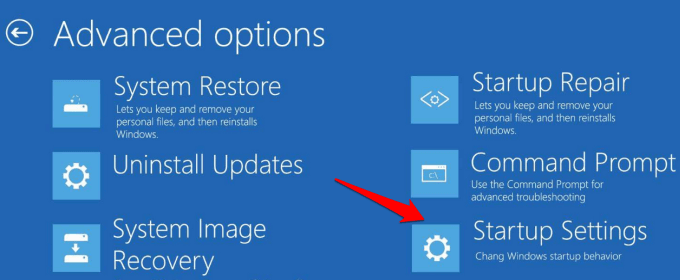
Step 1. To access the "Advanced Options" screen, start by initiating the Windows Recovery Environment, then proceed to the "Troubleshoot" section, and finally select "Advanced Options".
Step 2. To boot your computer into Safe Mode, click on "Startup Settings" and select "Restart". You will then be presented with various boot options, and you can press "F4" or "F5" to boot into Safe Mode.
Conclusion
We've explored various effective ways to address the frustrating issue of "Windows 10 won't boot after update 2016," including using Qiling Disk Master and rebuilding the Master Boot Record (MBR) to booting in Safe Mode. These methods cater to different levels of complexity and offer a variety of advantages, providing practical solutions to help resolve this issue.
A specific tool stands out in helping to restore Windows 10 functionality after the 2016 update, offering a user-friendly interface, non-destructive repair, and added functionalities, making it essential for its ability to streamline the process and minimize data loss.
FAQs About How to Perform Hard Drive Data Destruction
If you're still experiencing issues with Windows 10 not booting after the 2016 update, you may have questions. We've compiled answers to some common questions to help you further.
1. How do I fix my computer when it won't boot after the update?
Use the following steps to fix your computer if it won't boot after the update:
Step 1. You can access the Command Prompt in Windows Recovery Environment and run the command "del c: \windows\winsxs\cleanup.xml" to remove the cleanup.xml file from the Windows directory.
Step 2. After running the DISM command, execute the "del c:\windows\winsxs\pending.xml" command, exit the Command Prompt, and reboot your computer.
You can also read the following article to find more effective answers:
2. Why does my PC open but fail to boot?
When your PC won't boot after opening, it could be due to issues with the operating system or system files, such as corrupt updates or hardware problems.
3. How do I force Windows boot repair?
Here is how you can force Windows boot repair:
Step 1. To fix the issue, reboot your computer using a bootable USB with Windows installation media. On the Windows installation screen, click on "Repair Your Computer" to initiate the repair process.
Step 2. To resolve Windows 10 issues, go to Settings, click "Troubleshoot," then "Advanced Options," and tap "Startup Repair." Wait for the repair process to complete, and then reboot your computer.
Related Articles
- Setup Was Unable To Create a New System Partition or Locate an Existing System Partition Windows 7
- How Do You Create Partitions in Windows with Infographics 2023
- How to Install Windows 11 from USB Step by Step
- Guide to Test Seagate Expansion Speed with Pictures in 2023
- Can't Delete Recovery Partition? Fix It Now!
If you're having trouble deleting your recovery partition, don't worry - our step-by-step guide shows you how to quickly and safely delete it using either DiskPart or a third-party partition manager. With these tools, you can easily remove your recovery partition and free up space on your computer. - Can't Merge USB Partitions? 2 Proven Fixes Here
If you're experiencing issues with merging two USB partitions to allocate more single space for data, this article provides two effective fixes to resolve the “Can't merge USB partitions” issue.