How to Fix Windows Stuck on Diagnosing Your PC -10 Ways👍
You may have encountered the frustrating scenario where your system gets stuck on the "Diagnosing Your PC" screen during startup, instead of logging in to the desktop. The time it takes to diagnose the PC varies depending on your system's specifications and the severity of the issue, potentially taking a few minutes or up to 1-2 hours to proceed normally.
Several factors can contribute to the Diagnosing Your PC issue, including corrupt system files, registries, or updates. However, there's no problem without a solution. By reading this guide thoroughly, you can learn how to fix the issue and resolve the problem.
How to Fix Windows Stuck on Diagnosing Your PC
Here are some fixes that may work on your device, depending on the specific cause:
- 1. Hard Restart Windows PC
- 2. Use the Windows Boot Repair Tool
- 3. Run Windows Startup Repair
- 4. Boot in Safe Mode and Clear the Space
- 5. Run SFC and DISM
- ...
If you're experiencing a boot error, don't worry - there are effective ways to resolve the issue. For a step-by-step guide, continue reading the content. If you find this guide helpful, share it with others in need by clicking the social buttons.
1. Hard Restart Windows PC
Sometimes, a simple hard restart of your Windows can resolve the issue, allowing you to proceed directly to the Diagnosing Your PC screen. This fix may work due to various reasons, including.
- A hard restart, also known as a power cycle, involves unplugging the power cord and plugging it back in, which can sometimes resolve temporary glitches and issues that are preventing the system from booting correctly.
- It can remove problematic drivers and allow Windows to start normally.
To perform a hard restart on your PC, follow these simple steps: Press the power button to turn off your computer, wait for 10-15 seconds, and then press the power button again to turn it back on. This will restart your computer and clear any temporary issues that may be causing problems.
Step 1. First, unplug all power cables or remove the battery from a laptop. Wait for a while to allow any temporary cache to clear.
Step 2. After a power outage, unplug all cables from your system or remove the battery from your laptop. Wait for 30 seconds to discharge any remaining power. Then, re-plug cables in your system or reinstall the battery in the laptop.

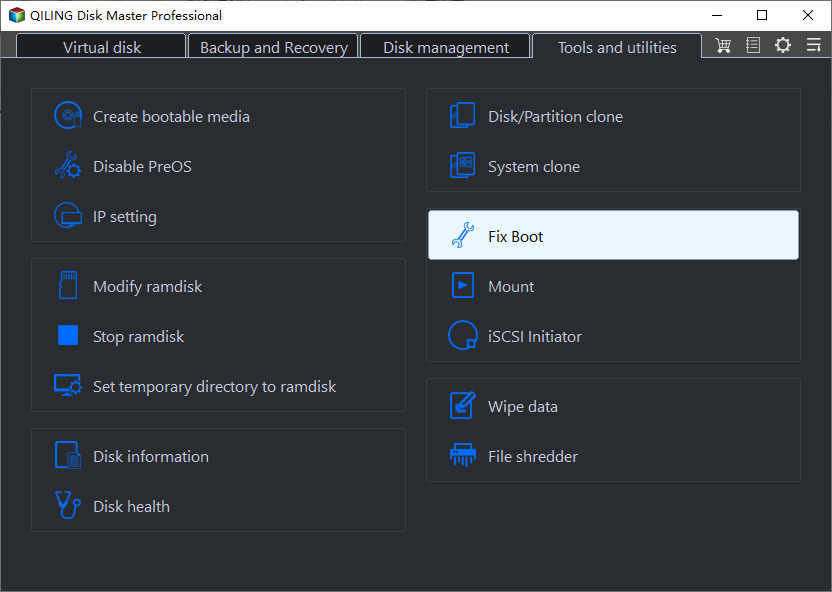
2. Use the Windows Boot Repair Tool
If your PC is stuck on the "Diagnosing Your PC" screen, you can use the Qiling Disk Master Professional to create a Bootable USB and repair your Windows. This can help fix the issue and get your PC up and running again.
This tool is an all-in-one solution that scans for missing or corrupted system files needed for booting Windows, replacing or repairing them to ensure the OS starts correctly. It also resolves Windows registry-related issues, providing a wide range of solutions in one tool.
Step 1. After connecting the external drive/USB to your computer, start Qiling Disk Master and go to the "Tools" section, then click on "Create bootable media".

Step 2. Insert a USB drive or CD/DVD, and click "Proceed" to continue with the installation process. Alternatively, you can burn the Windows ISO file onto the chosen storage media.

Step 3. Connect a bootable drive to a new computer, reboot by pressing F2/Del, set the drive as the boot disk, and exit the BIOS by pressing F10.
Step 4. Boot the computer again and enter the WinPE interface. From there, open Qiling Disk Master and select "Fix Boot" under the "Tools" option.
Step 5: Select the system you want to repair and click "Proceed".
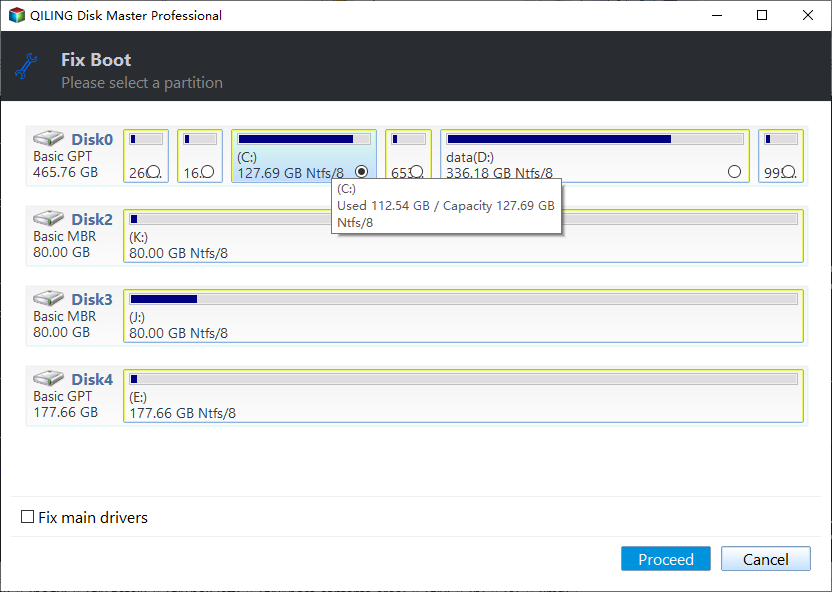
Step 6. Wait a moment, and you will receive an alert that the system has been successfully repaired.
⭐Need More Help
For more advice and detailed guidance, you can contact the Qiling experts as follows:
Qiling experts are available 24/7 to provide one-on-one manual services, helping to fix Windows boot errors, BSOD, and computer boot loops. They offer free evaluation services, diagnosing and resolving system boot failures, Windows stop codes, and OS lagging issues with their extensive experience.
- 1. To fix the BSOD error caused by a Windows update or other reasons, try the following steps: restart your computer in safe mode, check for corrupted system files using the System File Checker (SFC) tool, run a full system scan with an anti-virus software, disable any recently installed drivers or software, and if the issue persists, consider performing a System Restore to a previous point when the computer was working normally. If the problem is related to a Windows update, you may also want to try uninstalling the problematic update and then restarting your computer.
- 2. To resolve Windows boot errors like "no bootable device found" or BCD file corruption, start by booting from a Windows installation media or a USB drive with a Windows installation environment. From there, navigate to the "System" and "Command Prompt" options.
- 3. 0X000_error codes on Windows system or OS boot loop issues can be fixed by running the System File Checker (SFC) tool, which scans and replaces corrupted system files, and the Deployment Image Servicing and Management (DISM) tool, which checks and repairs the Windows image. Additionally, the Windows Update troubleshooter can be used to resolve any issues with Windows Update, and the System Restore feature can be used to restore the system to a previous state before the issue occurred.
The Boot Repair feature can resolve many Windows startup problems. Follow the guide below to use it.
3. Run Windows Startup Repair
Running the Windows Startup Repair feature is another alternative way to fix the issue. This can be beneficial for the following reasons.
- Startup Repair can detect and repair disk errors that contribute to startup problems.
- Registry errors can also cause this issue and may be resolved through this fix.
Follow these steps to execute a successful Startup Repair operation.
Step 1. To start the Windows installation process, insert the Windows installation disc into your PC and restart it. Upon restarting, hit any function key to boot Windows from media.
Step 2. After going through the general preference, you will reach the "Install now" screen. From there, hit the "Repair your computer" option to go to the "Choose an option" window.
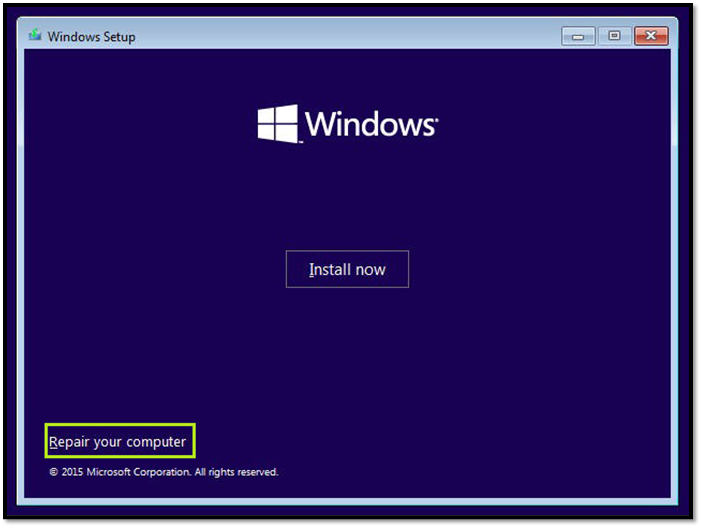
Step 3. To fix the issue, go to the "Troubleshoot" menu, then click on "Advanced Options," and select the "Startup Repair" option. This process will take some time as your PC automatically tries to repair itself.
4. Rebuild the BCD
Boot Configuration Data is a crucial database that contains boot parameters and settings required for Windows to start up properly. If it becomes corrupted, Windows may fail to boot and get stuck on the 'Diagnosing Your PC' screen. Rebuilding the BCD can resolve this issue, and Qiling Disk Master offers a feature to Rebuild MBR, which can be effective in resolving this problem.
The Master Boot Record (MBR) is the first sector of a computer's hard drive, containing information about partitioning and loading the operating system. The Rebuild MBR feature can resolve corrupted boot issues by rebuilding this critical sector.
Step 1. Create a WinPE bootable disk
- Launch Qiling Disk Master and click "Bootable Media" on the toolbar. Select "Create bootable media" from the options.
- Click "Next" to finish the process.
Step 2. Boot Qiling Disk Master Bootable USB
- Connect the bootable USB or CD/DVD to your PC.
- To enter the BIOS screen, press F2 or Del when restarting the computer. Set the computer to boot from "Removable Devices" or "CD-ROM Drive". This will allow Qiling Disk Master to run automatically when the computer starts up.
Step 3. Rebuild MBR
- Right-click the disk and choose "Rebuild MBR".
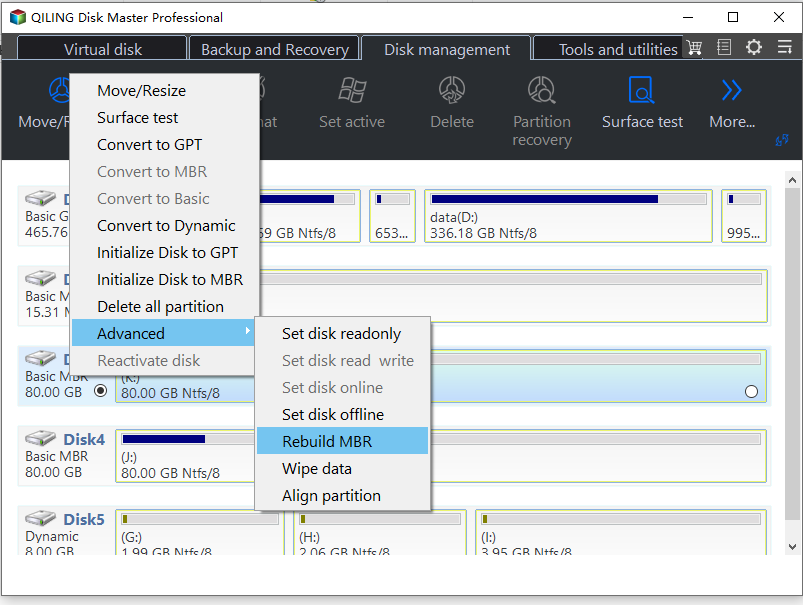
- To proceed, select the disk and the type of MBR. Then, click "Proceed".
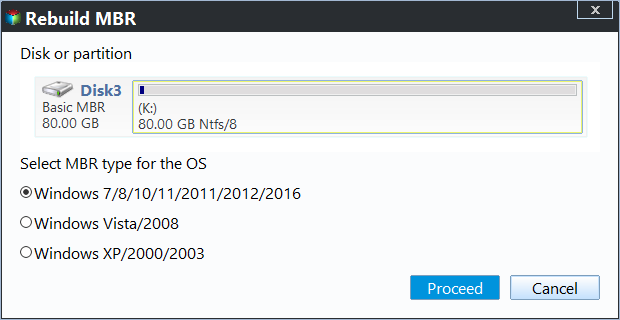
- The message "MBR has been successfully rebuilt on Disk X" indicates that the Master Boot Record (MBR) of disk X has been successfully rebuilt or restored to its original state, which may have been corrupted or damaged. This process can help resolve issues related to booting or accessing the disk.
5. Boot in Safe Mode and Clear the Space
Safe Mode loads Windows with a minimal set of drivers and startup programs, which can help resolve issues caused by faulty drivers or programs that are interfering with the normal functioning of the operating system. This can be a useful troubleshooting step when Windows is not starting properly or is experiencing other problems. By reducing the number of drivers and programs that are loaded, Safe Mode can help identify and isolate the source of the problem, making it easier to resolve the issue.
- It allows you to run anti-To resolve the issue, run a full system scan using a reputable antivirus software to detect and remove any malicious software that might be causing the problem. This will help identify and eliminate any malware that could be interfering with the computer's functionality.
- Performing a disk cleanup in Safe Mode can free up space by removing temporary files, cached data, and other unnecessary items.
Here are the steps to boot your Windows in Safe Mode and fix the "Diagnosing Your PC" issue in one paragraph:
Step 1. To access the "Choose an option" screen, turn on your device and repeatedly press the "F8" key. From there, select the "Troubleshoot" option and proceed to "Advanced options."
Step 2. To enable Safe Mode in Windows, go to the "Startup Settings" options and select the "Safe Mode" option by clicking the "Restart" button and then pressing "F4" after restarting. This will allow Windows to boot in Safe Mode.
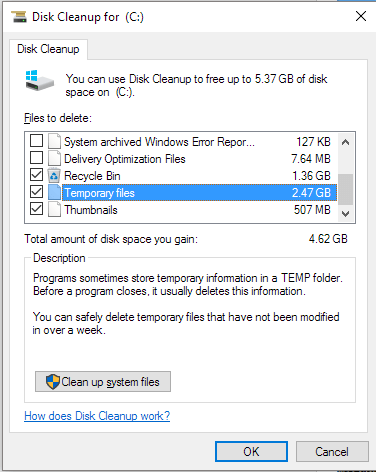
Step 3. Now, open the Disk Cleanup and clear the space:
- To launch the Disk Cleanup tool, press the "Win + R" keys on your keyboard to open the "Run" window, then type "cleanmgr" in the text box and press Enter.
- Choose the Windows drive and hit "OK."
- Finally, check the files you want to clean and click the "OK" button.
After this, you can restart your system in Normal Mode.
6. Run SFC and DISM
SFC and DISM are the command-Tools that can scan the system file errors and repair the Windows media include CheckDisk, SFC, and DISM. These tools can identify and fix corrupted system files, which are essential for booting the operating system. If critical system files are damaged, it can cause startup issues, and these tools can help resolve the problem by scanning the system files, identifying errors, and repairing or replacing them to ensure a smooth boot process.
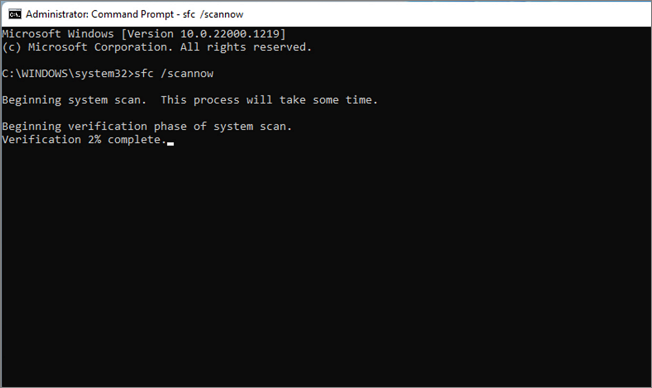
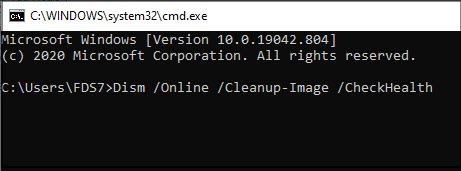
To exit the 'Diagnosing Your PC' screen, you can run the System File Checker (SFC) and Deployment Image Servicing and Management (DISM) commands. This will help repair the Windows Component Store, which can be the root cause of boot problems if not functioning properly. You can run these commands by typing 'sfc /scannow' and 'dism /online /cleanup-image /restorehealth' in the Command Prompt, and then restarting your PC.
Step 1. Go to the "Advanced options" menu, then head to "Command Prompt." Type the "sfc /scannow" command and press "Enter."
Step 2. Run the "Dism /Online /Cleanup-Image /CheckHealth" command, then "Dism /Online /Cleanup-Image /ScanHealth", and finally "Dism /Online /Cleanup-Image /RestoreHealth" to troubleshoot and repair any issues with your Windows image.
You're good to go now after restarting.
7. Use System Restore Points
Windows has a feature allowing users to create Restore Points to get to a previous functional state if needed. This can be helpful in resolving issues like yours due to the fact that it allows users to revert back to a point in time when the system was working properly, potentially resolving the problem.
- You may have installed a software or made a significant change that caused the issue, and reverting to the previous state can resolve it.
- Even corrupted Windows updates can contribute to this problem and can be fixed through Restore Points.
To resolve the stuck on Diagnosing Your PC screen problem, follow these steps: Run the Windows Update troubleshooter, then run the System File Checker (SFC) and DISM tools to scan and repair corrupted system files. If the issue persists, restart your PC in Safe Mode and run the SFC and DISM tools again.
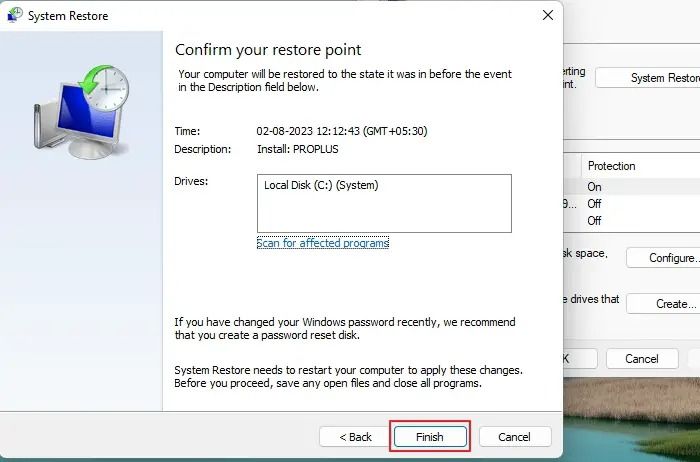
Step 1. Once you reach the "Advanced options" menu, click the "System Restore" option, then hit "Next" and check the "Show more restore points" box.
Step 2. After choosing a desired restore point, click "Next" and "Finish."
Reboot your device to run it normally.
8. Uninstall Recent Updates
Your Windows system can remove recently installed updates and revert to a previous stable update version. This is possible because Windows has a built-in mechanism that allows it to roll back to a previous update, effectively undoing the changes made by the most recent updates. This process can be initiated by the system itself, usually when it detects problems caused by the new updates, or it can be done manually by the user.
- Updates may occasionally introduce incompatibility issues with specific configurations, causing Windows to fail booting properly.
- In some cases, updates may not install properly and cause the system to become unstable, so you can simply uninstall those updates.
These are the steps given below to uninstall recent updates.
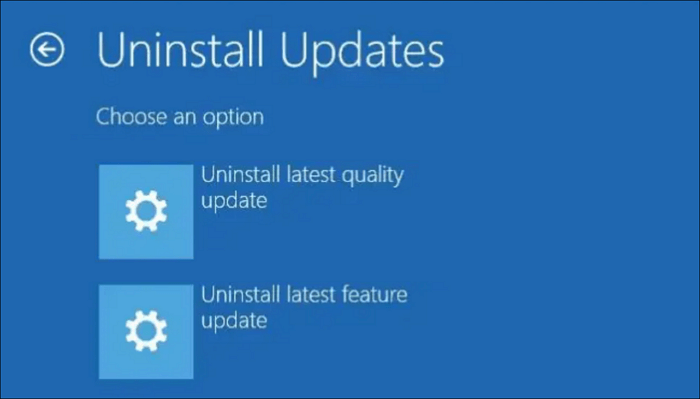
Instructions. To resolve the issue, go to the "Advanced options" screen and choose the "Uninstall Updates" option. Then, select "Uninstall latest quality update/Uninstall latest feature update" and restart your PC to restore it to a working state.
9. Disable Auto Repair
Auto Repair is a Windows feature that puts your PC into repair mode, allowing it to diagnose and fix issues. Disabling it may bypass the stuck screen problem, allowing your system to boot normally.
To disable the Auto Repair feature in Windows, follow these steps:
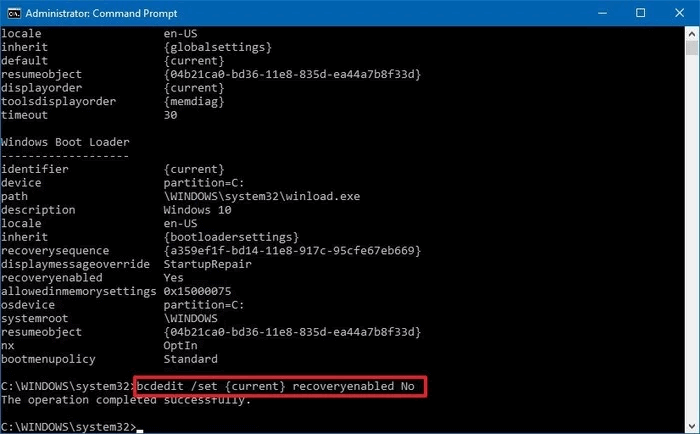
Step 1. From the "Advanced options" screen, go to the "Startup Settings" and hit the "Restart" button. Press the "F4" key to enable Safe Mode.
Step 2. After restarting, hit "Win + R" to reach the "Run" menu. Then, type "cmd" and hit "Enter" to access the command prompt. Input the "bcdedit /set recoveryenabled No" command and press "Enter" to disable the Windows Recovery Environment.
10. Recover Windows Registry
The Windows registry is a database that contains configuration settings for operating systems and apps, which can become corrupted due to software conflicts and malware, leading to critical boot problems.
Recovering the registry can restore it to a healthy state, resolving the Diagnosing Your PC screen scenario.
Step 1. To troubleshoot Windows issues, access the "Advanced options" from the "Troubleshoot" menu and select "Command Prompt." Then, type the command "copy c:\windows\system32\config\RegBack* c:\windows\system32\config" and press "Enter."
Step 2. To resolve the issue, you need to restore all data, restart your system, and then check if the problem is resolved. To do this, you'll first need to select the type of data restore, which is "All". Once you've done that, press "Enter" to proceed. After the restore process is complete, restart your system.
11. Reinstall Windows
If the Diagnosing Your PC stuck screen issue persists, you can try reinstalling Windows, which will create an error-free fresh registry.
This Windows ISO file will install all the new system files and drivers without glitches and corruption, making the installation process smooth and hassle-free. If you need to reinstall Windows, you can refer to this link and follow the step-by-step guide to install it correctly.
Why Windows 10/11 Stuck on Diagnosing Your PC
If your Windows 10 computer is stuck on the "Diagnosing your PC" screen, it could be due to a variety of reasons. The issue might be caused by a problem with the Windows Update process, a corrupted system file, or a malfunctioning driver. In some cases, the issue might be related to a hardware problem, such as a faulty RAM or a failing hard drive. Additionally, if you have recently installed a new driver or software, it might be causing the issue.
I've had problems with my laptop for the last 24 hours, and it's gotten to this screen but never advanced to the advanced startup blue screen. A bunch of searching hasn't helped me, and I don't have money to buy anything, although I have another laptop that is broken (HP Windows 10), if that means anything. from Microsoft Community
The Auto Repair utility is used to resolve startup issues, but sometimes it may not work due to temporary faults. Additionally, issues like corrupted BCD files, improperly installed updates, and insufficient disk space can also cause this problem.
The boot-loading problem arises due to various issues such as incorrect boot order, corrupted boot sector, and malfunctioning boot loader. This can lead to a system failure, preventing the operating system from loading properly. To resolve this issue, it's essential to follow the troubleshooting steps provided, which include checking the boot order, running a disk check, and reinstalling the boot loader.
Final Words
Your PC may occasionally experience startup issues due to various reasons, causing the screen to get stuck on the "Diagnosing Your PC" screen. This problem can be resolved through several practical solutions.
Qiling Disk Master is the ultimate partner in resolving boot-related complications, and even more. Its Boot Repair feature allows you to resolve almost any boot-related issue. You can also enjoy other features of this tool. Try it.
FAQs About Windows Diagnosing Your PC
There's still some confusion about the Windows 10/11 stuck on diagnosing Your PC issue, but this guide aims to clarify things. Some users may be experiencing this problem, and it's essential to address their frequently asked questions and provide answers to help resolve the issue.
1. How much time does diagnosing your PC take?
The processing time may range from a few minutes to over an hour, depending on the complexity of the situation and the device's specifications.
2. What to do when your PC is diagnosed?
Wait patiently, as it normally takes some time. If it gets stuck, try the fixes mentioned earlier. Alternatively, use the Qiling Disk Master tool to repair the boot for the most effective approach.
3. Why is my computer showing diagnosing your PC?
Your PC may show this screen due to damaged system files, corrupted drivers, faulty registry files, malware, or even faulty hardware.
Related Articles
- How to Format DVR Hard Disk & How to Connect DVR Hard Disk to PC
- How to Rebuild BCD | All You Should Know 🔥
- Effective Fixes for Hard Drive Not Detected in Windows 10 Installation
- How to Burn ISO to USB on Windows 8 Efficiently
Learn how to efficiently burn an ISO to a USB drive on Windows 8 with our step-by-step guide, making it easy to create bootable USB drives for installation or backup purposes. - How Do I Format Disk to exFAT in Command Prompt
Want to format your disk to exFAT easily? Discover how to do it using CMD or the user-friendly Qiling Disk Master and select the method that suits your requirements. - How to Format EFI Partition in Windows 11/10? [Your Guide Here 2024]
Formatting the EFI partition in Windows can lead to system crashes and difficulties with booting. It's not recommended to format the EFI partition unless absolutely necessary, such as when reinstalling Windows.