How to Burn ISO to USB on Windows 8 Efficiently
Burning an ISO to a USB drive on Windows 8 can be a complex process for those without technical expertise. However, this tutorial will guide you through the process in a straightforward and easy-to-follow manner, making it accessible to everyone, regardless of their technical background. We'll walk you through the steps to burn an ISO to a USB drive on Windows 8 efficiently and answer any questions you may have along the way.
Qiling Disk Master provides a simpler operation process than the Windows USB/DVD Download Tool, making it the best and easiest way to burn a Windows 8 ISO to a USB drive due to its user-friendly interface and ease of use.
Before proceeding, users should ensure they have the following preparations:
- Important
- USB: To format a USB drive to FAT32, right-click on the USB drive in Windows Explorer, select "Format," and choose FAT32 as the file system. This will ensure the drive has a capacity of at least 8-16GB.
- Windows 8 ISO file: The Windows 8 ISO file can be downloaded from the official Microsoft website or other trusted sources.
In order to connect the USB drive to the PC, you should plug it into a free USB port on the computer or laptop.
How to Burn ISO to USB on Windows 8
This part mentions two guides, which can be learned more about through the table below. The table provides details on the two ways, allowing for a better understanding of the options.
| ⚙️Comparison | ||
|---|---|---|
| ✏️Complex Level |
Low, for beginners |
A little bit complicated |
| 💻Applies to |
Burn Windows 8/8.1/10/11/7 to USB |
Burn Windows 7/8 to USB |
| ⏱️Duration |
1-3 Minutes |
3-5 Minutes |
| 🚩Interface |
Clear, with prompts |
Not that clear |
To burn a Windows 8 ISO to a USB drive on Windows 8, there are two methods: using Qiling Disk Master, the easiest way for beginners and non-technical individuals, or the Windows USB/DVD Download Tool, which is less friendly to beginners. For those who are not pros, Qiling Disk Master is recommended, and we will provide step-by-step instructions.
Guide 1. Burn Windows 8 ISO to USB Using Qiling Disk Master
Qiling Disk Master is a tool that allows users to manage partitions and burn ISO files to a USB drive, making it easy to install Windows 8/8.1 on a computer.
To burn a Windows 8 ISO file to a USB drive using Qiling Disk Master, you can follow these steps: First, download and install Qiling Disk Master on your computer. Next, insert the USB drive into your computer and launch Qiling Disk Master.
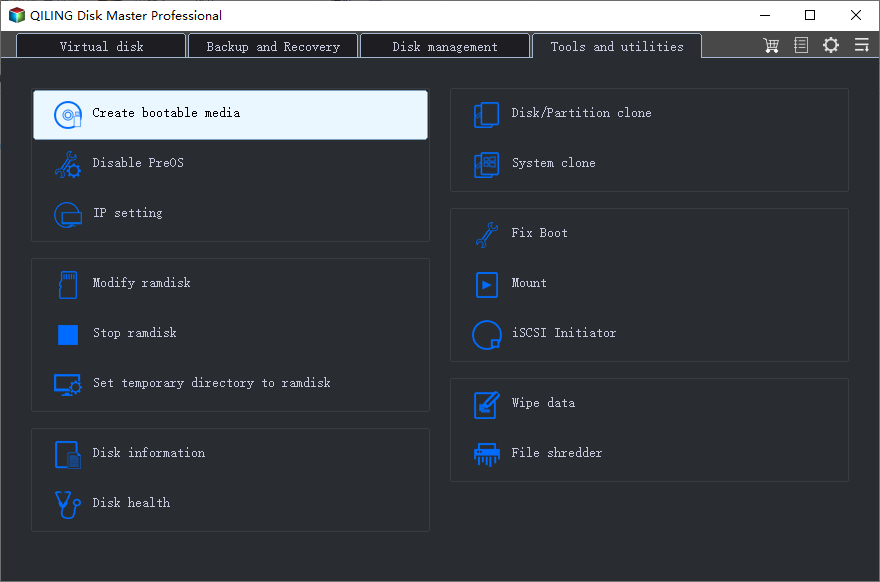
Step 1. Launch Qiling Disk Master and go to the Tools section. Click the "Create bootable media" button.
Step 2. Connect the target USB to your computer and select it as the destination drive. Click "Proceed" to initiate the transfer process.
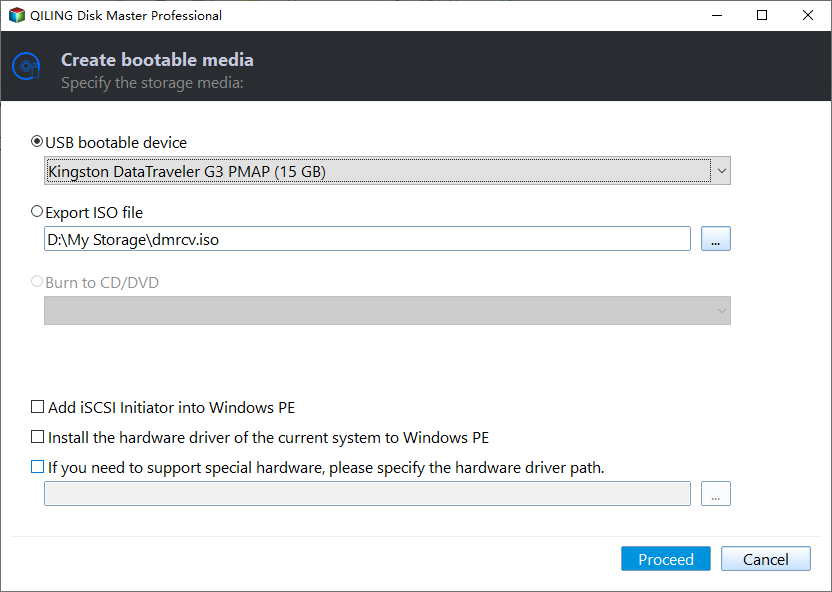
To use Qiling Disk Master, simply connect the USB drive with Windows 8 to your computer and run the software. Follow the on-screen instructions to create a bootable USB drive and install Windows 8. The software will guide you through the process, and you'll be able to create a bootable USB drive in no time.
Key Features of Qiling Disk Master:
- Burn ISO to USB on Windows 10
- Format USB to FAT32
- Create a bootable USB
- Burn Windows 7 ISO to USB
- Initialize a hard drive to install Windows 8
Qiling Disk Master is a user-friendly tool that makes it easy for users of all experience levels to navigate and utilize its features. With its simple interface and numerous options, it simplifies routine tasks, making it a great option to download and benefit from.
Guide 2. Burn Windows 8 ISO to USB Using Windows USB/DVD Download Tool
Microsoft's USB/DVD download tool enables you to create a bootable USB drive from a Windows 8 ISO file, making it possible to install Windows 8 from the USB drive.
To burn a Windows 8 ISO to a USB using the Windows USB/DVD download tool, follow these steps: First, download and install the tool from Microsoft's website, then run it and select the Windows 8 ISO file you want to burn. Next, choose the USB drive as the destination and select the drive letter you want to use.
Step 1. To proceed, download, install, and run the Windows USB/DVD Download Tool on your PC or laptop.
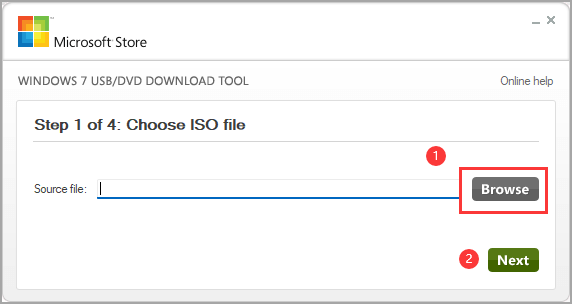
Step 2. On the initial screen of the Download Tool, select the ISO file for Windows 8, ensuring it has the ".iso" extension.
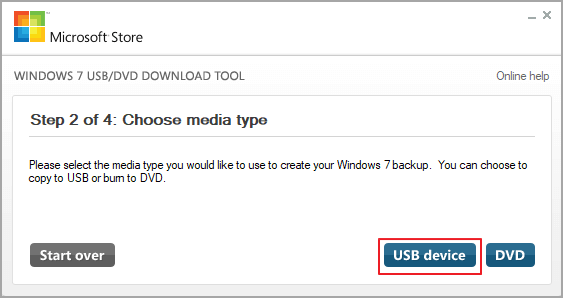
Step 3. In Step 2 of 4, choose the type of media you want to use (e.g.
Step 4. To proceed, insert the USB device into your computer and click the "Begin copying" button. Note that this process will erase the USB drive and all stored data, so ensure you have backed up any valuable information.
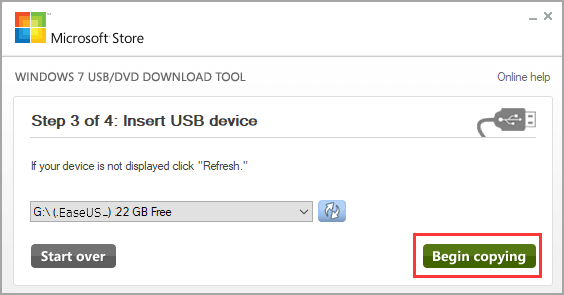
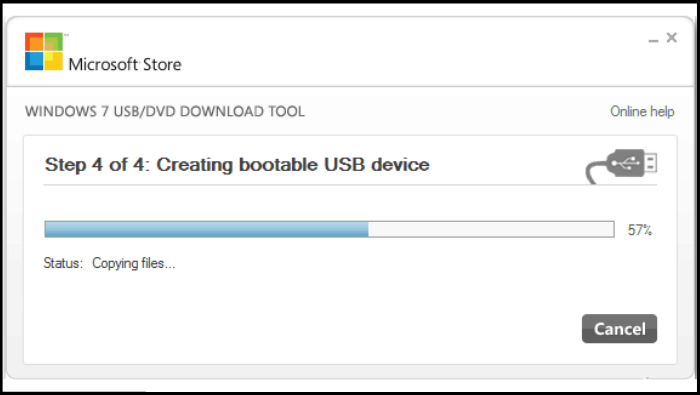
Step 5. The Download Tool will automatically begin creating the bootable USB device, waiting for a few minutes to complete.
- Notice:
- The steps provided are applicable to Windows 8 and Windows 8.1, although the screenshots may be based on the Windows 7 USB/DVD Download Tool. To burn the Windows 8 ISO to a USB drive, follow the instructions accordingly.
If you're not experienced with computing or prefer a more user-friendly option, you can use Qiling Disk Master to easily and quickly burn the Windows 8 ISO to a USB drive.
After burning the ISO to the USB drive, you need to set the bootable USB as the primary boot drive in your computer's BIOS settings to boot from the USB and initiate the Windows 8 installation process. If not, Windows 8 won't boot from the USB.
How to Install Windows 8 From the Bootable USB
To install Windows 8 from a bootable USB, start by plugging the USB into the computer you want to install Windows 8 on. Next, save any open work and shut down the computer. Then, turn the computer back on and enter the BIOS settings by pressing the key that allows you to do so (usually F2, F12, or Del).
Step 1. Insert a USB drive that has Windows 8 installed on it into the computer you want to install Windows 8 on.
Step 2. To set a computer to boot from a USB drive at startup, turn it on and enter the BIOS settings. Adjust the settings to enable the USB drive as a boot option, then save the changes and exit the BIOS settings. The computer will now attempt to boot from the USB drive.
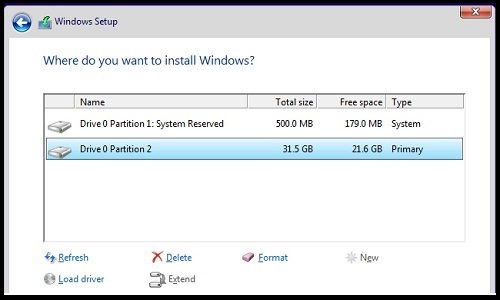
Step 3. To set up Windows 8 using a USB drive, follow the on-screen prompts to select the language and other details of your preferred Windows version. This will guide you through the process of configuring the operating system to your liking.
You can learn more details about installing Windows from the article below:

Windows can be installed on a variety of devices, including desktop computers, laptops, and even some tablets. To install Windows, you'll need to choose the device you want to install it on, and then decide whether you want to install a 32-bit or 64-bit version of the operating system.
Ensuring your Windows operating system is installed and running on the correct storage drive has always been important, regardless of whether you're using Windows 11, 10, 8, or 7.
Why Burn ISO to USB on Windows 8
Many users are seeking a way or tool to help burn ISO to USB on Windows 8. This process offers several advantages, including the ability to create a bootable USB drive that can be used to install an operating system, run a live Linux environment, or access a computer's BIOS settings. By burning an ISO file to a USB drive, users can create a portable and self-contained installation medium that can be easily transferred between computers, making it a convenient and efficient way to manage and maintain their systems.
- Portability: USB drives are compact and easy to carry, making it simple to take your Windows 8 installation or bootable drive anywhere you go.
- Speed: Installing Windows 8 from a USB drive is faster than using optical media like DVDs.
- Reusability: USB drives can be easily formatted and reused for different purposes, including creating bootable drives for other operating systems or storing data.
- Compatibility: USB drives are widely supported by modern computers and can be used on various devices, making it easy to install Windows 8 on different systems.
- Reliability: USB drives are more durable than optical media, reducing the risk of damage or data corruption during the installation process.
- Easy Updates: Using a USB drive, you can easily update your Windows 8 installation files or create new bootable drives with the latest updates.
- Flexibility: Burning an ISO to a USB drive allows you to customize the installation process, add software, and personalize the setup.
Burning an ISO to a USB drive is a preferred method for installing Windows 8 on compatible devices, offering advantages such as ease of use, flexibility, and reliability.
Conclusion
Burning an ISO to a USB drive on Windows 8 offers several benefits, including portability, speed, reusability, compatibility, reliability, easy updates, and flexibility. This can be achieved through two methods: using Qiling Disk Master, which provides a user-friendly interface and simplifies the process, or the Windows USB/DVD Download Tool, a Microsoft tool specifically designed for this purpose. Both methods require proper preparation, including selecting the USB drive as the primary boot option in the computer's BIOS settings.
We hope you find this article helpful and informative. To help your colleagues/friends, please share this article with them so they can efficiently burn ISO to USB on Windows 8.
You may also like:
Burn ISO to USB on Windows 8 FAQs
If you have further questions about burning an ISO to a USB on Windows 8, please refer to the following FAQs.
1. Can I create a bootable USB for Windows 8 from an ISO?
You can create a bootable USB for Windows 8 using the Windows USB/DVD Download Tool.
Follow these steps:
Step 1. Download and install the Windows USB/DVD Download Tool.
Step 2. Launch the tool and select the Windows 8 ISO file.
Step 3. Select the USB drive as the target device for creating a bootable USB drive.
Step 4. Follow the on-screen instructions to complete the process.
2. Which tool can I use to burn Windows 8 iso image to a bootable USB?
You can use various tools to burn a Windows 8 ISO image to a bootable USB drive, with the Windows USB/DVD Download Tool being a popular option. However, Qiling Disk Master is a highly effective tool that can easily perform this operation on any Windows version.
3. How do I burn an ISO file on Windows 8?
To burn an ISO file on Windows 8, you can use the built-in Windows Disc Image Burner. First, open the Windows Disc Image Burner by searching for it in the Start menu.
Step 1. To create a bootable USB drive, pick a reliable ISO burning software such as Qiling Disk Master and install it on your PC/Laptop.
Step 2. To burn an ISO image, simply open the software and select the option to do so, following the on-screen instructions to complete the process.
Step 3. Locate the ISO file on your computer.
Step 4. The USB drive was chosen as the destination for burning the ISO file.
Step 5. Initiate the burning process.
Related Articles
- Can't Delete Partition on USB? Time to Fix it!
- More Partition Guides: Resize or Move a Partition in Windows 💡
- Windows 10 Won't Boot? 8 Ways to Fix Your PC
- [Fixed] EmuDeck Not Recognizing SD Card on Steam Deck
Encountering issues with EmuDeck not recognizing your SD card on your Steam Deck can be frustrating, especially when trying to enjoy more games on your device. To resolve this problem, continue reading to find solutions that can help you fix the issue and get back to gaming. - Solved: SSD Not Showing Up in Disk Management on Windows 10/11/8/7
Is SSD not showing up in Disk Management? This article provides four effective fixes and some quick fixes for this issue. Dive into this article now. - Steam Deck Disk Speed Test Tutorial 2024 [Your Guide Is Here]
Is your Steam Deck starting to lag when playing games? The speed of your Steam Deck disk is likely being affected due to some issues. Find out when and how you should run the Steam Deck disk speed test in this article.
Products
Articles & Tutorials
- Data Recovery
- Data Backup
- File Recovery
- File Backup
- System Backup and Restore
- Disk and Partition Clone
- Technical articles
- Mobile articles
- Disk Master Help
- Windows Data Recovery Tutorials
- Windows Secure Delete Tutorials
- Windows Partition Management Tutorials
- Windows File Backup and Restore Tutorials
- Windows System Backup and Restore Tutorials
- Windows Disk Backup and Restore Tutorials
- Windows Clone Tutorials