4 Ways to Fix "Can't Burn ISO File to USB on Windows" Error
An ISO file is a small copy of a large data set, used for backup or storage, and can be decompressed by burning it to a USB drive, which is different from copying and pasting.
You're unable to burn an ISO file to a USB drive, but don't worry, this article is here to help. The issue may be due to various reasons, such as the ISO file being corrupted or the USB drive not being formatted correctly. To resolve the problem, you can try using a different ISO burning software, such as Rufus or Etcher, which are specifically designed for burning ISO files to USB drives.
Why Can't Burn ISO File to USB
ISO files typically include music CDs, video DVDs, and ISO files of Windows installation media. Users often face issues when burning ISO images, with the most common problem being related to Windows installation media. A typical user question might be: "I have a Windows 10 ISO file, but when I try to burn it to a DVD, it says the file is too large or the disc is not blank. How do I resolve this issue?
Burning a USB with a bootable ISO file is a common practice to back up the operating system or reinstall it in case of a computer crash, or to boot Windows using a USB. If you're unable to burn an ISO, it may be due to various reasons, and there's no need to worry, as this issue can be resolved.
- ⛏️Lack of a professional burning tool: Windows does not have a built-in option to burn ISO files directly to a USB flash drive. However, you can use the built-in tool "Windows To Go" to create a bootable USB drive from an ISO file, but it's not exactly the same as burning the ISO to a USB drive.
- 📁ISO file structure differs from the one used by USB: USB is not formatted as FAT32.
- 🔊The ISO file is too large: FAT32 does not support files larger than 4GB.
- 💻Wrong ISO file was downloaded: You need to go to Microsoft to download the correct ISO file.
- 📉Insufficient USB space: The USB cannot accommodate too large Windows ISO files.
To burn an ISO file to a USB drive, you'll need to use a tool specifically designed for this purpose, as ISO files cannot be burned directly to USB. Instead, you can use software like Rufus, Etcher, or PowerISO to create a bootable USB drive from an ISO file. These tools will allow you to select the ISO file and the USB drive, and then create a bootable drive that you can use to install an operating system or run a live session. Just be sure to choose the correct settings and options for your specific use case.
How to Fix Can't Burn ISO File to USB on Windows
If you're experiencing the can't burn ISO file to USB error, there are four effective solutions to help you resolve the issue. Alternatively, if the issue is related to a video ISO, you can simply convert it to MP4 and then copy it to USB.
If it's a Windows ISO file-related problem, please refer to the following solutions to fix it:
- Solution 1. Download the ISO File Correctly
- Solution 2. Burn ISO File to USB via Professional Tool
- Solution 3. Reformat the USB
- Solution 4. Restore USB to Full Capacity
Here is the step-by-step guide for these solutions:
1️⃣Solution 1. Download the ISO File Correctly
To download a Windows ISO file, you need to choose the correct version of Windows. Microsoft offers different options, and you can follow a simple step-by-step guide:
Step 1. Download the Windows ISO file:
- For Windows 11: https://www.microsoft.com/software-download/windows11
- For Windows 10: https://www.microsoft.com/en-hk/software-download/windows10
Here we will use Windows 11 as an example.
Step 2. To download Windows 11, you need to select the correct version of the operating system by choosing the corresponding ISO image, which is a disk image in the ISO format. This allows you to install the desired version of Windows 11 on your computer.
Step 3. Select the language and continue.
Step 4. You can download the Windows 11 ISO file from Microsoft's official website. To do this, go to the Microsoft website and select the Windows version number you want to download, such as Windows 11 Home or Windows 11 Pro.
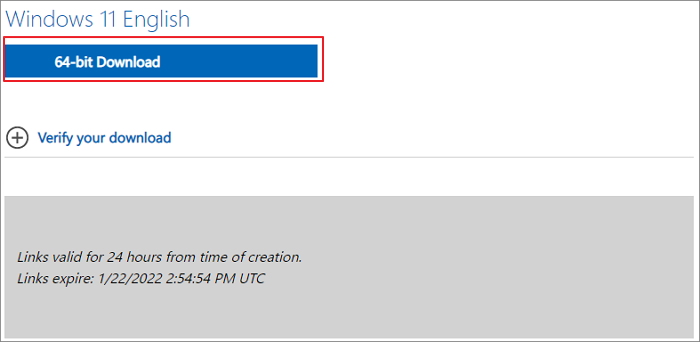
Once you have downloaded the correct Windows ISO, select a reliable tool and burn the ISO file to USB.
2️⃣Solution 2. Burn ISO File to USB via Professional Tool
You can burn an ISO file to a USB drive using a professional burning tool like Qiling Disk Master, which supports Windows and offers multiple burning options, including USB, DVD, and CD. This tool can help you successfully burn an ISO file to a USB drive, even if you're experiencing issues with other methods.
You can download the software for free and check out the detailed guide to get started.
Step 1. Launch Qiling Disk Master and go to the Tools section, then click "Create Bootable Media".

Step 2. Select the target USB as destination.

Step 3. Click "Proceed" to execute the operation.
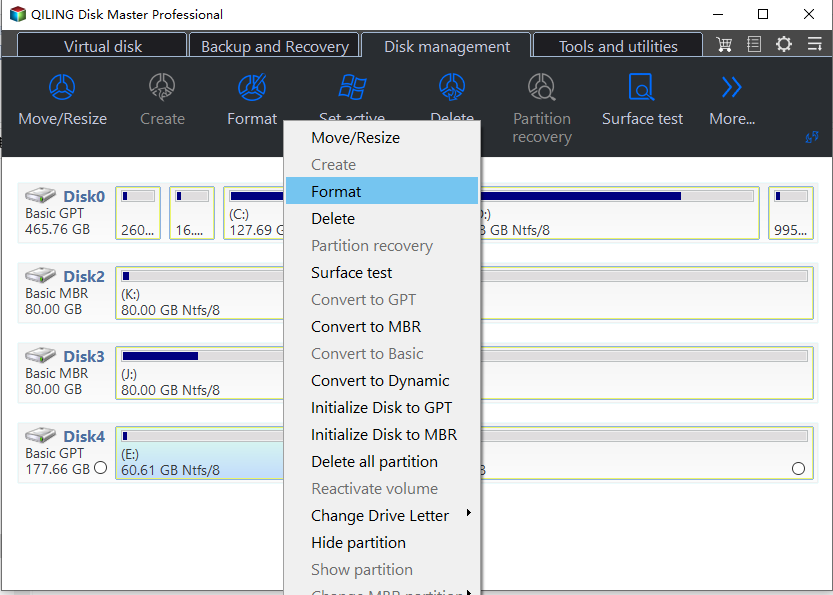
3️⃣Solution 3. Reformat the USB
If you can't put an ISO on a USB, it might be because the USB's format is incorrect. Windows ISO files require a specific file system format, which is FAT32. You can use Qiling Disk Master to easily and safely format the USB to the correct format.
Download this powerful tool now and follow the simple steps to complete the formatting:
Step 1. To format a partition on your external hard drive, USB, or SD card using Qiling Disk Master, right-click the desired partition and select the "Format" option from the context menu. This will initiate the formatting process.
Step 2. Assign a new partition label, file system (NTFS/FAT32/EXT2/EXT3/EXT4/exFAT), and cluster size to the selected partition.
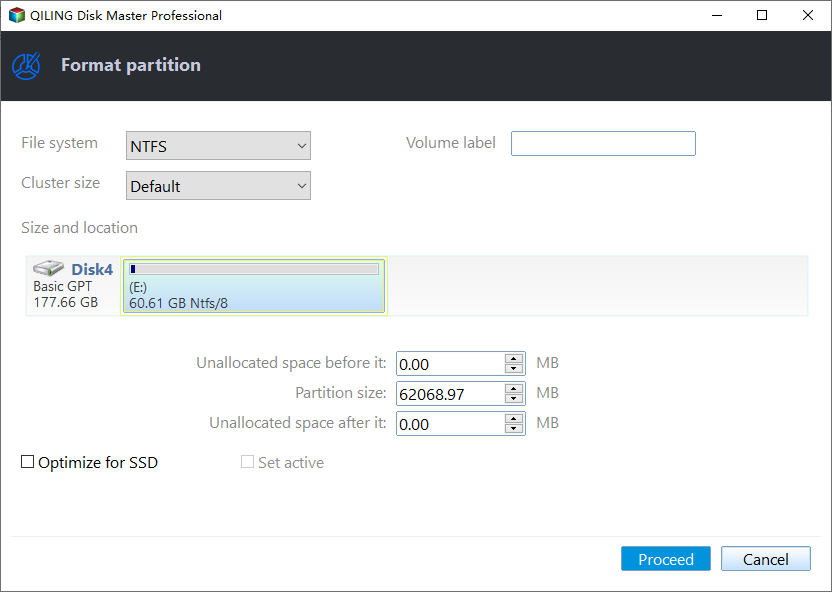
Step 3. Click the "Proceed" to start formatting your external hard drive/USB/SD card.
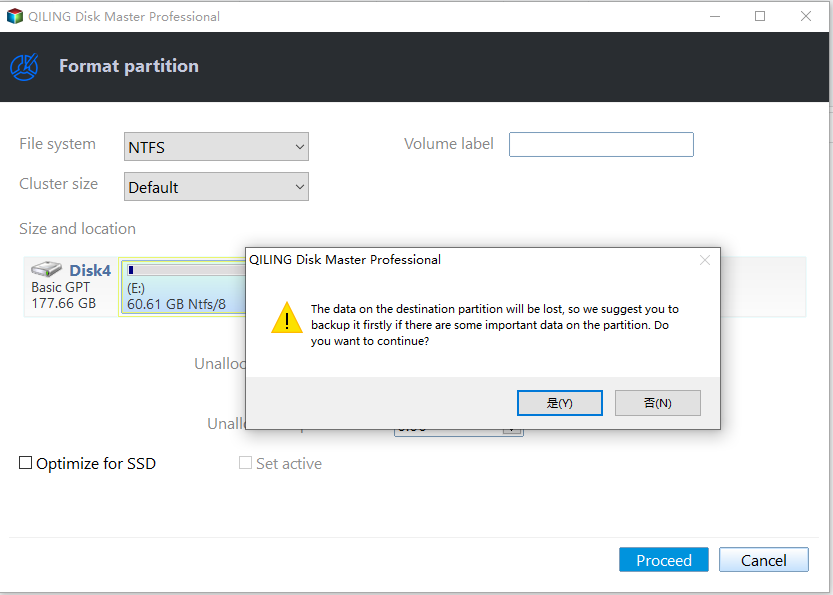
Step 4. In the Warning window, click "Yes" to continue.
If your USB is in NTFS format, this tool allows you to directly convert NTFS to FAT32 without losing any data.
4️⃣Solution 4. Restore USB to Full Capacity
Burning an ISO file to a USB can fail if the ISO file is too large or the USB drive lacks sufficient space, but there are ways to restore the USB to its full capacity.
- Format USB to NTFS/exFAT: This method will be incompatible with the requirements of burning ISO files. So it is better to choose another method. If you don't burn Windows ISO, you can select this option.
- Manually delete the USB contents: To delete unwanted files or contents, you can use File Explorer on your Windows PC. Simply open File Explorer, navigate to the location of the unwanted files, select the files you want to delete, and then press the Delete key on your keyboard.
- Delete the USB partition: You can delete and reuse the entire USB partition.
- Secure erase the hard drive: You can use Command Prompt or Disk Management to quickly format a drive.
Conclusion
If you're unable to burn an ISO file to a USB, the issue is likely due to the USB format or the burning method. To resolve this, download the correct Windows ISO file from the official website and use Qiling Disk Master to burn it to the USB drive. Alternatively, you can format the USB drive to resolve the issue.
This tool, Qiling Disk Master, can assist with managing USB drives, regardless of the method you choose. If you need help, you can download it from the blue button below to better manage your USB.
FAQs About Can't Burn ISO File to USB
1. How to burn ISO files to USB on Mac?
To burn an ISO file to a USB drive using Mac's Disk Utility, follow these steps: First, open Disk Utility, then select the USB drive from the left-hand sidebar and click the "Erase" button to format it. Next, click on "Restore" from the top toolbar and select the ISO file you want to burn. Finally, click on the "Restore" button to start the burning process.
Step 1. Insert your USB into the macOS.
Step 2. Open Disk Utility via Finder or Launchpad.
Step 3. If the USB appears, select New Image and save the disk size and name.
Step 4. Select the created image files by clicking Burn.
2. How to burn ISO to USB on Windows 11?
To burn a USB on Windows 11, download the ISO files and use a third-party tool, such as Qiling Disk Master, to put the ISO onto the USB.
Step 1. Download Qiling Disk Master and navigate to the Bootable Media section.
Step 2. Choose Burn ISO and click Next.
Step 3. Open the ISO file, set the USB as the destination, and click Burn.
3. Can I copy the Windows ISO file to a USB on Mac?
You can copy Windows ISO files to a USB drive by using Boot Camp on a Mac. First, create a Windows 10 installation disk, then select the ISO image from internal storage on your Mac. This process will help you successfully make a Windows USB using your Mac.
Related Articles
- How to Boot from USB on HP Laptop on Windows 11/10 [Step-by-Step Guide]
- 3 Solutions to File Record Segment is Unreadable
- M.2 vs. SSD, What's the Difference [New Details]
- How to Fix Windows 11 Slow Startup? Your Complete Guide
- How to Upgrade Xbox One X to SSD - Guide with Pictures
Are you looking to upgrade your Xbox One X to SSD to improve and optimize your gaming experience? This article will provide you with a detailed guide to this process. - How to Upgrade Xbox Series X/S Storage [Ultimate Guideline]
If you're running out of space on your Xbox Series X/S, don't worry - Microsoft offers a solution. You can upgrade your storage space using easy methods, allowing you to free up room on your console and continue enjoying your games and content without any issues.