How to Fix Your PC Did Not Start Correctly | 8 Ways🔥
Have you ever encountered the "Your PC did not start correctly" error when you turned on your computer? Here is a real case from the computer issues forum Super User:
Qiling will provide multiple practical solutions to help fix the computer startup issue in this guideline. Follow the comprehensive how-to guides to learn how to resolve this problem.
How to Resolve Your PC Did Not Start Correctly - 8 Ways
This part will guide you through a step-by-step tutorial with pictures for each solution, providing a clear and visual understanding of how to tackle each problem.
- Way 1. Apply Boot Repair via Qiling Disk Master
- Way 2. Run Windows Startup Repair
- Way 3. Repair MBR
- Way 4. Check System File
- Way 5. Rebuild BCD
- Way 6. Boot Into Safe Mode
- Way 7. Perform a System Restore
- Way 8. Delete Recently-Installed Windows Updates
If restarting your computer can't resolve the problem, you can immediately try the following eight methods. Don't forget to share with other users in need after this issue is successfully solved: If restarting your computer doesn't fix the issue, you can try the following steps. If restarting your computer can't resolve this problem, you can immediately try the following eight methods.
Way 1. Apply Boot Repair via Qiling Disk Master
We highly recommend Qiling Disk Master Professional for a smooth experience dealing with various startup repair issues, such as Windows startup repair not working and a black screen after installing Windows 10, due to its easy-to-use interface, quick solutions, and comprehensive capabilities.
To repair boot issues using Qiling Disk Master, start by downloading and installing the software on your computer. Then, create a bootable media, such as a USB drive or CD/DVD, and insert it into your computer.
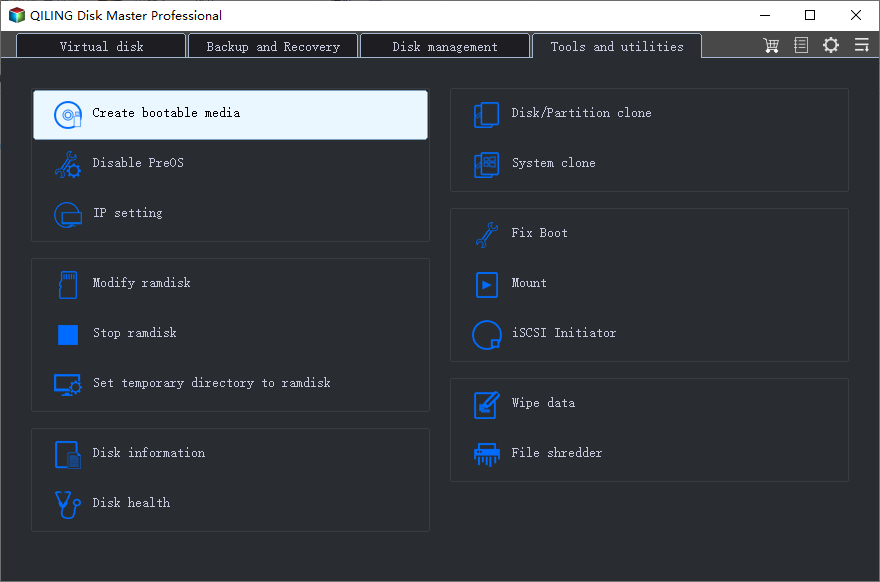
Step 1. After connecting the external drive/USB, start Qiling Disk Master, go to "Tools" and click "Create bootable media".
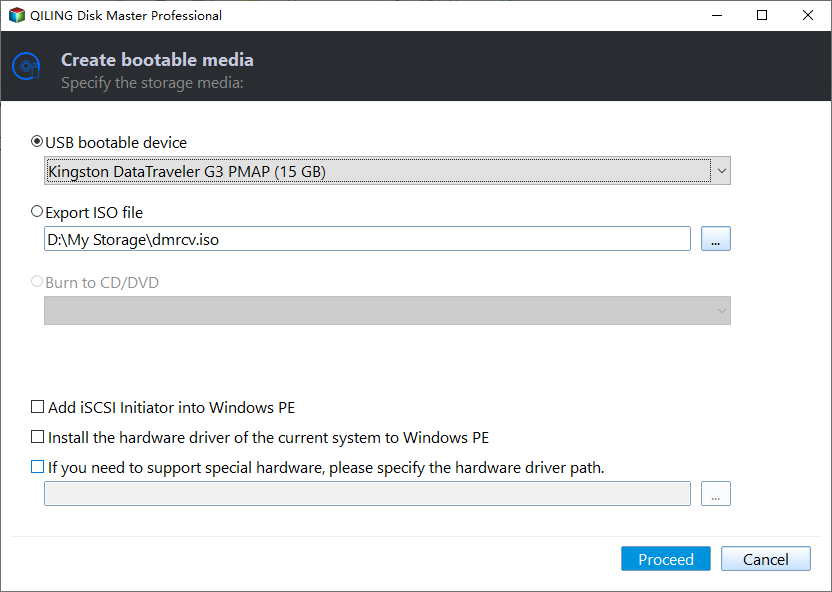
Step 2. To proceed, select a available USB drive or CD/DVD and click "Proceed", or alternatively, burn the Windows ISO file to the storage media.
Step 3. Connect a bootable drive to a new computer, reboot by pressing F2/Del to enter the BIOS, set the bootable drive as the boot disk, and exit by pressing F10.
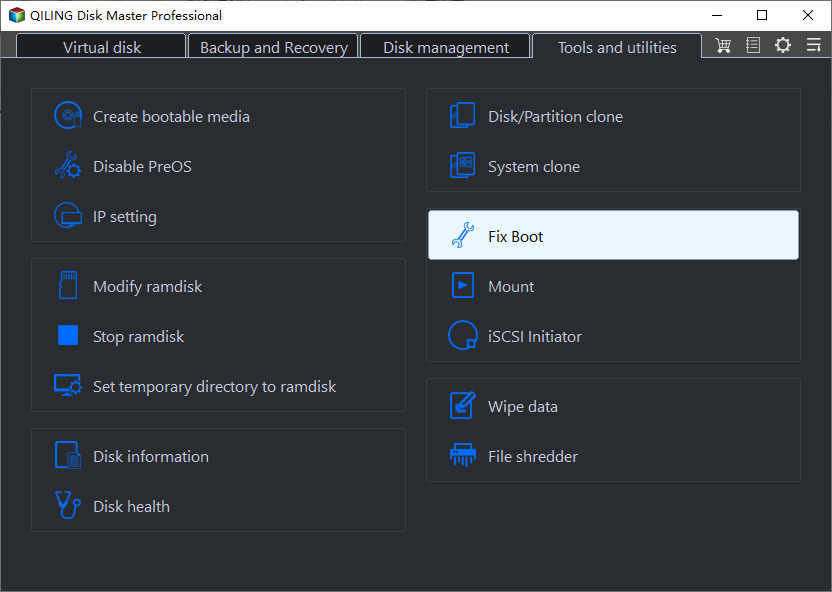
Step 4. Boot the computer again, enter the WinPE interface, and open Qiling Disk Master. From the menu, select "Tools" and click "Fix Boot" to resolve the issue.
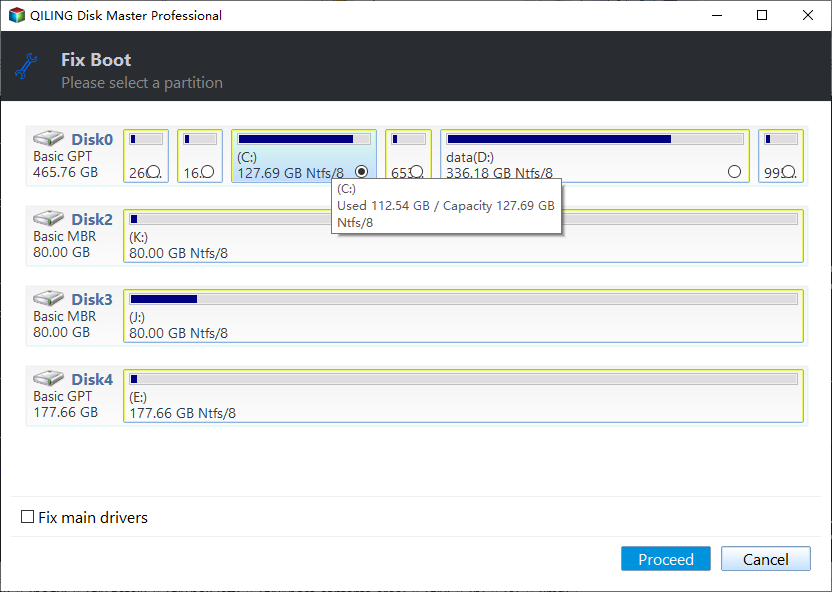
Step 5: Select the system you want to repair and click "Proceed".
Step 6. Wait a moment, and you will receive an alert that the system has been successfully repaired.
Here are the key features that can help resolve the "Your PC did not start correctly" error:
- Fix RunDll Error on Startup
- Fix can't find boot device error in Windows 10/8/7
- Apply Windows 10 boot repair
- To resolve the issue where Startup Repair cannot repair your computer automatically in Windows 10/8/7/Vista, try the following: Run a System File Checker (SFC) scan to identify and replace corrupted system files. You can also run a DISM scan to check for any corrupted system images.
- Troubleshoot Windows 11 boot loop
Hurry up and install this tool to keep your computer far from annoying boot problems:
Way 2. Run Windows Startup Repair
Windows Startup Repair is a tool in Microsoft Windows that helps fix computer problems during startup, such as corrupt system files or misconfigurations. If your computer won't boot properly and keeps going back to the Automatic Repair screen, try running the Startup Repair tool once.
Below is what you should do:
Step 1. To resolve the issue, select "Advanced options" on the "Your PC did not start correctly" screen. This provides you access to a range of troubleshooting and repair tools, including System Restore, Safe Mode, and the Command Prompt.
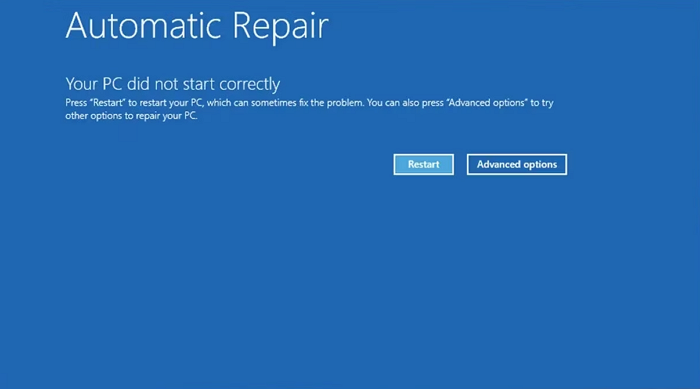
Step 2. Choose the "Startup Repair" option and let it detect and fix the startup issue.
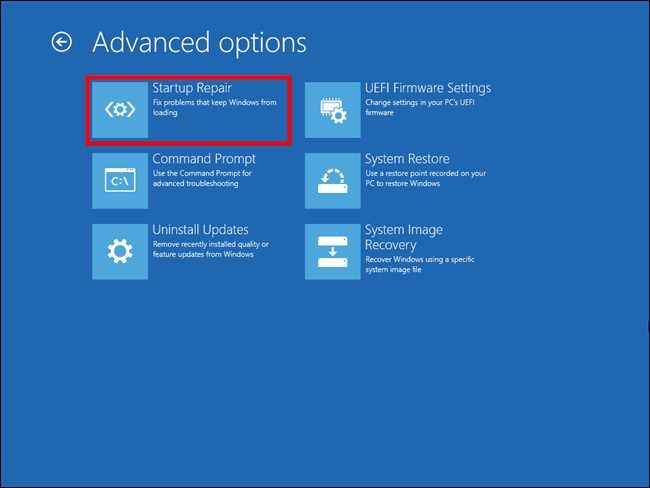
Step 3. Click "Restart" when the process is completed.
If the Startup Repair tool doesn't work, you may get a warning message stating that it cannot repair your computer automatically. In this case, refer to the solution provided by the tool to resolve the issue, or try the practical tips below:

If your Windows 11 startup repair is not working, don't worry! There are 7 tips to help you fix the issue.
If you're experiencing issues with Windows 11's startup repair not working, this post provides can help. We'll walk you through effective solutions to resolve this problem and get your system up and running smoothly.

Way 3. Repair MBR
The Master Boot Record (MBR) is the first sector of the system disk where Windows system and boot files are stored. If the MBR is damaged or corrupted, it can prevent the system from booting into Windows. Rebuilding the MBR is a viable solution in this case, and a tool like Qiling Disk Master Professional can effectively help with this process.
Step 1. Create a WinPE bootable disk
- Launch Qiling Disk Master, click "Bootable Media" on the toolbar, and select "Create bootable media".
- Click "Next" to finish the process.
Step 2. Boot Qiling Disk Master Bootable USB
- Connect the bootable USB or CD/DVD to your PC.
- When restarting the computer, press F2 or Del to enter the BIOS screen. From there, set the computer to boot from the "Removable Devices" or "CD-ROM Drive". Once this is done, Qiling Disk Master will automatically run.
Step 3. Rebuild MBR
- To fix the issue, go to the Disk management tab, right-click on the affected disk, and select the "Rebuild MBR" option.
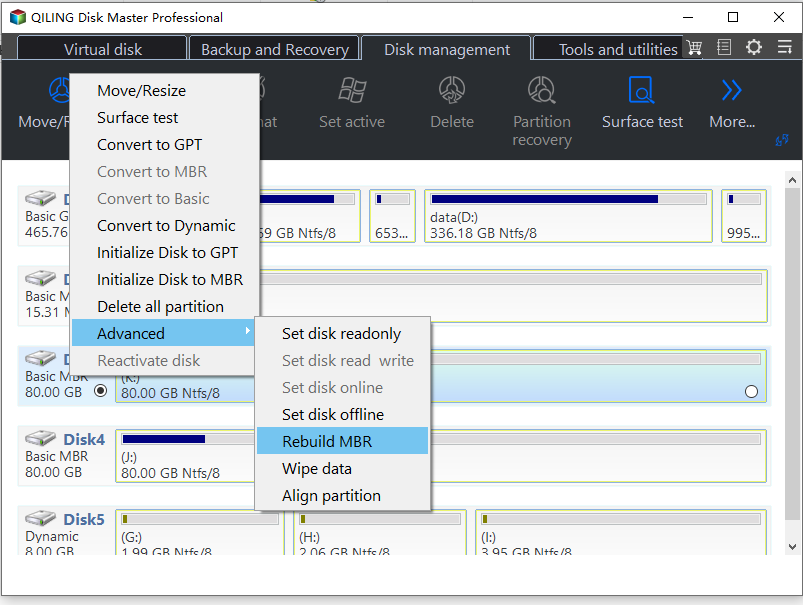
- Select the disk and the type of MBR, then click "Rebuild".
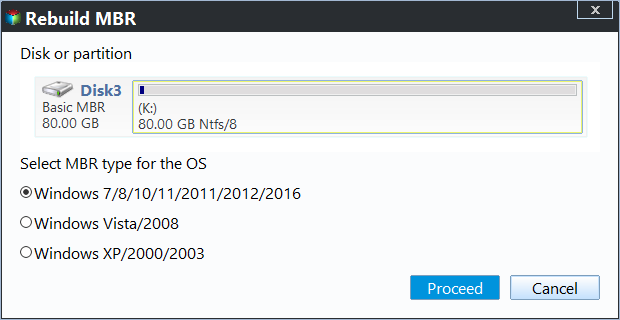
- The system successfully rebuilt the Master Boot Record (MBR) on Disk X, displaying the message "MBR has been successfully rebuilt on Disk X".
Way 4. Check System File
To fix the "Your PC did not start correctly" error caused by corrupted or missing system files, you can run the Windows System File Checker (SFC) tool to scan and repair system file problems.
Step 1. To access the Command Prompt, search for it in your computer's search bar, and log in as an administrator. This will allow you to execute commands with elevated privileges.
Step 2. Type the SFC command below and hit the "Enter" key:
SFC /scannow
Step 3. Wait till the scan finishes. You may receive:
- The SFC program detected no integrity issues.
- Windows Resource Protection found corrupted files but was unable to repair some of them.
For message 1, close the Command Prompt window. For message 2, to perform a DISM check, open Command Prompt as Administrator, type the following command, and press Enter: `dism /online /cleanup-image /restorehealth`
🚩Related Reading: To run the System File Checker (SFC) and Deployment Image Servicing and Management (DISM) tools in Windows 11, open Command Prompt as an administrator. Type the command `sfc /scannow` and press Enter to scan and replace corrupted system files.
Way 5. Rebuild BCD
To repair BCD, you can use the built-in command-line utility called Bootrec.exe. Here's how to use it:
Step 1. In the Automatic Repair error blue screen, click on "Advanced options" and then select "Command Prompt."

Step 2. Type the following commands before hitting "Enter" on the keyboard for each:
- Bcdedit /export C:\BCD_Backup
- ren c:\boot\bcd bcd.old
- Bootrec /rebuildbcd
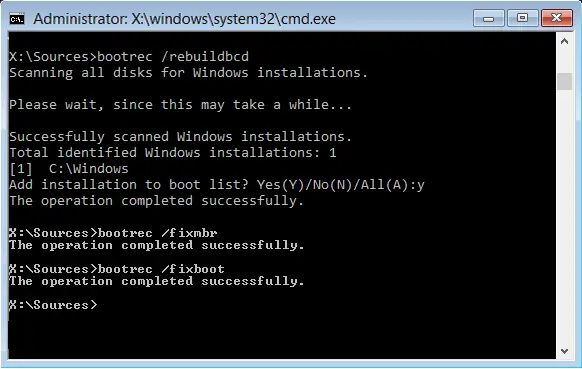
Step 3. Write exit to quit the utility and then restart your PC.
Way 6. Boot Into Safe Mode
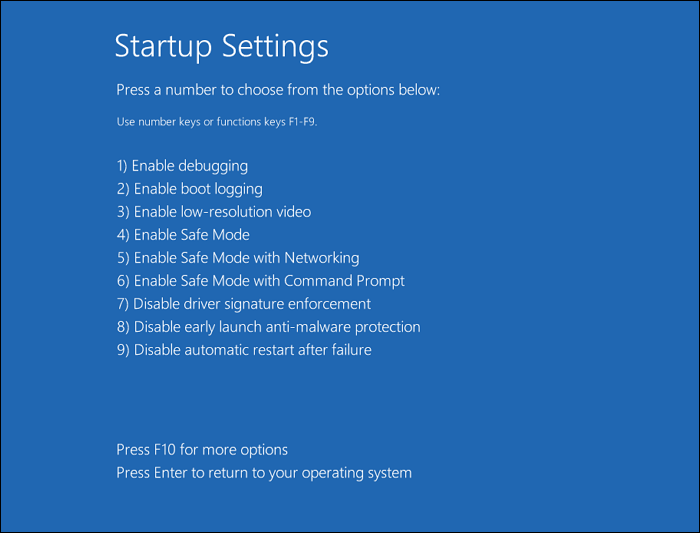
Step 1. On the "Your PC did not start correctly" error window, choose the "Advanced Options" button.
Step 2. From the Menu, select "Startup Settings"
Step 3. To boot into Safe Mode, restart your computer, and immediately press the "F4" key during the reboot process. This will initiate the Safe Mode startup sequence.
Way 7. Perform a System Restore
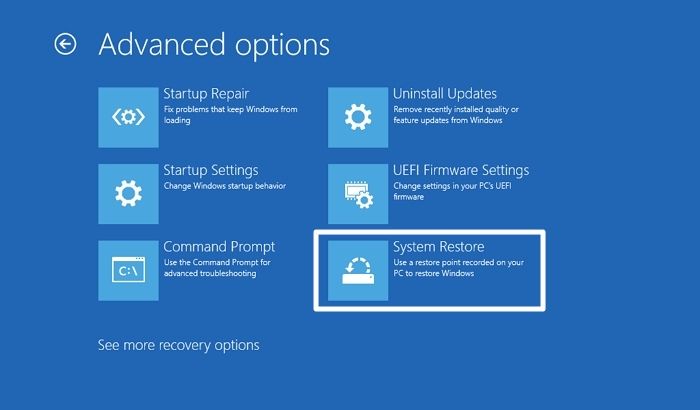
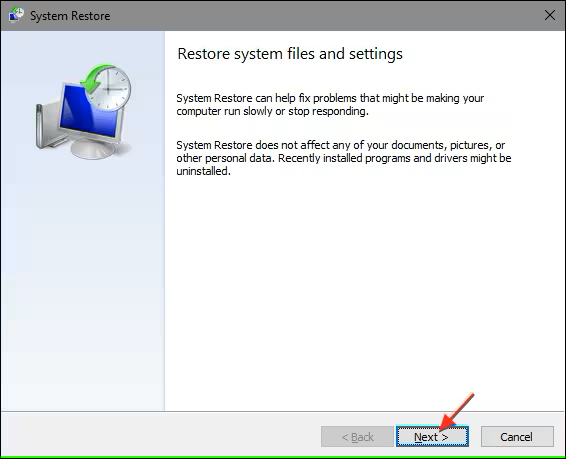
If the issue arises after updating Windows, you can resolve it by restoring your system to its previous version using the Windows System Restore function. To do this, follow the steps below:
Step 1. Select the "System Restore" option under the "Advanced Options."
Step 2. Choose a time point you want to return to and click "Next."
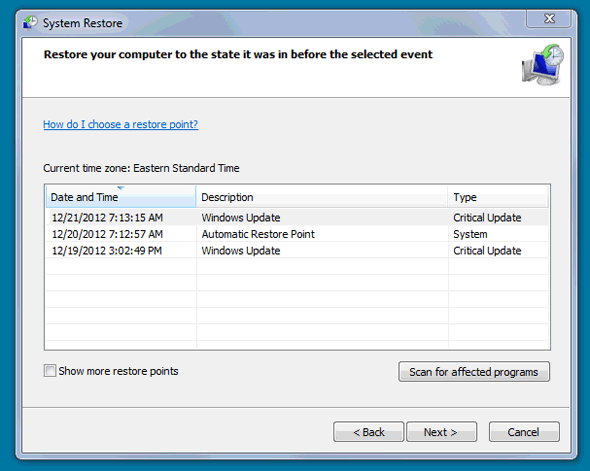
Step 3. Follow the on-screen instructions and complete the System Restore Wizard process.
Way 8. Delete Recently-Installed Windows Updates
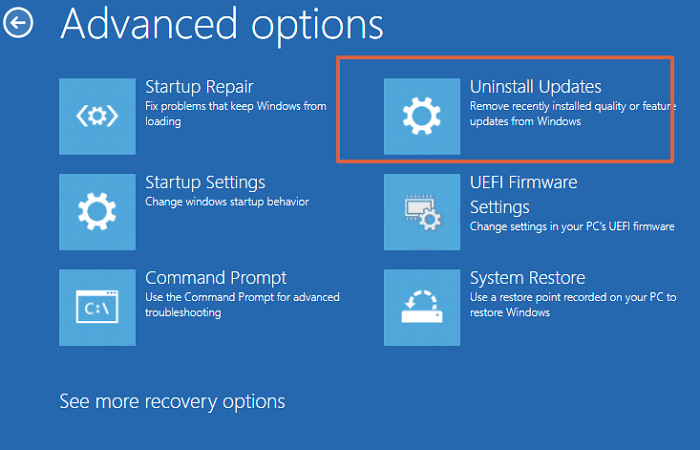
You can also resolve startup errors caused by recent Windows updates by cleaning them up. To do this, you can restore the Windows system to its previous time point, which will undo any changes made by the updates. However, if you'd like to remove the updates themselves, you can do so to repair the startup errors.
Step 1. To uninstall Windows updates, go to the "Advanced Options" menu and select "Uninstall Updates." From there, choose the latest quality or feature updates and follow the prompts to remove them.
Conclusion
The "Your PC did not start correctly" error in Automatic Repair can be resolved using eight workable go-to methods, which are described in simple and comprehensive tutorials. By following these methods, you can repair the issue and regain access to your Windows computer. Additionally, tools like Qiling Disk Master can provide helpful assistance with computer startup errors, making the process easier and more efficient.
FAQ About Your PC Did Not Start Correctly
If you have any remaining questions, you can find the answers in the FAQ section.
1. How do I fix my computer that couldn't turn off correctly?
If your computer can't shut down normally, you can try rebooting it. After the system reboots, try to turn it off normally. To access the power icon, click the Start Menu icon on your system and select "Restart" from the menu.
2. Why my computer did not boot correctly?
Windows may fail to start properly due to various reasons such as corrupted or missing BCD, compromised system integrity, faulty drivers and software, and more.
💡You May Like: How to Fix Hard Drive Won't Boot [Top 6 Fixes]
3. Can BIOS cause display issues?
If the BIOS is the issue, resetting it to its default settings may resolve the display problem. This can be done by accessing the BIOS settings during boot-up and selecting the option to reset to default. This will restore the BIOS settings to their most recent saved configuration, potentially resolving the display issue.
Related Articles
- Solved: SSD Not Showing Up in Disk Management on Windows 10/11/8/7
- How Big Is Overwatch 2 | Solution for Insufficient Disk Space🔥
- How Do I Clone Windows to SSD for Free? Your Reliable Guide
You can clone your Windows system to a new SSD for free without any boot issues. To do this, follow the steps outlined on this page, which provides a free solution that works to transfer your Windows OS to a new SSD without any complications. - How to Copy Hidden Partition to Another Drive/USB with Success
this guide will provide information on hidden partitions and guide you through the process of cloning them to another drive or USB, including recommendations for the best software to assist with the task. - How Big Is Valorant | Download Size & System Requirement🔍
To play Valorant, you'll want to know its system requirements and how to free up disk space for a smooth gaming experience. This guide provides detailed information and tips for cleaning up your disk to ensure Valorant runs smoothly on your device. - How to Find Large Files on Windows 10 | Quick Guide💡
If you're running low on storage space on your Windows 10 device, this article can help you identify and delete large files that are taking up valuable space. It will also provide tips and ideas for freeing up disk space and optimizing your computer's storage capacity.
Products
Articles & Tutorials
- Data Recovery
- Data Backup
- File Recovery
- File Backup
- System Backup and Restore
- Disk and Partition Clone
- Technical articles
- Mobile articles
- Disk Master Help
- Windows Data Recovery Tutorials
- Windows Secure Delete Tutorials
- Windows Partition Management Tutorials
- Windows File Backup and Restore Tutorials
- Windows System Backup and Restore Tutorials
- Windows Disk Backup and Restore Tutorials
- Windows Clone Tutorials