Convert to GPT Greyed Out in Windows 10? Fix It Instantly
With the development of technology, users can update their old Windows system to Windows 11, but first, they need to convert their system disk from MBR to GPT. However, some users have found that the option to convert to GPT is greyed out in Disk Management, preventing them from proceeding with the update. To resolve this issue, we have identified the best solutions, which will be presented in a concise and easy-to-follow format.
| ⏱️Duration | 5-7 minutes |
| 🔨Tools |
|
| 💻Supported Systems | Windows 10 |
| 👣Steps |
Use Qiling Disk Master to Convert...Full steps Convert to GPT Using Disk Management...Full steps Running Diskpart to Convert to GPT...Full steps |
The option to convert to GPT disk is greyed out in Disk Management because the system disk is not empty, meaning it has partitions. To resolve this, you can delete all partitions on the disk, which will allow the conversion to GPT. Alternatively, you can create a new disk and copy all data to the new disk, then convert the original disk to GPT. This will ensure a successful conversion.
3 Methods to Fix "Convert to GPT Greyed Out Windows 10."
After understanding why the "convert to GPT greyed out Windows 10" error occurs, we can proceed to the solutions. Qiling Disk Master is a top recommendation for converting MBR to GPT due to its user-friendly interface and high efficiency, which can complete the process without deleting partitions. However, it is still essential to back up your data and files to avoid data loss. By following the tutorial of this method, users can successfully accomplish the conversion process.
Method 1. Convert MBR to GPT via Qiling Disk Master (Without Lossing Data)
If you're looking for a hassle-free way to convert your MBR to GPT without losing any data, Qiling Disk Master is the perfect solution. This user-friendly tool allows you to easily convert your system disk from MBR to GPT in just a few simple steps, all while safeguarding your data from loss. Download Qiling Disk Master and start the easy disk conversion process today.
Here is how to convert MBR to GPT using Qiling Disk Master in one paragraph shortly:
Step 1. Download and launch Qiling Disk Master on your computer.
Step 2. To continue, go to Disk Converter and select the "Disk management" tab page.
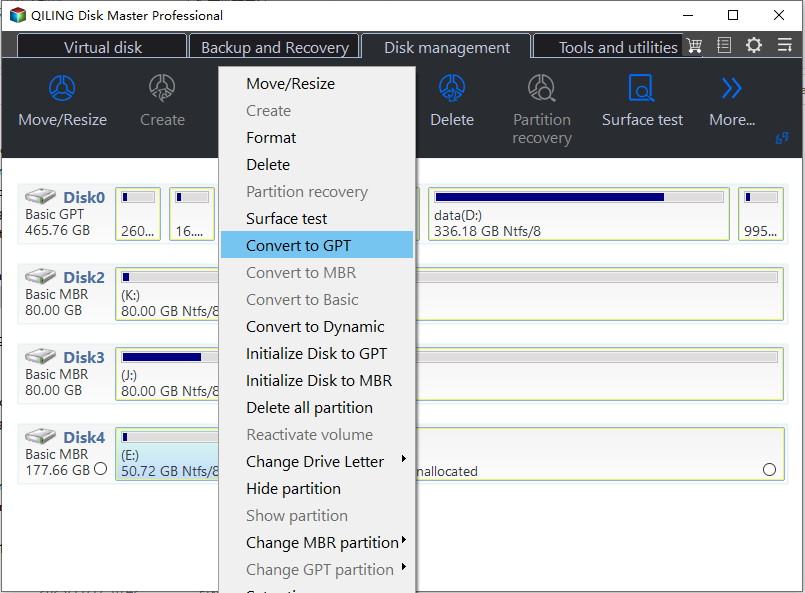
Step 3. To convert the target MBR disk to GPT, right-click it and select "Convert to GPT".
Other Powerful Features of Qiling Disk Master
Qiling Disk Master offers more than MBR to GPT conversion. It can also help with the following disk and partition management tasks.
- Convert FAT32 to NTFS in Windows 10
- Change basic disk to dynamic
- Resize the partitions in Windows 10
- Clone disk from one drive to another
If you've encountered a situation where your computer won't boot, you can't access your data, or your operating system is damaged, installing Qiling Disk Master can help you resolve the issue quickly and easily.
Method 2. Convert MBR to GPT via CMD (Deleting All Partitions)
To convert a Master Boot Record (MBR) disk to a GUID Partition Table (GPT) disk using DiskPart, back up all data first because this method deletes every partition on the target disk. Compared with Disk Management, DiskPart uses command lines and requires extra care, so make sure you select the correct disk before running the commands.
To convert MBR to GPT using DiskPart, run the commands below in order. Replace the disk number with the target MBR disk, and note that the clean command removes all existing data on that disk.
Step 1. Type cmd to open "Command Prompt"
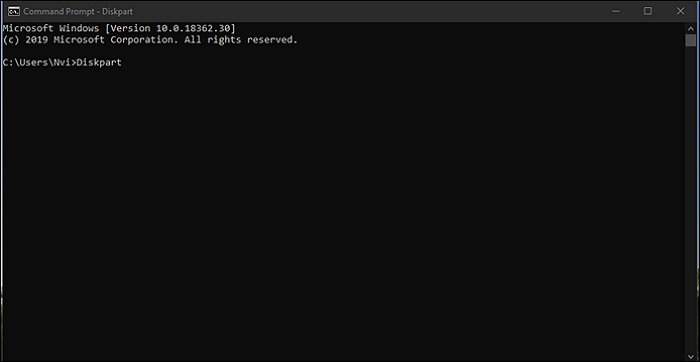
Step 2. Right-click it and choose "Run as administrator."
Step 3. To access the Command Prompt as an administrator, type `diskpart` and press Enter. This will open the Diskpart utility.
Step 4. Type the following command lines and hit "Enter" after each:
- list disk
- select disk 2 (Replace 2 with the disk number of your MBR disk.)
- clean
- convert gpt
Step 5. Type exit to close when the conversion process is finished.
Method 3. Convert MBR to GPT via Disk Management (With Data Loss)
To convert an MBR disk to GPT, you can enable the convert to GPT option by deleting all partitions on the disk, then use Disk Management to change the disk from MBR to GPT. This process allows the conversion of the disk from MBR to GPT, enabling the use of larger disk sizes and enhanced partitioning capabilities.
To fix the "convert GPT" option being grayed out in Disk Management, follow these steps: Open Disk Management by searching for it in the Start menu, right-click on the disk you want to convert, select "Convert to GPT disk" from the context menu, confirm the conversion in the pop-up window, and wait for the process to complete. This process will convert the disk to use the GPT partitioning scheme, which is required for disks larger than 2TB.
Step 1. Back up the data on the MBR disk before conversion.
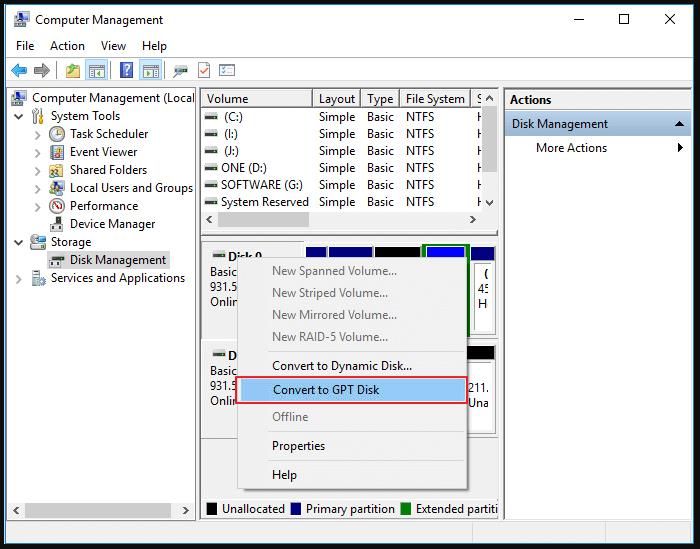
Step 2. Type "Disk Management" in the search box.
Step 3. Delete all partitions and volumes on the MBR disk. (The greyed-out option will become available.)
Step 4. Right-click the target MBR disk and select "Convert to GPT Disk."
If this guide helped you resolve the "Convert to GPT" option being greyed out in Windows 10, consider sharing it with others who may face the same problem.
Conclusion:
The "convert to GPT greyed out Windows 10" issue often appears when the disk still contains partitions or when the conversion method has limitations. Back up important data before trying any method that deletes partitions. Qiling Disk Master provides a safer way to convert MBR to GPT without deleting partitions, while DiskPart and Disk Management require removing existing volumes first.
FAQ about Convert to GPT Greyed Out Windows 10
If you're still unsure about converting to GPT greyed out Windows 10, here are some frequently asked questions and their quick answers:
1. How do I know if my BIOS is MBR or GPT?
To determine whether your disk is MBR or GPT, right-click the disk and select "Properties". Then, check "Partition style" under the "Volumes" tab to see whether the disk uses Master Boot Record (MBR) or GUID Partition Table (GPT).
2. Why can't I boot my SSD as GPT?
If your SSD is a GPT disk, you need to switch to UEFI Setup, and if it's an MBR disk, you need to ensure Legacy BIOS is set up, or you won't be able to boot from your SSD.
3. How to enable UEFI for the GPT disk?
Before fixing the issue, you need to know how to check if your system is set to UEFI or Legacy mode. If you're unsure, follow the step-by-step tutorial on how to change the boot mode from BIOS to UEFI.
Step 1. Reboot the computer and press the F2 key to enter the BIOS setup utility.
Step 2. Click "Boot," select "UEFI/BIOS Boot Mode," and hit Enter.
Step 3. Switch the boot mode from "Legacy" to "UEFI."
Related Articles
- How to Reset Windows XP Passwords [Full Guide]
- How to Make Unallocated Space Contiguous [Step-by-Step Guide]
- How to Create WinPE Bootable Disk for All Windows - 2 Ways
- Windows Can't Format USB Drive? Format USB with 6+ Fixes [Beginners' How-To Guide]
- How Do I Run External SSD Speed Test on My Own? Your Guide Is Here
Have you purchased an external SSD? And do you want to learn how to test an external SSD's speed? Don't worry. You can learn it easily through this how-to guide. The process is easy and straightforward. Just follow this tutorial. - Failed to Create a New Partition on the Selected Unused Space? Fix Now!
The 'Failed to create a new partition on the selected unused space' error occurs while installing Windows, but don't worry, this article provides techniques to fix it using the right tools in your Windows computer.