Tutorial | Separate OS from Programs Without Losing Data
Having more than one partition on your hard drive, specifically separating the Operating System (OS) from programs, is a good idea. The system partition, usually the C drive, contains the OS and provides essential support for running a computer, managing hardware and software resources, and offering various services. This setup allows for better organization and security of your computer's resources.
To avoid slowing down your PC and causing unexpected errors, it's generally recommended to install programs and apps on a separate partition from your operating system. If your computer only has one partition, you'll need to create additional ones to store your programs and apps. Fortunately, this article provides a step-by-step guide to help you achieve this.
To separate the program from the Windows system, you can install the program on a separate drive, such as an external hard drive or a network drive. This way, the program's files and settings won't be affected by any changes made to the Windows system.
Stage 1 - Create a New Partition (2 Ways)
Now, if you only have one hard disk on your computer and you are not planning to buy another HDD or SSD, here's what you can do to separate the OS from programs. First, create a new partition from the only partition you have. Here, we provide you with 2 ways to do this.
The C drive is the primary drive where Windows is installed. It contains the operating system, programs, and user data. The C drive is usually the default drive letter assigned to the system drive.
Way 1. Use Qiling Disk Master
Partitioning a drive can be challenging for Windows beginners, as it requires considering different file systems. For a straightforward partitioning experience, a reliable third-party tool is recommended. Qiling Disk Master Professional is a suggested option for creating a new partition with ease.
This software offers a user-friendly interface and comprehensive functions to manage disks and partitions. It allows you to complete various partition-related operations, making it a powerful tool for managing your disks and partitions.
Part 1. Resize the C drive to a smaller partition
Step 1: Locate and select target partition to shrink
To shrink a partition, go to the Partition Manager section, right-click on the partition you want to shrink, and select "Resize/Move".
Step 2: Adjust to shrink partition
To shrink a partition, use your mouse to drag the end of the target partition to the desired size, effectively reducing the partition space.
You can also adjust the partition size box to shrink the target partition. Once done.
Step 3: Execute operation
Click the "Proceed" button to keep all changes.
Part 2. Create a new partition from unallocated space
Step 1. Launch Qiling Disk Master, right-click on the unallocated space on your hard drive or external storage device and select "Create" from the main window.
Step 2. Adjust the partition size, file system, label, and other settings for the new partition to suit your needs.
Step 3. Click on the "Proceed" button to create a new partition.
Watch a video tutorial to learn how to create a partition in various file systems, including NTFS, FAT, and EXT, and gain the skills to do so.
Besides this way, you can also split the C drive and the tool will prompt you to create a new partition directly.
Way 2. Use Disk Management
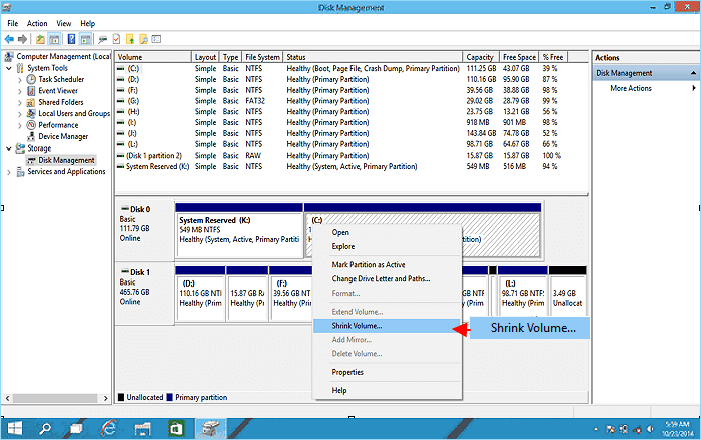
For those who don't like third-To create a partition from the C drive on your Windows computer using the built-in Disk Management tool, follow these steps: Open Disk Management by searching for it in the Start menu, select the C drive, right-click on it, and choose "Shrink Volume" to create unallocated space. Then, right-click on the unallocated space and select "New Simple Volume" to create a new partition. Follow the prompts to assign a drive letter and file system to the new partition. This will allow you to create a separate partition from the C drive.
Step 1. Right-click the Windows icon and select Disk Management.
Step 2. Right-click the C drive and select "Shrink Volume".
Step 3. Confirm the amount of space you want to shrink. Then click "Shrink".
Step 4. Right-click on the unallocated space you just created, and select "New Simple Volume" from the context menu.
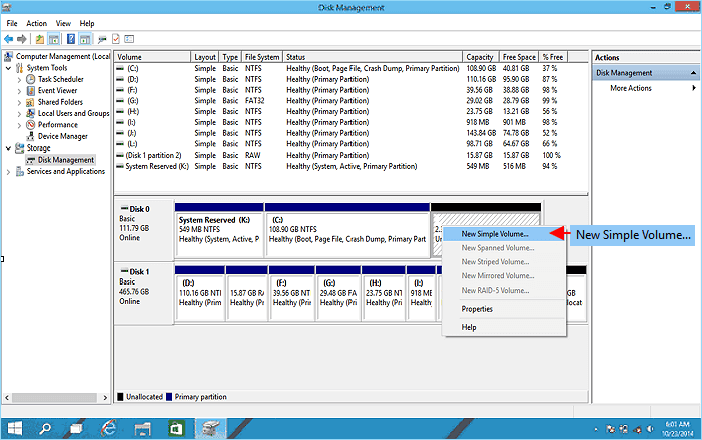
Step 5. The New Simple Volume Wizard will guide you through the process of creating a new simple volume, which is a basic step in setting up a new disk or partition. Follow the on-screen instructions to complete the wizard, and you'll have a new simple volume set up in no time.
If you're having trouble using the "New Simple Volume" option in Disk Management, you're not alone. The issue may be caused by various factors, and the solution can be found by reading the article below.
To fix the "New Simple Volume Greyed Out" error in Windows Disk Management, first, ensure the disk is not in use by other applications or services. Then, open Disk Management, right-click the disk, and select "New Simple Volume" from the context menu.
If the New Simple Volume is greyed out in Disk Management, it means you are unable to create a new volume from unallocated space. This can be resolved by checking if the disk is online, converting the disk to GPT if it's MBR, or checking if the disk is removable and making sure it's not in use by another program. If none of these solutions work, you can try using the built-in Check Disk tool to identify and fix any errors on the disk. If the issue persists, you can use a third-party disk management tool to create a new volume.
If you think our method is simple and practical, please share it on your social media to help more people know about it!
Stage 2 - Move Programs to the New Partition
Now that you have multiple partitions on your hard drive, you can use Qiling Disk Master to move programs from the C drive to the D drive. This can be done using the AppMove feature, which allows you to transfer your programs and apps from one partition to another, making the process easy and efficient.
Step 1. Select the targeted partition and click "Split Partition" from the Feature List.
Step 2. Resize the size of the two split partitions and click "OK".
Step 3. All the introduced changes to the disk layout will be pending until applied in the Execute Task.
Step 4. The changes were made and the partition was successfully split into two separate partitions.
Notes:
- Qiling Disk Master only supports splitting partitions on basic disks, and is unable to split dynamic volumes.
- Only the non-hidden partition can be split.
- The unused space of the operating partitions should be more than 5% of the total partition space.
Benefits: Separate OS from Programs
Separating the OS from your files and apps is an essential move for better management and performance of your computer. There are many advantages of it, and here I will list 3 main ones for you to have a deep look at.
- Avoid data loss. If your computer is unable to start or has crashed, and you've tried all the methods you can find, but nothing works, you may finally resort to reinstalling the system. It's a good idea to separate the OS from programs to make it less likely that your personal data will be affected during the process. Ideally, you would have created a system image in advance.
- Improve computer performance. When other programs and apps are installed on the C drive, they consume free space, potentially leading to poor system performance, including slow speeds and system crashes.
- Ensure enough space for certain programs. Certain built-in programs and third-party software require more storage space than basic requirements to store files generated from themselves, and can only be stored on the C drive.
Conclusion
Storing the Windows operating system and programs on separate partitions makes it easier to manage files and programs. You can use software like Qiling Disk Master to partition the C drive and create a new partition, then safely and quickly move your programs to the new drive. This approach allows for better organization and maintenance of your computer's files and programs.
FAQs on Separate OS from Programs
If you have any other questions related to "separate OS from programs", check the questions and answers listed below.
1. Is it safe to partition C drive?
They are theoretically safe operations, assuming there isn't corruption. You can resize the C drive if there is free space at the end so that you can perform data migration to store them on another drive.
2. Is it better to install programs on a separate partition?
It's recommended to install the operating system on a separate partition from your files and programs, as this can help prevent issues that may arise during updates. This setup allows you to isolate the operating system and keep your important files and programs safe.
3. Is it OK to move files from C drive to D drive?
It's perfectly fine to move files from the C drive to the D drive, allowing you to declutter your C drive and free up space. You can either cut and paste personal files from the desktop or saved on the C drive to the D drive, or simply change the file path of the desktop to point to the new location. This way, you can keep your files organized and make the most of your storage space.
Related Articles
- Resolve 100% Disk Usage in Windows 11
- Guide to Migrate OS to SSD for Windows 8.1 with Pictures
- How to Upgrade Xbox One Hard Drive [Guide with Pictures]
- [Fixed] FAT32 Format Option Not Available in Windows
- Can't Format/Clean USB Bootable Flash Drive, How to Fix
Why can't format/clean WinTo USB bootable flash drive? How can you fix this error efficiently? Don't worry; this article will guide you on how to remove this error. - Clean VS Formatting a Hard Drive, Can You Tell Me Their Difference
Is cleaning a hard drive the same as formatting a hard drive? Of course not. This article focuses on this question and tells you how to format a hard drive instead of cleaning a hard drive.