How to Split C Drive in Windows 11/10/8/7🔥
To optimize system performance and improve disk usage, it's recommended to divide the C drive into partitions, freeing up space and reducing clutter, ultimately leading to a more efficient and stable operating system.
This article from Qiling offers two simple methods to split the C drive on Windows 11/10/8/7, allowing you to store different types of data on separate partitions.
Split C Drive with Partition Software
While Windows has a built-in Disk Management, it can be complex for beginners and may lead to data loss. For a more user-friendly experience, third-party partition software is recommended.
With the help of Qiling Disk Master, you can easily split the C drive without formatting, automatically allocating the unused free space into two partitions, and manually adjusting the space capacity of the partitions, among other features.
After downloading the software, follow the detailed steps to solve your problem.
Step 1. Select the desired partition and click "Move/resize" from the Feature List.
Step 2. Resize the size of the two split partitions and click "Proceed".
Step 3. Right-click the unallocated space and select "Create".
Step 4. Click "Proceed" to create a new partition.
Notes:
- Qiling Disk Master only supports splitting partitions on basic disks, and not on dynamic volumes.
- Only the non-hidden partition can be split.
- The unused space of the operating partitions should be more than 5% of the total partition space.
Besides splitting partitions, Qiling Disk Master also offers several other features to help you modify and optimize your disk space, including [list the features].
- Create/Delete Partition: Creating new partitions for storing different kinds of data and files, and deleting unnecessary partitions to free up space for other partitions.
- Merge Partitions: Merging two partitions involves combining their storage capacity into one single larger partition, effectively increasing the available storage space. This process can be useful for consolidating data, reducing the number of partitions, and improving overall system organization.
- Format/Wipe Partition: Formatting or wiping a partition helps protect your privacy by deleting all data stored within it.
- Convert MBR to GPT: Converting a partition style from MBR to GPT allows for the use of larger than 2TB partition capacity, making it a useful upgrade for systems that require more storage space.
- Resize/Move Partition: Resizing or moving a partition allows users to modify its storage capacity or location without deleting its data.
Now that you have learned how to separate a drive, it's time to look at how to create new partitions from unallocated space. Here is a worthy reading article for you to learn.
How to Create Partition from Unallocated Space
To create a partition from unallocated space in Windows 10, you have three methods to choose from. You can read more about them and select the one that suits your needs.
Split C Drive in via Disk Management
There's a built-To divide the C drive into several partitions in Windows OS, you can use the Disk Management tool, which allows you to manage your disk in certain ways. However, to separate the local disk, you can only shrink the C drive first, and then create a new partition from the unallocated space to get more partitions on your hard drive.
Follow the steps in the guide below:
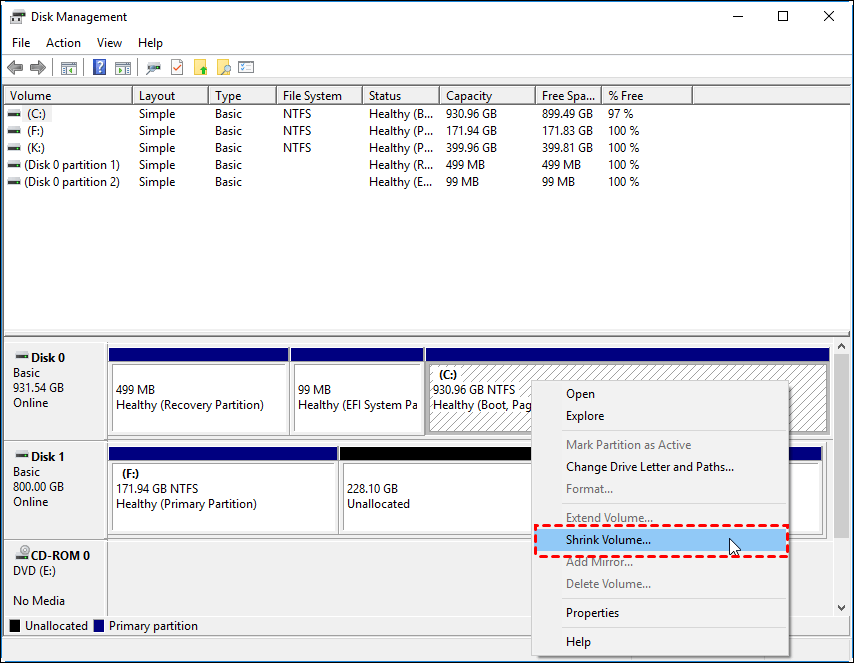
Step 1. Open Disk Management by right-clicking the Start icon and selecting Disk Management.
Step 2. Right-click C drive and select Shrink Volume.
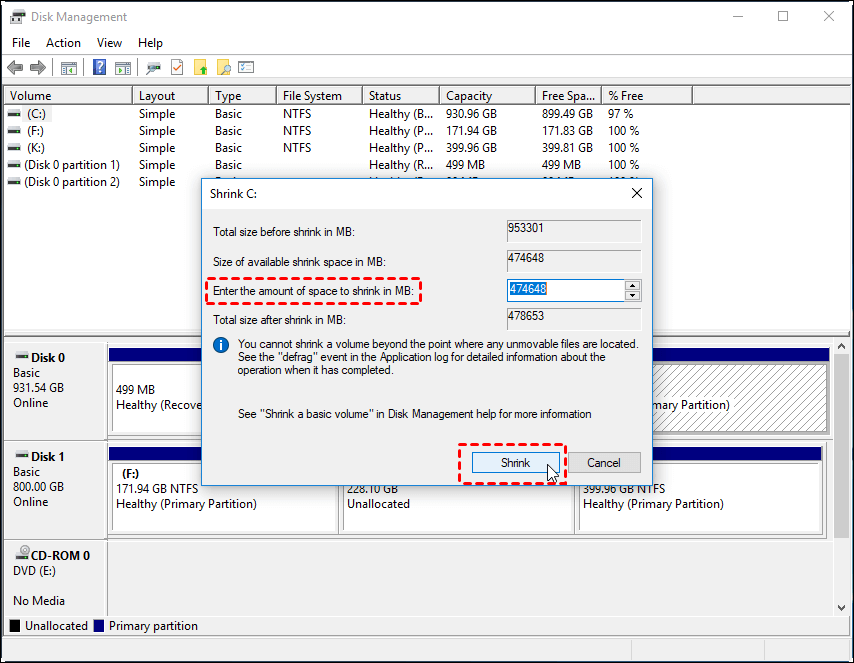
Step 3. Type in the amount of space to shrink from C drive and then click Shrink to get the unallocated space.
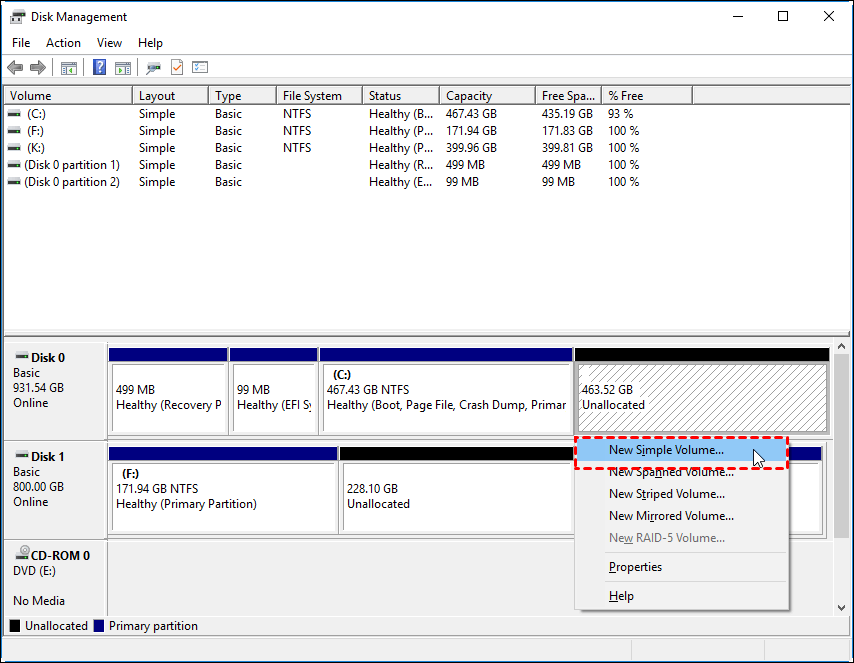
Step 4. Right-click the unallocated volume and click New Simple Volume.
Step 5. To create a new volume, you'll want to allocate a specific amount of space for it, and then format it to create a new partition. This process involves selecting the desired size for the new volume, which can be done by specifying a size in megabytes, gigabytes, or even a percentage of the total available disk space.
Share this post with your friends if it's useful.
Why Do You Need to Split C Drive
Splitting a C drive means dividing a single large partition into smaller ones on a hard disk or SSD, achieved by resizing the large partition into desired smaller sizes.
Using the C drive as the only drive can lead to partition troubles, as the unallocated space cannot be used to create new partitions. This means that users will have to rely on the C drive for all their storage needs, which can cause issues if the drive becomes full. Instead, having multiple partitions can help to keep the C drive free and uncluttered, making it easier to manage and maintain the system. This approach can help to prevent partition troubles and ensure that the system runs smoothly.
When purchasing a new PC, it's recommended to split the C drive first. This approach helps to keep your system running smoothly and efficiently.
- To minimize risk and ensure stability, it's recommended to keep the operating system separate from personal data. This approach helps prevent potential issues with the operating system from affecting personal files and vice versa, maintaining a clean and secure computing environment.
- Make full use of disk space and make the number and size of partitions more reasonable.
- To install two different Windows OSs on one device, you'll need to create a separate partition for each operating system. This can be done using a tool like Disk Management in Windows or a third-party partition manager.
- Improve the loading and performance of your computer.
- Sort data for better management and easier backup.
- This software can work with multiple file systems, including NTFS, FAT32, and exFAT.
Conclusion
When you get a new computer, it's recommended to split the C drive to avoid data chaos and damage to the operating system. This helps keep your files organized and prevents the C drive from becoming cluttered. By doing so, you can maintain a healthy and efficient computer system.
You can maximize your computer's potential without losing data by splitting the C drive using Qiling Disk Master, a partition software that can help you achieve this. By doing so, you can avoid a lot of trouble and save yourself the hassle.
FAQs on Split C Drive
1. How many GB should I leave on C drive?
You should have at least 20 GB on your C drive as free space to ensure the operating system, important data, and other programs have enough space.
2. How do I split C drive into D and E in Windows 11?
Check out the guide here:
- Open Disk Management.
- Right-click C drive, then select "Shrink Volume".
- Type in the amount of space and click "next".
- Right-click on the unallocated space and select "new simple volume".
- Set partition size and add drive letter with D.
- Allocate enough unallocated space to create D. Reserve enough unallocated space and repeat the previous step to create E.
3. Can I split my C drive?
To repartition the C drive, you'll first need to format it, but Windows has a protective mechanism that prevents this with standard tools. Instead, you can only adjust the size of the C drive if you want to increase or shrink the partition on Windows systems.
4. How do I split my SSD C drive?
- Open Disk Management.
- Right-click C drive, then select "Shrink Volume".
- Type in the amount of space and click "next" to shrink the C drive.
- Right-To create a new simple volume on the unallocated space, click on the unallocated space and select "New Simple Volume" from the context menu on the target hard drive.
- In the Advanced Settings, you can modify the partition size, assign a different drive letter, change the file system, and make other adjustments as needed.
- Click "OK".
Related Articles
- How to Speed Up Hard Drive in Windows 11/10/8/7 [100% Working Solutions]
- How to Check SMART Status on Windows 10 in 2023 - 2 Efficient Ways
- How to Clone Only Used Space [Step-by-Step Guide]
- How to Format SD Card for Dash Cam on Windows/Mac/Dash Cam? [2023 Lasted Ways]
- How Can I Remove Write Protection From USB, Help
Sometimes the USB will be write-protected, and this article will give you a beginner's guide on how to remove write protection from USB so that you can format or modify it again. - How Do I Recover a Pen Drive from Write-Protected?
Have you ever got into write protection trouble? Then how do I recover a pen drive from write-protected? This page will provide the tested and worked ways to help you remove the write protection.