SSD Reports Wrong Size? Reasons and Fixes Here!
The SSD may report a wrong size due to various reasons, such as reinstalling the operating system, cloning the drive, or other factors.
If you're experiencing issues with your SSD, it could lead to other storage management problems. This guide will help you resolve the issue effectively and ensure your SSD operates properly.
Why SSD Reports Wrong Size
An SSD may report the incorrect size for any number of reasons, including incorrect firmware, incorrect drive geometry, or incorrect partitioning. This can result in an incorrect size being reported, which can cause issues with the operating system and other software. Additionally, some SSDs may have issues with the TRIM command, which can also lead to incorrect size reporting.
- Vendor SSD error: The SSD may be defective or its size may be incorrectly reported due to a vendor error.
- SSD is MBR partition style: SSDs use the inbuilt MBR partition style, which is limited to disks up to 2TB, potentially leading to reports of incorrect sizes.
- Virtual memory paging files exist in SSD: Using virtual memory with paging files on a solid-state drive (SSD) can lead to the SSD storage appearing smaller than it actually is, as the paging files take up space on the drive.
- Hibernate files exist in SSD: If Hibernate files are stored on an SSD, they can consume a significant amount of space, potentially making the SSD's capacity appear smaller than it actually is.
- Incompatible with the computer: Hardware or firmware that isn't compatible with the machine could result in the SSD reporting an incorrect size, leading to issues with data storage and retrieval.
- Virus infection: The reported size of the SSD may change if your computer is infected with malware or a virus.
- Cloned smaller partition space: A larger SSD may appear to be smaller if a smaller partition is copied onto it, potentially leading to a lesser perceived size.
You can use the next section to find a potential fix if you identify the cause of the SSD reports wrong size issue.
How to Fix SSD Reports Wrong Size
Here, we discuss six workable solutions to the problem. You can use any method that suits your needs.
Fix 1. Convert MBR to GPT
If your SSD reports the wrong size due to its MBR type, you may need to convert it to GPT style to discover the total storage. This can be done using a reliable tool like Qiling Disk Master, which can convert any SSD or hard drive from MBR to GPT without losing data or partitions. This conversion process can help you recognize the surpassing space on your State Storage Drive.
Download Qiling Disk Master and follow the steps to convert your MBR to GPT in a matter of seconds. This process is quick and efficient, allowing you to seamlessly transition your disk to the GPT format without any hassle.
Step 1. Download and launch Qiling Disk Master on your computer.
Step 2. Go to Disk Converter, select "Disk management" tab page.
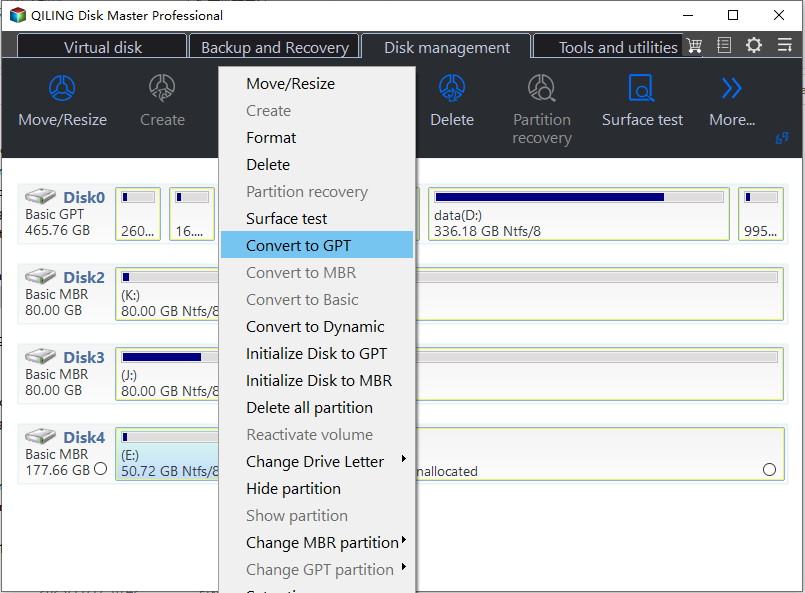
Step 3. To convert a target MBR disk to GPT, right-click the disk and select the "Convert to GPT" option, initiating the conversion process.
Qiling Disk Master is a full-The `py7zr` library is a Python module that provides a simple and efficient way to create and extract 7z archives. It also supports conversion to and from various disk formats, including zip, tar, gzip, bz2, xz, lzma, lzip, lzop, zstd, xar, cpio, mtree, ar, cab, jar, war, ear, sar, and others. This feature allows users to easily convert their 7z
- Convert NTFS to FAT32 and vice versa
- Convert logical partition to primary partition
- Convert basic disk to dynamic disk
You can download this intelligent tool and enjoy its conveniences!
Fix 2. Reset the Virtual Memory Paging File
The Windows utility "Virtual Memory" utilizes the PAGEFILE.SYS file to reflect the actual amount of virtual memory available and used. This method allows you to examine virtual memory and, if your SSD reports a different size, reset it.
Step 1: To access the Control Panel in Windows, go to the "Windows Search" and type "Control Panel." This will open the app, allowing you to access various system settings and tools.
Step 2: Click "System and Security" and select "System."
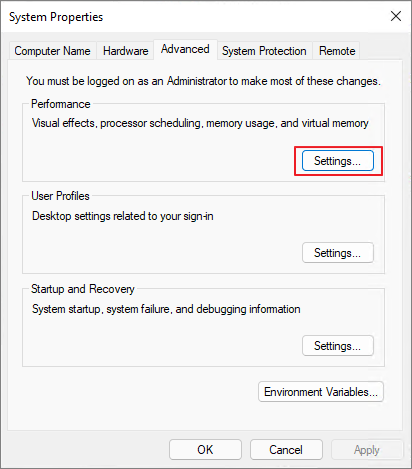
Step 3: Go to the "Performance" section and click on the "Settings" button.
Step 4: Click "Advanced" from the top menu.
Step 5: Under the "Performance" tab, select "Settings."
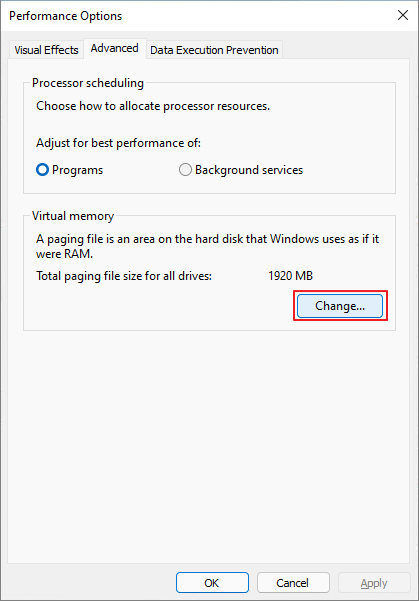
Step 6: Check the size under "Virtual memory" and click the "Change" button.
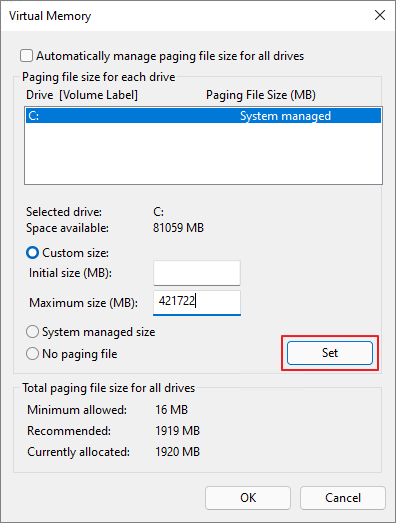
Step 7: Select the drive letter and uncheck the "Automatically manage paging file size for all drives" checkbox. Then, click on the "Custom size" button and set the initial and maximum size of the paging file to a suitable value.
Step 8: To set a custom size for your SSD, select the "Custom size" option and specify the initial size and maximum size of your SSD.
Step 9: Click "Set" then "OK" and reboot your computer.
Once the system restarts, check if your SSD is reporting the right size.
Other topics related to SSD:
Fix 3. Delete Hibernate File
The operating system sometimes creates Hibernate files that may occupy a massive RAM and storage space in the C drive of the computer, leading to incorrect SSD size reporting. To resolve this issue, follow these steps to delete the hibernate file.
Step 1: Open the search box and type "Command prompt."
Step 2: Right-click the first result and select "Rin as administrator."
Step 3: Type or paste the following command and hit Enter.
powercg -f off
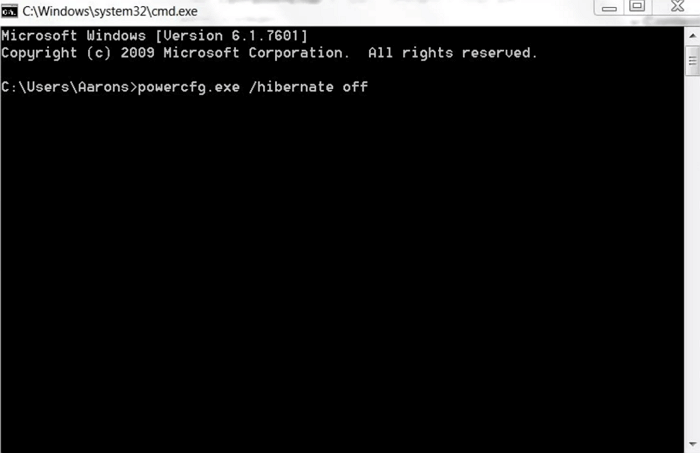
The command will automatically delete any hibernation files that may have been present.
Fix 4. Make Conversion Between Vendor and OS Capacity Calculating
Your SSD might be showing the wrong size due to a difference between how the vendor calculates capacity and how Windows does it. To find the correct size, you need to reconcile the two. Check your system's manual or the SSD vendor's website to understand how storage is measured. This will help you determine the actual size of your SSD.
To check the capacity of your SSD on Windows, open File Explorer, right-click the drive you want to examine, and click "Properties." This will display the actual capacity in bytes and GB.
The operating system uses the binary system, where 1024MB equals 1GB and 1024 equals 1TB, but providers use the decimal system, where 1KB equals 1,000 bytes and 1MB equals 1,000KB. If a manufacturer claims a 120GB SSD, it means they calculated it as 120,000,000,000 bytes, not 120,000,000 bytes. This discrepancy can lead to confusion and incorrect SSD size displays.
120GB=120,000MB=120,000,000KB=120,000,000,000 bytes
The OS will calculate it as 120,000,000,000=1024*1024*1024=111.8 GB
The actual size of your SSD is 112GB, but it's labeled as 120 GB, resulting in a difference of 8GB.
Fix 5. Extend Volume with Unallocated Space
If you have an SSD drive over 2TB and it's formatted with the MBR partitioning style, there's a good chance it will report the wrong size. This is because MBR is designed for drives under 2TB and can't identify the extra space, which appears as Unallocated space. Converting to GPT can help solve this problem.
Converting the SSD to GPT, which supports disks larger than 2TB, can help solve the problem. Using an efficient disk management tool like Qiling Disk Master, you can convert the partition style and extend the partition with unallocated space on the drive, making it a one-stop shop with additional data security and recovery options.
To extend your SSD's volume and utilize unallocated space, simply install Qiling Disk Master and follow the guided steps. This straightforward process allows you to maximize your SSD's capacity, making the most of the available storage space.
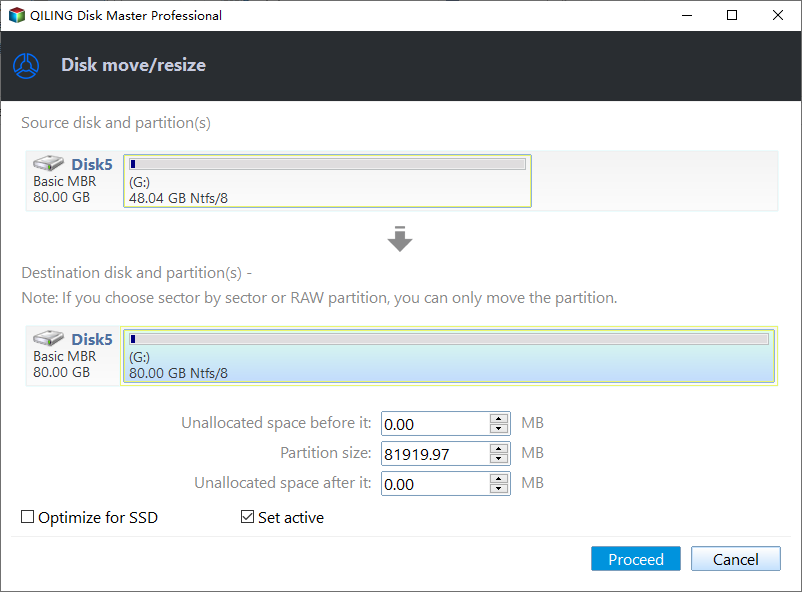
Step 1. Locate the Target Partition.
To resize or move a partition, go to Partition Manager, locate the target partition, and select the "Resize/Move" option. This will allow you to adjust the partition's size or move it to a different location on the disk.

Step 2. Extend the Target Partition.
Drag the partition panel rightward or leftward to add the unallocated space into your current partition and click "OK" to confirm.
Extra Option: Get Space from Another Drive
If you're running low on unallocated space, right-click on a larger partition with available space, and select 'Allocate space' to transfer some of that space to the partition that needs it.
To extend a partition, select the target partition that you want to extend at the "allocate space to" column.
Step 3. Execute Operations to Extend Partition.
To resolve the issue with the target partition, drag the dots of the target partition into the unallocated space. This will allow the partition to expand into the available space, potentially resolving the issue.
Click the "Proceed" button to keep all the changes.
Fix 6. Connect with the Manufacturer
If you find out that your SSD is reporting the wrong size due to a manufacturing error, you should contact the manufacturer to get a replacement. It's worth noting that the correct size of the SSD is important, as an incorrect size might not fit or work properly, leading to further issues. To avoid any complications, it's a good idea to check the size of your current SSD before reaching out to the manufacturer.
Conclusion
This guide addresses various scenarios where SSD reports wrong size, providing the best solution to fix the issue. It also recommends using Qiling Disk Master, a tool that offers remarkable features for SSD drives, such as fixing Sandisk SSD slow errors, improving SSD read and write speed, and more.
FAQs About SSD Reports Wrong Size
The FAQs section provides answers to frequently asked questions about the topic, offering additional information and insights to help you better understand the issue at hand. If you have any further concerns or questions, you can explore this section for more guidance and clarification.
1. Why is my SSD showing full, but it is not?
The SSD may be partitioned incorrectly, or there is unallocated space, and programs, games, or hidden files or directories are taking up space on the disk.
2. How to fix cloned SSD not showing full capacity?
If your cloned SSD is not showing its highest capacity, you can try Qiling Disk Master, which can help extend the partition size by converting MBR to GPT, re-clone it, and more.
3. Why is 2tb SSD only showing 1tb?
A 2TB SSD may only display 1TB due to improper partitioning, MBR partition style, hidden data, or firmware issues, but using Qiling Disk Master can help utilize the full capacity by examining and addressing these factors.
Related Articles
- [Fixed] FAT32 Format Option Not Available in Windows
- How to Convert MBR to GPT in Windows Server 2022/2019/2016/2012
- Full Guide to Format 4K Sector Hard Drive Partitions in Windows 11/10
- How to Fix Surface Won't Turn On [100% Working Solutions🚩]
- How to Fix USB Is Write Protected or Read Only, Help
This article can explain why write protection or read-only happen and provide practical solutions to help you remove the write protection and get the USB back to use. - How to Remove Write Protection From SD Card Windows 7 [Fixed]
This article will teach you how to remove write protection from sd card Windows 7 by providing solutions with detailed steps attached.